

KitchenAid XA8 T1U K H - XA8 T1U K H EN (F154095) Istruzioni per l'Uso
KitchenAid XA8 T1U K H - XA8 T1U K H EN (F154095) Istruzioni per l'Uso
KitchenAid XA8 T1U K H - XA8 T1U K H EN (F154095) Istruzioni per l'Uso

You also want an ePaper? Increase the reach of your titles
YUMPU automatically turns print PDFs into web optimized ePapers that Google loves.
GB<br />
Start-up and use<br />
Starting the appliance<br />
! Before starting the appliance, follow the installation<br />
instructions (see Installation).<br />
! Before connecting the appliance, clean the compartments and<br />
accessories well with lukewarm water and bicarbonate.<br />
! The appliance comes with a motor protection control system which<br />
makes the compressor start approximately 8 minutes after being<br />
switched on. The compressor also starts each time the power supply<br />
is cut off whether voluntarily or involuntarily (blackout).<br />
1. Insert the plug into the socket and switch on the product using<br />
the appropriate button, ensure that yellow refrigerator and<br />
freezer tem<strong>per</strong>ature lights illuminates<br />
2. After a few hours you will be able to put food in the refrigerator.<br />
3. Press the SUPER FREEZE button (rapid freezing): the SUPER<br />
FREEZE indicator light will illuminate. Once the refrigerator has<br />
reached the optimal tem<strong>per</strong>ature, the indicator light goes out<br />
and you can begin food storage.<br />
Using the refrigerator to its full potential<br />
• Place only cold or lukewarm foods in the compartment, never<br />
hot foods (see Precautions and tips).<br />
• Remember that cooked foods do not last longer than raw foods.<br />
• Do not store liquids in open containers: they will increase the<br />
level of humidity in the refrigerator and cause condensation to<br />
form.<br />
Cooling system<br />
No Frost<br />
The No Frost system circulates cold air continuously to collect<br />
humidity and prevent ice and frost formation. The system maintains<br />
an optimal humidity level in the compartment, preserving the<br />
original quality of the food, preventing the food from sticking<br />
together and making defrosting a thing of the past. Do not block<br />
the aeration cells by placing food or containers in direct contact<br />
with the refrigerating back panel. Close bottles and wrap food<br />
tightly.<br />
COMPARTM<strong>EN</strong>T 3 IN 1 ZONE*<br />
This is the new box which offers maximum flexibility in order to<br />
stock your food in an excellent way.<br />
-store meat, fish and delicate food;<br />
-rapid cooling of hot food from 70°C to 3°C and of other fresh<br />
foods and leftovers<br />
-low tem<strong>per</strong>ature defrosting (it inhibits the proliferation of<br />
microorganisms).<br />
You can get the 0°C tem<strong>per</strong>ature, in standard conditions, when<br />
the fridge compartment tem<strong>per</strong>ature is at about 4°C.<br />
By decreasing the fridge tem<strong>per</strong>ature you decrease the CHILLER<br />
compartment tem<strong>per</strong>ature too.<br />
* Varies by number and/or position, available only on certain<br />
models.<br />
SHELVES:<br />
Due to the special guides the shelves are removable and the<br />
height is adjustable allowing easy storage of large containers<br />
and food. Height can be adjusted without complete removal of<br />
the shelf. (see diagram),<br />
1<br />
2<br />
TEMPERATURE Indicator light*: to identify the coldest area in<br />
the refrigerator.<br />
1. Check that OK appears clearly on the indicator light (see<br />
diagram).<br />
2. If the word “OK” does not appear it means that the tem<strong>per</strong>ature<br />
is too high: adjust the REFRIGERATOR OPERATION knob to a<br />
higher position (colder) and wait approximately 10 hours until<br />
the tem<strong>per</strong>ature has been stabilised.<br />
3. Check the indicator light again: if necessary, readjust it following<br />
the initial process. If large quantities of food have been added<br />
or if the refrigerator door has been opened frequently, it is<br />
normal for the indicator not to show OK. Wait at least 10 hours<br />
before adjusting the REFRIGERATOR OPERATION knob to a<br />
higher setting.<br />
I CARE*<br />
Controls the activation and deactivation of the I CARE function<br />
(optimal o<strong>per</strong>ating tem<strong>per</strong>ature for minimal energy consumption).<br />
Consumption will be optimised 24h after the function was enabled.<br />
When this function is activated, the I CARE LED on the keypad<br />
lights up.Press and hold the I CARE button for 8 seconds so that<br />
the corresponding LED begins to flash; this will allow you to set<br />
the tem<strong>per</strong>ature to in the Refrigerator compartment and in the<br />
Freezer compartment. Two minutes after the most recent user<br />
interaction, the display enters its energy saving mode.To exit<br />
the energy saving mode, simply press any button or open the<br />
refrigerator door.<br />
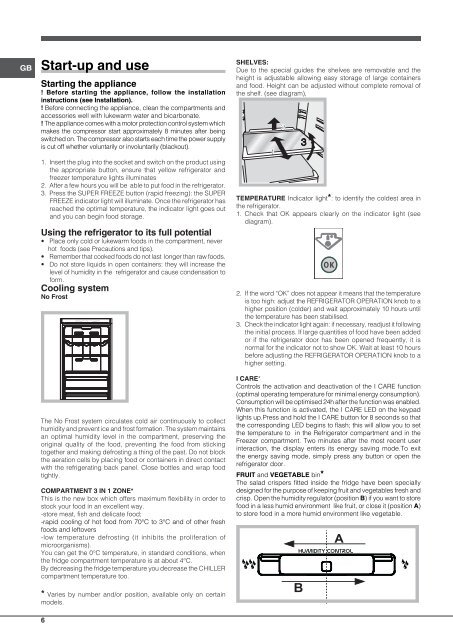
FRUIT and VEGETABLE bin*<br />
The salad cris<strong>per</strong>s fitted inside the fridge have been specially<br />
designed for the purpose of keeping fruit and vegetables fresh and<br />
crisp. Open the humidity regulator (position B) if you want to store<br />
food in a less humid environment like fruit, or close it (position A)<br />
to store food in a more humid environment like vegetable.<br />
B<br />
A<br />
6


