

Sony SEL30M35 - SEL30M35 Istruzioni per l'uso Spagnolo
Sony SEL30M35 - SEL30M35 Istruzioni per l'uso Spagnolo
Sony SEL30M35 - SEL30M35 Istruzioni per l'uso Spagnolo

You also want an ePaper? Increase the reach of your titles
YUMPU automatically turns print PDFs into web optimized ePapers that Google loves.
Interchangeable Lens<br />
Objectif interchangeable<br />
<br />
<br />
<br />
O<strong>per</strong>ating Instructions<br />
Mode d’emploi<br />
Manual de instrucciones<br />
<strong>SEL30M35</strong><br />
Printed in Japan<br />
–1<br />
<br />
(1) (2)<br />
–2<br />
1<br />
2<br />
4-286-758-01(2)<br />
E 30mm F3.5 Macro<br />
E-mount<br />
©2011 <strong>Sony</strong> Corporation<br />
3<br />
4<br />
<br />
<br />
<br />
<br />
<br />
<br />
<br />
<br />
<br />
<br />
<br />
<br />
<br />
<br />
<br />
E<br />
A<br />
<br />
<br />
ˎˎ<br />
<br />
<br />
ˎˎ1<br />
<br />
<br />
<br />
<br />
ˎˎ<br />
<br />
2<br />
<br />
1 <br />
2 <br />
3 *<br />
4 <br />
* <br />
<br />
<br />
–<br />
1 <br />
<br />
ˎˎ122<br />
<br />
2 <br />
<br />
<br />
<br />
ˎˎ<br />
<br />
ˎˎ<br />
–<br />
<br />
<br />
<br />
<br />
<br />
<br />
<br />
<br />
ˎˎ<br />
<br />
<br />
ˎˎ<br />
<br />
ˎˎ<br />
<br />
<br />
<br />
3<br />
<br />
<br />
DMF<br />
<br />
<br />
<br />
<br />
<br />
<br />
<br />
<br />
<br />
E 30mm F3.5 Macro<br />
<br />
AUTO<br />
<br />
<br />
<br />
<br />
<br />
<br />
<br />
m<br />
+2/3 +1/3 0<br />
0.095 0.098 0.159 ∞<br />
ˎˎ<br />
<br />
<br />
<br />
<br />
<br />
E 30mm F3.5 Macro (<strong>SEL30M35</strong>)<br />
35mm* 1<br />
45<br />
(mm)<br />
6-7<br />
50°<br />
* 2 (m) 0.095<br />
() 1.0<br />
f/22<br />
(mm) 49<br />
<br />
(mm)<br />
62.0×55.5<br />
(g) 138<br />
* 1 35mmAPS-C<br />
<br />
<br />
* 2 <br />
<br />
ˎˎ<br />
<br />
<br />
<br />
11<br />
1*1<br />
<br />
*<br />
<br />
<br />
<br />
This instruction manual explains how to use lenses.<br />
Precautions common to all lenses such as notes on use<br />
are found in the separate “Precautions before using”. Be<br />
sure to read both documents before using your lens.<br />
This lens is designed for <strong>Sony</strong> α camera system E-mount<br />
cameras. You cannot use it on A-mount cameras.<br />
Notes on Use<br />
ˎˎWhen carrying a camera with the lens attached, always firmly<br />
hold both the camera and the lens.<br />
Precautions on using a flash<br />
ˎˎWhen using a flash, always remove the lens hood and shoot<br />
at least 1 m (3.3 feet) away from your subject. With certain<br />
combinations of lens and flash, the lens may partially block<br />
the light of the flash, resulting in a shadow at the bottom of<br />
the picture.<br />
Vignetting<br />
ˎˎWhen using the lens, the corners of the screen become darker<br />
than the center. To reduce this phenomena (called vignetting),<br />
close the a<strong>per</strong>ture by 1 to 2 stops.<br />
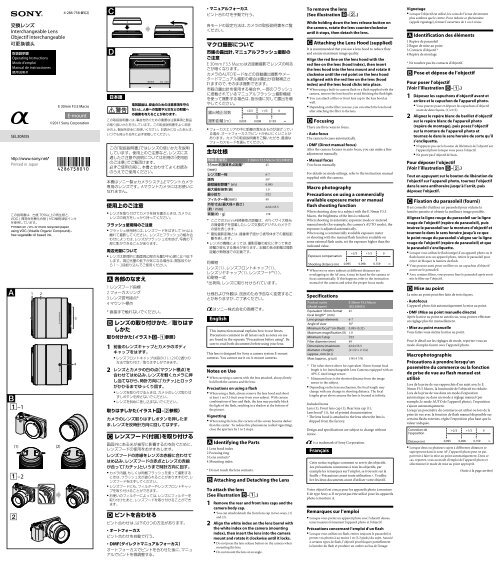
Identifying the Parts<br />
1 Lens hood index<br />
2 Focusing ring<br />
3 Lens contacts*<br />
4 Mounting index<br />
* Do not touch the lens contacts.<br />
Attaching and Detaching the Lens<br />
To attach the lens<br />
(See illustration –.)<br />
1 Remove the rear and front lens caps and the<br />
camera body cap.<br />
ˎˎYou can attach/detach the front lens cap in two ways, (1)<br />
and (2).<br />
2 Align the white index on the lens barrel with<br />
the white index on the camera (mounting<br />
index), then insert the lens into the camera<br />
mount and rotate it clockwise until it locks.<br />
ˎˎDo not press the lens release button on the camera when<br />
mounting the lens.<br />
ˎˎDo not mount the lens at an angle.<br />
To remove the lens<br />
(See illustration –.)<br />
While holding down the lens release button on<br />
the camera, rotate the lens counterclockwise<br />
until it stops, then detach the lens.<br />
Attaching the Lens Hood (supplied)<br />
It is recommended that you use a lens hood to reduce flare<br />
and ensure maximum image quality.<br />
Align the red line on the lens hood with the<br />
red line on the lens (hood index), then insert<br />
the lens hood into the lens mount and rotate it<br />
clockwise until the red point on the lens hood<br />
is aligned with the red line on the lens (hood<br />
index) and the lens hood clicks into place.<br />
ˎˎWhen using a built-in camera flash or a flash supplied with the<br />
camera, remove the lens hood to avoid blocking the flash light.<br />
ˎˎYou can attach a filter or front lens cap to the lens hood as<br />
well.<br />
ˎˎDepending on the filter you use, you can attach the lens hood<br />
after attaching the filter to the lens.<br />
Focusing<br />
There are three ways to focus.<br />
• Auto focus<br />
The camera focuses automatically.<br />
• DMF (Direct manual focus)<br />
After the camera focuses in auto focus, you can make a fine<br />
adjustment manually.<br />
• Manual focus<br />
You focus manually.<br />
For details on mode settings, refer to the instruction manual<br />
supplied with the camera.<br />
Macro photography<br />
Precautions on using a commercially<br />
available exposure meter or manual<br />
flash shooting function<br />
When shooting close to a subject with the E 30mm F3.5<br />
Macro, the brightness of the lens is reduced.<br />
When shooting in automatic exposure mode or metered<br />
manual mode (for example, the camera’s AUTO mode), the<br />
exposure is adjusted automatically.<br />
When using a commercially available exposure meter<br />
or shooting with the manual flash function available on<br />
some external flash units, set the exposure higher than the<br />
indicated value.<br />
Exposure compensation<br />
Shooting distance (m)<br />
+2/3 +1/3 0<br />
0.095 0.098 0.159 ∞<br />
ˎˎWhen two or more subjects at different distances are<br />
overlapping in the AF area, it may be hard for the camera to<br />
focus automatically. If this happens, refer to the instruction<br />
manual of the camera and select the pro<strong>per</strong> focus mode.<br />
Specifications<br />
Product name<br />
(Model name)<br />
E 30mm F3.5 Macro<br />
(<strong>SEL30M35</strong>)<br />
Equivalent 35mm-format 45<br />
focal length* 1 (mm)<br />
Lens groups-elements 6-7<br />
Angle of view 50°<br />
Minimum focus* 2 (m (feet)) 0.095 (0.32)<br />
Maximum magnification (X) 1.0<br />
Minimum f-stop f/22<br />
Filter diameter (mm) 49<br />
Dimensions (maximum<br />
diameter × height)<br />
62.0×55.5<br />
(2 1/2 × 2 1/4)<br />
(approx., mm (in.))<br />
Mass (approx., g (oz)) 138 (4 7/8)<br />
* 1 The value shown above for equivalent 35mm-format focal<br />
length is for Interchangeable Lens Cameras equipped with an<br />
APS-C sized image sensor.<br />
* 2 Minimum focus is the shortest distance from the image<br />
sensor to the subject.<br />
ˎˎDepending on the lens mechanism, the focal length may<br />
change with any change in shooting distance. The focal<br />
lengths given above assume the lens is focused at infinity.<br />
Included items<br />
Lens (1), Front lens cap (1), Rear lens cap (1),<br />
Lens hood* (1), Set of printed documentation<br />
* The lens hood is attached to the lens when the lens is<br />
shipped from the factory.<br />
Design and specifications are subject to change without<br />
notice.<br />
is a trademark of <strong>Sony</strong> Corporation.<br />
Cette notice explique comment se servir des objectifs.<br />
Les précautions communes à tous les objectifs, par<br />
exemple les remarques sur l’emploi, se trouvent sur la<br />
feuille « Précautions avant toute utilisation ». Veuillez<br />
lire les deux documents avant d’utiliser votre objectif.<br />
Votre objectif est conçu pour les appareils photo à monture<br />
E de type <strong>Sony</strong> α. Il ne peut pas être utilisé pour les appareils<br />
photo à monture A.<br />
Remarques sur l’emploi<br />
ˎˎLorsque vous portez un appareil photo avec l’objectif dessus,<br />
tenez toujours fermement l’appareil photo et l’objectif.<br />
Précautions concernant l’emploi d’un flash<br />
ˎˎLorsque vous utilisez un flash, retirez toujours le parasoleil et<br />
prenez vos photos à au moins 1 m (3,3 pieds) du sujet. Associé<br />
à certains types de flash, l’objectif peut bloquer partiellement<br />
la lumière du flash et produire un ombre au bas de l’image.<br />
Vignetage<br />
ˎˎLorsque l’objectif est utilisé, les coins de l’écran deviennent<br />
plus sombres que le centre. Pour réduire ce phénomène<br />
(appelé vignetage), fermez l’ouverture de 1 ou 2 crans.<br />
Identification des éléments<br />
1 Repère de parasoleil<br />
2 Bague de mise au point<br />
3 Contacts d’objectif *<br />
4 Repère de montage<br />
* Ne touchez pas les contacts d’objectif.<br />
Pose et dépose de l’objectif<br />
Pour poser l’objectif<br />
(Voir l’illustration –.)<br />
1 Déposez les capuchons d’objectif avant et<br />
arrière et le capuchon de l’appareil photo.<br />
ˎˎVous pouvez poser et déposer les capuchons d’objectif<br />
avant de deux façons, (1) et (2).<br />
2 Alignez le repère blanc du barillet d’objectif<br />
sur le repère blanc de l’appareil photo<br />
(repère de montage), puis posez l’objectif<br />
sur la monture de l’appareil photo et<br />
tournez-le dans le sens horaire de sorte qu’il<br />
s’encliquette.<br />
ˎˎN’appuyez pas sur le bouton de libération de l’objectif sur<br />
l’appareil photo lorsque vous posez l’objectif.<br />
ˎˎNe posez pas l’objectif de biais.<br />
Pour déposer l’objectif<br />
(Voir l’illustration –.)<br />
Tout en appuyant sur le bouton de libération de<br />
l’objectif sur l’appareil photo, tournez l’objectif<br />
dans le sens antihoraire jusqu’à l’arrêt, puis<br />
déposez l’objectif.<br />
Fixation du parasoleil (fourni)<br />
Il est conseillé d’utiliser un parasoleil pour réduire la<br />
lumière parasite et obtenir la meilleure image possible.<br />
Alignez la ligne rouge du parasoleil sur la ligne<br />
rouge de l’objectif (repère de parasoleil), puis<br />
insérez le parasoleil sur la monture d’objectif et<br />
tournez-le dans le sens horaire jusqu’à ce que<br />
le point rouge du parasoleil s’aligne sur la ligne<br />
rouge de l’objectif (repère de parasoleil) et que<br />
le parasoleil s’encliquette.<br />
ˎˎLorsque vous utilisez le flash intégré d’un appareil photo ou le<br />
flash fourni avec un appareil photo, retirez le parasoleil pour<br />
éviter de bloquer la lumière du flash.<br />
ˎˎVous pouvez aussi poser un filtre ou un capuchon d’objectif<br />
avant sur le parasoleil.<br />
ˎˎAvec certains filtres, vous pouvez fixer le parasoleil après avoir<br />
mis le filtre sur l’objectif.<br />
Mise au point<br />
La mise au point peut être faite de trois façons.<br />
• Autofocus<br />
L’appareil photo fait automatiquement la mise au point.<br />
• DMF (Mise au point manuelle directe)<br />
Après la mise au point en autofocus, vous pouvez effectuer<br />
un réglage plus fin manuellement.<br />
• Mise au point manuelle<br />
Vous faites vous-même la mise au point.<br />
Pour le détail sur les réglages de mode, reportez-vous au<br />
mode d’emploi fourni avec l’appareil photo.<br />
Macrophotographie<br />
Précautions à prendre lorsqu’un<br />
posemètre du commerce ou la fonction<br />
de prise de vue au flash manuel est<br />
utilisé<br />
Lors de la prise de vue rapprochée d’un sujet avec le E<br />
30mm F3.5 Macro, la luminosité de l’objectif est réduite.<br />
Lors de la prise de vue dans un mode d’exposition<br />
automatique ou dans un mode à réglage manuel (par<br />
exemple, le mode AUTO de l’appareil photo), l’exposition<br />
s’ajuste automatiquement.<br />
Lorsqu’un posemètre du commerce est utilisé ou lors de la<br />
prise de vue avec la fonction de flash manuel disponible sur<br />
certains flashs externes, réglez l’exposition plus haut que la<br />
valeur indiquée.<br />
Correction de<br />
l’exposition<br />
Distance (m)<br />
+2/3 +1/3 0<br />
0,095 0,098 0,159 ∞<br />
ˎˎLorsque deux ou plusieurs sujets à différentes distances se<br />
su<strong>per</strong>posent dans la zone AF, l’appareil photo peut ne pas<br />
parvenir à faire la mise au point automatiquement. Dans ce<br />
cas, reportez-vous au mode d’emploi de l’appareil photo et<br />
sélectionnez le mode de mise au point approprié.<br />
(Suite à la page arrière)
–1<br />
(1) (2)<br />
–2<br />
<br />
<br />
<br />
1 2<br />
3<br />
4<br />
(Suite de la page avant)<br />
Spécifications<br />
Nom de produit<br />
(Nom de modèle)<br />
E 30mm F3.5 Macro<br />
(<strong>SEL30M35</strong>)<br />
Focale équivalente en 45<br />
format 35 mm* 1 (mm)<br />
Éléments-groupes de 6-7<br />
lentilles<br />
Angle de champ 50°<br />
Mise au point minimale* 2 0,095 (0,32)<br />
(m (pieds))<br />
Grossissement maximal (X) 1,0<br />
f-stop minimal f/22<br />
Diamètre d’objectif (mm) 49<br />
Dimensions (diamètre<br />
maximal × hauteur)<br />
62,0×55,5<br />
(2 1/2 × 2 1/4)<br />
(environ, mm (po.))<br />
Poids (environ, g (oz)) 138 (4 7/8)<br />
* 1 La valeur indiquée ci-dessus comme focale équivalente<br />
en format 35 mm concerne les appareils photo à objectif<br />
interchangeable avec capteur d’image de taille APS-C.<br />
* 2 La mise au point minimale est la distance la plus courte du<br />
capteur d’image au sujet.<br />
ˎˎSelon le mécanisme de l’objectif, la focale peut changer lorsque<br />
la distance de prise de vue change. Les focales indiquées cidessus<br />
présupposent que l’objectif est réglé sur l’infini.<br />
Articles inclus<br />
Objectif (1), Capuchon d’objectif avant (1),<br />
Capuchon d’objectif arrière (1), Parasoleil* (1),<br />
Jeu de documents imprimés<br />
* Le parasoleil a été fixé en usine sur l’objectif.<br />
La conception et les spécifications peuvent être modifiées<br />
sans préavis.<br />
est une marque commerciale de <strong>Sony</strong> Corporation.<br />
En este manual se explica cómo utilizar objetivos. Las<br />
precauciones comunes a todos los objetivos, como notas<br />
sobre la utilización, se encuentran en las “Precauciones<br />
previas a la utilización del producto” suministradas por<br />
separado. Cerciórese de leer ambos documentos antes<br />
de utilizar su objetivo.<br />
Este objetivo está diseñado para cámaras con montura E<br />
del sistema de cámaras α de <strong>Sony</strong>. No podrá utilizarse con<br />
cámaras con montura A.<br />
Notas sobre la utilización<br />
ˎˎCuando transporte una cámara con el objetivo fijado, sujete<br />
siempre firmemente tanto la cámara como el objetivo.<br />
Precauciones sobre la utilización de un flash<br />
ˎˎCuando utilice un flash quítele siempre el parasol del objetivo<br />
y fotografíe alejado a 1 m por lo menos de su motivo. Con<br />
ciertas combinaciones de objetivo y flash, el objetivo puede<br />
bloquear parcialmente la luz del flash, lo que resultará en una<br />
sombra en la parte inferior de la fotografía.<br />
Viñeteado<br />
ˎˎSi utiliza el objetivo, las esquinas de la pantalla se vuelven más<br />
oscuras que el centro. Para reducir este fenómeno (llamado<br />
viñeteado), cierre la a<strong>per</strong>tura de 1 a 2 puntos.<br />
Identificación de las partes<br />
1 Índice del parasol del objetivo<br />
2 Anillo de enfoque<br />
3 Contactos del objetivo*<br />
4 Índice de montaje<br />
* No toque los contactos del objetivo.<br />
Colocación y extracción del<br />
objetivo<br />
Para colocar el objetivo<br />
(Consulte la ilustración –.)<br />
1 Extraiga las tapas posterior y frontal del<br />
objetivo y la tapa del cuerpo de la cámara.<br />
ˎˎUsted podrá colocar/extraer la tapa frontal del objetivo<br />
de dos formas, (1) y (2).<br />
2 Alinee el índice blanco del barril del<br />
objetivo con el índice blanco de la cámara<br />
(índice de montaje), y después inserte el<br />
objetivo en la montura de la cámara y gírelo<br />
hacia la derecha hasta que se bloquee.<br />
ˎˎNo presione el botón de liberación del objetivo de la<br />
cámara cuando monte el objetivo.<br />
ˎˎNo monte el objetivo de forma inclinada.<br />
Para extraer el objetivo<br />
(Consulte la ilustración –.)<br />
Manteniendo presionado el botón de liberación<br />
del objetivo de la cámara, gire el objetivo<br />
hacia la izquierda hasta que se pare, y después<br />
extraiga el objetivo.<br />
Colocación del parasol del objetivo<br />
(suministrado)<br />
Es recomendable utilizar un parasol para reducir los reflejos<br />
y garantizar la máxima calidad de la imagen.<br />
Alinee la línea roja del parasol con la línea roja<br />
del objetivo (índice del parasol), y después<br />
inserte el parasol en la montura de la cámara y<br />
gírelo hacia la derecha hasta que el punto rojo<br />
del parasol quede alineado con la línea roja<br />
del objetivo (índice del parasol) y el parasol<br />
chasquee en su lugar.<br />
ˎˎCuando utilice un flash incorporado en la cámara o el flash<br />
suministrado con la cámara, extraiga el parasol para evitar que<br />
se bloquee la luz del flash.<br />
ˎˎTambién puede colocar un filtro o la tapa frontal del objetivo<br />
en el parasol del objetivo.<br />
ˎˎDependiendo del filtro que utilice, podrá colocar el parasol del<br />
objetivo después de fijar el filtro al objetivo.<br />
Enfoque<br />
Existen tres formas de enfocar.<br />
• Enfoque automático<br />
La cámara enfocará automáticamente.<br />
• DMF (Enfoque manual directo)<br />
Después de que la cámara enfoque automáticamente, podrá<br />
realizar manualmente un ajuste fino.<br />
• Enfoque manual<br />
Usted enfocará manualmente.<br />
Con respecto a los detalles sobre los ajustes de modo,<br />
consulte el manual de instrucciones suministrado con la<br />
cámara.<br />
Fotografía en macro<br />
Precauciones en la utilización de<br />
medidor de exposición a la venta en el<br />
mercado o de la función de fotografiado<br />
con exposición manual<br />
Cuando fotografíe cerca de un motivo con el E 30mm F3.5<br />
Macro, el brillo del objetivo se reducirá.<br />
Cuando fotografíe en el modo de exposición automática<br />
o en el modo de medición manual (por ejemplo, el<br />
modo AUTO de la cámara), la exposición se ajustará<br />
automáticamente.<br />
Cuando utilice un exposímetro adquirido en un<br />
establecimiento del ramo o realice tomas con la función<br />
de flash manual disponible en algunas unidades de flash<br />
externas, ajuste la exposición a un valor más alto que el<br />
indicado.<br />
Compensación de la<br />
exposición<br />
Distancia de toma (m)<br />
+2/3 +1/3 0<br />
0,095 0,098 0,159 ∞<br />
ˎˎCuando dos o más motivos situados a distancias diferentes<br />
se su<strong>per</strong>pongan en el área AF, puede resultar difícil que la<br />
cámara enfoque automáticamente. Cuando suceda esto,<br />
consulte el manual de instrucciones de la cámara y seleccione<br />
el modo de enfoque apropiado.<br />
Especificaciones<br />
Nombre del producto E 30mm F3.5 Macro<br />
(Nombre del modelo) (<strong>SEL30M35</strong>)<br />
Distancia focal* 1 (mm) 45<br />
equivalente al formato de<br />
35 mm<br />
Grupos y elementos del 6-7<br />
objetivo<br />
Ángulo de visión 50°<br />
Enfoque mínimo* 2 (m) 0,095<br />
Ampliación máxima (X) 1,0<br />
A<strong>per</strong>tura del diafragma f/22<br />
mínima<br />
Diámetro del filtro (mm) 49<br />
Dimensiones (diámetro 62,0×55,5<br />
máximo × altura)<br />
(Aprox., mm)<br />
Peso (Aprox., g) 138<br />
* 1 El valor mostrado arriba para la distancia focal equivalente al<br />
formato de 35 mm es para cámaras de lentes intercambiables<br />
equipadas con un sensor de imágenes de tamaño APS-C.<br />
* 2 El enfoque mínimo es la distancia más corta desde el sensor<br />
de imágenes al motivo.<br />
ˎˎEn función del mecanismo del objetivo, es posible que la<br />
distancia focal varíe si la distancia de toma de imagen también<br />
lo hace. Las distancias focales indicadas arriba asumen que el<br />
objetivo está enfocado al infinito.<br />
Elementos incluidos<br />
Objetivo (1), Tapa frontal del objetivo (1),<br />
Tapa posterior del objetivo (1), Parasol* (1),<br />
Juego de documentación impresa<br />
* El parasol del objetivo está instalado en el objetivo cuando<br />
el objetivo se envía desde la fábrica.<br />
El diseño y las especificaciones están sujetos a cambios sin<br />
previo aviso.<br />
es marca comercial de <strong>Sony</strong> Corporation.<br />
<br />
<br />
<br />
<br />
<br />
<br />
<br />
<br />
<br />
<br />
<br />
<br />
<br />
<br />
<br />
<br />
<br />
<br />
<br />
<br />
<br />
<br />
<br />
<br />
<br />
<br />
<br />
<br />
<br />
<br />
1 <br />
<br />
<br />
2 <br />
<br />
<br />
<br />
<br />
<br />
<br />
<br />
<br />
<br />
<br />
<br />
<br />
<br />
<br />
<br />
<br />
<br />
<br />
<br />
<br />
<br />
<br />
<br />
<br />
<br />
<br />
<br />
<br />
<br />
<br />
<br />
<br />
<br />
<br />
<br />
<br />
<br />
<br />
<br />
<br />
<br />
<br />
<br />
<br />
<br />
<br />
<br />
<br />
<br />
<br />
<br />
+2/3 +1/3 0<br />
0.095 0.098 0.159 ∞


