

Sony KD-55X8509C - KD-55X8509C Istruzioni per l'uso
Sony KD-55X8509C - KD-55X8509C Istruzioni per l'uso
Sony KD-55X8509C - KD-55X8509C Istruzioni per l'uso

Create successful ePaper yourself
Turn your PDF publications into a flip-book with our unique Google optimized e-Paper software.
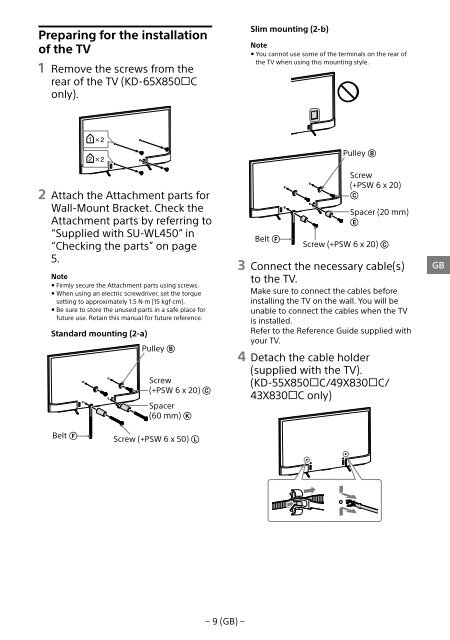
Preparing for the installation<br />
of the TV<br />
1 Remove the screws from the<br />
rear of the TV (<strong>KD</strong>-65X850C<br />
only).<br />
Slim mounting (2-b)<br />
Note<br />
ˎˎYou cannot use some of the terminals on the rear of<br />
the TV when using this mounting style.<br />
Pulley <br />
2 Attach the Attachment parts for<br />
Wall-Mount Bracket. Check the<br />
Attachment parts by referring to<br />
“Supplied with SU-WL450” in<br />
“Checking the parts” on page<br />
5.<br />
Note<br />
ˎˎFirmly secure the Attachment parts using screws.<br />
ˎˎWhen using an electric screwdriver, set the torque<br />
setting to approximately 1.5 N·m {15 kgf·cm}.<br />
ˎˎBe sure to store the unused parts in a safe place for<br />
future use. Retain this manual for future reference.<br />
Standard mounting (2-a)<br />
Pulley <br />
Screw<br />
(+PSW 6 x 20) <br />
Spacer<br />
(60 mm) <br />
Belt <br />
Screw<br />
(+PSW 6 x 20)<br />
<br />
Spacer (20 mm)<br />
<br />
Screw (+PSW 6 x 20) <br />
3 Connect the necessary cable(s)<br />
to the TV.<br />
Make sure to connect the cables before<br />
installing the TV on the wall. You will be<br />
unable to connect the cables when the TV<br />
is installed.<br />
Refer to the Reference Guide supplied with<br />
your TV.<br />
4 Detach the cable holder<br />
(supplied with the TV).<br />
(<strong>KD</strong>-55X850C/49X830C/<br />
43X830C only)<br />
GB<br />
Belt <br />
Screw (+PSW 6 x 50) <br />
− 9 (GB) −


