
You also want an ePaper? Increase the reach of your titles
YUMPU automatically turns print PDFs into web optimized ePapers that Google loves.
10<br />
Warning<br />
• Before installing the automatic system read the instructions hereunder carefully.<br />
• It is strictly forbidden to use the product <strong>BOB24</strong> for applications other than indicated in this instruction handbook.<br />
• Show the user how to use the automation system.<br />
• Give the user the part of the leaflet which contains the instructions for users.<br />
• All Benincá products are covered by an insurance policy for any possible damages to objects and persons caused by<br />
construction faults, under condition that the entire system be marked CE and only Benincá parts be used.<br />
General information<br />
For an efficient operation of these automatisms, the gate must have the following features:<br />
- good stoutness and stiffness<br />
- all hinges must have positive clearances and permit smooth and regular manual operations.<br />
- when wings are closed their height have to fit together.<br />
Fitting the automatic system<br />
Stabilise the height of the automatic system above ground level (it should be as central as possible with respect to the<br />
gate and corresponding to a sturdy cross piece).<br />
Then weld the plate P respecting the distances in fig. 2.<br />
When the gate is closing, weld the bracket S respecting the distance in fig. 3, onto a cross piece of the gate or another<br />
suitably robust element; bear in mind that in this condition the actuator must not be completely at the end of travel.<br />
Remove the protective cover C unscrewing the screw F, then fix the actuator to the plate P with the screw T, the washer<br />
L and the nut D (fig. 3).<br />
Lastly block the actuator on the plate S with the screw V and the washer R.<br />
The holes in the actuator (fig.3A) help you respect the optimum installation distances.<br />
The adjustable fixing brackets, available on request, allow a wider possibility of adapting the actuator to the different<br />
installation conditions, also avoiding cutting and welding the brackets supplied.<br />
To adjust the limit switches<br />
The actuator is equipped with electro-magnetic sensors which are adjustable in the opening and closing phases, fitted<br />
to mechanical locks as shown in Fig. 3. To adjust, position the “Open” and “Close” mechanical locks, as indicated<br />
hereunder:<br />
1 Release the automatic system by using the special release lever, as shown in the user’s instruction manual.<br />
2 Close the gate leaf.<br />
3 Loosen the V1 screw and move the “Close” block until it touches the “P” pin. Then tighten the V1 screw.<br />
4 Open the gate leaf.<br />
5 Loosen the V2 screw and move the “Open” block until it touches the “P” pin. Then tighten the V2 screw<br />
6 Reset the automatic operation.<br />
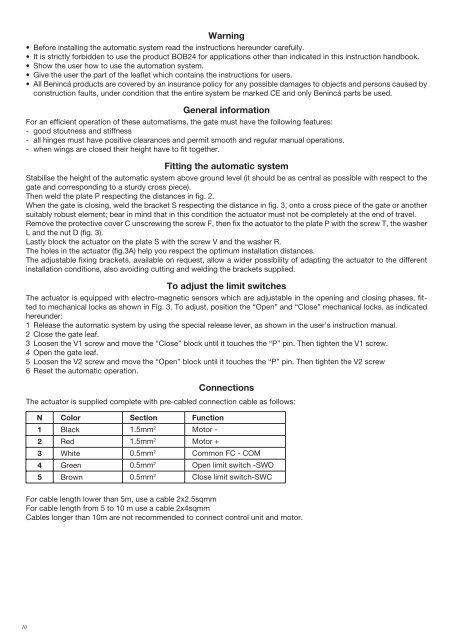
Connections<br />
The actuator is supplied complete with pre-cabled connection cable as follows:<br />
N Color Section Function<br />
1 Black 1.5mm 2 Motor -<br />
2 Red 1.5mm 2 Motor +<br />
3 White 0.5mm 2 Common FC - COM<br />
4 Green 0.5mm 2 Open limit switch -SWO<br />
5 Brown 0.5mm 2 Close limit switch-SWC<br />
For cable length lower than 5m, use a cable 2x2.5sqmm<br />
For cable length from 5 to 10 m use a cable 2x4sqmm<br />
Cables longer than 10m are not recommended to connect control unit and motor.