Cortina... Einzelseiten - Buschbeck Masonry Barbecues
Cortina... Einzelseiten - Buschbeck Masonry Barbecues
Cortina... Einzelseiten - Buschbeck Masonry Barbecues

Create successful ePaper yourself
Turn your PDF publications into a flip-book with our unique Google optimized e-Paper software.
English<br />
General information:<br />
The outdoor fireplace/garden grill has to be<br />
assembled on compacted, leveled ground or<br />
concrete. Make sure there is sufficient clearance<br />
(36 inches), between the unit and flammable<br />
material. Step #4: the refractor base is<br />
an option when grilling (can be omitted), but<br />
is mandatory for wood burning.<br />
Using the outdoor fireplace/garden grill:<br />
Start the fire with a small flame; if unit is exposed<br />
to extreme heat too quickly, cracking of<br />
the parts might occur. This is very important<br />
if the weather condition caused the concrete<br />
parts to become wet. However, if cracks should<br />
occur, it would not dimish the function of your<br />
outdoor fireplace/garden grill, because all components<br />
are metal re-enforced. The occurrence<br />
of hairline cracks in the refractor parts are possible,<br />
but do not constitute a claim.<br />
Recommended burning materials:<br />
The outdoor fireplace/garden grill is made<br />
for usage of charcoal only!<br />
Do not use more than 10 lbs of charcoal at<br />
one time!<br />
Use only recommended starter fluid or kindling!<br />
Do not use kerosene or gasoline, or similar<br />
liquids to light the charcoal/firewood!<br />
Attention:<br />
Do not overheat the outdoor fireplace/garden<br />
grill!<br />
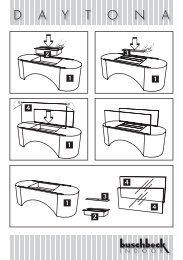
Assembly:<br />
Make sure the ground is prepared and the base<br />
is leveled. Follow the drawing to assemble<br />
part - . Make sure the space between the<br />
refractor hood and the outer hood is equal<br />
all around. This ensures even air circulation between<br />
the two parts.<br />
It is important, that all components are assembled<br />
flush at the rear, except the outer hood<br />
, which should have an overhang of app.<br />
3/4 inch.<br />
It is recommended to “spot glue“ all parts, but it<br />
is mandatory to glue all parts completely together<br />
from the top of the outer hood up. Drying<br />
time for the adhesive is app. 24 hours.<br />
The optional spark arrestor (USA only) has<br />
to be glued between the two-piece chimney<br />
extension.<br />
Included:<br />
1 bag of adhesive.<br />
Disassembly:<br />
If unit has to be disassembled, follow the reversed<br />
instructions.<br />
Cleaning:<br />
The surface of your outdoor fireplace/garden<br />
grill can be cleaned with either a high pressure<br />
power washer, or diluted bleach and coarse<br />
brush.<br />
The copper inlay (on some models), will show<br />
a green patina after a period of time, which is<br />
normal, but can be cleaned with copper or brass<br />
cleaning material, if so desired.