Patriot - Noragent
Patriot - Noragent
Patriot - Noragent

You also want an ePaper? Increase the reach of your titles
YUMPU automatically turns print PDFs into web optimized ePapers that Google loves.
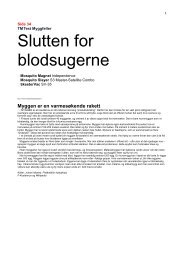
Self-Contained<br />
<strong>Patriot</strong><br />
Parts Included<br />
Bug Bag<br />
Already<br />
Installed<br />
5<br />
Base Propane<br />
Tank Cradle (1)<br />
Principal Parts<br />
Quick Clear Adapter<br />
10 Metal Power Cord<br />
Burying Clips<br />
Power Head (1)<br />
Trumpet (1)<br />
Support Pole (1)<br />
Support Leg (1)<br />
50' Power Cord<br />
Assembly Instructions<br />
Step 1 Step 2 Step 3 Step 4<br />
Place base upside down on a flat<br />
surface, slide U-shaped support<br />
legs into slots on base until they<br />
lock in place.<br />
Turn base and leg assembly<br />
right-side-up and place support<br />
pole into cavity on base.<br />
Place trap power head onto pole.<br />
Press down firmly with two<br />
hands to secure.<br />
Step 5 Step 6 Step 7 Step 8<br />
Insert Octenol or Lurex3<br />
cartridge in compartment per<br />
instructions in cartridge<br />
packaging.<br />
Place the base of the propane<br />
tank into the molded cradle<br />
supplied.<br />
Step 9 Step 10<br />
Plug Adapter into properly<br />
grounded electrical outlet.<br />
Making sure propane tank is fully<br />
closed, attach propane regulator<br />
hose to propane tank. Secure<br />
tightly by hand. Do not use tools.<br />
Turn propane valve on slowly.<br />
See page 8 for propane tank<br />
installation.<br />
Completed assembly should have<br />
the front of power head in the same<br />
direction as base U-shaped legs.<br />
Plug power connector into the<br />
trap power slot located on the<br />
back of the power head.<br />
6