Instructions for use - Indesit
Instructions for use - Indesit
Instructions for use - Indesit

You also want an ePaper? Increase the reach of your titles
YUMPU automatically turns print PDFs into web optimized ePapers that Google loves.
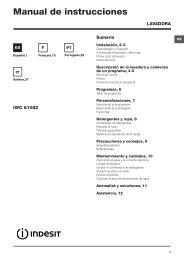
Display<br />
B<br />
GB<br />
A<br />
C<br />
The display is <strong>use</strong>ful when programming the machine and provides a great deal of in<strong>for</strong>mation.<br />
The duration of the available programmes and the remaining time of a running cycle appear in section A; if the DELAY START<br />
option has been set, the countdown to the start of the selected programme will appear. Pressing the relative button, the<br />
machine automatically displays the maximum temperature and spin speed values set <strong>for</strong> the selected cycle, or the most<br />
recently-<strong>use</strong>d settings if they are compatible with the selected cycle.<br />
The “programme phases” relative to the selected programme and the “programme phase” of the running programme appear<br />
in section B:<br />
Wash / Rinse / Spin / Drain<br />
The icons corresponding to “temperature” , “Programmed start” and “spin” appear in section C from top to bottom:<br />
If the symbol lights up, the display will visualise the set “temperature” value.<br />
When a “delayed start” has been set, the symbol lights up.<br />
If the symbol lights up, the display will visualise the set “spin” value.<br />
Door locked symbol<br />
The lit symbol indicates that the door is locked. To prevent any damage, wait until the symbol turns off be<strong>for</strong>e opening the<br />
door (wait approximately 3 minutes). To open the door while a cycle is in progress, press the START/PAUSE button; if the<br />
symbol is switched off the door may be opened.<br />
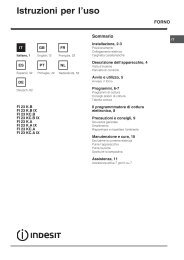
How to open and to close the drum<br />
Fig. 1 Fig. 2<br />
A) Opening (Fig. 1).<br />
Lift the external lid and open it completely.<br />
B) Opening the drum (Soft opening):<br />
With one finger, push the button indicated in fig. 2 and the drum<br />
will open delicately.<br />
C) Loading the washing machine (Fig. 3).<br />
D) Shutting (Fig. 4).<br />
- close the drum fully by first shutting the front door<br />
followed by the rear one;<br />
- then ensure the hooks on the front door are perfectly<br />
ho<strong>use</strong>d within the seat of the rear door;<br />
- after the hooks have clicked into position, press both<br />
doors lightly downwards to make sure they do not<br />
come loose;<br />
- finally shut the external lid.<br />
Fig. 3 Fig. 4<br />
7