You also want an ePaper? Increase the reach of your titles
YUMPU automatically turns print PDFs into web optimized ePapers that Google loves.
#include <br />
VOID OnUnload( IN PDRIVER_OBJECT DriverObject)<br />
{<br />
__asm // CR0 레지스터 속성 되돌리기<br />
{<br />
push eax<br />
mov eax, CR0<br />
or eax, NOT 0FFFEFFFFh<br />
mov CR0, eax<br />
pop eax<br />
}<br />
}<br />
DbgPrint("unload~~₩n");<br />
NTSTATUS DriverEntry( IN PDRIVER_OBJECT theDriverObject, IN PUNICODE_STRING theRegistryPath )<br />
{<br />
DbgPrint("DriverEntry() Start₩n");<br />
theDriverObject->DriverUnload = OnUnload;<br />
__asm<br />
{<br />
}<br />
// CR0 레지스터 WP비트를 0으로 만들기~~<br />
push eax<br />
mov eax, CR0<br />
and eax, 0FFFEFFFFh<br />
mov CR0, eax<br />
pop eax<br />
}<br />
return STATUS_SUCCESS;<br />
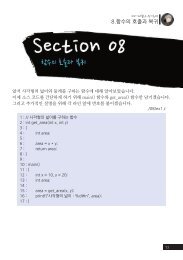
KCr0.c<br />
이전에 작성했던 KBasic.c와 다른 부분은 인라인 어셈코드가 들어가 있는 굵은 글씨의 부분밖에<br />
는 없습니다. 이것이 CR0 레지스터의 WP비트를 바꾸는 루틴입니다. 정말로 CR0 레지스터의 비<br />
트가 바뀌었는지 LiveKd를 이용해서 확인해보겠습니다. LiveKd는 지금은 Microsoft에 인수된<br />
Sysinternals.com 홈페이지를 들어가면 다운로드 받을 수 있고, 설치법은 압축된 파일을 전부<br />
WinDbg의 폴더에 복사시키면 됩니다. 실행법은 단순히 LiveKd.exe 파일을 실행하면 됩니다.<br />
먼저 드라이버를 구동시키기 전의 CR0 레지스터의 값은 밑의 그림과 같습니다.
![[Debugging] Art of Hooking 2th Edition](https://img.yumpu.com/22140176/1/167x260/debugging-art-of-hooking-2th-edition.jpg?quality=85)