
Create successful ePaper yourself
Turn your PDF publications into a flip-book with our unique Google optimized e-Paper software.
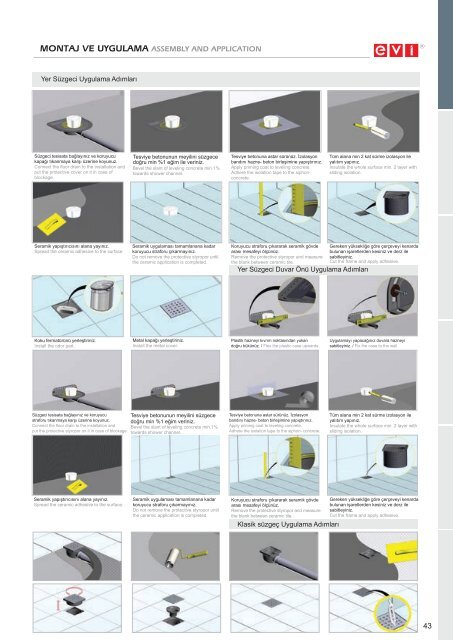
MONTAJ VE UYGULAMA ASSEMBLY AND APPLICATION<br />
Yer Sü<strong>zgeci</strong> Uygulama Adımları<br />
Sü<strong>zgeci</strong> tesisata bağlayınız ve ko<strong>ru</strong>yucu<br />
kapağı tıkanmaya karşı üzerine koyunuz.<br />
Connect the floor drain to the installation and<br />
put the protective cover on it in case of<br />
blockage.<br />
Tesviye betonunun meyilini süzgece<br />
doğ<strong>ru</strong> min %1 eğim ile veriniz.<br />
Bevel the slant of leveling concrete min.1%<br />
towards shower channel.<br />
Tesviye betonuna astar sürünüz. İzolasyon<br />
bandını hazne- beton birleşimine yapıştırınız.<br />
Apply priming coat to leveling concrete.<br />
Adhere the isolation tape to the siphonconcrete.<br />
Tüm alana min 2 kat sürme izolasyon ile<br />
yalıtım yapınız.<br />
In<strong>su</strong>late the whole <strong>su</strong>rface min. 2 la<strong>yer</strong> with<br />
sliding isolation.<br />
Seramik yapıştırıcısını alana yayınız.<br />
Spread the ceramic adhesive to the <strong>su</strong>rface<br />
Seramik uygulaması tamamlanana kadar<br />
ko<strong>ru</strong>yucu strafo<strong>ru</strong> çıkarmayınız.<br />
Do not remove the protective styropor until.<br />
the ceramic application is completed.<br />
Ko<strong>ru</strong>yucu strafo<strong>ru</strong> çıkararak seramik gövde<br />
arası mesafeyi ölçünüz.<br />
Remove the protective styropor and mea<strong>su</strong>re<br />
the blank between ceramic tile.<br />
Yer Sü<strong>zgeci</strong> Duvar Önü Uygulama Adımları<br />
Gereken yüksekliğe göre çerçeveyi kenarda<br />
bulunan işaretlerden kesiniz ve derz ile<br />
sabitleyiniz.<br />
Cut the frame and apply adhesive.<br />
Koku fermatürünü <strong>yer</strong>leştiriniz.<br />
Install the odor part.<br />
Metal kapağı <strong>yer</strong>leştiriniz.<br />
Install the metal cover.<br />
Plastik hazneyi kıvrım noktasından yukarı<br />
doğ<strong>ru</strong> bükünüz. / Flex the plastic case upwards.<br />
Uygulamayı yapacağınız duvara hazneyi<br />
sabitleyiniz. / Fix the case to the wall.<br />
Sü<strong>zgeci</strong> tesisata bağlayınız ve ko<strong>ru</strong>yucu Tesviye betonunun meyilini süzgece<br />
strafo<strong>ru</strong> tıkanmaya karşı üzerine koyunuz. doğ<strong>ru</strong> min %1 eğim veriniz.<br />
Connect the floor drain to the installation and Bevel the slant of leveling concrete min.1%<br />
put the protective styropor on it in case of blockage. towards shower channel.<br />
Tesviye betonuna astar sürünüz. İzolasyon<br />
bandını hazne- beton birleşimine yapıştırınız.<br />
Apply priming coat to leveling concrete.<br />
Adhere the isolation tape to the siphon- concrete.<br />
Tüm alana min 2 kat sürme izolasyon ile<br />
yalıtım yapınız.<br />
In<strong>su</strong>late the whole <strong>su</strong>rface min. 2 la<strong>yer</strong> with<br />
sliding isolation.<br />
Seramik yapıştırıcısını alana yayınız.<br />
Spread the ceramic adhesive to the <strong>su</strong>rface.<br />
Seramik uygulaması tamamlanana kadar<br />
ko<strong>ru</strong>yucu strafo<strong>ru</strong> çıkarmayınız.<br />
Do not remove the protective styropor until<br />
the ceramic application is completed.<br />
Ko<strong>ru</strong>yucu strafo<strong>ru</strong> çıkararak seramik gövde<br />
arası mesafeyi ölçünüz.<br />
Remove the protective styropor and mea<strong>su</strong>re<br />
the blank between ceramic tile.<br />
Klasik süzgeç Uygulama Adımları<br />
Gereken yüksekliğe göre çerçeveyi kenarda<br />
bulunan işaretlerden kesiniz ve derz ile<br />
sabitleyiniz.<br />
Cut the frame and apply adhesive.<br />
43