S6-701XXX Stage6 Big Racing
STAGE6 BIGRACING - 77cc S6-7018810 AM6 S6-7019210 Derbi Euro2 S6-7019310 Derbi Euro3 STAGE6 BIGRACING - 88cc S6-7018820 AM6 S6-7019220 Derbi Euro2 S6-7019320 Derbi Euro3 STAGE6 STREET RACE - 77cc S6-7118810 AM6 S6-7119210 Derbi Euro2 S6-7119310 Derbi Euro3 STAGE6 STREET RACE - 88cc S6-7118820 AM6 S6-7119220 Derbi Euro2 S6-7119320 Derbi Euro3
STAGE6 BIGRACING - 77cc
S6-7018810 AM6
S6-7019210 Derbi Euro2
S6-7019310 Derbi Euro3
STAGE6 BIGRACING - 88cc
S6-7018820 AM6
S6-7019220 Derbi Euro2
S6-7019320 Derbi Euro3
STAGE6 STREET RACE - 77cc
S6-7118810 AM6
S6-7119210 Derbi Euro2
S6-7119310 Derbi Euro3
STAGE6 STREET RACE - 88cc
S6-7118820 AM6
S6-7119220 Derbi Euro2
S6-7119320 Derbi Euro3

You also want an ePaper? Increase the reach of your titles
YUMPU automatically turns print PDFs into web optimized ePapers that Google loves.
FR<br />
FICHE DE MONTAGE<br />
KITS CYLINDRES STAGE6<br />
ALU BIG RACING<br />
FONTE STREET RACE<br />
77cc/88cc<br />
1. INTRODUCTION<br />
Vous venez d’acheter un kit cylindre <strong>Stage6</strong> et nous<br />
vous en remercions, ainsi que pour la confiance<br />
que vous nous témoignez à travers cet achat.<br />
Cette notice de montage vous apportera toutes<br />
les indications nécessaires pour exploiter au mieux<br />
votre nouvel ensemble haut moteur et ainsi en tirer<br />
les meilleures performances possibles.<br />
2. CONTENU DU KIT CYLINDRE<br />
Cylindre & Culasse <strong>Stage6</strong><br />
Piston, Segment<br />
Axe de piston, Circlips (x2)<br />
Pochette de joints<br />
Notice de montage<br />
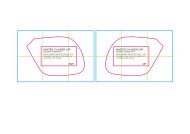
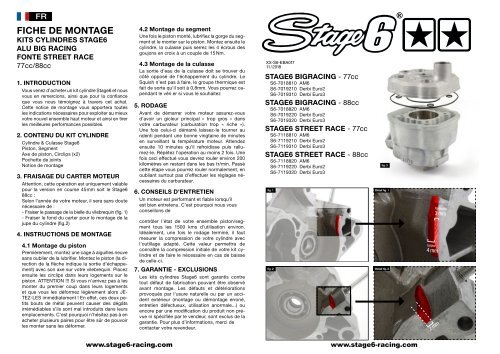
3. FRAISAGE DU CARTER MOTEUR<br />
Attention, cette opération est uniquement valable<br />
pour la version en course 45mm soit le <strong>Stage6</strong><br />
88cc :<br />
Selon l’année de votre moteur, il sera sans doute<br />
nécessaire de :<br />
- Fraiser le passage de la bielle du vilebrequin (fig. 1)<br />
- Fraiser le fond du carter pour le montage de la<br />
jupe du cylindre (fig.2)<br />
4. INSTRUCTIONS DE MONTAGE<br />
4.1 Montage du piston<br />
Premièrement, montez une cage à aiguilles neuve<br />
sans oublier de la lubrifier. Montez le piston (la direction<br />
de la flèche indique la sortie d’échappement)<br />
avec son axe sur votre vilebrequin. Placez<br />
ensuite les circlips dans leurs logements sur le<br />
piston. ATTENTION !!! Si vous n’arrivez pas à les<br />
monter du premier coup dans leurs logements<br />
et que vous les déformez légèrement alors JE-<br />
TEZ-LES immédiatement ! En effet, ces deux petits<br />
bouts de métal peuvent causer des dégâts<br />
irrémédiables s’ils sont mal introduits dans leurs<br />
emplacements. C’est pourquoi n’hésitez pas à en<br />
acheter plusieurs paires pour être sûr de pouvoir<br />
les monter sans les déformer.<br />
4.2 Montage du segment<br />
Une fois le piston monté, lubrifiez la gorge du segment<br />
et le monter sur le piston. Montez ensuite le<br />
cylindre, la culasse puis serrez les 4 écrous des<br />
goujons en croix à un couple de 15 Nm.<br />
4.3 Montage de la culasse<br />
La sortie d’eau de la culasse doit se trouver du<br />
côté opposé de l’échappement du cylindre. Le<br />
Squish n’est pas à faire, le groupe thermique est<br />
fait de sorte qu’il soit à 0,8mm. Vous pourrez cependant<br />
le véri er si vous le souhaitez<br />
5. RODAGE<br />
Avant de démarrer votre moteur assurez-vous<br />
d’avoir un gicleur principal « trop gros » dans<br />
votre carburateur (carburation trop « riche »).<br />
Une fois celui-ci démarré laissez-le tourner au<br />
ralenti pendant une bonne vingtaine de minutes<br />
en surveillant la température moteur. Attendez<br />
ensuite 10 minutes qu’il refroidisse puis rallumez-le.<br />
Répétez l’opération au moins 2 fois. Une<br />
fois ceci effectué vous devrez rouler environ 200<br />
kilomètres en restant dans les bas tr/min. Passé<br />
cette étape vous pourrez rouler normalement, en<br />
oubliant surtout pas d’effectuer les réglages nécessaires<br />
du carburateur.<br />
6. CONSEILS D’ENTRETIEN<br />
Un moteur est performant et fiable lorsqu’il<br />
est bien entretenu. C’est pourquoi nous vous<br />
conseillons de<br />
contrôler l’état de votre ensemble piston/segment<br />
tous les 1500 kms d’utilisation environ.<br />
Idéalement, une fois le rodage terminé, il faut<br />
mesurer la compression de votre cylindre avec<br />
l’outillage adapté. Cette valeur permettra de<br />
connaître la compression initiale de votre kit cylindre<br />
et de faire le nécessaire en cas de baisse<br />
de celle-ci.<br />
7. GARANTIE - EXCLUSIONS<br />
Les kits cylindres <strong>Stage6</strong> sont garantis contre<br />
tout défaut de fabrication pouvant être observé<br />
avant montage. Les défauts et détériorations<br />
provoqués par l’usure naturelle ou par un accident<br />
extérieur (montage ou démontage erroné,<br />
entretien défectueux, utilisation anormale...) ou<br />
encore par une modification du produit non prévue<br />
ni spécifiée par le vendeur, sont exclus de la<br />
garantie. Pour plus d’informations, merci de<br />
contacter votre revendeur.<br />
XX-<strong>S6</strong>-EBA017<br />
11 / 2018<br />
STAGE6 BIGRACING - 77cc<br />
<strong>S6</strong>-7018810 AM6<br />
<strong>S6</strong>-7019210 Derbi Euro2<br />
<strong>S6</strong>-7019310 Derbi Euro3<br />
STAGE6 BIGRACING - 88cc<br />
<strong>S6</strong>-7018820 AM6<br />
<strong>S6</strong>-7019220 Derbi Euro2<br />
<strong>S6</strong>-7019320 Derbi Euro3<br />
STAGE6 STREET RACE - 77cc<br />
<strong>S6</strong>-7118810 AM6<br />
<strong>S6</strong>-7119210 Derbi Euro2<br />
<strong>S6</strong>-7119310 Derbi Euro3<br />
STAGE6 STREET RACE - 88cc<br />
<strong>S6</strong>-7118820 AM6<br />
<strong>S6</strong>-7119220 Derbi Euro2<br />
<strong>S6</strong>-7119320 Derbi Euro3<br />
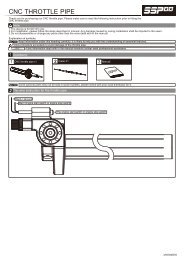
fig. 3<br />
fig. 1 Détail fig. 1<br />
fig. 2 Détail fig. 2<br />
Largeur<br />
4 mm<br />
Profondeur<br />
3 mm<br />
2 mm<br />
www.stage6-racing.com<br />
www.stage6-racing.com
ENG DE<br />
INSTALLATION GUIDE<br />
STAGE6 CYLINDER KITS<br />
ALUMINIUM BIGRACING<br />
IRON CAST STREET RACE<br />
77cc/88cc<br />
1. INTRODUCTION<br />
Thank you for purchasing this <strong>Stage6</strong> Cylinder<br />
Kit, we appreciate your trust in our company and<br />
our products. This manual will provide all necessary<br />
information to properly install your new<br />
cylinder and adjust it to obtain the best possible<br />
performance.<br />
2. CONTENTS OF CYLINDER KIT<br />
Cylinder & Cylinder Head<br />
Piston, Piston Rings<br />
Piston Pin, Circlips (x2)<br />
Gasket Kit<br />
Installation Guide<br />
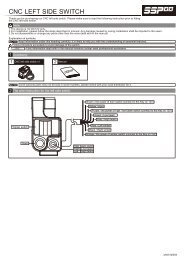
3. CRANKCASE MILLING<br />
Attention: crankcase milling is only necessary<br />
for the <strong>Stage6</strong> 88cc version with 45mm stroke.<br />
Depending on the year of manufacture, the<br />
following modifications have to be performed:<br />
- Increase recess for connecting rod of crankshaft<br />
(fig. 1)<br />
- Mill down the cylinder base seat on the crankcase<br />
(fig.2)<br />
4. INSTALLATION GUIDE<br />
4.1 Installing the piston<br />
First of all, install a new small end bearing, don’t<br />
forget to lubricate it. Install the piston (with the<br />
arrow pointing towards the exhaust) and pin onto<br />
your crankshaft. Place the circlips into the bore<br />
and push them into the grooves. ATTENTION !!!<br />
If you don’t get it right the first time and you happen<br />
to slightly bend the circlips – THROW THEM<br />
AWAY! These tiny pieces of metal can cause severe<br />
damage if they are not properly seated in<br />
those grooves. That’s why you should consider<br />
buying several sets of circlips to be absolutely<br />
certain you’ll have some that are not bent.<br />
4.2 Installing the piston ring<br />
Once the piston is mounted, lubricate the<br />
grooves for the piston ring, then place the rings<br />
into the grooves. Slide the cylinder over the piston,<br />
then put the cylinder head on top and tighten<br />
the 4 bolts to 15 Nm in a diagonal pattern.<br />
4.3 Installing cylinder head<br />
Make sure that the water connection of the cylinder<br />
head is mounted opposite the outlet.<br />
There is no need to adjust squish clearance, it<br />
is preset to 0.8 mm. You can, however, measure<br />
and verify squish if you want to be on the safe<br />
side.<br />
5. RUNNING-IN<br />
Before starting the engine make sure that your<br />
carburetor main jet is too large (mixture is too<br />
rich). Let your engine idle for a good twenty minutes<br />
and check the temperature of the engine.<br />
Then stop the engine and let it cool down for<br />
10 minutes. Repeat at least 2 times. Once this<br />
is done you should drive approx. 200km keeping<br />
your engine at low rpm. Then you can give<br />
it more gas; don’t forget to (re-)adjust the carburetor.<br />
6. MAINTENANCE<br />
Your engine will only stay powerful and reliable<br />
when properly looked after. We recommend<br />
checking your piston and piston rings every<br />
1500km. Once your engine is run in, you should<br />
measure cylinder compression (with appropriate<br />
tools). This will tell you the compression your<br />
cylinder started out with and will serve as a reference<br />
in case compression will drop.<br />
7. GUARANTEE / EXEMPTIONS<br />
<strong>Stage6</strong> aluminium cylinder kits have a guarantee<br />
against manufacturing defects discovered<br />
before installation. Defects or damage caused<br />
by wear or accidents (incorrect mounting or<br />
dismounting, faulty maintenance, improper use<br />
etc.) or by modifications not intended by the<br />
manufacturer are exempt from this guarantee.<br />
For more information, please contact vendor.<br />
EINBAUANLEITUNG<br />
STAGE6 ZYLINDER<br />
ALUMINIUM BIGRACING<br />
GRAUGUSS STREET RACE<br />
77cc / 88cc<br />
1. EINLEITUNG<br />
Wir möchten uns für den Kauf dieses <strong>Stage6</strong><br />
Zylinderkits und das damit entgegengebrachte<br />
Vertrauen in uns und unsere Produkte bedanken.<br />
In dieser Einbauanleitung findet ihr alle Informationen,<br />
die ihr zum ordnungsgemäßen<br />
Einbau und der daraus resultierenden<br />
Leistungsoptimierung benötigt.<br />
2. INHALT DES ZYLINDERKITS<br />
<strong>Stage6</strong> Zylinder & Zylinderkopf, Kolben, Kolbenringe,<br />
Kolbenbolzen, Sicherungsringe (x2)<br />
Dichtungen, Einbauanleitung<br />
3. FRÄSEN DES MOTORGEHÄUSES<br />
Achtung: das Motorgehäuse muss nur für die<br />
88cc Version mit 45mm Hub bearbeitet werden.<br />
Je nach Baujahr müssen folgende Areale ausgespindelt<br />
werden:<br />
- Vergrößern der Aussparung für das Pleuel (fig. 1)<br />
- Ausspindeln der Zylinderfußaufnahme (fig.2)<br />
4. EINBAUANLEITUNG<br />
4.1 Einbau Kolben<br />
Zuerst einmal baut ihr den neuen Kolbenbolzen<br />
ein, bitte gut schmieren! Bringt den Kolben<br />
(mit dem Pfeil Richtung Auslass zeigend)<br />
und Kolbenbolzen an der Kurbelwelle an.<br />
Platziert die Sicherungsclips in der Öffnung<br />
und schiebt sie in die dafür vorgesehenen<br />
Nuten. ACHTUNG!!! Falls ihr das nicht beim<br />
ersten Mal hinbekommt und die Ringe leicht<br />
verbiegt – WEGWERFEN! Diese unscheinbaren<br />
Metallringe können bei unsachgemäßen Einbau<br />
schwere Schäden verursachen. Wir empfehlen<br />
daher, immer ein paar Clips auf Reserve<br />
zu haben, damit ihr auf jeden Fall welche<br />
im einwandfreien Zustand zur Hand habt.<br />
4.2 Einbau Kolbenring<br />
Nachdem der Kolben eingebaut ist, schmiert die<br />
Kolbenringnut, dann legt den Kolbenring in die<br />
Ringnut. Schiebt den Zylinder über den Kolben,<br />
setzt den Zylinderkopf darauf und zieht die 4<br />
Bolzen mit 15 Nm Drehmoment an, und zwar<br />
über Kreuz.<br />
4.3 Einbau Zylinderkopf<br />
Es ist darauf zu achten, dass der Wasseranschluss<br />
des Zylinderkopfes entgegengesetzt<br />
des Auslasses montiert wird.<br />
Die Quetschkante muss nicht eingestellt werden,<br />
sie ist auf 0,8 mm voreingestellt. Falls ihr aber<br />
auf Nummer sicher gehen wollt, könnt ihr sie<br />
natürlich trotzdem nachmessen.<br />
5. EINFAHREN<br />
Erst einmal sollte eine etwas zu große<br />
Hauptdüse verwendet werden (Mischung ist<br />
zu fett). Lasst den Motor etwa 20 Minuten im<br />
Standgas laufen und haltet ein Auge auf die<br />
Betriebstemperatur. Motor ausschalten und 10<br />
Minuten abkühlen lassen. Das Ganze wird noch<br />
mind. 2x wiederholt. Danach fahrt ihr die ersten<br />
200km im eher niedrigen Drehzahlbereich. Jetzt<br />
ist der Motor eingefahren, und der Vergaser<br />
kann nachjustiert werden.<br />
6. WARTUNG<br />
Ordnungsgemäße und regelmäßige Wartung<br />
ist die Voraussetzung für maximale Leistung<br />
und Langlebigkeit. Wir empfehlen, Kolben und<br />
Kolbenringe alle 1500km zu checken. Nachdem<br />
der Motor korrekt eingefahren wurde, solltet ihr<br />
die Kompression messen, somit habt ihr einen<br />
Referenzwert, auf den ihr zurückgreifen könnt,<br />
um zu kontrollieren, ob die Kompression später<br />
abfällt.<br />
7. GARANTIE / GARANTIEAUSSCHLUSS<br />
Die <strong>Stage6</strong> Zylinder haben eine Garantie für alle<br />
Fabrikationsfehler, die vor Einbau festgestellt<br />
werden. Defekte und Schäden, die durch<br />
normale Abnutzung und durch den Anwender<br />
verursachte Schäden (unsachgemäßer Ein- und<br />
Ausbau, falsche Wartung, unvorschriftsmäßige<br />
Verwendung etc.) sowie durch vom Hersteller<br />
nicht vorgesehene Modifikationen hervorgerufen<br />
werden, sind von der Garantie ausgeschlossen.<br />
Bitte den Verkäufer kontaktieren, falls weitere<br />
Informationen gewünscht werden.<br />
www.stage6-racing.com<br />
www.stage6-racing.com