guitar & bass auto tuner gu20 user's manual ... - Ibanez Guitars
guitar & bass auto tuner gu20 user's manual ... - Ibanez Guitars
guitar & bass auto tuner gu20 user's manual ... - Ibanez Guitars
You also want an ePaper? Increase the reach of your titles
YUMPU automatically turns print PDFs into web optimized ePapers that Google loves.
Caution<br />
1 To avoid short circuit, electric shock or malfunction:<br />
Do not disassemble for repair.<br />
Do not place in high temperature and humid space such as electric<br />
heater, direct sunlight, bathroom, wet floor etc.<br />
Do not place in excessive vibration.<br />
Do not place in dusty or dirty space.<br />
Do not operate the <strong>tuner</strong> with wet hands.<br />
2 To avoid breakdown<br />
Do not handle all controls with excessive power.<br />
Do not drop the <strong>tuner</strong>.<br />
3 Cleaning<br />
Do not use thinner or alcohol for cleaning.<br />
Use only dry and clean cloth.<br />
4 To prevent battery loss<br />
Remove the battery when the <strong>tuner</strong> is not in use for a long time.<br />
Turn the power button off when the <strong>tuner</strong> is not in use.<br />
5 Battery<br />
Use only 3V battery : AAA Size (R03, LR03, L30) × 2<br />
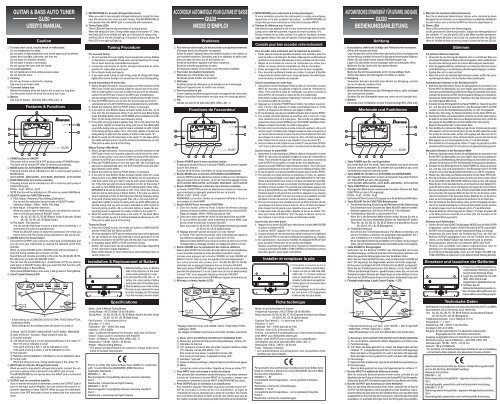
Features & Functions<br />
1 POWER button for ON/OFF<br />
The power will be turned ON & OFF by each press of POWER button.<br />
This <strong>tuner</strong> will be turned OFF after 20 minutes <strong>auto</strong>matically.<br />
2 MODE button for AUTO/MAN & GUITAR/BASS selection<br />
Following modes will be indicated on LCD in order by each press of<br />
MODE button.<br />
AUTO GUITAR - MAN GUITAR - AUTO BASS - MAN BASS - AUTO GUITAR<br />
3 FUNCTION button for Function selection<br />
Following modes will be indicated on LCD in order by each press of<br />
FUNCTION button.<br />
PITCH - FLAT - PITCH - FLAT<br />
NOTE Function will be indicated on LCD when you select MAN Mode.<br />
4 ADJUST button for FUNCTION modes<br />
i) Pitch Adjust : Reference Pitch Setting (Calibration)<br />
You can set the calibration by each press of ADJUST button.<br />
Calibration Range : 435Hz - 445Hz (1Hz step)<br />
ii) Note Adjust : Tuning Note Selection<br />
When you wish to tune in MAN mode, you can select the note you<br />
wish to tune by each press of ADJUST button.<br />
Note : 5A, 4D, 3G, 2B, 1E, 7B, 6E (Electric Guitar & Acoustic Guitar)<br />
3A, 2D, 1G, HC, LB, 4E (Bass Guitar)<br />
iii) Flat Adjust : Flat Selection<br />
You can use the Flat mode to tune to a pitch that is lowered by 1~2<br />
semitones ( / ) for the specified note.<br />
Press the ADJUST button to select the semitones ( / ) that you<br />
wish to lower and Flat modes will be indicated on LCD one by one.<br />
5 SOUND button for Sound Output<br />
Connect the OUTPUT jack of <strong>tuner</strong> to a input jack of amplification and<br />
you can tune your instruments by hearing the standard sound from<br />
amplifier.<br />
When you press SOUND button, SOUND mode will be indicated on<br />
LCD and tuning needles will not shown on LCD.<br />
Sound Note will circulate according to the order 5A-4D-3G-2B-1E-7B-<br />
6E, whenever you press the ADJUST button.<br />
You can hear the sound flatten by 1~2 semitones ( / ) you wish by<br />
each press of ADJUST button after you select the Flat Function with<br />
FUNCTION button in Sound Mode.<br />
If you press SOUND button once more, it will go back to Tuning Mode.<br />
6 Liquid Crystal Display (LCD)<br />
* Initial setting on LCD:MODE=AUTO GUITAR, FUNCTION=PITCH,<br />
Calibration=440Hz<br />
These settings will be initialized when the power is turned on.<br />
a Mode : AUTO GUITAR / MAN GUITAR / AUTO BASS / MAN BASS<br />
b Note of Electric / Acoustic / Bass <strong>Guitars</strong> & Violin etc.<br />
c Function Indicator<br />
d /#: When the string is in tune, tuning needle stop in the center "0"<br />
then /# will be indicated on LCD.<br />
If the pitch of string is flat, will be indicated on LCD.<br />
If the pitch of string is sharp, # will be indicated on LCD.<br />
e Flat indicator<br />
f Reference pitch (Calibration) : Indicates the current calibration value.<br />
g Tuning meter<br />
When the string is in tune, Tuning needle stops in the center “0”.<br />
7 INPUT Jack For Electric Stringed Instruments<br />
When you wish to tune electric stringed instruments, connect the out-<br />
put cord or pickup of the instrument to the INPUT jack of <strong>tuner</strong>.<br />
The MICROPHONE do not operate when the INPUT jack is connected<br />
with instrument.<br />
8 OUTPUT jack for connection amplifier<br />
If you to monitor the sound of instrument, connect the OUTPUT jack of<br />
<strong>tuner</strong> to the Input jack of Amplifier. You can monitor the sound of in-<br />
strument regardless of <strong>tuner</strong> ON/OFF. When you play the instrument,<br />
be sure to turn OFF the power of <strong>tuner</strong> to prevent the hum noise from<br />
<strong>tuner</strong>.<br />
9 MICROPHONE For Acoustic Stringed Instruments<br />
When you wish to tune acoustic stringed instruments, locate this <strong>tuner</strong><br />
near the instrument for more accurate tuning. This MICROPHONE do<br />
not operate when the INPUT jack is connected with instrument.<br />
0 Tuning Guide LEDs<br />
These LEDs will help the discrimination of tuning process.<br />
When the string is in tune, Tuning needle stops in the center “0”. Then,<br />
the Green LED in the middle will light up. If the pitch of string is flat,<br />
the Red LED in the left will light up. If the pitch of string is sharp, the<br />
Red LED in the right will light up.<br />
Tuning Procedure<br />
For accurate Tuning<br />
• Do not operate the <strong>tuner</strong> nearby sound equipment such as Radios<br />
or Televisions, if possible. These units can be impediment in recep-<br />
tion of exact sound by internal Microcomputer.<br />
• Locate the volume level of electric stringed instruments at center<br />
position for reasonable sound input.<br />
• Do not pluck loudly and heavily.<br />
• If you want quick tuning of next string, press all strings with finger<br />
lightly after current tuning to cut sound input of current tuning string.<br />
Accord <strong>auto</strong>matique en mode Auto<br />
1. Electric stringed instruments : Connect output cord of the instrument to the<br />
INPUT jack of <strong>tuner</strong> and if possible, adjust the volume level of the instru-<br />
ment to center position. If you wish to monitor the sound of the instrument,<br />
connect the OUTPUT jack of <strong>tuner</strong> to the INPUT jack of amplification.<br />
Acoustic stringed instruments : Locate the instrument near the MIC in <strong>tuner</strong>.<br />
2. Press the POWER button to turn the <strong>tuner</strong> ON. The LCD lights up and LCD is<br />
<strong>auto</strong>matically set to the AUTO GUITAR mode and standard reference pitch 440Hz.<br />
3. Adjust the reference pitch by PITCH button, if necessary.<br />
4. If you wish to tune Electric Guitar, Acoustic Guitar, Violin etc., try to<br />
tune from the low frequency string. If you wish to tune Bass Guitar,<br />
press the Mode button twice, AUTO-BASS will be indicated on LCD.<br />
Then, try the tuning from the low frequency string.<br />
5. If the pitch of tuning string is greater than -50 or +50 cents from the<br />
exact pitch, tighten or loosen the string until one of the LEDs lights<br />
up and the tuning note you wish to tune is indicated on LCD. If pitch<br />
of the tuning string is within -50 or +50 cents, tighten or loosen the<br />
string slowly to approach the needle of meter to the center “0”.<br />
6. When the needle of LCD meter stops in the center “0”, the Green LED in<br />
the middle will light up and /# will be indicated simultaneously on LCD.<br />
This point is exact sound of the string.<br />
Manual Tuning in Man Mode<br />
1. Electric stringed instruments : Connect output cord of the instrument to the<br />
INPUT jack of <strong>tuner</strong> and if possible, adjust the volume level of the instru-<br />
ment to center position. If you wish to monitor the sound of the instrument,<br />
connect the OUTPUT jack of <strong>tuner</strong> to the INPUT jack of amplification.<br />
2. Press the POWER button to turn the <strong>tuner</strong> ON. The LCD lights up<br />
and LCD is <strong>auto</strong>matically set to the AUTO GUITAR mode and stan-<br />
dard reference pitch 440Hz.<br />
3. Adjust the reference pitch by PITCH button, if necessary.<br />
4. If you wish to tune Electric Guitar, Acoustic Guitar, Violin etc., press<br />
Mode button once, MAN GUITAR & 5A (Note) will be indicated on<br />
LCD then, select note you wish to tune by each press of Adjust but-<br />
ton. If the note you wish to tune is indicated on LCD, try the tuning. If<br />
you wish to tune BASS Guitar, press the Mode button three times,<br />
MAN-BASS & 3A will be indicated on LCD. Then, select the note you<br />
wish to tune by each press of Adjust button. If the note you wish to<br />
tune is indicated on LCD, try the tuning from the low frequency string.<br />
5. If the pitch of tuning string is greater than -50 or +50 cents from the<br />
exact pitch, tighten or loosen the string until one of the LEDs lights up<br />
and the tuning note you wish to tune is indicated on LCD. If pitch of<br />
the tuning string is within -50 or +50 cents, tighten or loosen the tun-<br />
ing string slowly to approach the needle of meter to the center “0”.<br />
6. When the needle of LCD meter stops in the center “0”, the Green LED in<br />
the middle will light up and & # will be indicated simultaneously on LCD.<br />
This point is exact sound of the string.<br />
Tuning by Sound<br />
1. Press the SOUND button, the mode will switch to MAN GUITAR,<br />
and the FUNCTION will switch to NOTE.<br />
A5 will be displayed for NOTE and the corresponding sound will be generated.<br />
2. You can compare and tune while listening to sound generated from the<br />
amplifier connected to the OUTPUT jack with the pitch of your instrument.<br />
3. If necessary, adjust NOTE or FLAT to perform tuning.<br />
Notice: The sound level can be subjected to decrease depending<br />
on the instrument output impedance.<br />
When either Volume or Tone control turns aniti-clockwise fully, no<br />
sound comes out.<br />
Installation & Replacement of Battery<br />
1. Slide the battery cover on bottom<br />
side in the direction of the <strong>tuner</strong><br />
arrow while pressing the cover.<br />
2. Fix AAA Size (R03, LR03, L30) × 2 - 3V<br />
battery into correct polarity of battery<br />
terminal and insert it in the battery space.<br />
3. Slide the battery cover on the contrary.<br />
* This <strong>tuner</strong> is very convenient for users<br />
to monitor its display on LCD, because<br />
it is a little inclined to be more stable.<br />
Specifications<br />
Mode : Auto & Manual Tuning Modes<br />
Tuning Range : A0 (27.50Hz)~C8 (4,186.00Hz)<br />
Tuning Note : 5A, 4D, 3G, 2B, 1E, 7B, 6E (Electic Guitar & Acoustic Guitar)<br />
3A, 2D, 1G, HC, LB, 4E (Bass Guitar)<br />
Flat Function : 1~2 semitones ( / )<br />
Accuracy :+/- 1 Cent<br />
Calibration : 435 ~ 445Hz (1Hz step)<br />
Indicator : LCD & 3LEDs<br />
Input : Condenser Microphone for Acoustic, Input Jack for Electric<br />
Output : Output Jack for connection with Amplifier<br />
Power : 3V Battery - AAA size (R03, LR03, L30) × 2<br />
Dimensions : 105 (W) × 68 (D) × 25 (H) mm<br />
Weight : 120g (Including Battery)<br />
* The design and specifications are subject to change without prior<br />
notice for product improvement.<br />
This is to certify that Guitar & Bass Tuner GU20 is in conformity<br />
with : Council Directive 89/336/EEC (EMC Directive)<br />
Applicable Standards :<br />
EN50081-1 : .92<br />
Electromagnetic Compatibility-Generic emission standard.<br />
Part 1 :<br />
Residential, commercial and light industry.<br />
EN50082-1 : 01.97<br />
Electromagnetic Compatibility-Generic immunity standard.<br />
Part 1 :<br />
Residential, commercial and light industry.<br />
GUITAR & BASS AUTO TUNER<br />
GU20<br />
USER’S MANUAL<br />
Prudence<br />
1 Pour éviter des court-circuits, des électrocutions ou des dysfonctionnements:<br />
N’essayez jamais de démonter cet appareil.<br />
Evitez de placer l’appareil dans des endroits soumis à une chaleur ou<br />
une humidité excessive. Exemples: près d’un radiateur, en plein soleil,<br />
dans une salle de bains, sur un sol humide, etc.<br />
Evitez de soumettre l’appareil à de fortes vibrations.<br />
Evitez les endroits poussiéreux et sales.<br />
Ne manipulez jamais cet accordeur avec des mains mouillées.<br />
2 Pour éviter des dysfonctionnements<br />
Manipulez les commandes avec soin.<br />
Ne laissez jamais tomber cet accordeur.<br />
3 Nettoyage<br />
N’utilisez jamais de détergent ou du benzène pour le nettoyage.<br />
Nettoyez l’appareil avec un chiffon sec et doux.<br />
4 Pour économiser la pile<br />
Si vous ne pensez pas utiliser cet appareil durant une longue période, retirez la pile.<br />
Mettez l’accordeur hors tension tant que vous n’en avez pas besoin.<br />
5 Pile<br />
Utilisez une pile 3V de taille AAA (R03, LR03, L30) × 2<br />
Fonctions de l’accordeur<br />
1 Bouton POWER pour la mise sous/hors tension<br />
En appuyant plusieurs fois sur le bouton POWER, vous mettez l’appareil<br />
sous et hors tension.<br />
Au bout de 20 minutes, l’accordeur se coupe <strong>auto</strong>matiquement.<br />
2 Bouton MODE pour la sélection AUTO/MAN & GUITAR/BASS<br />
Le bouton MODE permet de sélectionner plusieurs modes que vous choisissez en<br />
appuyant plusieurs fois sur ce bouton. Le nom du mode choisi apparaît à l’écran.<br />
AUTO GUITAR- MAN GUITAR –AUTO BASS- MAN BASS – AUTO GUITAR<br />
3 Bouton FUNCTION pour la sélection de la fonction souhaitée<br />
Le bouton FUNCTION permet de sélectionner plusieurs modes que<br />
vous choisissez en appuyant plusieurs fois sur ce bouton.<br />
PITCH - FLAT - PITCH - FLAT<br />
REMARQUE La fonction choisie est uniquement affichée à l’écran si<br />
vous passez en mode MAN.<br />
4 Bouton ADJUST pour les modes FUNCTION<br />
i) Choix de la hauteur: permet de choisir la hauteur de référence (calibrage)<br />
Choisissez la fréquence de référence en appuyant plusieurs fois sur le bouton ADJUST.<br />
Plage de réglage: 435Hz - 445Hz (par pas de 1Hz)<br />
ii) Choix de la note: permet de choisir la note devant être accordée<br />
Si vous préférez accorder votre instrument en mode MAN, vous<br />
devez choisir la note avec le bouton ADJUST.<br />
Notes à accorder: 5A, 4D, 3G, 2B, 1E, 7B, 6E (<strong>guitar</strong>e électrique & acoustique)<br />
3A, 2D,1G, HC, LB, 4E (<strong>guitar</strong>e <strong>bass</strong>e)<br />
iii) Réglage alternatif: permet de choisir un mode "bémol"<br />
Le mode "Flat" permet d’accorder votre instrument par rapport à<br />
une référence abaissée d’1 ou de 2 demi-tons ( / ).<br />
Utilisez le bouton ADJUST pour choisir le nombre de demi-tons ( / )<br />
correspondant au décalage souhaité. Ce réglage est affiché à l’écran.<br />
5 Bouton SOUND pour la reproduction des notes de référence<br />
Reliez la prise OUTPUT de l’accordeur à l’entrée ad hoc de votre amplificateur<br />
si vous souhaitez entendre les notes de référence pendant l’accord.<br />
Lorsque vous appuyez sur le bouton SOUND, le mode SOUND est<br />
affiché à l’écran. Dans ce cas, les aiguilles d’accord disparaissent.<br />
Les notes pouvant être jouées sont 5A-4D-3G-2B-1E-7B-6E;<br />
choisissez-les en appuyant plusieurs fois sur le bouton ADJUST.<br />
Tant que le bouton FUNCTION indique le mode Sound, les notes choisies<br />
peuvent être abaissées d’1 ou de 2 demi-tons ( / ) en sélectionnant<br />
le mode "Flat" et en appuyant ensuite sur le bouton ADJUST.<br />
Appuyez une fois de plus sur le bouton SOUND pour repasser en mode d’accord.<br />
6 Affichage à cristaux liquides (LCD)<br />
* Réglage initial de l’écran LCD: MODE= AUTO, FUNCTION= PITCH,<br />
Calibrage= 440Hz<br />
Ces réglages sont utilisés chaque fois que vous mettez l’accordeur sous tension.<br />
a Mode: AUTO GUITAR/MAN GUITAR/AUTO BASS/MAN BASS<br />
b Notes pour <strong>guitar</strong>es électriques/acoustiques/<strong>bass</strong>es, violons, etc.<br />
c Indicateur de fonction<br />
d /#: Lorsque la corde est bien accordée, l'aiguille s'arrête au milieu<br />
("0"). Ensuite, l'écran LCD affiche /#.<br />
Si la corde est trop <strong>bass</strong>e, apparaît à l’écran LCD.<br />
Si la corde est trop haute, # apparaît à l’écran LCD.<br />
e Indicateur "trop bas"<br />
f Hauteur de référence (calibrage) : Indique la fréquence de référence en vigueur.<br />
g Mètre<br />
Lorsqu’une corde est accordée, l’aiguille se trouve au milieu ("0").<br />
7 Prise INPUT pour instruments a cordes électriques<br />
Pour accorder des instruments à cordes électriques, vous devez connecter<br />
la sortie de l’instrument à la prise INPUT de l’accordeur. Lorsque vous<br />
connectez un instrument à la prise INPUT, le MICROPHONE est coupé.<br />
8 Prise OUTPUT pour la connexion à un amplificateur<br />
Pour entendre le signal de l’instrument, vous devez connecter la prise OUT-<br />
PUT de l’accordeur à l’entrée ad hoc d’un amplificateur. Le signal de<br />
l’instrument est toujours retransmis par la sortie de l’accordeur. Peu importe<br />
donc si ce dernier est allumé ou éteint. Avant de vous mettre à jouer pour de<br />
bon, mettez l’accordeur hors tension pour éviter tout souffle ou bourdonnement.<br />
9 MICROPHONE pour instruments à cordes acoustiques:<br />
Si vous souhaitez accorder des instruments à cordes acoustiques,<br />
rapprochez-en le plus possible l’accordeur. Le MICROPHONE est<br />
coupé dès que vous connectez un instrument à la prise INPUT.<br />
0 Témoins de référence pour l’accord<br />
Ces témoins vous aideront à voir si votre instrument est bien accordé.<br />
Lorsqu’une corde est accordée, l’aiguille se trouve au milieu ("0").<br />
De plus, le témoin vert au milieu s’allume. Si la corde est trop <strong>bass</strong>e, le témoin<br />
rouge à gauche s’allume. Si la corde est trop haute, le témoin rouge à droite s’allume.<br />
Conseils pour bien accorder votre instrument<br />
Pour accorder votre instrument avec le maximum de précision<br />
• Evitez, dans la mesure du possible, de placer votre accordeur près d’un<br />
poste de radio ou de télévision. De telles unités peuvent en effet entraver<br />
la détection de la hauteur effectuée par le micro-ordinateur de l’accordeur.<br />
• Réglez la commande de volume de l’instrument au milieu pour<br />
obtenir un niveau d’entrée acceptable du côté de l’accordeur.<br />
• Evitez de frapper les cordes et de les pincer de façon exagérée.<br />
• Pour accorder rapidement toutes les cordes, il convient d’étouffer<br />
chaque fois les cordes dont vous n’avez pas besoin. De cette façon,<br />
seule la hauteur souhaitée est analysée.<br />
Accord <strong>auto</strong>matique en mode Auto<br />
1. Instruments à cordes électriques: Reliez le câble de l’instrument à la prise<br />
INPUT de l’accordeur (si possible) et réglez le volume de l’instrument au<br />
milieu. Pour entendre le signal de l’instrument, vous devez connecter la<br />
prise OUTPUT de l’accordeur à l’entrée ad hoc d’un amplificateur.<br />
Instruments à cordes acoustiques: Rapprochez l’instrument le plus possible<br />
du microphone (MIC) de l’accordeur.<br />
2. Appuyez sur le bouton POWER pour mettre l’accordeur sous ten-<br />
sion. L’écran LCD s’allume et passe <strong>auto</strong>matiquement en mode<br />
AUTO. La fréquence de référence est réglée à 440Hz.<br />
3. En cas de besoin, vous pouvez modifier la hauteur avec le bouton PITCH.<br />
4. Pour accorder une <strong>guitar</strong>e électrique ou acoustique, voire un violon, etc., il vaut<br />
mieux commencer par la corde la plus grave. Pour accorder une <strong>guitar</strong>e <strong>bass</strong>e,<br />
appuyez deux fois sur le bouton MODE pour que "AUTO-BASS" apparaisse à l’écran.<br />
Essayez ensuite d’accorder la corde la plus grave.<br />
5. Si l’écart entre l’accord actuel de la corde choisie est supérieur à –50 ou +50<br />
cent par rapport à la hauteur juste, changez la hauteur de cette corde jusqu’à ce<br />
que l’un des témoins s’allume et que le nom de la note soit affiché à l’écran. Dès<br />
que la hauteur de la note se trouve à moins de –50 ou +50 cents de la hauteur<br />
juste, changez l’accord jusqu’à ce que l’aiguille se trouve au centre ("0").<br />
6. Lorsqu’une corde est accordée, l’aiguille se trouve au milieu ("0"), alors que l’écran LCD affiche<br />
" /#". De plus, le témoin vert au milieu s’allume. L’accord de la corde est désormais parfait.<br />
Accord manuel en mode MAN<br />
1. Instruments à cordes électriques: Reliez le câble de l’instrument à la prise<br />
INPUT de l’accordeur (si possible) et réglez le volume de l’instrument au<br />
milieu. Pour entendre le signal de l’instrument, vous devez connecter la<br />
prise OUTPUT de l’accordeur à l’entrée ad hoc d’un amplificateur.<br />
2. Appuyez sur le bouton POWER pour mettre l’accordeur sous tension. L’écran LCD s’allume<br />
et passe <strong>auto</strong>matiquement en mode AUTO. La fréquence de référence est réglée à 440Hz.<br />
3. En cas de besoin, vous pouvez modifier la hauteur avec le bouton PITCH.<br />
4. Pour accorder une <strong>guitar</strong>e électrique ou acoustique, un violon, etc., appuyez<br />
une fois sur le bouton MODE. L’écran affiche alors "MAN GUITAR" & "5A" (note).<br />
Utilisez le bouton ADJUST pour choisir le nom de la note devant être accordée.<br />
Dès que le nom de la note que vous souhaitez accorder apparaît à l’écran LCD,<br />
accordez la corde en question. Pour accorder une <strong>guitar</strong>e <strong>bass</strong>e, appuyez trois<br />
fois sur le bouton MODE pour que "MAN-BASS" & "3A" apparaissent à l’écran.<br />
Choisissez ensuite la note devant être accordée en appuyant une ou plusieurs<br />
fois sur le bouton ADJUST. Si le nom de la note que vous souhaitez accorder<br />
est affiché à l’écran LCD, accordez la corde en question «depuis le bas».<br />
5. Si le nom de la note que vous souhaitez accorder est affiché à l’écran LCD. Dès<br />
que la hauteur de la note se trouve à moins de –50 ou +50 cents de la hauteur<br />
juste, changez l’accord jusqu’à ce que l’aiguille se trouve au centre ("0").<br />
6. Lorsqu’une corde est accordée, l’aiguille se trouve au milieu ("0"),<br />
alors que l’écran LCD affiche " /#". De plus, le témoin vert au mi-<br />
lieu s’allume. L’accord de la corde est désormais parfait.<br />
Accord avec des notes pilote<br />
1. Appuyez sur le bouton SOUND pour sélectionner le mode MAN GUITAR<br />
et activer la fonction NOTE.<br />
A côté de "NOTE" apparaît "A5" et vous entendez cette note.<br />
2. Comparez la hauteur de votre instrument avec celle de la note jouée via l'amplificateur<br />
(relié à la prise OUTPUT de l'accordeur) et effectuez les changements qui s'imposent.<br />
3. En cas de besoin, vous pouvez modifier les réglages NOTE et FLAT<br />
pour accorder l'instrument de la manière escomptée.<br />
Remarque: Le volume du signal dépend très fort de l'impédance de l'instrument connecté.<br />
Lorsque la commande VOLUME ou TONE CONTROL de l’instrument se trouve<br />
tout à fait à gauche, aucun signal n’est transmis.<br />
Installer et remplacer la pile<br />
1. Faites glisser le couvercle au dos de<br />
l’accordeur vers la flèche en appuyant dessus.<br />
2. Insérez une pile de taille AAA (R03,<br />
LR03, L30) × 2 - 3V dans l’unité pour<br />
piles, en respectant la polarité, puis<br />
remettez l’unité dans le compartiment.<br />
3. Faites glisser le couvercle dans<br />
le sens opposé.<br />
* Un des avantages de cet accordeur<br />
est son écran LCD légèrement<br />
incliné et dès lors plus lisible.<br />
Fiche technique<br />
Mode: accord <strong>auto</strong>matique et manuel<br />
Fréquences reconnues : A0 (27.50Hz)~C8 (4,186.00Hz)<br />
Notes à accorder: 5A, 4D, 3G, 2B, 1E, 7B, 6E (<strong>guitar</strong>e électrique & acoustique)<br />
3A, 2D,1G, HC, LB, 4E (<strong>guitar</strong>e <strong>bass</strong>e)<br />
Fonction Flat ("bémol") : 1~2 demi-tons ( / )<br />
Précision: ±1 cent<br />
Calibrage : 435 ~ 445Hz (par pas de 1Hz)<br />
Témoins : écran LCD, 3 témoins à DEL<br />
Entrées : microphone à condensateur pour instruments acoustiques,<br />
prise INPUT pour instruments électriques<br />
Sorties : prise OUTPUT pour la connexion à un amplificateur<br />
Alimentation: pile 3V de taille AAA (R03, LR03, L30) × 2<br />
Dimensions: 105 (L) × 68 (P) × 25 (H) mm<br />
Poids : 120g (pile comprise)<br />
* Les caractéristiques et la présentation sont susceptibles d’être<br />
modifiés sans avis préalable.<br />
Par la présente, nous certifions que l’accordeur pour Guitar & Bass Tuner<br />
GU20 se conforme à: Directive du Conseil 89/336/EEC (directive EMC)<br />
Normes étant d’application :<br />
EN50081-1 : .92<br />
Compatibilité électromagnétique – norme générale d’émission.<br />
Partie 1:<br />
Résidentiel, commercial, industrie légère.<br />
EN50082-1 : 01.97<br />
Compatibilité électromagnétique – norme générale d’immunité.<br />
Partie 1:<br />
Résidentiel, commercial, industrie légère.<br />
ACCORDEUR AUTOMATIQUE POUR GUITARE ET BASSE<br />
GU20<br />
MODE D’EMPLOI<br />
Achtung<br />
1 Kurzschlüsse, elektrische Schläge und Fehlfunktionen vermeiden:<br />
Öffnen Sie niemals das Gerät.<br />
Lagern Sie das Gerät nicht an extrem heißen oder feuchten Orten, wie beispielsweise<br />
auf einer Heizung, im direkten Sonnenlicht, im Bad oder auf einem feuchten Fußboden.<br />
Setzen Sie das Gerät keinen starken Erschütterungen aus.<br />
Lagern Sie das Gerät nicht an staubigen oder verschmutzten Orten.<br />
Bedienen Sie das Gerät nicht mit nassen Händen.<br />
2 Schäden vermeiden<br />
Bedienen Sie die Steuerelemente nicht mit übermäßiger Kraft.<br />
Achten Sie darauf, das Stimmgerät nicht fallen zu lassen.<br />
3 Reinigung<br />
Verwenden Sie kein Lösemittel oder Alkohol zur Reinigung, sondern<br />
nur ein trockenes, sauberes Tuch.<br />
4 Batterieverbrauch minimieren<br />
Nehmen Sie die Batterie aus dem Stimmgerät heraus, sollte es längere<br />
Zeit nicht benutzt werden.<br />
Schalten Sie das Stimmgerät immer aus, wenn es nicht benutzt wird.<br />
5 Batterie<br />
Es werden zwei 3-V-Batterien im AAA-Format benötigt (R03, LR03, L30).<br />
Merkmale und Funktionen<br />
1 Taste POWER zum Ein- und Ausschalten<br />
Das Gerät lässt sich mit dieser Taste einschalten und durch erneutes<br />
Drücken wieder ausschalten. Es schaltet sich <strong>auto</strong>matisch aus, wenn<br />
es 20 Minuten lang nicht benutzt wurde.<br />
2 Taste MODE für die Wahl von AUTO/MAN und GUITAR/BASS<br />
Die folgenden Betriebsarten werden nacheinander bei jedem Drücken<br />
der Taste MODE auf dem LCD angezeigt.<br />
AUTO GUITAR- MAN GUITAR –AUTO BASS- MAN BASS – AUTO GUITAR<br />
3 Taste FUNCTION zur Funktionswahl<br />
Die folgenden Modi werden nacheinander bei jedem Drücken der Taste<br />
FUNCTION auf dem LCD angezeigt:<br />
PITCH - FLAT - PITCH - FLAT<br />
Die Funktion NOTE wird auf dem LCD angezeigt, wenn Sie die Betriebsart MAN wählen.<br />
4 Taste ADJUST für die FUNCTION-Betriebsarten<br />
i) Tonhöheneinstellung: Einstellung der Referenztonhöhe (Kalibrierung)<br />
Das Gerät kann durch Drücken der Taste ADJUST kalibriert werden.<br />
Kalibrierungsbereich: 435 Hz bis 445 Hz (in 1-Hz-Schritten)<br />
ii) Toneinstellung: Wahl der zu stimmenden Tons<br />
Wenn Sie in der Betriebsart MAN stimmen wollen, können Sie den zu<br />
stimmenden Ton durch wiederholtes Drücken der Taste ADJUST wählen.<br />
Töne: 5A, 4D, 3G, 2B, 1E, 7B, 6E (E-Gitarre und akustische Gitarre)<br />
3A, 2D,1G, HC, LB, 4E (Bassgitarre)<br />
iii) Tiefalterationsmodus<br />
Sie können den Tiefalterationsmodus (Flat Mode) verwenden, um<br />
auf eine Tonhöhe zu stimmen, die gegenüber dem gewählten Ton 1<br />
oder 2 Halbtöne ( / ) tiefer ist als der Bezugston.<br />
Mit der Taste ADJUST können Sie die Halbtöne ( / ) wählen, die Sie verringern<br />
wollen, und die Tiefalterationsmodi werden nacheinander auf dem LCD angezeigt.<br />
5 Taste SOUND für Klangausgabe<br />
Verbinden Sie die Buchse OUTPUT des Stimmgeräts mit einem<br />
Verstärkereingang, und Sie können dann Ihre Instrumente stimmen und<br />
dabei die gewohnte Wiedergabe über den Verstärker hören.<br />
Wenn Sie die Taste SOUND drücken, wird die Betriebsart SOUND auf<br />
dem LCD angezeigt; die Zeigernadeln werden nicht mehr angezeigt.<br />
Die Töne werden in der Abfolge 5A-4D-3G-2B-1E-7B-6E mit der Taste ADJUST „durchgeschaltet“.<br />
Wenn Sie den Tiefalterationsmodus (Flat Mode) - mit der Taste FUNC-<br />
TION in der Betriebsart Sound - gewählt haben, hören Sie, wie sich die<br />
Tonhöhe mit jedem Drücken der Adjust-Taste um einen Halbton ( / ).<br />
Wenn Sie die Taste SOUND nochmals drücken, kehrt das Gerät in die Betriebsart Tuning zurück.<br />
6 Flüssigkristallanzeige (Liquid Crystal Display - LCD)<br />
* Standardeinstellung auf dem LCD: MODE = AUTO GUITAR,<br />
FUNCTION = PITCH, Calibration = 440Hz<br />
Diese Einstellungen sind nach dem Einschalten des Geräts aktiv.<br />
a Betriebsart: AUTO GUITAR/ MAN GUITAR /AUTO BASS/ MAN BASS<br />
b Ton von E-Gitarre, akustische Gitarre, Bassgitarre und Violine usw.<br />
c Funktionsanzeige<br />
d /#: Wenn die Saite gestimmt ist, stoppt die Zeigernadel auf dem<br />
mittleren “0”, und gleichzeitig wird dann /# auf dem LCD angezeigt.<br />
Wenn die Saite zu tief gestimmt ist, wird auf dem LCD angezeigt.<br />
Wenn die Saite zu hoch gestimmt ist, wird # auf dem LCD angezeigt.<br />
e Flat-Anzeige<br />
f Referenztonhöhe (Kalibrierung): zeigt die aktuelle Kalibrierungseinstellung an.<br />
g Stimmanzeige<br />
Wenn die Saite gestimmt ist, stoppt die Zeigernadel auf der mittleren “0”.<br />
7 Buchse INPUT für elektrische Saiteninstrumente<br />
Wenn Sie elektrische Saiteninstrumente stimmen wollen, schließen Sie das<br />
Signalkabel oder das Pickup des Instruments an die Buchse INPUT des Stimmgeräts.<br />
Solange an der Buchse INPUT ein Instrument angeschlossen ist, ist das Mikrofon außer Funktion.<br />
8 Buchse OUTPUT zum Anschluss an einen Verstärker<br />
Wenn Sie den Klang des Instruments hören wollen, schließen Sie die Buchse<br />
OUTPUT des Stimmgeräts an die Eingangsbuchse eines Verstärkers. Das In-<br />
strument können Sie auch dann über den Verstärker hören, wenn das Stimmgerät<br />
ausgeschaltet ist. Wenn Sie das Instrument spielen, sollten Sie das Stimmgerät<br />
ausschalten, um eventuelle Störungen durch das Stimmgerät auszuschließen.<br />
9 Mikrofon für akustische Saiteninstrumente<br />
Wenn Sie ein akustisches Saiteninstrument stimmen wollen, platzieren Sie dieses<br />
Stimmgerät nahe am Instrument, um ein präzises Stimmen zu ermöglichen. Das Mikrofon<br />
ist außer Funktion, wenn an der Buchse INPUT ein Instrument angeschlossen ist.<br />
0 Stimm-LEDs<br />
Diese LEDs unterstützen den Stimmvorgang.<br />
Ist die gewünschte Stimmung erreicht, stoppt die Anzeigenadel auf<br />
der mittleren “0” und die grüne LED in der Mitte leuchtet permanent.<br />
Wenn die Tonhöhe der Saite zu tief ist („flat“) ist, leuchtet die linke rote LED auf.<br />
Wenn die Tonhöhe der Saite zu hoch ist („sharp“), leuchtet die linke rote LED auf.<br />
Stimmen<br />
Für präzises Stimmen beachten<br />
• Verwenden Sie das Stimmgerät möglichst nicht in unmittelbarer Nähe von<br />
potentiellen Störquellen wie Radios oder Fernsehgeräten. Solche Geräte können<br />
die Aufnahme des Klangs durch den internen Microcomputer beeinflussen.<br />
• Stellen Sie gegebenenfalls die Lautstärkeregler von elektrischen Saiteninstrumenten<br />
auf die Mittelstellung, um eine Übersteuerung des Stimmgeräte-Eingangs zu vermeiden.<br />
• Zupfen Sie nicht zu laut und hart.<br />
• Wenn Sie sofort die nächste Saite stimmen wollen, sollten Sie zuvor<br />
nachklingende Saiten mit der flachen Hand abdämpfen.<br />
Automatisches Stimmen in der Betriebsart AUTO<br />
1. Elektrische Saiteninstrumente: Stecken Sie das Signalkabel des Instruments in die<br />
Buchse INPUT des Stimmgeräts, und, wenn möglich, regeln Sie die Lautstärke des<br />
Instruments auf die Mittelstellung. Wenn Sie den Klang des Instruments hören wollen,<br />
verbinden Sie die Buchse OUTPUT des Stimmgeräts mit Eingang eines Verstärkers.<br />
Akustische Saiteninstrumente: Platzieren Sie das Instrument nahe<br />
des Stimmgerät-Mikrofons.<br />
2. Schalten Sie das Stimmgerät mit der Taste POWER ein. Das LCD leuchtet<br />
auf, und das LCD wird <strong>auto</strong>matisch in die Betriebsart AUTO GUITAR<br />
versetzt und auf die Standardreferenztonhöhe von 440 Hz eingestellt.<br />
3. Stellen Sie, falls nötig, die Referenztonhöhe mit der Taste PITCH ein.<br />
4. Wenn Sie eine E-Gitarre, eine akustische Gitarre, eine Violine usw. stimmen wollen, beginnen<br />
Sie dabei mit der tiefsten Saite. Wenn Sie eine Bassgitarre stimmen wollen, drücken Sie<br />
dazu zweimal die Taste MODE; dann wird AUTO-BASS auf dem LCD angezeigt.<br />
Beginnen Sie das Stimmen mit der tiefsten Saite.<br />
5. Wenn die Höhe der zu stimmenden Saite mehr als -50 oder +50 Cents von der exakten<br />
Höhe abweicht, stimmen Sie das Instrument, bis eine der LEDs aufleuchtet und der<br />
Ton, auf den Sie stimmen wollen, auf dem LCD angezeigt wird. Wenn sich der Ton<br />
innerhalb eines Bereichs von -50 bis +50 Cents befindet, spannen oder lösen Sie die<br />
Saite langsam, bis sich die Anzeigenadel auf der „0“ in der Mitte befindet.<br />
6. Wenn die Nadel der LCD-Anzeige auf der mittleren “0” stoppt, die grüne LED in der Mitte<br />
permanent leuchtet und auf dem LCD /# erscheint, ist die gewünschte Stimmung erreicht.<br />
Manuelles Stimmen in der Betriebsart MAN<br />
1. Elektrische Saiteninstrumente: Stecken Sie das Signalkabel des Instruments in die<br />
Buchse INPUT des Stimmgeräts, und, wenn möglich, regeln Sie die Lautstärke des<br />
Instruments auf die Mittelstellung. Wenn Sie den Klang des Instruments hören wollen,<br />
verbinden Sie die Buchse OUTPUT des Stimmgeräts mit Eingang eines Verstärkers.<br />
2. Schalten Sie das Stimmgerät mit der Taste POWER ein. Das LCD leuchtet<br />
auf, und das LCD wird <strong>auto</strong>matisch in die Betriebsart AUTO GUITAR<br />
versetzt und auf die Standardreferenztonhöhe von 440 Hz eingestellt.<br />
3. Stellen Sie, falls nötig, die Referenztonhöhe mit der Taste PITCH ein.<br />
4. Wenn Sie eine E-Gitarre, eine akustische Gitarre, eine Violine usw. stimmen wollen, drücken<br />
Sie die Taste MODE ein Mal; MAN GUITAR & 5A(Note) wird dann auf dem LCD angezeigt.<br />
Wählen Sie dann mit der Taste Adjust den Ton, auf den Sie stimmen wollen. Sobald der Ton,<br />
auf den Sie stimmen wollen, auf dem LCD angezeigt wird, beginnen Sie mit dem Stimmen.<br />
Wenn Sie eine Bassgitarre stimmen wollen, drücken Sie Taste MODE drei Mal; MAN-BASS<br />
& 3A wird auf dem LCD angezeigt. Wählen Sie dann den Ton, den Sie stimmen wollen,<br />
indem Sie entsprechend oft die Taste Adjust drücken. Sobald der Ton, den Sie stimmen<br />
wollen, auf dem LCD angezeigt wird, beginnen Sie das Stimmen mit der tiefsten Saite.<br />
5. Wenn die Tonhöhe des Tons, den Sie stimmen wollen, auf dem LCD angezeigt wird. Wenn<br />
sich der Ton innerhalb eines Bereichs von -50 bis +50 Cents befindet, spannen oder lösen<br />
Sie die Saite langsam, bis sich die Anzeigenadel auf der „0“ in der Mitte befindet.<br />
6. Wenn die Nadel der LCD-Anzeige auf der mittleren “0” stoppt, die grüne LED<br />
in der Mitte permanent leuchtet und auf dem LCD /# erscheint, ist die<br />
gewünschte Stimmung erreicht.<br />
Stimmen nach Referenzton<br />
1. Drücken Sie die Taste SOUND. Die Betriebsart (MODE) wird auf MAN GUITAR<br />
umgeschaltet, und die Funktion (FUNCTION) wird auf NOTE umgeschaltet.<br />
Als NOTE wird A5 angezeigt, und der entsprechende Klang wird erzeugt.<br />
2. Vergleichen Sie nach Gehör die Tonhöhe des Tons, der über die<br />
Buchse OUTPUT ausgegeben wird, mit der Tonhöhe des Instru-<br />
ments, um bei Bedarf danach das Instrument grob zu stimmen.<br />
3. Falls gewünscht, wählen Sie zum Stimmen NOTE oder FLAT.<br />
Hinweis: Die Lautstärke sinkt dabei möglicherweise; dies ist<br />
abhängig von der Ausgangsimpedanz des Instruments.<br />
Es erfolgt keine Klangausgabe, wenn sich der Regler VOLUME oder<br />
TONE CONTROL am Instrument in der äußerst linken Stellung befindet.<br />
Einsetzen und tauschen der Batterien<br />
1. Schieben Sie die Batteriefachabdeckung<br />
auf der Unterseite in Pfeilrichtung, während<br />
Sie leicht auf die Abdeckung drücken.<br />
2. Legen Sie zwei Batterien (3 V, AAA<br />
(R03, LR03, L30)) korrekt<br />
ausgerichtet in das Batteriefach ein.<br />
3. Schieben Sie die<br />
Batteriefachabdeckung wieder zu.<br />
* Das LCD dieses Stimmgeräts lässt sich<br />
bequem ablesen, da es etwas geneigt ist.<br />
Technische Daten<br />
Betriebsarten: <strong>auto</strong>matisches und manuelles Stimmen (AUTO und MAN)<br />
Stimmbereich: A0 (27,50 Hz) bis C8 (4.186,00 Hz)<br />
Töne: 5A, 4D, 3G, 2B, 1E, 7B, 6E (E-Gitarre und akustische Gitarre)<br />
3A, 2D,1G, HC, LB, 4E (Bassgitarre)<br />
Tiefalterationsmodus: 1 bis 2 Halbtöne ( / )<br />
Genauigkeit: +/- 1 Cent<br />
Kalibrierung: 435 - 445 Hz (1-Hz-Schritte)<br />
Anzeigen: LCD und 3 LEDs<br />
Eingang: Kondensatormikrofon für akustische Instrumente,<br />
Eingangsbuchse für elektrische Instrumente<br />
Ausgang: Ausgangsbuchse zum Anschluss an einen Verstärker<br />
Stromversorgung: zwei 3-V-Batterien - AAA (R03, LR03, L30)<br />
Abmessungen: 105 (B) × 68 (T) × 25 (H) mm<br />
Gewicht: 120 g (mit Batterie)<br />
* Zur Vornahme von Produktverbesserungen behalten wir uns vor, Gestaltung<br />
und technische Daten jederzeit ohne besonderen Hinweis zu ändern.<br />
Hiermit wird die Konformität des Gitarren- & Bass-Stimmgeräts GU20<br />
mit der EU-Richtlinie 89/336/EEC bestätigt.<br />
Relevante Vorschriften:<br />
EN50081-1: .92<br />
Elektromagnetische Kompatibilität – allgemeiner Emissionsvorschriften.<br />
Teil 1:<br />
Haushaltsgeräte, gewerbliche und leichtindustrielle Ausrüstung.<br />
EN50082-1: 01.97<br />
Elektromagnetische Kompatibilität – allgemeine Verträglichkeitsvorschriften.<br />
Teil 1:<br />
Haushaltsgeräte, gewerbliche und leichtindustrielle Ausrüstung.<br />
AUTOMATISCHES STIMMGERÄT FÜR GITARRE UND BASS<br />
GU20<br />
BEDIENUNGSANLEITUNG


