DK GB D N FIN S - Calix
DK GB D N FIN S - Calix
DK GB D N FIN S - Calix

You also want an ePaper? Increase the reach of your titles
YUMPU automatically turns print PDFs into web optimized ePapers that Google loves.
M5T 194A<br />
DEUTSCH<br />
A. Einbauhinweise sorgfältig durchlesen. Sämtliche Details inclusive Zubehör<br />
laut Pkt A kontrollieren. Nur zur Übersicht - keine Wiedergabe von<br />
Einzel-heiten.<br />
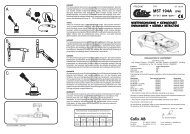
B. Einbau des Heizelementes<br />
1. Kühlwasser ablassen.<br />
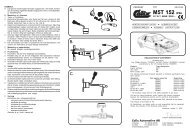
2. Verschluß der Bohrung im Motorblock herausnehmen, Bild. Dazu mit<br />
schmalem Werkzeug (Dorn) seitlich auf den Verschluß schlagen, bis<br />
dieser sich schräg stellt. Danach mit Zange herausnehmen, Bild B.<br />
3. Einbaukabel (mit Anbaustecker) von außen in den Motorraum ziehen.<br />
Steckverbindung von Heizung und Kabel bis zum Anschlag ineinanderschieben<br />
O-Ring muß völlig dichtschließen. Zu beachten: Etwas Öl auf den<br />
O-Ring geben. Die Zusammenkupplung wird dann erleichtert. Verbindung<br />
muß unbedingt auf diese Weise hergestellt werden.<br />
4. Etwas Öl auf den O-Ring geben und Heizer durch das Loch schieben. Darauf<br />
achten, daß der O-Ring nicht beschädigt wird. Falls nötig, Außenkante<br />
des Lochs abschleifen, damit der O-Ring nicht durchgewetzt wird. Danach<br />
Hauptmutter anziehen, Bild C. (Achtung! Drehmoment 3,5 Nm).<br />
5. Wasser einfüllen und Kühlsystem lüften. Hinweise der Kfz-Betriebsanleitung<br />
beachten. Motor laufen lassen und Einbaustelle auf Dichtigkeit<br />
prüfen.<br />
C. Einbau des steckers<br />
1. Siehe mitgelieferte montageanleitung.<br />
D. Probelauf<br />
1. Kühlwasserniveau kontrollieren.<br />
2. Kühlsystem sorgfältig entlüften, da Heizpatrone sonst durchbrennen<br />
kann.<br />
3. Dichtheit, auch bei warmen Motor überprüfen.<br />
4. Nur eine geerdete Steckdose verwenden. Steckverbindungen überprüfen.<br />
Funktion des Gerätes kontrollieren - beim Heizvorgang kann ein leichtes<br />
Siedegeräusch vernommen werden.<br />
E. Wichtig<br />
1. Immer ausreichend Frostschutzmittel beimischen.<br />
2. Motorheizer nur an eine geerdete Steckdose anschliessen. Der Mantel<br />
der Motorheizung, die Karosserie und der Schutzleiter der Steckdose<br />
müssen unbedingt leitend miteinander verbunden sein.<br />
3. Nur <strong>Calix</strong> MS Kabel für Anschluss ans Netz verwenden.<br />
4. Das Kabel regelmäßig auf Beschädigungen oder Alterungserscheinungen<br />
kontrollieren. Ein beschädigtes Kabel muß sofort ausgetauscht werden.<br />
5. Installationsteile dürfen Motorenteile, die erwärmt werden oder in bewegung<br />
sind, nicht berühren. Der Abstand zum Auspuffsystem soll mindestens<br />
50 mm (auch bei Turbo-Aggregat) betragen - sonst den <strong>Calix</strong> Strahlungsschutz<br />
verwenden.<br />
6. Einbaukabel und eventuelle Verbindungskabel müssen dicht neben den<br />
Verbindungsstecker mit den mitgelieferten Klammer befestigt werden.<br />
F. Warnung<br />
Abbrennen des Heizelementes (des Widerstandsdrahtes) kann erfolgen<br />
bei<br />
• Heizer an stossartige (pulsierende) Spannung angeschlossen wird<br />
• unsauberer Kühlflüssigkeit<br />
• ungenügender Kühlwassermenge<br />
• nicht entlüftetem Kühlwassersystem<br />
• Verwendung von Kühlerzement<br />
In diesen Fällen kann keine Garantileistung erfolgen.<br />
ENGLISH<br />
A. Read the assembly instructions carefully. Check that all parts and fittings<br />
illustrated under ”A” are included. Survey view only, without detailed<br />
reproduction.<br />
B. Installation of the heater<br />
1. Drain the coolant.<br />
2. Remove the frost plug which covers the hole as shown in the figure. This<br />
can be done by knocking the edge of the plug with a drift or similar. The<br />
plug then turns and can be removed with polygrip pliers, figure B.<br />
3. Pull the cable with socket for the engine heater into the engine compartment.<br />
Press the plug-in connection between the engine heater and cable<br />
fully together so that the O-ring seals properly and there is no gap. Apply<br />
a few drops of oil on the O-ring. The connection can then be made easier.<br />
It is very important that connection is made this way.<br />
4. Apply a few drops of engine oil on the O-ring and insert the heater in<br />
the hole. Take care not to damage the O-ring. If necessary burr must be<br />
removed from the outer edge of the hole so that the O-ring is not torn.<br />
Then tighten the centrenut, figure C. (Note! Tighten torque 3,5 Nm).<br />
5. Fil up with coolant and vent the cooling system, see the instruction book.<br />
Run the engine and check that there is no leakage.<br />
C. Fitting of lead-in<br />
1. See separate mountinginstruction.<br />
D. Test-running<br />
1. Check that the cooling system is full of coolant.<br />
2. Make sure that all air has been removed from the cooling system as the<br />
heater element will immidiately burn out if surrounded by air.<br />
3. Check that all seals are tight even with the engine warm.<br />
4. Check the heater by connecting it to an earthed point. A low sizzling<br />
noise will be heard when the water on the surface of the heater element<br />
boils.<br />
E. Important<br />
1. Always use anti-freeze in the cooling system.<br />
2. The engine heater must only be connected to an earthed point. There must<br />
always be a continuous internal earth connection running from the engine<br />
heater casing through the body and right up to the earthed point.<br />
3. Use only <strong>Calix</strong> MS kabel for connection to the mains network.<br />
4. Inspect the cable periodically for damage or ageing. A damaged cable<br />
must be replaced without delay.<br />
5. No parts of the installation must be allowed to come into contact with<br />
moving or hot parts of the engine. The distance to all parts of the exhaust<br />
system must be at least 50 mm (2”). (Also applicable for the turbo unit if<br />
any.) Otherwise <strong>Calix</strong> Heat Shield must be used.<br />
F. Warning<br />
The heater element can be burnt out if:<br />
• the heater is connected to intermittent (pulsating) voltage<br />
• the coolant is dirty<br />
• there is insufficient coolant<br />
• there is air in the system<br />
• there is sludge in the cooling system<br />
M5T 194A<br />
SUOMI<br />
A. Tutustu asennusohjeesseen huolellisesti ja tarkista, että kaikki kohdassa<br />
A, mainitut osat ovat mukana. Yleiskuvia, ei yksityiskohtaisia.<br />
B. Lämmittimen asennus<br />
1. Poistakaa jäähdyttäjänneste.<br />
2. Poistakaa kuvassa osoitettua reikää peittävä tiivistelevy esim. lyömällä<br />
vasaralla ja jollakin teräasella levyn reunaa. Levy vääntyy tällöin ja<br />
voi-daan helposti poistaa pihdeillä.<br />
3. Lämmittimen kaapeli pistokkeineen vedetään etupuskurista moottoritilaan<br />
ja moottorilämmittimeen.Työnnä pikallitäntä, joka on moottorilämmittimeen<br />
ja kaapelin välillä, kokonaan yhteen niin että O-rengas<br />
tiivistää kunnolla. HUOM. Tiputa muutama pisara öljya O-renkaan<br />
päälle. Tämä helpottaa kytkentää. On erittäin tärkeää että kytkentää<br />
tapahtuu tällä tavalla.<br />
4. Tiputa muutama pisara öljyä O-renkaan päälle ja vie lämmitin reikään.<br />
Katso ettei O-rengas vaurioidu, tasoita reuna tarvittaessa. Kiinnitä<br />
lämmitin kiertämällä mutteria, kuva C. (HUOM! Kiristys momentti 3,5<br />
Nm).<br />
5. Täytä jäähdytysjärjestelmä ja suorita ilmaus käyttöohjekirjan mukaisesti.<br />
Käynnistä moottori ja tarkista mahdolliset vuodot..<br />
C. Pistokytkimen asennus<br />
1. Katso asennusohjet.<br />
D. Koeajo<br />
1. Tarkista jäähdytysnesteen määrä.<br />
2. Varmistaudu siitä, että ilma poistuu jäähdytysjärjestelmästä. Vastus<br />
palaa nimittäin hetkessä poikki, jos se joutuu ilman kanssa kosketuksiin.<br />
3. Tarkista, ettei vuotoja tapahdu moottorin ollessa lämmin.<br />
4. Kokeile lämmitintä yhdistämällä verkkojohto maadoitettun pistorasiaan.<br />
Kuuluu pientä sirinää veden kiehuessa lämmittimen pinnassa.<br />
E. Tärkeää<br />
1. Käytä aina riittävää määrää pakkasnestettä.<br />
2. Moottorilämmittimen saa liittää ainoastaan maadoitettuun pistrasiaan<br />
ja on varmistettava että maadoituskosketus on hyvä moottorilämmittimestä<br />
ja auton korista maadoitettuun pistorasiaan.<br />
3. Käytä ainoastaan <strong>Calix</strong> MS johtoa verkkovirran liittämiseksi.<br />
4. Tutki kaapeli säännöllisesti vaurioiden sekä vanhenemisen suhteen.<br />
Vaurioitunutkaapeli pitää vaihtaa välittömästi.<br />
5. Mikään lämmittimen osista ei saa koskettaa moottorin lämpeneviä tai<br />
liikkuvia osia. Etäisyys pakosarjaan vähintään 50 mm (koskee myös<br />
turbolaitetta). Muissa tapauksissa on käytettävä lämmöneristettä.<br />
6. Panssarikaapelit voidaan pidentää jatkokaapeleilla pikaliittimien avulla.<br />
Tällöin on pakauksessa olevat kaapelikiinnikkeet kiinnitettävä liitoskohdon<br />
molemmin puolin maadollilsimman lähelle pikaliitimiä.<br />
F. Varoitus<br />
Vastuselementti palaa poikki jos<br />
• lämmitin liitetään sähköjärjestelmään, jonka jännite on jaksottaista.<br />
• jäähdytysneste on likaista<br />
• jäähdytysnestettä ei ole tarpeeksi<br />
• jäähdytysjärjestelmässä on ilmaa tai jääsohjoa