


You also want an ePaper? Increase the reach of your titles
YUMPU automatically turns print PDFs into web optimized ePapers that Google loves.
Page 12 / RACE Catalog K-1, <strong>ZoomLock</strong> <strong>Braze</strong>-<strong>Free</strong> <strong>Fittings</strong><br />
Installation Instructions<br />
1 2<br />
1 2<br />
> CLICK <<br />
1 2<br />
1 2<br />
1 2<br />
> CLICK <<br />
CK <<br />
STEP 1<br />
Slide battery into charger. Plug charger<br />
into a power source. Check to see<br />
that the charging light is on. When<br />
red light turns off and green light<br />
turns on, battery is fully charged ~ 20<br />
minutes.<br />
1 2<br />
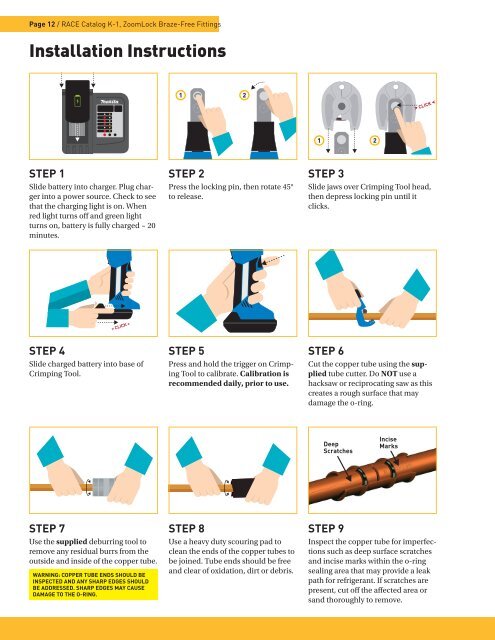
STEP 2<br />
Press the locking pin, then rotate 45°<br />
to release.<br />
STEP 3<br />
Slide jaws over Crimping Tool head,<br />
then depress locking pin until it<br />
clicks.<br />
1 2<br />
> CLICK < > CLICK <<br />
> CLICK <<br />
> CLICK <<br />
STEP 4<br />
Slide charged battery into base of<br />
Crimping Tool.<br />
STEP 5<br />
Press and hold the trigger on Crimping<br />
Tool to calibrate. Calibration is<br />
recommended daily, prior to use.<br />
STEP 6<br />
Cut the copper tube using the supplied<br />
tube cutter. Do NOT use a<br />
hacksaw or reciprocating saw as this<br />
creates a rough surface that may<br />
damage the o-ring.<br />
Deep<br />
Scratches<br />
Incise<br />
Marks<br />
STEP 7<br />
Use the supplied deburring tool to<br />
remove any residual burrs from the<br />
outside and inside of the copper tube.<br />
WARNING: COPPER TUBE ENDS SHOULD BE<br />
INSPECTED AND ANY SHARP EDGES SHOULD<br />
BE ADDRESSED. SHARP EDGES MAY CAUSE<br />
DAMAGE TO THE O-RING.<br />
STEP 8<br />
Use a heavy duty scouring pad to<br />
clean the ends of the copper tubes to<br />
be joined. Tube ends should be free<br />
and clear of oxidation, dirt or debris.<br />
STEP 9<br />
Inspect the copper tube for imperfections<br />
such as deep surface scratches<br />
and incise marks within the o-ring<br />
sealing area O-Ring that may provide a leak<br />
path for refrigerant. If scratches are<br />
present, cut off the affected area or<br />
sand thoroughly to remove.<br />
O-Ring