21 mm Strongline - Boen
21 mm Strongline - Boen
21 mm Strongline - Boen
- TAGS
- strongline
- boen
- boen.com

You also want an ePaper? Increase the reach of your titles
YUMPU automatically turns print PDFs into web optimized ePapers that Google loves.
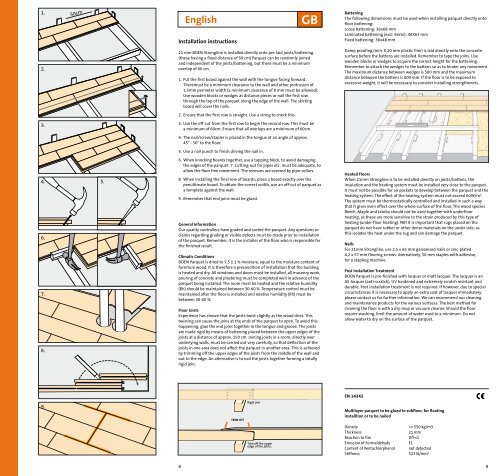
1.<br />
2.<br />
3.<br />
4.<br />
6.<br />
7.<br />
8.<br />
9.<br />
50cm<br />
5.<br />
English GB<br />
Installation instructions<br />
<strong>21</strong> <strong>mm</strong> <strong>Boen</strong> <strong>Strongline</strong> is installed directly onto pre-laid joists/battening<br />
(these having a fixed distance of 50 cm) Parquet can be randomly joined<br />
and independent of the joists/battening, but there must be a minimum<br />
overlap of 60 cm.<br />
1. Put the first board against the wall with the tongue facing forward.<br />
Theremust be a minimum clearance to the wall and other protrusion of<br />
1,5<strong>mm</strong> permeter width (a minimum clearance of 8 <strong>mm</strong> must be allowed).<br />
Use wooden blocks or wedges as distance pieces or nail the first row<br />
through the top of the parquet along the edge of the wall. The skirting<br />
board will cover the nails.<br />
2. ensure that the first row is straight. Use a string to check this.<br />
3. Use the off-cut from the first row to begin the second row. This must be<br />
a minimum of 60cm. ensure that all overlaps are a minimum of 60cm.<br />
4. The nail/screw/stapler is placed in the tongue at an angle of approx.<br />
45° - 50° to the floor.<br />
5. Use a nail punch to finish driving the nail in.<br />
6. When knocking boards together, use a tapping block, to avoid damaging<br />
the edges of the parquet. 7. Cutting-out for pipes etc. must be adequate, to<br />
allow the floor free movement. The recesses are covered by pipe-collars.<br />
8. When installing the final row of boards; place a board exactly over the<br />
penultimate board. To obtain the correct width, use an off-cut of parquet as<br />
a template against the wall.<br />
9. Remember that end joins must be glued.<br />
General Information<br />
our quality controllers have graded and sorted the parquet. Any questions or<br />
claims regarding grading or visible defects must be made prior to installation<br />
of the parquet. Remember, it is the installer of the floor who is responsible for<br />
the finished result.<br />
Climatic Conditions<br />
<strong>Boen</strong> Parquet is dried to 7,5 ± 1 % moisture, equal to the moisture content of<br />
furniture wood. It is therefore a precondition of installation that the building<br />
is heated and dry. All windows and doors must be installed, all masonry work,<br />
pouring of concrete and plastering must be completed well in advance of the<br />
parquet being installed. The room must be heated and the relative humidity<br />
(Rh) should be maintained between 30-60 %. Temperature control must be<br />
maintained after the floor is installed and relative humidity (Rh) must be<br />
between 30-60 %.<br />
Floor Joists<br />
experience has shown that the joists twist slightly as the wood dries. This<br />
twisting can cause the joins at the ends of the parquet to open. To avoid this<br />
happening, glue the end joins together in the tongue and groove. The joists<br />
are made rigid by means of battening placed between the upper edges of the<br />
joists at a distance of approx. 150 cm. Joining joists in a room, directly over<br />
underlying walls, must be carried out very carefully, so that deflection of the<br />
joists in one area does not affect the parquet in another area. This is achieved<br />
by tri<strong>mm</strong>ing off the upper edges of the joists from the middle of the wall and<br />
out to the edge. An alternative is to nail the joists together forming a totally<br />
rigid join.<br />
TRIM OFF<br />
Rigid join<br />
Trim off the upper<br />
edge of the joists.<br />
Battening<br />
The following dimensions must be used when installing parquet directly onto<br />
floor battening:<br />
Loose battening: 36x68 <strong>mm</strong><br />
Laminated battening (excl. Kerto): 40X63 <strong>mm</strong><br />
Fixed battening: 36x48 <strong>mm</strong><br />
Damp proofing (min. 0,20 <strong>mm</strong> plastic film) is laid directly onto the concrete<br />
surface before the battens are installed. Remember to tape the joins. Use<br />
wooden blocks or wedges to acquire the correct height for the battening.<br />
Remember to attach the wedges to the battens so as to hinder any movement.<br />
The maximum distance between wedges is 500 <strong>mm</strong> and the maximum<br />
distance between the battens is 600 <strong>mm</strong>. If the floor is to be exposed to<br />
excessive weight, it will be necessary to consider installing strengtheners.<br />
Heated Floors<br />
When <strong>21</strong><strong>mm</strong> <strong>Strongline</strong> is to be installed directly on joists/battens, the<br />
insulation and the heating system must be installed very close to the parquet.<br />
It must not be possible for air pockets to develop between the parquet and the<br />
heating system. The effect of the heating system must not exceed 60W/m 2 .<br />
The system must be thermostatically controlled and installed in such a way<br />
that it gives even effect over the whole surface of the floor. The wood species<br />
Beech, Maple and Jatoba should not be used together with underfloor<br />
heating, as these are more sensitive to the strain produced by this type of<br />
heating (under-floor heating). nB! It is important that rugs placed on the<br />
parquet do not have rubber or other dense materials on the under side, as<br />
this isolates the heat under the rug and can damage the parquet.<br />
Nails<br />
For <strong>21</strong><strong>mm</strong> <strong>Strongline</strong>, use 2,5 x 65 <strong>mm</strong> galvanised nails or zinc-plated<br />
4,2 x 57 <strong>mm</strong> flooring screws. Aternatively, 50 <strong>mm</strong> staples with adhesive,<br />
for a stapling machine.<br />
Post Installation Treatment<br />
<strong>Boen</strong> Parquet is pre-finished with lacquer or matt lacquer. The lacquer is an<br />
AS-lacquer (anti-scratch), UV hardened and extremely scratch resistant and<br />
durable. Post installation treatment is not required. If however, due to special<br />
circumstances it is necessary to apply an extra coat of lacquer i<strong>mm</strong>ediately,<br />
please contact us for further information. We can reco<strong>mm</strong>end our cleaning<br />
and maintenance products for the various surfaces. The best method for<br />
cleaning the floor is with a dry-mop or vacuum cleaner. Should the floor<br />
require washing, limit the amount of water used to a minimum. Do not<br />
allow water to dry on the surface of the parquet.<br />
EN 14342<br />
Multilayer parquet to be glued to subfloor, for floating<br />
installtion or to be nailed<br />
Density >= 550 kg/m3<br />
Thickness <strong>21</strong> <strong>mm</strong><br />
Reaction to fire Dfl-s1<br />
emission of Formaldehyde e1<br />
Content of Pentachlorphenol not detected<br />
Stiffness 523 n/<strong>mm</strong> 3<br />
8 9