Knockout Punch Set with Wrench - Klein Tools
Knockout Punch Set with Wrench - Klein Tools
Knockout Punch Set with Wrench - Klein Tools
You also want an ePaper? Increase the reach of your titles
YUMPU automatically turns print PDFs into web optimized ePapers that Google loves.
ENGLISH<br />
Model no. 53732<br />
Overall Dimensions:<br />
12-1/2" x 9" x 2-1/2"<br />
Hole size: 1/2" to 2"<br />
conduit size holes<br />
Weight: 9 lbs.<br />
Capacity: 10 gauge (.134 in.)<br />
mild steel maximum<br />
instructions for <strong>Klein</strong> <strong>Knockout</strong> <strong>Punch</strong> set<br />
<strong>with</strong> <strong>Wrench</strong> (Cat. no. 53732)<br />
sPECiFiCaTiOns<br />
Contents:<br />
Plastic Case<br />
1" Ratchet <strong>Wrench</strong><br />
3/8" Draw Bolt<br />
3/4" Draw Bolt<br />
1/2" <strong>Punch</strong><br />
1/2" Die<br />
3/4" <strong>Punch</strong><br />
3/4" Die<br />
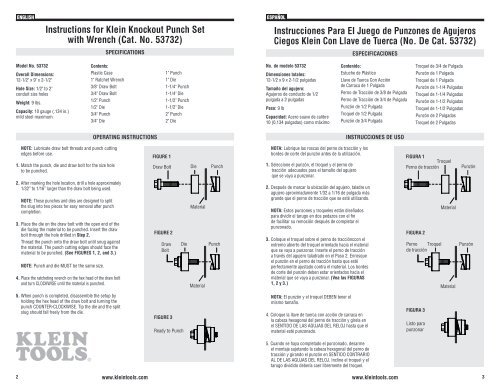
nOTE: Lubricate draw bolt threads and punch cutting<br />
edges before use.<br />
1. Match the punch, die and draw bolt for the size hole<br />
to be punched.<br />
2. After marking the hole location, drill a hole approximately<br />
1/32” to 1/16” larger than the draw bolt being used.<br />
nOTE: These punches and dies are designed to split<br />
the slug into two pieces for easy removal after punch<br />
completion.<br />
3. Place the die on the draw bolt <strong>with</strong> the open end of the<br />
die facing the material to be punched. Insert the draw<br />
bolt through the hole drilled in step 2.<br />
Thread the punch onto the draw bolt until snug against<br />
the material. The punch cutting edges should face the<br />
material to be punched. (see FigUrEs 1, 2, and 3.)<br />
nOTE: <strong>Punch</strong> and die MUST be the same size.<br />
4. Place the ratcheting wrench on the hex head of the draw bolt<br />
and turn CLOCKWISE until the material is punched.<br />
5. When punch is completed, disassemble the setup by<br />
holding the hex head of the draw bolt and turning the<br />
punch COUNTER-CLOCKWISE. Tip the die and the split<br />
slug should fall freely from the die.<br />
1" <strong>Punch</strong><br />
1" Die<br />
1-1/4" <strong>Punch</strong><br />
1-1/4" Die<br />
1-1/2" <strong>Punch</strong><br />
1-1/2" Die<br />
2" <strong>Punch</strong><br />
2" Die<br />
instrucciones Para El Juego de Punzones de agujeros<br />
Ciegos <strong>Klein</strong> Con Llave de Tuerca (no. De Cat. 53732)<br />
no. de modelo 53732<br />
Dimensiones totales:<br />
12-1/2 x 9 x 2-1/2 pulgadas<br />
Tamaño del agujero:<br />
Agujeros de conducto de 1/2<br />
pulgada a 2 pulgadas<br />
EsPECiFiCaCiOnEs<br />
2 www.kleintools.com www.kleintools.com<br />
3<br />
Peso: 9 lb<br />
Capacidad: Acero suave de calibre<br />
10 (0,134 pulgadas) como máximo<br />
Contenido:<br />
Estuche de Plástico<br />
Llave de Tuerca Con Acción<br />
de Carraca de 1 Pulgada<br />
Perno de Tracción de 3/8 de Pulgada<br />
Perno de Tracción de 3/4 de Pulgada<br />
Punzón de 1/2 Pulgada<br />
Troquel de 1/2 Pulgada<br />
Punzón de 3/4 Pulgada<br />
OPEraTing insTrUCTiOns insTrUCCiOnEs DE UsO<br />
FIGURE 1<br />
FIGURE<br />
Draw Bolt<br />
1<br />
FIGURE 1<br />
Draw Bolt<br />
Draw Bolt<br />
FIGURE 2<br />
FIGURE 2<br />
Draw<br />
FIGURE<br />
Bolt<br />
2<br />
Draw<br />
Bolt Draw<br />
Bolt<br />
FIGURE 3<br />
Die<br />
Die<br />
Die<br />
FIGURE 3<br />
Ready<br />
FIGURE<br />
to<br />
3<br />
<strong>Punch</strong><br />
Ready to <strong>Punch</strong><br />
Ready to <strong>Punch</strong><br />
Die<br />
Die<br />
Die<br />
Material<br />
Material<br />
Material<br />
Material<br />
Material<br />
Material<br />
<strong>Punch</strong><br />
<strong>Punch</strong><br />
<strong>Punch</strong><br />
<strong>Punch</strong><br />
<strong>Punch</strong><br />
<strong>Punch</strong><br />
ESPAÑOL<br />
nOTa: Lubrique las roscas del perno de tracción y los<br />
bordes de corte del punzón antes de la utilización. FIGURE 1<br />
FIGURA 1 FIGURE 1<br />
Troquel<br />
FIGURE 1<br />
FIGURA<br />
Perno<br />
1. Seleccione<br />
de<br />
1<br />
tracción<br />
el punzón,<br />
Draw<br />
FIGURE FIGURE<br />
Bolt<br />
el 1 1troquel<br />
Punzóny<br />
el Die perno de <strong>Punch</strong> Boulon de<br />
tracción adecuados Troquel para el tamaño del agujero FIGURE<br />
traction<br />
1<br />
FIGURA 1<br />
Perno que de tracción se vaya a punzonar. Punzón<br />
Boulon de<br />
Troquel Draw Bolt Die <strong>Punch</strong><br />
traction<br />
Perno de tracción Punzón<br />
Boulon de<br />
2. Después de marcar la ubicación del agujero, taladre traction un<br />
agujero aproximadamente 1/32 a 1/16 de pulgada más<br />
grande que el perno de tracción que se esté utilizando.<br />
Troquel de 3/4 de Pulgada<br />
Punzón de 1 Pulgada<br />
Troquel de 1 Pulgada<br />
Punzón de 1-1/4 Pulgadas<br />
Troquel de 1-1/4 Pulgadas<br />
Punzón de 1-1/2 Pulgadas<br />
Troquel de 1-1/2 Pulgadas<br />
Punzón de 2 Pulgadas<br />
Troquel de 2 Pulgadas<br />
FIGURA 1<br />
Emporte- Troquel<br />
Emboutissoir<br />
Perno<br />
FIGURA<br />
pièce de<br />
1<br />
tracción<br />
Emporte- Troquel<br />
Emboutissoir<br />
Perno pièceEmporte- de tracción<br />
Emboutissoir<br />
pièce<br />
Punzón<br />
Punzón<br />
Material<br />
Material<br />
nOTa: Estos punzones y troqueles están diseñados<br />
para dividir el Material tarugo en dos pedazos Material con el fin<br />
Matériau<br />
Matériau<br />
Material<br />
Material<br />
de facilitar su remoción después de completar el<br />
FIGURA 2 Material<br />
FIGURE 2<br />
FIGURE 2<br />
punzonado.<br />
FIGURE 2<br />
FIGURA 2 FIGURE 2<br />
Boulon de<br />
Perno Troquel Draw PunzónDie<br />
<strong>Punch</strong> FIGURE 2<br />
FIGURA de tracción<br />
3. Coloque 2 el troquel sobre el perno de tracciónccon traction el<br />
Bolt<br />
Boulon de<br />
Perno extremo Troquel abierto del troquel Draw Punzón orientado Die hacia el material <strong>Punch</strong><br />
traction<br />
de tracción que se vaya a punzonar. Bolt BoltInserte<br />
el perno de tracción Boulon de<br />
Perno Troquel Punzón<br />
a través del agujero taladrado en el Paso 2. Enrosque traction<br />
de tracción<br />
el punzón en el perno de tracción hasta que esté<br />
perfectamente ajustado contra el material. Los bordes<br />
de corte del punzón deben estar orientados hacia el<br />
Matériau FIGURA 2<br />
Emporte-<br />
Emboutissoir FIGURA 2<br />
Perno pièce Troquel<br />
Emporte-<br />
Emboutissoir de tracción<br />
Perno pièceEmporte- Troquel Troquel<br />
Emboutissoir de de tracción pièce<br />
Punzón<br />
Punzón<br />
material que Material se vaya a punzonar. (Vea Material las FigUras<br />
Matériau<br />
Material<br />
1, 2 y 3.)<br />
Material<br />
Material<br />
Matériau<br />
Material<br />
Material<br />
nOTa: El punzón y el troquel DEBEN tener el<br />
Matériau<br />
FIGURA mismo 3 tamaño. FIGURE 3<br />
FIGURE 3<br />
FIGURA 3<br />
FIGURA 3 FIGURE FIGURE 3<br />
FIGURE 3<br />
Listo 4. Coloque para la llave Ready de tuerca to <strong>Punch</strong> con acción de carraca en<br />
FIGURA 3<br />
FIGURE<br />
Prêt à perforer<br />
3<br />
punzonar la cabeza hexagonal del perno de tracción y gírela en<br />
Listo para<br />
el SENTIDO DE LAS Ready Ready<br />
AGUJAS to <strong>Punch</strong><br />
DEL RELOJ hasta que<br />
Prêt<br />
el<br />
à perforer<br />
punzonar Listo para material esté punzonado.<br />
Prêt à perforer<br />
punzonar<br />
5. Cuando se haya completado el punzonado, desarme<br />
el montaje sujetando la cabeza hexagonal del perno de<br />
tracción y girando el punzón en SENTIDO CONTRARIO<br />
AL DE LAS AGUJAS DEL RELOJ. Incline el troquel y el<br />
tarugo dividido debería caer libremente del troquel.<br />
FIGURA 3<br />
Listo para<br />
punzonar<br />
Listo para<br />
punzonar punzonar


