Manual do MT-511C - Full Gauge Controls
Manual do MT-511C - Full Gauge Controls
Manual do MT-511C - Full Gauge Controls

Create successful ePaper yourself
Turn your PDF publications into a flip-book with our unique Google optimized e-Paper software.
www.fullgauge.com<br />
www.fullgauge.com.br<br />
www.fullgauge.es<br />
<strong>Full</strong> <strong>Gauge</strong> <strong>Controls</strong>®<br />
+55 51 34753308<br />
sales@fullgauge.com<br />
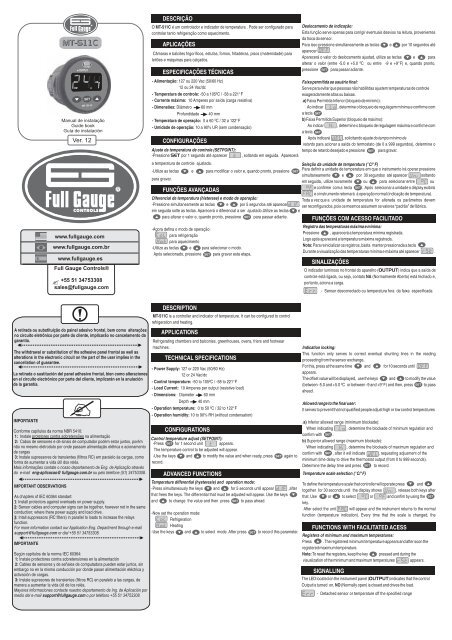
DESCRIÇÃO<br />
O <strong>MT</strong>-<strong>511C</strong> é um controla<strong>do</strong>r e indica<strong>do</strong>r de temperatura . Pode ser configura<strong>do</strong> para Deslocamento de indicação:<br />
controlar tanto refrigeração como aquecimento.<br />
Esta função serve apenas para corrigir eventuais desvios na leitura, provenientes<br />
da troca <strong>do</strong> sensor.<br />
APLICAÇÕES<br />
Para isso pressione simultaneamente as teclas e por 10 segun<strong>do</strong>s até<br />
Câmaras e balcões frigoríficos, estufas, fornos, fritadeiras, pisos (maternidade) para<br />
leitões e máquinas para calça<strong>do</strong>s.<br />
aparecer .<br />
Aparecerá o valor <strong>do</strong> deslocamento ajustad, utilize as teclas e para<br />
alterar o valor (entre -5.0 e +5.0 ºC ou entre -9 e +9°F) e, quan<strong>do</strong> pronto,<br />
ESPECIFICAÇÕES TÉCNICAS<br />
pressione SET para passar adiante.<br />
- Alimentação: 127 ou 220 Vac (50/60 Hz)<br />
Faixa permitida ao usuário final:<br />
12 ou 24 Vac/dc<br />
Serve para evitar que pessoas não habilitdas ajustem temperaturas de controle<br />
- Temperatura de controle: -50 a 105ºC / -58 a 221°F<br />
exageradamente altas ou baixas.<br />
- Corrente máxima: 10 Amperes por saída (carga resistiva)<br />
. a) Faixa Permitida Inferior (bloqueio de mínimo):<br />
- Dimensões: Diâmetro 60 mm<br />
Ao indicar , determine o bloqueio de regulagem mínima e confirme com<br />
Profundidade 40 mm<br />
a tecla SET .<br />
- Temperatura de operação: 0 a 60 ºC / 32 a 122°F<br />
b) Faixa Permitida Superior (bloqueio de máximo):<br />
- Umidade de operação: 10 a 90% UR (sem condensação)<br />
Ao indicar<br />
a tecla SET .<br />
, determine o bloqueio de regulagem máxima e confirme com<br />
CONFIGURAÇÕES<br />
Após indicará , solicitan<strong>do</strong> ajuste <strong>do</strong> tempo mínimo de<br />
retar<strong>do</strong> para acionar a saída <strong>do</strong> termostato (de 0 a 999 segun<strong>do</strong>s), determine o<br />
Ajuste da temperatura de controle (SETPOINT):<br />
tempo de retar<strong>do</strong> deseja<strong>do</strong> e pressione SET para gravar.<br />
-Pressione SET por 1 segun<strong>do</strong> até aparecer , soltan<strong>do</strong> em seguida. Aparecerá<br />
a temperatura de controle ajustada.<br />
Seleção da unidade de temperatura (°C/°F)<br />
-Utilize as teclas<br />
para gravar.<br />
e para modificar o valor e, quan<strong>do</strong> pronto, pressione SET Para definir a unidade de temperatura em que o instrumento irá operar pressione<br />
simultaneamente e por 30 segun<strong>do</strong>s até aparecer soltan<strong>do</strong><br />
em seguida, utilize novamente ou para selecionar entre ou<br />
FUNÇÕES AVANÇADAS<br />
Diferencial de temperatura (histerese) e mo<strong>do</strong> de operação:<br />
-Pressione simultaneamente as teclas e por 5 segun<strong>do</strong>s até aparecer<br />
em seguida solte as teclas. Aparecerá o diferencial a ser ajusta<strong>do</strong>.Utilize as teclas<br />
e confirme com a tecla SET . Após selecionar a unidade o display exibirá<br />
e o instrumento retornará à operação normal (indicação de temperatura).<br />
Toda a vez que a unidade de temperatura for alterada os parâmetros devem<br />
, ser reconfigura<strong>do</strong>s, pois os mesmos assumem os valores “padrão” de fábrica.<br />
e<br />
para alterar o valor e, quan<strong>do</strong> pronto, pressione SET para passar adiante. FUNÇÕES COM ACESSO FACILITADO<br />
-Agora defina o mo<strong>do</strong> de operação:<br />
para refrigeração<br />
para aquecimento<br />
-Utilize as teclas e para selecionar o mo<strong>do</strong>.<br />
Após seleciona<strong>do</strong>, pressione SET para gravar esta etapa.<br />
Registro das temperaturas máxima e mínima:<br />
Pressione , aparecerá a temperatura mínima registrada.<br />
Logo após aparecerá a temperatura máxima registrada.<br />
Nota: Para reinicializar os registros, basta manter pressionada a tecla<br />
Durante a visualização das temperaturas mínima e máxima até aparecer<br />
SINALIZAÇÕES<br />
.<br />
DESCRIPTION<br />
<strong>MT</strong>-<strong>511C</strong> is a controller and indicator of temperature. It can be configured to control<br />
refrigeration and heating.<br />
APPLICATIONS<br />
Refrigerating chambers and balconies, greenhouses, ovens, friers and footwear<br />
machines.<br />
TECHNICAL SPECIFICATIONS<br />
Temperature differential (hysteresis) and operation mode:<br />
-Press simultaneously the keys and for 5 seconds until appear ,after<br />
that frees the keys. The differential that must be adjusted will appear. Use the keys<br />
and to change the value and then press SET to pass ahead.<br />
-Now set the operation mode:<br />
Refrigeration<br />
Heating<br />
-Use the keys and to select mode. After press SET to record this parameter.<br />
O indica<strong>do</strong>r luminoso no frontal <strong>do</strong> aparelho ( OUTPUT)<br />
indica que a saída de<br />
controle está ligada, ou seja, contato NA (Normalmente Aberto) está fecha<strong>do</strong> e,<br />
portanto, aciona a carga.<br />
- Sensor desconecta<strong>do</strong> ou temperatura fora da faixa especificada<br />
The withdrawal or substitution of the adhesive panel frontal as well as<br />
alterations in the electronic circuit on the part of the user implies in the<br />
cancellation of guarantee.<br />
- Power Supply: 127 or 220 Vac (50/60 Hz)<br />
La retirada o sustitución del panel adhesivo frontal, bien como alteraciones<br />
12 or 24 Vac/dc<br />
en el circuito electrónico por parte del cliente, implicarán en la anulación<br />
- Control temperature: -50 to 105ºC / -58 to 221°F<br />
de la garantía.<br />
- Load Current: 10 Amperes per output (resistive load)<br />
<br />
- Dimensions: Diameter 60 mm<br />
Depth 40 mm<br />
- Operation temperature: 0 to 50 ºC / 32 to 122°F<br />
- Operation humidity: 10 to 90% RH (without condensation)<br />
Indication locking:<br />
This function only serves to correct eventual shunting lines in the reading<br />
proceeding from the sensor exchange..<br />
For this, press at the same time and for 10 seconds until<br />
appears.<br />
The offset value will be displayed, use the keys and to modify the value<br />
(between -5.0 and +5.0 ºC or between -9 and +9°F) and then, press SET to pass<br />
ahead.<br />
Allowed range to the final user:<br />
It serves to prevent that not qualified people adjust high or low control temperatures<br />
IMPORTANTE<br />
. a) Inferior allowed range (minimum blockade):<br />
Conforme capítulos da norma NBR 5410:<br />
1: Instale protetores contra sobretensões na alimentação<br />
2: Cabos de sensores e de sinais de computa<strong>do</strong>r podem estar juntos, porém<br />
não no mesmo eletroduto por onde passam alimentação elétrica e acionamento<br />
de cargas<br />
3: Instale supressores de transientes (filtros RC) em paralelo às cargas, como<br />
forma de aumentar a vida útil <strong>do</strong>s relés.<br />
Mais informações contate o nosso departamento de Eng. de Aplicação através<br />
CONFIGURATIONS<br />
Control temperature adjust (SETPOINT):<br />
-Press SET for 1 second unit appears.<br />
The temperature control to be adjusted will appear.<br />
-Use the keys and to modify the value and when ready, press SET again to<br />
record.<br />
When indicating , determine the blockade of minimum regulation and<br />
confirm with SET .<br />
b) Superior allowed range (maximum blockade):<br />
When indicating , determine the blockade of maximum regulation and<br />
confirm with SET , after it will indicate , requesting adjusment of the<br />
minimum time delay to drive the thermostat output (from 0 to 999 seconds).<br />
Determine the delay time and press SET to record.<br />
<strong>do</strong> e-mail eng-aplicacao@ fullgauge.com.br ou pelo telefone (51) 34753308. ADVANCED FUNCTIONS<br />
Temperature scale selection (°C/°F)<br />
IMPORTANT OBSERVATIONS<br />
As chapters of IEC 60364 standart:<br />
1:<br />
Install protectors against overloads on power supply.<br />
2:<br />
Sensor cables and computer signs can be together, however not in the same<br />
conduction; where there power supply and load drive.<br />
3:<br />
Intall suppressors (RC filters) in parallel to loads to increase the relays<br />
function.<br />
For more information contact our Application Eng. Department through e-mail<br />
support@fullgauge.com or dial +55 51 34753308.<br />
IMPORTANTE<br />
CONTROLS<br />
<strong>MT</strong>-<strong>511C</strong><br />
<strong>Manual</strong> de instalação<br />
Guide book<br />
Guía de instalación<br />
Ver. 12<br />
A retirada ou substituição <strong>do</strong> painel adesivo frontal, bem como alterações<br />
no circuito eletrônico por parte <strong>do</strong> cliente, implicarão no cancelamento da<br />
garantia.<br />
Según capítulos de la norma IEC 60364:<br />
1: Instale protectores contra sobretensiones en la alimentación<br />
2: Cables de sensores y de señales de computa<strong>do</strong>ra pueden estar juntos, sin<br />
embargo no en la misma conducción por <strong>do</strong>nde pasan alimentación eléctrica y<br />
activación de cargas.<br />
3: Instale supresores de transientes (filtros RC) en paralelo a las cargas, de<br />
manera a aumentar la vida útil de los relés.<br />
Mayores informaciones contacte nuestro departamento de Ing. de Aplicación por<br />
medio del e-mail support@fullgauge.com o por teléfono +55 51 34753308.<br />
R<br />
To define the temperature scale that controller will operate press and<br />
together for 30 seconds until the display shows , release both keys after<br />
that. Use<br />
key.<br />
or to select or and confim by using the SET<br />
After select the unit will appear and the instrument returns to the normal<br />
function (temperature indication). Every time that the scale is changed, the<br />
FUNCTIONS WITH FACILITATED ACESS<br />
Registers of minimum and maximum temperatures:<br />
Press . The registered minimum temperature appears and after soon the<br />
registered maximum temperature.<br />
Note: To reset the registers, keep the key pressed and during the<br />
visualization of the minimum and maximum temperatures appears.<br />
SIGNALLING<br />
The LED located on the instrument panel ( OUTPUT)<br />
indicates that the control<br />
Output is turned on, NO (Normally open) is closed and drives the load.<br />
- Detached sensor or temperature off the specified range
VINIL PROTETOR/PROTECTIVE VINIL/ADHESIVO PROTECTOR<br />
PRETO / BLACK / NEGRO<br />
MARROM / BROWN / MARRÓN<br />
CINZA / GRAY / GRIS<br />
AMARELO / YELLOW / AMARILLO<br />
AZUL / BLUE / AZUL<br />
LARANJA / ORANGE / NARANJA<br />
DESCRIPCIÓN<br />
Protege os instrumentos instala<strong>do</strong>s em locais sujeitos a respingos<br />
d'água, como em balcões frigoríficos, por exemplo. Este vinil adesivo acompanha<br />
o instrumento, dentro da sua embalagem.<br />
Faça a aplicação somente após concluir as conexões elétricas.<br />
El <strong>MT</strong>-<strong>511C</strong> es un controla<strong>do</strong>r e indica<strong>do</strong>r de temperatura. Puede ser configura<strong>do</strong> para<br />
controlar tanto refrigeración como calefacción.<br />
APLICACIONES<br />
Corrimiento de indicación:<br />
Esta función sirve solamente para corregir eventuales errores en la lectura<br />
provenientes del cambio del sensor.<br />
Para esto presione simultáneamente las teclas y por 10 segun<strong>do</strong>s<br />
Cámaras y refrigera<strong>do</strong>res comerciales, invernaderos y estufas, frei<strong>do</strong>ras, pisos hasta que aparezca .<br />
(maternidad) para cer<strong>do</strong>s y máquinas para zapatos.<br />
Aparecerá el valor del corrimiento ajusta<strong>do</strong>.<br />
It protects the instruments installed in local subdued to water drops, for example in<br />
refrigeration chambers.<br />
ESPECIFICACIONES TÉCNICAS<br />
This adhesive vinyl follows the instrument, inside of this packing.<br />
- Alimentación: 127 ó 220 Vac (50/60 Hz)<br />
Only <strong>do</strong> the application after conclude the electrical connections.<br />
12 ó 24 Vac/dc<br />
Entonces, utilice las teclas y para alterar el valor (entre -5.0 y +5.0<br />
ºC ó entre -9 hasta +9°F) y, cuan<strong>do</strong> esté listo, presione SET para seguir<br />
adelante.<br />
- Temperatura de control: -50 hasta 105ºC / -58 hasta 221°F<br />
Protege los instrumentos instala<strong>do</strong>s en locales someti<strong>do</strong>s a goteos de agua, como<br />
- Corriente máxima: 10 Amperes por salida (carga resistiva)<br />
en refrigera<strong>do</strong>res comerciales, por ejemplo. Este adhesivo acompaña el<br />
instrumento, adentro de su embalaje.<br />
- Dimensiones: Diámetro 60 mm<br />
Límite permiti<strong>do</strong> al usuario final:<br />
Sirve para evitar que personas no habilitadas ajusten temperaturas de control<br />
extremadamente altas o bajas.<br />
Haga la aplicación solamente después de concluir las conexiones eléctricas.<br />
Profundidad 40 mm<br />
- Temperatura de operación: 0 hasta 50 ºC / 32 hasta 122°F<br />
. a) Límite permiti<strong>do</strong> inferior (bloqueo de mínimo):<br />
- Humedad de operación: 10 hasta 90% HR (no condensante)<br />
Al indicar<br />
la tecla SET .<br />
, determine el bloqueo de regulación mínima y confirme con<br />
Dobre as abas laterais<br />
Fold the lateral bolders<br />
Doble las aletas laterales<br />
CONFIGURACIONES<br />
Ajuste de la temperatura de control (SETPOINT):<br />
- Presione SET durante 1 segun<strong>do</strong> hasta que aparezca .<br />
Aparecerá la temperatura de control ajustada.<br />
- Utilice las teclas y para alterar el valor y, cuan<strong>do</strong> esté listo, presione<br />
nuevamente para grabar.<br />
SET<br />
b) Límite permiti<strong>do</strong> superior (bloqueo de máximo):<br />
Al indicar , determine el bloqueo de regulación máxima y confirme con<br />
la tecla .<br />
Luego indicará , solicitan<strong>do</strong> ajuste del tiempo mínimo de retar<strong>do</strong> para<br />
activar la salida del termostato (de 0 hasta 999 segun<strong>do</strong>s).<br />
Determine el tiempo de retar<strong>do</strong> desea<strong>do</strong> y presione SET para grabar.<br />
Selección de la unidad de temperatura (°C/°F)<br />
FUNCIONES AVANZADAS<br />
Para definir la unidad en que el instrumento operará presione<br />
simultáneamente durante 30 segun<strong>do</strong>s hasta que aparezcas<br />
y<br />
soltan<strong>do</strong><br />
Diferencial de temperatura (histéresis) y mo<strong>do</strong> de operación:<br />
enseguida, utilice nuevamente o para seleccionar entre<br />
-Presione simultáneamente las teclas y por 5 segun<strong>do</strong>s hasta que aparezca o y confirme con la tecla SET<br />
. Después de seleccionar la unidad el display<br />
, enseguida suelte las teclas. Aparecerá el diferencial a ser ajusta<strong>do</strong>. Utilice las exhibirá y el instrumento retornará a la operación normal ( indicación de<br />
teclas y para alterar el valor y, cuan<strong>do</strong> esté listo, presione SET para seguir temperatura). Siempre que la unidad de temperatura es alterada los parámetros<br />
adelante.<br />
deben ser reconfigura<strong>do</strong>s, pues los mismos asumen los valores “padrón” de fábrica.<br />
-Ahora defina el mo<strong>do</strong> de operación:<br />
para refrigeración.<br />
para calefacción.<br />
FUNCIONES CON ACCESO FACILITADO<br />
-Utilice las teclas y para seleccionar el mo<strong>do</strong>.<br />
Después de seleccionar, presione SET para grabar esta etapa.<br />
SENSOR<br />
VINIL PROTETOR<br />
VINYL FILM<br />
VINILO PROTECTOR<br />
OUTPUT<br />
ESQUEMADE LIGAÇÃO / WIRING DIAGRAM / ESQUEMADE CONEXIÓN<br />
PRETO e MARROM : 220 Vac ( 24 Vac/dc )<br />
PRETO e CINZA: 127 Vac ( 12 Vac/dc )<br />
AMARELO: Comum<br />
AZUL: Contato NA<br />
LARANJA: Contato NF<br />
BLACK and BROWN : 220 Vac ( 24 Vac/dc )<br />
BLACK and GRAY: 127 Vac ( 12 Vac/dc )<br />
YELLOW: Common<br />
BLUE: NO contact<br />
ORANGE: NC contact<br />
NEGRO y MARRÓN : 220 Vac ( 24 Vac/dc )<br />
NEGRO y GRIS: 127 Vac ( 12 Vac/dc )<br />
AMARILLO: Común<br />
AZUL: Contacto NA<br />
NARANJA: Contacto NC<br />
Compressor de refrigeração ou válvula solenóide. Acima da corrente especificada utilize contatora.<br />
Refrigeration compressor or heating resistence. Above specified current use a contactor<br />
Compresor de refrigeración o válvula solenoide. Arriba de la corriente especificada utilice contactor.<br />
Nota: O comprimento <strong>do</strong> cabo <strong>do</strong> sensor pode ser aumenta<strong>do</strong> pelo próprio usuário, em até 200 metros,<br />
utilizan<strong>do</strong> cabo PP 2 x 24 AWG. Para imersão em água utilize poço termométrico.<br />
Note: The sensor cable lenght can be increased by the user unitl 200 meters, using PP 2 x 24 AWG Cable.<br />
For immersion in water it uses thermometric well<br />
Nota: El largo del cable del sensor puede ser amplia<strong>do</strong> por el propio usuario, hasta 200 metros utilizan<strong>do</strong><br />
cable PP 2 x 24 AWG. Para inmersión en agua utilice pozo termométrico.<br />
Esquema de ligação de supressores em contatoras<br />
Wiring diagram of suppresor in contactors<br />
Esquema de conexión de supresores en contactores<br />
Supressor<br />
A1<br />
A2<br />
A1 e A2 são os bornes da<br />
bobina da contatora.<br />
A1 and A2 are the<br />
contactor coil.<br />
A1 y A2 son los bornes<br />
de la bobina del contactor<br />
Registros de temperaturas mínima y máxima:<br />
Presione . Aparecerá la temperatura mínima registrada y luego después<br />
aparecerá la temperatura máxima registrada.<br />
Nota: Para reiniciar los registros, mantener presionada la tecla durante la<br />
visualización de las temperaturas mínima y máxima hasta que aparezca.<br />
SEÑALIZADORES<br />
El indica<strong>do</strong>r luminoso en el frontal del instrumento ( OUTPUT)<br />
indica que la<br />
salida de control está conectada, o sea, contacto NA (Normalmente Abierto)<br />
está cerra<strong>do</strong> y por lo tanto acciona la carga.<br />
- Sensor desconecta<strong>do</strong> o la temperatura fuera del rango especifica<strong>do</strong><br />
Ø61mm<br />
Dimensão <strong>do</strong> furo para fixação <strong>do</strong> instrumento<br />
Dimension of the puncture for set the instrument<br />
Dimensión del agujero para fijación del instrumento<br />
Esquema de ligação de supressores em cargas acionamento direto<br />
Wiring diagram of suppresor linking in loads direct drive<br />
Esquema de conexión de los supresores en cargas de activación directa<br />
Supressor<br />
Carga<br />
Load<br />
Para acionamento direto leve em<br />
consideração a corrente máxima<br />
especificada.<br />
For direct drive attention<br />
at the specified load current.<br />
Para activación directa hay que llevar<br />
en consideración la corriente máxima<br />
especificada.