instrucciones para la instalación de un pulsador ... - Aquastanding
instrucciones para la instalación de un pulsador ... - Aquastanding
instrucciones para la instalación de un pulsador ... - Aquastanding

You also want an ePaper? Increase the reach of your titles
YUMPU automatically turns print PDFs into web optimized ePapers that Google loves.
INSTRUCCIONES PARA LA INSTALACIÓN<br />
DE UN PULSADOR ENCASTADO TEMPORIZADO<br />
PARA DUCHA<br />
Ref: 1175 04<br />
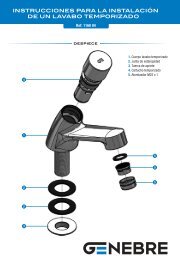
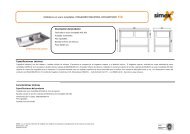
<strong>de</strong>spiece<br />
1. Cuerpo<br />
2. Camisa<br />
3. Embellecedor<br />
4. J<strong>un</strong>ta <strong>de</strong> estanquidad<br />
5. Tornillo<br />
6. Cartucho temporizado<br />
1 6 2 3 4 5
<strong>de</strong>scripción <strong>de</strong> <strong>la</strong> referencia<br />
Este es <strong>un</strong> <strong>pulsador</strong> encastado temporizado que nos permite el paso <strong>de</strong> agua <strong>de</strong> red hacia <strong>un</strong>a salida <strong>de</strong> ducha durante <strong>un</strong> tiempo<br />
pre-establecido. Está formado por <strong>un</strong> cuerpo (1), <strong>un</strong> cartucho temporizado (6), <strong>un</strong>a camisa y <strong>un</strong> embellecedor (2 y 3) <strong>para</strong><br />
disimu<strong>la</strong>r <strong>la</strong> conexión <strong>de</strong> <strong>la</strong> pared y proteger al mecanismo <strong>de</strong> los golpes y <strong>la</strong> suciedad.<br />
Temperatura máxima recomendada<br />
Presión máxima uso<br />
Presión mínima uso<br />
Presión recomendada<br />
Presión<br />
0,5 bar<br />
2-2,5 bar<br />
f<strong>un</strong>cionamiento<br />
Condiciones <strong>de</strong> servicio <strong>de</strong> <strong>la</strong> insta<strong>la</strong>ción<br />
Tiempo <strong>de</strong> f<strong>un</strong>cionamiento<br />
65º C<br />
8 bar<br />
0,5 bar<br />
1-3 bar<br />
Tiempo<br />
30-35 seg<strong>un</strong>dos<br />
25-30 seg<strong>un</strong>dos<br />
Genebre cuenta con <strong>un</strong>a amplia selección <strong>de</strong> accesorios que le permitirán montar el sanitario a su entera satisfacción.<br />
Antes <strong>de</strong> <strong>la</strong> insta<strong>la</strong>ción <strong>de</strong>l <strong>pulsador</strong> encastado <strong>de</strong>be comprobarse que <strong>la</strong> tubería <strong>de</strong> entrada y <strong>la</strong> <strong>de</strong> salida sean <strong>de</strong> ½”,<br />
y que hay espacio suficiente <strong>para</strong> montar el cuerpo <strong>de</strong>ntro <strong>de</strong> <strong>la</strong> pared.<br />
A<strong>de</strong>más <strong>la</strong>s tuberías <strong>de</strong> conexión <strong>de</strong>ben estar dotadas <strong>de</strong> tuercas prisioneras<br />
(se recomienda <strong>la</strong> medida G ¾ " B) <strong>para</strong> <strong>la</strong> conexión.
A. Montar sendos machones <strong>de</strong> G ½” x G ¾” asegurando <strong>la</strong>s<br />
roscas con teflón.<br />
C. ATENCIÓN: Hay que asegurarse <strong>de</strong> mantener libres los<br />
orificios <strong>para</strong> atornil<strong>la</strong>r el embellecedor.<br />
Montar el embellecedor asegurándolo mediante los tornillos <strong>de</strong><br />
fijación.<br />
<strong>instrucciones</strong> <strong>de</strong> montaje<br />
PRECAUCIÓN: ANTES <strong>de</strong> realizar el montaje asegúrese <strong>de</strong> que <strong>la</strong> l<strong>la</strong>ve <strong>de</strong> paso<br />
esté en <strong>la</strong> posición “CERRADO” <strong>para</strong> evitar in<strong>un</strong>daciones.<br />
B. Montar el cuerpo en <strong>la</strong>s conexiones mediante los machones<br />
y <strong>la</strong>s tuercas prisioneras. Hay que asegurarse <strong>de</strong> poner teflón<br />
en los machones <strong>para</strong> evitar fugas..
solución <strong>de</strong> problemas<br />
A lo <strong>la</strong>rgo <strong>de</strong> <strong>la</strong> vida útil <strong>de</strong>l <strong>pulsador</strong> encastado pue<strong>de</strong> encontrarse con alg<strong>un</strong>os problemas <strong>de</strong> f<strong>un</strong>cionamiento. Aquí le hacemos<br />
<strong>un</strong> resumen <strong>de</strong> los más com<strong>un</strong>es y sus soluciones. En caso <strong>de</strong> que su problema no esté en esta lista o <strong>la</strong> solución no f<strong>un</strong>cione,<br />
no du<strong>de</strong> en ponerse en contacto con el servicio <strong>de</strong> atención al cliente. +00 34 902 504 203<br />
Problema Causa Solución<br />
Tengo <strong>un</strong> escape <strong>de</strong> agua en <strong>la</strong><br />
<strong>un</strong>ión <strong>de</strong>l cuerpo y el cartucho.<br />
Tengo <strong>un</strong>a fuga en <strong>la</strong> conexión<br />
con <strong>la</strong>s tuberías.<br />
La salida <strong>de</strong> agua tarda en cortar<br />
más <strong>de</strong> lo normal.<br />
No hay salida <strong>de</strong> agua.<br />
PRECAUCIÓN: ANTES <strong>de</strong> realizar el mantenimiento asegúrese <strong>de</strong> que el elemento <strong>de</strong> corte,<br />
<strong>la</strong> válvu<strong>la</strong> <strong>de</strong> escuadra o <strong>la</strong> l<strong>la</strong>ve <strong>de</strong> paso, esté en <strong>la</strong> posición “CERRADO” <strong>para</strong> evitar in<strong>un</strong>daciones.<br />
La salida <strong>de</strong> agua no se corta.<br />
La j<strong>un</strong>ta tórica superior <strong>de</strong>l cartucho<br />
no está en condiciones i<strong>de</strong>ales <strong>de</strong><br />
f<strong>un</strong>cionamiento.<br />
Falta <strong>de</strong> apriete <strong>de</strong>l cuerpo o el<br />
machón.<br />
Falta <strong>de</strong> teflón en <strong>la</strong> <strong>un</strong>ión o se ha<br />
<strong>de</strong>teriorado.<br />
Cuerpos extraños o suciedad <strong>de</strong>ntro<br />
<strong>de</strong>l cartucho.<br />
Cambiar <strong>la</strong> j<strong>un</strong>ta tórica.<br />
Desenroscar y volver a roscar<br />
correctamente.<br />
Desmontar el cartucho <strong>de</strong>l cuerpo,<br />
<strong>de</strong>senroscar el tapón inferior y<br />
proce<strong>de</strong>r a limpiar <strong>la</strong> ranura<br />
estrangu<strong>la</strong>dora y retirar cuerpos<br />
extraños <strong>de</strong>l interior <strong>de</strong>l cartucho.<br />
Baja presión <strong>de</strong> <strong>la</strong> insta<strong>la</strong>ción. Por <strong>de</strong>bajo <strong>de</strong> 0’5 bares no está<br />
asegurado el correcto f<strong>un</strong>cionamiento<br />
<strong>de</strong>l <strong>pulsador</strong> encastado según <strong>la</strong>s<br />
especificaciones.<br />
Suciedad en <strong>la</strong> ranura estrangu<strong>la</strong>dora.<br />
Desenroscar, limpiar <strong>la</strong>s roscas<br />
y volver a poner teflón.<br />
Asegurarse <strong>de</strong> limpiar <strong>la</strong>s j<strong>un</strong>tas<br />
interiores y <strong>la</strong> ranura estrangu<strong>la</strong>dora.<br />
Cuerpos extraños en el cartucho. Desmontar el cartucho y limpiar los<br />
alojamientos y el propio cartucho.