como adjuntar la base de datos de las empresas - VisualCont
como adjuntar la base de datos de las empresas - VisualCont
como adjuntar la base de datos de las empresas - VisualCont

Create successful ePaper yourself
Turn your PDF publications into a flip-book with our unique Google optimized e-Paper software.
COMO ADJUNTAR COMO ADJUNTAR LA LA BASE DE DATOS DE DE LAS LAS EMPRESAS EMPRESAS<br />
Cuando el usuario formatee su PC o LAPTOP y quiere reinsta<strong>la</strong>r el Sistema <strong>de</strong> Contabilidad<br />
<strong>VisualCont</strong> <strong>de</strong> nuevo.<br />
Primero <strong>de</strong>be verificar <strong>la</strong> carpeta contabilidad si se encuentra en <strong>la</strong> unidad D: <strong>de</strong> su<br />
máquina, en caso <strong>de</strong> no encontrar <strong>la</strong> carpeta contabilidad, proce<strong>de</strong>r <strong>la</strong> insta<strong>la</strong>ción <strong>de</strong>l<br />
sistema <strong>de</strong> nuevo.<br />
Después <strong>de</strong>be insta<strong>la</strong>r el SQLSERVER<br />
Luego dar doble clic sobre el icono que dice Adjuntar BD.exe para que adjunte <strong>la</strong> <strong>base</strong><br />
<strong>de</strong> <strong>datos</strong>: BDContaMaestra1 y EMPRESA_Data<br />
<br />
Le muestra <strong>la</strong> siguiente ventana<br />
Dar doble clic<br />
Dar Clic<br />
Y al momento <strong>de</strong> darle clic en don<strong>de</strong> dice Adjuntar Base <strong>de</strong> Datos, sale el siguiente mensaje<br />
<strong>de</strong> error así <strong>como</strong> se observa - seguir los siguientes pasos:<br />
Más información: www.visualcont.com / www.softwareintegrado.com
En este caso seguir los siguientes pasos:<br />
*En caso el usuario tenga varias <strong>empresas</strong> con <strong>la</strong> que ha venido trabajando, entonces tiene<br />
que entrar al administrador corporativo para Adjuntar <strong>la</strong> <strong>base</strong> <strong>de</strong> dato <strong>de</strong> <strong>la</strong>s <strong>empresas</strong>.<br />
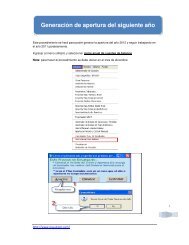
PASO Nº 01.- Dar clic en botón inicio, todos los programas, Microsoft SQL Server,<br />
Administrador Corporativo.<br />
PASO Nº 02.- Sale <strong>la</strong> siguiente ventana, allí vamos a <strong>de</strong>splegar dando clic en cada cuadradito<br />
con signo ( + )<br />
Para <strong>de</strong>splegar dar clic.<br />
Dar clic aquí.<br />
Dar clic aquí.<br />
Dar clic aquí.<br />
Más información: www.visualcont.com / www.softwareintegrado.com
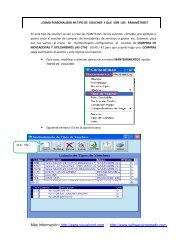
PASO Nº 03.- En <strong>la</strong> siguiente ventana vamos a <strong>de</strong>splegar <strong>la</strong>s Base <strong>de</strong> Datos, Allí vemos<br />
que no hay ningún <strong>base</strong> <strong>de</strong> <strong>datos</strong><br />
Dar<br />
clic<br />
aquí.<br />
PASO Nº 04.- En siguiente paso comenzamos el proceso <strong>de</strong> <strong>adjuntar</strong> <strong>la</strong> <strong>base</strong> <strong>de</strong> <strong>datos</strong>.<br />
Más información: www.visualcont.com / www.softwareintegrado.com
Dar clic<br />
<strong>de</strong>recho<br />
PASO Nº 05.- Sale siguiente ventana<br />
PASO Nº 06.- Sale <strong>la</strong> siguiente ventana<br />
Dar clic<br />
aquí.<br />
Dar clic<br />
aquí.<br />
Más información: www.visualcont.com / www.softwareintegrado.com
Dar clic en es cuadradito<br />
con signo (+) en<br />
seguida va mostrar el<br />
contenido <strong>de</strong> <strong>la</strong> unidad<br />
D.<br />
PASO Nº 07.- En Siguiente ventana observamos <strong>la</strong> carpeta contabilidad <strong>de</strong>ntro <strong>de</strong> <strong>la</strong> unidad<br />
D.<br />
Más información: www.visualcont.com / www.softwareintegrado.com
Dar clic para<br />
<strong>de</strong>splegar<br />
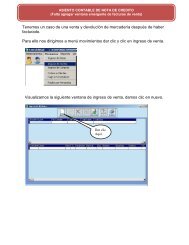
PASO Nº 08.- En esta imagen vemos el contenido <strong>de</strong> <strong>la</strong> carpeta contabilidad.<br />
Dar clic<br />
para<br />
<strong>de</strong>splegar<br />
PASO Nº 09.- En siguiente imagen vemos el contenido <strong>de</strong> <strong>la</strong> carpeta BD Maestra <strong>de</strong> <strong>la</strong> cual<br />
<strong>de</strong>bemos seleccionar BDContaMaestra1.mdf así <strong>como</strong> observamos en siguiente ventana.<br />
Más información: www.visualcont.com / www.softwareintegrado.com
1.- Dar clic para<br />
<strong>de</strong>splegar<br />
2.-seleccionas<br />
BDContaMaestra1.m<br />
df<br />
PASO Nº 10.- A continuación muestra los <strong>datos</strong><br />
PASO Nº 11.- Sale el mensaje, Se adjuntó correctamente <strong>la</strong> <strong>base</strong> <strong>de</strong> <strong>datos</strong>.<br />
Dar Clic<br />
3.- Clic en<br />
aceptar<br />
Dar clic en<br />
Aceptar<br />
Más información: www.visualcont.com / www.softwareintegrado.com
PASO Nº 12.- En este paso repetir los pasos <strong>de</strong> PASO Nº 04 HATA PASO Nº 08<br />
so<strong>la</strong>mente en este caso sería <strong>de</strong>splegar carpeta EMPRESAS <strong>de</strong>ntro <strong>de</strong> <strong>la</strong> capeta están todas<br />
<strong>la</strong> <strong>empresas</strong> creadas <strong>de</strong>l cual se <strong>de</strong>be <strong>adjuntar</strong> uno por uno <strong>la</strong> <strong>base</strong> <strong>de</strong> <strong>datos</strong> siguiendo los<br />
pasos indicados.<br />
1.- Dar clic<br />
para<br />
<strong>de</strong>splegar<br />
PASO Nº 13.- Siguiente ventana se observa <strong>la</strong> empresa y se tiene que ajuntar así <strong>como</strong><br />
indica. CARAZASCCUROCARLOS_Data.mdf<br />
1.- Dar clic para<br />
<strong>de</strong>splegar<br />
2.-seleccionas<br />
CARAZASCCUROCARLOS_<br />
Data.mdf<br />
3.-Dar Clic<br />
Más información: www.visualcont.com / www.softwareintegrado.com
PASO Nª 14.- A continuación vemos <strong>la</strong> <strong>base</strong> <strong>de</strong> <strong>datos</strong> ajuntados<br />
PASO Nº .- 15 a continuación se <strong>de</strong>be enviar un acceso directo <strong>de</strong>l ejecutable <strong>de</strong> <strong>VisualCont</strong><br />
al escritorio.<br />
Dar clic<br />
<strong>de</strong>recho,<br />
enviar al<br />
escritorio<br />
Más información: www.visualcont.com / www.softwareintegrado.com
PASO Nº 17.- en esta imagen vemos el icono <strong>de</strong> Visualcont en el escritorio,<br />
Para ejecutar el Sistema <strong>VisualCont</strong> dar doble clic en el icono visualcont.exe, luego nos va<br />
abrir <strong>la</strong> siguiente ventana ahí vamos a seleccionar <strong>la</strong> empresa que hemos adjuntado su <strong>base</strong><br />
<strong>de</strong> <strong>datos</strong><br />
Más información: www.visualcont.com / www.softwareintegrado.com
Después nos abre el sistema y esto seria todos los pasos para que funcione correctamente el<br />
sistema<br />
Más información: www.visualcont.com / www.softwareintegrado.com