
You also want an ePaper? Increase the reach of your titles
YUMPU automatically turns print PDFs into web optimized ePapers that Google loves.
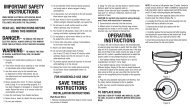
OPERACIÓN<br />
1. Cuelgue el gancho en la puerta y cuelgue<br />
la boquilla en el gancho. El gancho también<br />
puede servir para colgar las prendas que<br />
desea desarrugar. No sobrecargue el gancho.<br />
Esto podría deformarlo.<br />
2. Asegúrese que el aparato esté apagado<br />
(OFF).<br />
3. Asegúrese que la manguera esté<br />
debidamente instalada.<br />
4. Enchufe el cable en un tomacorriente.<br />
5. Encienda el aparato (ON).<br />
6. La luz en el botón de Encendido/Apagado<br />
se encenderá para indicar que el aparato<br />
está encendido.<br />
7. El aparato empezará a producir vapor<br />
después de aproximadamente 4 a 5 minutos.<br />
Mantenga la manguera en el gancho durante<br />
este tiempo.<br />
8. Para apagar el aparato, coloque el botón<br />
de Encendido/Apagado en la posición "OFF".<br />
IMPORTANT<br />
SAFETY<br />
INSTRUCTIONS<br />
When using electrical appliances, especially<br />
when children are present, basic safety<br />
precautions should always be taken, including<br />
the following:<br />
READ ALL INSTRUCTIONS<br />
BEFORE USING<br />
DANGER — Any appliance is<br />
electrically live even when the switch is off.<br />
To reduce the risk of death by electric shock:<br />
1. Always unplug appliance immediately<br />
after using.<br />
2. Do not place or store appliance where it<br />
can fall or be pulled into a tub or sink.<br />
3. Do not place in, or drop into water or other<br />
liquid.<br />
4. If an appliance falls into water, unplug it<br />
immediately. Do not reach into the water.<br />
WARNING — To reduce the risk of<br />
burns, electrocution, fire, or injury to persons:<br />
1. Do not overfill steamer as it can cause hot<br />
water to boil out and burn.<br />
2. This appliance should not be used by<br />
or near children or individuals with certain<br />
disabilities.<br />
3. Use this appliance only for its intended<br />
use as described in this manual. Do not<br />
use attachments not recommended by the<br />
manufacturer.<br />
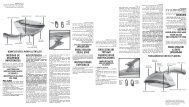
Gancho para<br />
colgar la<br />
boquilla en<br />
la puerta<br />
Mango<br />
aislante<br />
(Colgar la<br />
boquilla aquí)<br />
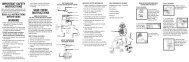
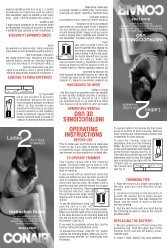
FAMILIARÍCESE CON SU DESARRUGADOR DE PRENDAS<br />
4. Never operate this appliance if it has a<br />
damaged cord or plug, if it is not working<br />
properly, or if it has been dropped or damaged,<br />
or dropped into water. Do not attempt to repair<br />
the appliance. Incorrect reassembly or repair<br />
could cause a risk of fire, electric shock, or<br />
injury to persons when the appliance is used.<br />
Return the appliance to an authorized service<br />
center for examination and repair.<br />
5. Keep the cord away from heated surfaces.<br />
Do not allow cord to contact heated surfaces.<br />
Do not pull or twist cord. Let appliance cool<br />
completely before putting away. Loop cord<br />
loosely around appliance when storing.<br />
6. Do not use outdoors or operate where<br />
aerosol (spray) products are being used or<br />
where oxygen is being administered.<br />
7. To reduce likelihood of circuit overload, do<br />
not operate another high wattage appliance<br />
on the same circuit.<br />
8. Use of an extension cord is not recommended.<br />
If an extension cord is absolutely necessary, a<br />
15-ampere-rated cord should be used. Cords<br />
rated for less amperage may overheat. Care<br />
should be taken to arrange the cord so that it<br />
cannot be pulled or tripped over.<br />
9. Use caution when changing attachments.<br />
Please be sure the unit is off and no steam<br />
is being released to avoid contact with hot<br />
water.<br />
10. Use caution when changing attachments<br />
as they may contain hot water from<br />
condensation. T-nozzle should never be placed<br />
on the unit when in use or when pre-heating.<br />
Ensure the attachments are dry or cooled off<br />
to avoid contact with hot water.<br />
11. Do not hold steamer during use. Steamer<br />
must sit on floor while steaming.<br />
Gancho plegable<br />
Boquilla fija que produce<br />
potentes chorros<br />
de vapor<br />
Manguera<br />
aislante<br />
Cable de<br />
1.85 m<br />
Botón de<br />
encendido<br />
Elemento<br />
calefactor de 1000<br />
vatios – produce<br />
vapor de alta<br />
velocidad, para<br />
lograr resultados<br />
profesionales<br />
12. Allow unit to cool before emptying reservoir<br />
for storage.<br />
13. Use caution when removing hose cap.<br />
Remove slowly.<br />
14. Do not use if unit has been dropped or<br />
damaged.<br />
CAUTION<br />
1. This appliance should never be left<br />
unattended when plugged in.<br />
2. This appliance has a polarized plug (one<br />
blade is wider than the other). As a safety<br />
feature, this plug will fit in a polarized outlet<br />
only one way. If the plug does not fit fully in<br />
the outlet, reverse the plug. If it still does<br />
not fit, contact a qualified electrician. Do not<br />
attempt to defeat this safety feature.<br />
3. Never drop or insert any object into any<br />
opening or hose.<br />
4. Do not place the steam nozzle directly on<br />
any surface or on the appliance power cord<br />
while it is hot or plugged in. Use the door<br />
hook provided.<br />
5. This product emits hot steam during use. Do<br />
not touch T-nozzle when product is in use.<br />
6. Do not steam garments while on a person.<br />
7. Before unit is turned on the hose must be<br />
extended and hanging on door hook.<br />
8. Never yank cord to disconnect from outlet.<br />
Instead, grasp plug and pull to disconnect.<br />
9. Burns could occur from touching hot metal<br />
parts, hot water, or steam. Use care when you<br />
turn a steam appliance upside down – there<br />
may be hot water in reservoir.<br />
10. Use caution when carrying steamer as it<br />
contains hot water.<br />
11. Caution: hose will be hot when in use.<br />
Avoid prolonged contact.<br />
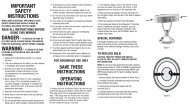
Usar el gancho para colgar<br />
la boquilla en la puerta<br />
INSTRUCCIONES<br />
DE OPERACIÓN<br />
LLENADO DEL DEPÓSITO<br />
(ANTES DE CONECTAR EL APARATO)<br />
Saque la tapa del depósito y llene el depósito<br />
con agua corriente hasta el nivel deseado, sin<br />
pasarse de la línea “Max Fill”. NO SOBRELLENE<br />
EL DEPÓSITO. Esto podría causar un derrame y<br />
provocar quemaduras. NO LLENE EL DEPÓSITO<br />
CON AGUA CALIENTE.<br />
Cómo desconectar la manguera<br />
(permita que el aparato enfríe antes de<br />
desconectar la manguera)<br />
Gire la extremidad de la manguera un cuarto<br />
de turno en sentido antihorario y álcela.<br />
Puede que la manguera esté rígida al principio.<br />
Después de usarla, se relajará y la boquilla<br />
encajará en el gancho.<br />
SAVE THESE<br />
INSTRUCTIONS<br />
FOR HOUSEHOLD USE ONLY<br />
NOT FOR COMMERCIAL OR<br />
INDUSTRIAL USE<br />
UNPACKING INSTRUCTIONS<br />
Place the box on a large sturdy flat surface.<br />
Carefully remove the appliance from the<br />
packing material. Keep all plastic bags away<br />
from children.<br />
STEAMER ASSEMBLY<br />
Attaching the Steamer Hose<br />
Align the 2 protrusions in hose cap with the<br />
2 openings in the steamer housing. Push<br />
down and twist clockwise (about one quarter<br />
turn) to securely fasten hose onto housing.<br />
1. Insert.<br />
1. Insertar.<br />
ENSAMBLADO<br />
Cómo conectar la manguera<br />
Haga coincidir las dos protuberancias en<br />
la extremidad de la manguera con las<br />
hendiduras en el orificio del depósito. Inserte<br />
la manguera en el orificio y gire un cuarto de<br />
turno en sentido horario para sujetarla.<br />
Tenga cuidado al vaciar el tanque, puesto que<br />
puede contener agua caliente.<br />
10. Tenga cuidado al desplazar el aparato,<br />
puesto que contiene agua caliente.<br />
11. La manguera se vuelve muy caliente<br />
durante el uso. Evite tocarla durante un<br />
tiempo prolongado.<br />
GUARDE ESTAS<br />
INSTRUCCIONES<br />
PARA USO DOMÉSTICO SOLAMENTE<br />
NO DISEÑADO PARA USO COMERCIAL<br />
DESEMPACADO<br />
Ponga la caja sobre una superficie llana y<br />
segura y saque el aparato cuidadosamente.<br />
Mantenga las fundas de plástico fuera del<br />
alcance de los niños.<br />
Removing the Steamer Hose<br />
(make sure unit has cooled)<br />
To remove, turn counterclockwise one<br />
quarter turn, then gently pull up until<br />
hose releases.<br />
Hose may be stiff upon removal from box.<br />
Hose will relax after initial use. T-handle will sit<br />
properly on door hook once hose is relaxed.<br />
OPERATING<br />
INSTRUCTIONS<br />
FILLING THE WATER RESERVOIR<br />
(PRIOR TO PLUGGING IN THE APPLIANCE)<br />
Remove the hose cap. Fill the reservoir with<br />
clean tap water to the desired level or until<br />
water reaches "Max Fill" line on side of unit.<br />
DO NOT OVERFILL as this will cause water to<br />
boil out of steamer and spill. Empty until water<br />
is just under the internal fill indicator. DO NOT<br />
FILL THE CONTAINER WITH HOT WATER.<br />
Hanging the t-nozzle<br />
on the door hook<br />
agua caliente. Asegúrese que estén secos y<br />
fríos antes de manipularlos. Nunca ponga la<br />
boquilla sobre el aparato cuando el aparato<br />
esté calentando o funcionando.<br />
11. El aparato debe permanecer en el piso<br />
después de encenderse. No lo alce durante<br />
el uso.<br />
12. Permita que el aparato enfríe antes de<br />
vaciar el tanque.<br />
13. Abra el tanque con mucho cuidado.<br />
PRECAUCIÓN<br />
1. Nunca deje este aparato desatendido<br />
mientras esté conectado.<br />
2. El cable de este aparato está dotado<br />
de una clavija polarizada (una pata es<br />
más ancha que otra). Como medida de<br />
seguridad, se podrá enchufar de una sola<br />
manera en el tomacorriente. Si no entrara<br />
en el tomacorriente, inviértela. Si aún no<br />
entrara completamente, comuníquese con un<br />
electricista. No intente vencer esta función de<br />
seguridad.<br />
3. Nunca deje caer ni inserte un objeto en<br />
ninguna de las aberturas o en la manguera.<br />
4. No coloque la boquilla en ninguna superficie<br />
mientras esté caliente o mientras el aparato<br />
esté conectado. Manténgala alejada del cable<br />
eléctrico. Utilice el gancho provisto.<br />
5. Este aparato produce vapor muy caliente.<br />
Nunca toque la boquilla durante el uso.<br />
6. Nunca desarrugue prendas mientras<br />
alguien las tenga puestas.<br />
7. Extienda la manguera y cuelgue la boquilla<br />
en el gancho antes de encender el aparato.<br />
8. Nunca jale el cable para desconectar el<br />
aparato. Cójalo por la clavija.<br />
9. Las partes de metal calientes, el agua<br />
caliente y el vapor pueden causar heridas.<br />
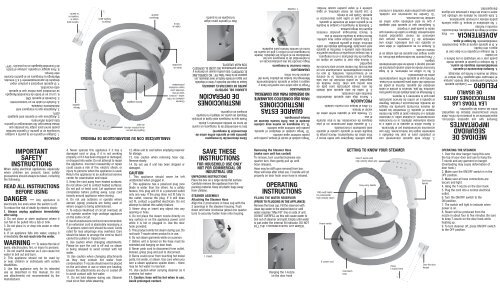
1000-watt heater<br />
for professional<br />
high-velocity steam<br />
Power switch<br />
6' power cord<br />
GETTING TO KNOW YOUR STEAMER<br />
Cool-touch<br />
hose<br />
Fixed T-nozzle with<br />
high-velocity steam jets<br />
Easy-carry handle<br />
3. Utilice este aparato únicamente con<br />
el propósito para el cual fue diseñado y<br />
solamente según las instrucciones. Sólo use<br />
accesorios recomendados por el fabricante.<br />
4. Nunca utilice el aparato si el cable o la<br />
clavija estuviesen dañados, si no funcionase<br />
correctamente, si hubiese caído, si estuviese<br />
dañado o si hubiese caído al agua. No intente<br />
reparar el aparato. El ensamblar las partes<br />
de manera incorrecta aumenta los riesgos<br />
de incendio, electrocución y heridas. Regrese<br />
el aparato a un centro de servicio autorizado<br />
para que lo examinen y lo reparen.<br />
5. Mantenga el cable alejado de las superficies<br />
calientes. No jale, retuerza ni enrolle el cable<br />
alrededor del aparato. Oprima el pedal de<br />
enrollado del cable para guardarlo en la base.<br />
Permita que el aparato enfríe completamente<br />
antes de almacenarlo.<br />
6. No lo utilice en exteriores, ni lo haga<br />
funcionar donde se estén usando productos en<br />
aerosol (spray) o donde se esté administrando<br />
oxígeno.<br />
7. Para prevenir las sobrecargas eléctricas, no<br />
opere ningún otro aparato de alto vataje en el<br />
mismo circuito.<br />
8. Aunque no es aconsejable, si debe usar<br />
el aparato con una extensión, utilice una<br />
extensión de 15 amperios, porque una<br />
extensión de menor capacidad podría<br />
sobrecalentar. Ubique el cable de manera que<br />
nadie lo pueda jalar o tropezar.<br />
9. Asegúrese que el aparato esté apagado<br />
y que no esté emitiendo vapor antes de<br />
cambiar los accesorios.<br />
10. Cambie los accesorios con cuidado,<br />
puesto que podrían estar calientes o contener<br />
(hang<br />
t-nozzle here)<br />
Cool-touch<br />
handle<br />
Over-the-door<br />
hanger<br />
MEDIDAS DE<br />
SEGURIDAD<br />
IMPORTANTES<br />
Siempre que use aparatos eléctricos,<br />
especialmente en la presencia de niños, debe<br />
tomar precauciones básicas de seguridad,<br />
entre las cuales las siguientes:<br />
LEA TODAS LAS<br />
INSTRUCCIONES ANTES<br />
DE USARLO<br />
PELIGRO — Cualquier aparato<br />
enchufado permanece bajo tensión, aunque<br />
el interruptor esté apagado. Para reducir el<br />
riesgo de muerte o herida por descarga:<br />
1. Siempre desconecte el aparato<br />
inmediatamente después de usarlo.<br />
2. No coloque ni guarde el aparato donde<br />
pueda caer o ser empujado a una bañera o<br />
un lavabo.<br />
3. No coloque el aparato ni lo deje caer al<br />
agua u otro líquido.<br />
4. Si el aparato cayera al agua, desconéctelo<br />
inmediatamente. No toque el agua.<br />
ADVERTENCIA — Para<br />
reducir el riesgo de quemaduras, electrocución,<br />
incendio o heridas:<br />
1. No sobrellene el tanque. El agua caliente<br />
podría rebosar y provocar quemaduras.<br />
2. Este aparato no debería ser utilizado por,<br />
sobre o cerca de niños o personas con alguna<br />
discapacidad.<br />
OPERATING THE STEAMER<br />
1. Over the door hanger: hang this over<br />
the top of your door and use to hang the<br />
T-nozzle and any garment on hanger.<br />
(Overloading may cause deformation of<br />
door hook.)<br />
2. Make sure the ON/OFF switch is in the<br />
OFF position.<br />
3. Make sure all hose connections are<br />
secure and tight.<br />
4. Hang the T-nozzle on the door hook.<br />
5. Plug the cord into a normal electrical<br />
outlet.<br />
6. Turn the ON/OFF switch to the<br />
ON position.<br />
7. The switch will light to indicate when<br />
power is on.<br />
8. Steam will be produced from the<br />
nozzle in about four to five minutes. Be sure<br />
to keep T-nozzle on the door hook while<br />
heating up.<br />
9. To turn steamer off, press ON/OFF switch<br />
to the OFF position.
®<br />
Manual<br />
de Instrucciones<br />
Para su seguridad y para disfrutar<br />
plenamente de este producto, siempre<br />
lea las instrucciones cuidadosamente<br />
antes de usarlo.<br />
NOTE<br />
This steamer is designed to sit on the floor. Do<br />
not put on a table or chair when in use.<br />
OTHER IMPORTANT NOTES<br />
During operation, the steamer hose<br />
may gurgle. This is a normal result of<br />
condensation collecting inside the hose.<br />
Simply lift the cool-touch handle upward<br />
until the hose is extended to its full height.<br />
The gurgling will disappear when the excess<br />
moisture inside the hose has had a chance<br />
to drain back into the base.<br />
CAUTION: Hose will be hot when<br />
in use. Avoid prolonged contact.<br />
high velocity steam<br />
jet T-nozzle<br />
Modelo <strong>GS33</strong><br />
desarrugador<br />
de prendas prendas<br />
compacto<br />
<strong>IB</strong>-8811<br />
<strong>08PA10381</strong><br />
©2008 <strong>Conair</strong> Corporation<br />
East Windsor, NJ 08520/Glendale, AZ 85307<br />
Para más información sobre los productos de<br />
<strong>Conair</strong>, llame al 1-800-3-CONAIR o visite<br />
http://www.conair.com<br />
Centro de Servicio<br />
<strong>Conair</strong> Corporation<br />
Service Department<br />
7475 N. Glen Harbor Blvd.<br />
Glendale, AZ 85307<br />
HOW TO STEAM<br />
Grasp the cool-touch handle with the steam<br />
jets in the nozzle facing away from you.<br />
Begin at the bottom of the fabric to allow the<br />
steam to rise inside and outside, removing<br />
wrinkles. Slowly move the nozzle from the<br />
bottom to the top of the fabric. Remove the<br />
nozzle from the garment and smooth the<br />
fabric with your free hand. Some fabrics<br />
are best steamed on the underside of the<br />
material. This will allow the fibers of the fabric<br />
to relax, eliminating wrinkles.<br />
NOTE: Test fabric for color fastness in an<br />
inconspicuous spot. Drape linens, towels,<br />
handkerchiefs and napkins over a rod or<br />
place on a towel rack.<br />
Heavier fabrics may require repeated<br />
steaming. Repeat as necessary.<br />
With practice, you will gain speed and<br />
efficiency. You will soon learn which fabrics<br />
require multiple steam applications.<br />
Do not directly touch velvet or silk with the<br />
steam head.<br />
using the over-the-door hook<br />
GARANTÍA LIMITADA DE UN AÑO<br />
<strong>Conair</strong> reparará o remplazará (a su opción) su<br />
aparato sin cargo por un período de 12 meses a<br />
partir de la fecha de compra si presentara defectos<br />
de materiales o fabricación.<br />
Para obtener servicio técnico bajo esta garantía,<br />
regrese su aparato al Centro de Servicio indicado<br />
a continuación, junto con su recibo de compra y<br />
un cheque o giro postal de $3.00US por gastos de<br />
manejo y envío. Los residentes de California sólo<br />
necesitan dar una prueba de compra y deben llamar<br />
al 1-800-366-0937 para recibir instrucciones<br />
de envío. En ausencia del recibo de compra, el<br />
período de garantía será de 12 meses a partir de<br />
la fecha de fabricación.<br />
CUALQUIERA GARANTÍA, OBLIGACIÓN O<br />
RESPONSABILIDAD IMPLÍCITAS, INCLUYENDO<br />
PERO NO LIMITADAS A LA GARANTÍA IMPLÍCITA<br />
DE COMERCIABILIDAD Y APTITUD PARA UN<br />
PROPÓSITO ESPECÍFICO, ESTARÁN LIMITADAS<br />
POR LOS 12 MESES DE LA PRESENTE<br />
GARANTÍA ESCRITA. Algunos Estados no permiten<br />
limitaciones sobre la duración de una<br />
garantía implícita, de modo que las limitaciones<br />
mencionadas pueden no regir para usted.<br />
CONAIR NO SERÁ RESPONSABLE EN NINGÚN<br />
CASO POR ALGÚN DAÑO ESPECIAL, INCIDENTAL<br />
O CONSECUENTE DEBIDO AL INCUMPLIMIENTO<br />
DE ESTA O CUALQUIER OTRA GARANTÍA,<br />
EXPRESA O IMPLÍCITA. Algunos Estados no<br />
permiten la exclusión o limitación de daños<br />
especiales, incidentales o consecuentes,<br />
de modo que las limitaciones mencionadas<br />
pueden no regir para usted.<br />
Esta garantía le otorga derechos legales específicos<br />
y usted puede tener otros derechos que<br />
varían de un Estado a otro.<br />
Always steam with hose in upright<br />
position, so any condensation is free<br />
to flow back into the steamer.<br />
If you steam in a low position, condensation<br />
will collect inside the hose. This will cause<br />
gurgling and some water droplets to form<br />
near the steam jets on the T-nozzle. To avoid<br />
this, frequently lift the steam handle upward<br />
until the hose is extended to its full height.<br />
TO STEAM DRAPES<br />
Wash and dry drapes as directed according<br />
to fabric type. Re-hang drapes and steam<br />
drapes when in place.<br />
CLEANING AND STORING<br />
I. Turn the ON/OFF switch to the OFF position<br />
and unplug from the power source.<br />
2. Wait for the steamer to cool completely for<br />
at least 30 minutes.<br />
3. Unplug power cord and gently wrap around<br />
the bottom of the unit.<br />
4. Remove steamer hose.<br />
5. Remove excess water from the reservoir by<br />
lifting the unit and pouring down a drain.<br />
6. Wrap hose around unit or remove hose<br />
from steamer housing and coil and store<br />
separately.<br />
Nota: El agua de la llave puede tener un<br />
alto contenido en minerales. Para lograr<br />
un desempeño óptimo, saque el agua<br />
remanente en el depósito y en el tanque<br />
interno después de cada uso.<br />
• PROBLEMA: El aparato produce poco vapor<br />
CAUSA: Depósitos de sarro<br />
SOLUCIÓN: Limpie la cal<br />
• PROBLEMA: La boquilla burbujea<br />
CAUSA: Condensación en la manguera<br />
SOLUCIÓN: Alce la manguera para que<br />
el agua baje<br />
• PROBLEMA: Gotas de agua caen de<br />
la boquilla<br />
CAUSA: Condensación en la manguera<br />
SOLUCIÓN: Alce la manguera para que<br />
el agua baje<br />
• PROBLEMA: El aparato no produce vapor<br />
CAUSA: El nivel de agua está bajo<br />
SOLUCIÓN: Apague el aparato y llene<br />
el depósito<br />
• PROBLEMA: El aparato se apaga<br />
automáticamente<br />
CAUSA: El depósito de agua está vacío<br />
SOLUCIÓN: Llene el depósito<br />
• PROBLEMA: El aparato no calienta<br />
CAUSA: El aparato no está enchufado<br />
SOLUCIÓN: Conecte el cable a un<br />
tomacorriente<br />
RESOLUCIÓN DE PROBLEMAS<br />
DECALCIFICATION<br />
If the appliance begins to produce steam<br />
more slowly than usual, if the steamer<br />
stops producing steam and then starts<br />
again, you may need to decalcify your<br />
steamer. Decalcification refers to removing<br />
the calcium deposits which form over time<br />
on the metal parts of the steamer. For best<br />
performance of the <strong>Conair</strong> Fabric Steamer,<br />
decalcify the unit from time to time. The<br />
frequency depends upon the hardness of<br />
your tap water and how often you use the<br />
steamer.<br />
To decalcify, use a solution of 1/3 white<br />
vinegar and 2/3 water in the water container.<br />
Plug the unit into electrical outlet. Turn to the<br />
ON position and run until half the amount<br />
has steamed. Turn the unit to the OFF<br />
position, unplug from electrical outlet, and<br />
allow to sit for 30 minutes.<br />
Remove excess water from the reservoir<br />
by lifting the unit, inverting and pouring the<br />
water over sink, and allowing water to drain<br />
from internal reservoir. Repeat the above<br />
procedure as many times as necessary until<br />
a normal steam rate returns, usually 2-3<br />
times. With each repeated cycle, use a fresh<br />
solution of vinegar and water. Run one cycle<br />
of fresh, cold water through the unit at the<br />
completion of decalcification, before using<br />
the unit again to steam garments.<br />
Mezcle 1/3 de vinagre blanco con 2/3 de<br />
agua. Vierta la mezcla en el depósito. Coloque<br />
el depósito en la base y encienda el aparato.<br />
Espere hasta que la mitad del líquido (1 litro)<br />
se haya evaporado. Apague y desconecte<br />
el aparato. Permita que enfríe durante 30<br />
minutos, luego vacíe el líquido remanente.<br />
Repita estos pasos 2 ó 3 veces, usando cada<br />
vez una nueva mezcla de agua con vinagre,<br />
hasta que el vapor salga normalmente de la<br />
boquilla. Antes de volver a usar el aparato<br />
para desarrugar prendas, repita estos pasos<br />
con un tanque de agua fresca.<br />
Para lograr resultados óptimos, le<br />
recomendamos que limpie la cal<br />
regularmente. La frecuencia de la limpieza<br />
dependerá de la dureza del agua y de la<br />
frecuencia de uso del aparato.<br />
LIMPIEZA DE LA CAL<br />
Si el aparato produjera menos vapor o<br />
funcionara de manera intermitente, o si<br />
el indicador de agua baja se encendiera<br />
mientras hay agua en el tanque todavía,<br />
se deberá limpiar la cal, sea eliminar los<br />
depósitos de sarro acumulados en las partes<br />
metálicas internas del aparato.<br />
TROUBLESHOOTING THE STEAMER<br />
• PROBLEM - No steam<br />
CAUSE - Steamer not turned on<br />
SOLUTION - Turn ON/OFF switch to<br />
ON position<br />
• PROBLEM - Steamer fails to heat<br />
CAUSE - Steamer not plugged in<br />
SOLUTION - Plug into electrical outlet<br />
• PROBLEM - No steam<br />
CAUSE - Water level is low<br />
SOLUTION - Turn ON/OFF switch off and<br />
refill water container<br />
• PROBLEM - Water drips from nozzle<br />
CAUSE - Condensation in hose<br />
SOLUTION - Hold the hose vertically<br />
and allow water to drain back into unit<br />
• PROBLEM - Nozzle gurgles<br />
CAUSE - Condensation in hose<br />
SOLUTION - Hold the hose vertically and<br />
allow water to drain back into unit<br />
• PROBLEM - Poor steam performance<br />
CAUSE - Sediment in container<br />
SOLUTION - Decalcify reservoir and water<br />
container<br />
Note: Minerals in water will vary in<br />
different areas. To insure continued operation<br />
of the steamer, never store without<br />
cleaning and removing excess water from<br />
the reservoir and water container.<br />
LIMPIEZA Y ALMACENAJE<br />
1. Apague (OFF) y desconecte el aparato<br />
antes de limpiarlo.<br />
2. Permita que el aparato enfríe durante 30<br />
minutos o más.<br />
3. Desconecte el cable y enróllelo.<br />
4. Desconecte la manguera.<br />
5. Vacíe el agua remanente en el depósito.<br />
6. Enrolle la manguera alrededor de la base.<br />
CONSEJOS PARA DESARRUGAR CORTINAS<br />
Lave y seque las cortinas según las<br />
instrucciones del fabricante. Cuelgue las<br />
cortinas y desarrúguelas después.<br />
Siempre sostenga la boquilla recta y alta,<br />
para que la condensación baje hacia el<br />
depósito.<br />
Si la manguera no estuviera recta, condensación<br />
se podría acumular adentro de la<br />
boquilla, causando gorgoteo y gotas que podrían<br />
mojar las prendas. Para evitar que esto<br />
ocurra, alce la manguera frecuentemente.<br />
LIMITED ONE-YEAR WARRANTY<br />
<strong>Conair</strong> will repair or replace (at our option)<br />
your unit free of charge for 12 months from<br />
the date of purchase if the appliance is<br />
defective in workmanship or materials.<br />
To obtain service under this warranty, return<br />
the defective product to the service center<br />
listed below that is nearest you, together<br />
with your purchase receipt and $3.00 for<br />
postage and handling. California residents<br />
need only provide proof of purchase and<br />
should call 1-800-366-0937 for shipping<br />
instructions. In the absence of a purchase<br />
receipt, the warranty period shall be 12<br />
months from the date of manufacture.<br />
ANY IMPLIED WARRANTIES, INCLUDING<br />
BUT NOT LIMITED TO THE IMPLIED<br />
WARRANTY OF MERCHANTABILITY AND<br />
FITNESS FOR A PARTICULAR PURPOSE,<br />
SHALL BE LIMITED IN DURATION TO THE<br />
12-MONTH DURATION OF THIS WRITTEN<br />
WARRANTY. Some states do not allow<br />
limitations on how long an implied warranty<br />
lasts, so the above limitations may not apply<br />
to you.<br />
IN NO EVENT SHALL CONAIR BE LIABLE<br />
FOR ANY SPECIAL, INCIDENTAL, OR<br />
CONSEQUENTIAL DAMAGES FOR BREACH<br />
OF THIS OR ANY OTHER WARRANTY,<br />
EXPRESS OR IMPLIED, WHATSOEVER.<br />
Some states do not allow the exclusion or<br />
limitation of special, incidental, or consequential<br />
damages, so the above limitation<br />
may not apply to you. This warranty gives<br />
you specific legal rights, and you may also<br />
have other rights, which vary from state to<br />
state.<br />
Colgar la prenda en<br />
el gancho<br />
No permita que la boquilla haga contacto con<br />
seda o terciopelo.<br />
Con práctica, desarrugar prendas se volverá<br />
más fácil y rápido y usted aprenderá cual<br />
telas necesitan más de una aplicación.<br />
Telas más densas pueden necesitar más<br />
tiempo para desarrugarse. Aplique vapor<br />
cuantas veces sea necesario.<br />
NOTA: Haga una prueba de color en un<br />
área discreta de la tela antes de desarrugar<br />
la prenda. Se le hará más fácil desarrugar<br />
toallas, servilletas y manteles colgándolos en<br />
una barra.<br />
CONSEJOS PARA DESARRUGAR PRENDAS<br />
Sostenga la boquilla con los orificios frente<br />
a la prenda. Mueva la boquilla lentamente<br />
desde abajo hasta arriba, por dentro y por<br />
fuera. Para terminar, aleje la boquilla y alise la<br />
ropa con la mano. Algunos tejidos responden<br />
mejor cuando se aplica vapor por dentro. Esto<br />
relaja las fibras y elimina las arrugas.<br />
Service Center<br />
<strong>Conair</strong> Corporation<br />
Service Department<br />
7475 N. Glen Harbor Blvd.<br />
Glendale, AZ 85307<br />
For information on any <strong>Conair</strong> products call:<br />
1-800-3-CONAIR or visit us on the web at<br />
http://www.conair.com<br />
©2008 <strong>Conair</strong> Corporation<br />
East Windsor, NJ 08520/Glendale, AZ 85307<br />
<strong>08PA10381</strong><br />
<strong>IB</strong>-8811<br />
Potentes chorros de vapor<br />
PRECAUCIÓN: La manguera se volverá<br />
caliente durante el uso. Evite tocarla.<br />
NOTA IMPORTANTE<br />
La manguera puede gorgotear durante el uso.<br />
Esto es el resultado normal de la condensación<br />
acumulada en la misma. Para corregir<br />
esto, levante la boquilla hasta extender<br />
la manguera completamente. El gorgoteo<br />
desaparecerá cuando el agua haya bajado<br />
hasta el tanque.<br />
NOTA<br />
Este aparato debe permanecer en el piso<br />
durante el uso. No lo ponga sobre una mesa<br />
o una silla.<br />
compact<br />
fa fabric ic stea steamer er<br />
Model <strong>GS33</strong><br />
Instructions<br />
for Use<br />
For your safety and continued<br />
enjoyment of this product,<br />
always read the instruction book<br />
carefully before using.<br />
®
![Instruction Booklet - Foot Bath with Bubbles & Heat [FB5X] - Conair](https://img.yumpu.com/12402142/1/190x81/instruction-booklet-foot-bath-with-bubbles-heat-fb5x-conair.jpg?quality=85)