Hydraulic Disc Brake Hose Length Adjustment ... - Bike-Manual.com
Hydraulic Disc Brake Hose Length Adjustment ... - Bike-Manual.com
Hydraulic Disc Brake Hose Length Adjustment ... - Bike-Manual.com

You also want an ePaper? Increase the reach of your titles
YUMPU automatically turns print PDFs into web optimized ePapers that Google loves.
English<br />
10<br />
4<br />
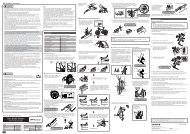
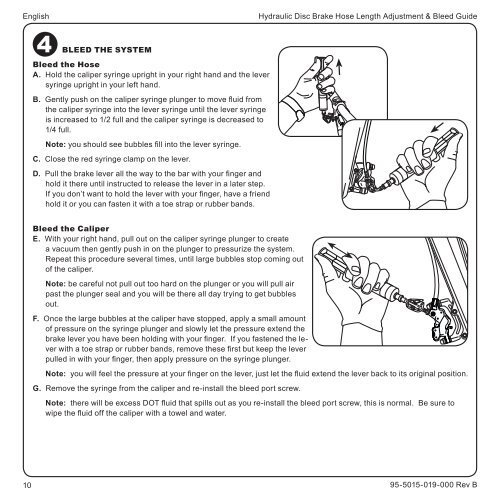
BLeeD tHe system<br />
Bleed the <strong>Hose</strong><br />
A. Hold the caliper syringe upright in your right hand and the lever<br />
syringe upright in your left hand.<br />
B. Gently push on the caliper syringe plunger to move fluid from<br />
the caliper syringe into the lever syringe until the lever syringe<br />
is increased to 1/2 full and the caliper syringe is decreased to<br />
1/4 full.<br />
Note: you should see bubbles fill into the lever syringe.<br />
C. Close the red syringe clamp on the lever.<br />
D. Pull the brake lever all the way to the bar with your finger and<br />
hold it there until instructed to release the lever in a later step.<br />
If you don’t want to hold the lever with your finger, have a friend<br />
hold it or you can fasten it with a toe strap or rubber bands.<br />
Bleed the caliper<br />
E. With your right hand, pull out on the caliper syringe plunger to create<br />
a vacuum then gently push in on the plunger to pressurize the system.<br />
Repeat this procedure several times, until large bubbles stop <strong>com</strong>ing out<br />
of the caliper.<br />
Note: be careful not pull out too hard on the plunger or you will pull air<br />
past the plunger seal and you will be there all day trying to get bubbles<br />
out.<br />
F. Once the large bubbles at the caliper have stopped, apply a small amount<br />
of pressure on the syringe plunger and slowly let the pressure extend the<br />
brake lever you have been holding with your finger. If you fastened the lever<br />
with a toe strap or rubber bands, remove these first but keep the lever<br />
pulled in with your finger, then apply pressure on the syringe plunger.<br />
<strong>Hydraulic</strong> <strong>Disc</strong> <strong>Brake</strong> <strong>Hose</strong> <strong>Length</strong> <strong>Adjustment</strong> & Bleed Guide<br />
Note: you will feel the pressure at your finger on the lever, just let the fluid extend the lever back to its original position.<br />
G. Remove the syringe from the caliper and re-install the bleed port screw.<br />
Note: there will be excess DOT fluid that spills out as you re-install the bleed port screw, this is normal. Be sure to<br />
wipe the fluid off the caliper with a towel and water.<br />
95-5015-019-000 Rev B<br />
<strong>Hydraulic</strong> <strong>Disc</strong> <strong>Brake</strong> <strong>Hose</strong> <strong>Length</strong> <strong>Adjustment</strong> & Bleed Guide<br />
Bleed the Lever<br />
H. Open the red syringe clamp on the lever.<br />
I. Pull out on the lever syringe plunger to create a vacuum, then gently push in<br />
on plunger to pressurize the system. Squeeze and release the brake lever ten<br />
times, allowing the lever to snap back to it’s starting position after squeezing (this<br />
helps break loose the bubbles). Repeat this procedure several times, until large<br />
bubbles stop <strong>com</strong>ing out of the lever.<br />
Note: be careful not pull out too hard on the plunger or you will suck air past the<br />
plunger seal into the fluid and create more bubbles that you will have to eliminate.<br />
J. Once the large bubbles at the lever have stopped, apply a small amount of<br />
pressure on the syringe plunger then remove the syringe and re-install the<br />
bleed port screw.<br />
Note: there will be a small amount of excess DOT fluid that spills out as you remove the syringe and re-install the<br />
bleed port screw, this is normal. Be sure to wipe the fluid off the lever with a towel.<br />
final touch<br />
K. Spray isopropyl alcohol or water onto a towel and wipe off the brake lever and caliper to remove any excess DOT fluid<br />
you may have missed before.<br />
L. Remove the Bleed Block from the caliper and re-install the brake pads and spreader clip.<br />
M. Re-install your wheel according to the manufacturer’s instructions.<br />
N. Empty the syringes into a sealed container and dispose of the fluid properly. Remember, used DOT fluid should be<br />
recycled or disposed of in accordance to local and federal regulations.<br />
NEVER pour used DOT fluid down a sewage or drainage system or into the ground or a body of water.<br />
Do not re-use this fluid.<br />
Do not leave the hose clamps closed, this will damage the clear tubing on the syringes.<br />
5 test tHe system<br />
You are almost ready to ride, but first it’s a good idea to test your brakes. Pull on the lever extremely hard (as hard as you<br />
can imagine yourself pulling the lever while you’re riding) several times. Make sure and look around the hose nut on the<br />
lever, and the banjo bolt on the caliper for any leaks. Make one last check of all the bolts and fittings.<br />
If everything checks out, YOU ARE READY TO RIDE!<br />
English<br />
Copyright © 2009 SRAM, LLC 11