DELUXE HAND SHOWER - Invacare
DELUXE HAND SHOWER - Invacare
DELUXE HAND SHOWER - Invacare

You also want an ePaper? Increase the reach of your titles
YUMPU automatically turns print PDFs into web optimized ePapers that Google loves.
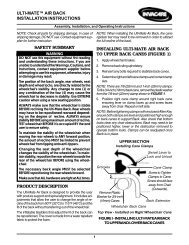
<strong>HAND</strong> <strong>SHOWER</strong> - MODEL NO. 826<br />
<strong>DELUXE</strong> <strong>HAND</strong> <strong>SHOWER</strong> - MODEL NO. 828<br />
SAVE THESE INSTRUCTIONS<br />
NOTE: Check ALL parts for shipping damage. If shipping<br />
damage is noted, DO NOT use. Contact Carrier/<br />
Dealer for further instruction.<br />
SAFETY SUMMARY<br />
The following recommendations are made<br />
for the safe installation and use of the Hand<br />
Shower:<br />
WARNING<br />
DO NOT install this equipment without first<br />
reading and understanding this instruction<br />
sheet. If you are unable to understand<br />
these Warnings, Cautions and Instructions,<br />
contact a healthcare professional, dealer<br />
or technical personnel if applicable before<br />
attempting to install this equipment -<br />
otherwise, injury or damage may occur.<br />
DESCRIPTION QUANTITY<br />
826 828<br />
Deluxe Hand Shower - 1<br />
Hand Shower 1 -<br />
Shower Hose 1 1<br />
Gasket 2 1<br />
Wall Bracket 1 1<br />
Double-Faced Tape 1 1<br />
Anchors 2 2<br />
Screws 2 2<br />
Assembly, Installation, and Operating Instructions<br />
INSTALLING THE WALL BRACKET<br />
NOTE: Refer to the WARNINGS in the SAFETY SUM-<br />
MARY of this instruction sheet.<br />
NOTE: The wall bracket can be mounted with either<br />
the screws or double-face tape provided.<br />
SCREWS - If installing the wall bracket into ceramic tile,<br />
masonary or paneled drywall, use the screws and plastic<br />
anchors provided. If installing the wall bracket into a prefab<br />
bath enclosure of fiberglass or metal it may be necessary<br />
to use toggle bolts or molliers.<br />
DOUBLE-FACE TAPE - Use double face tape only on<br />
hard surfaces such as tile, fiberglass, etc. DO NOT use<br />
on any painted surfaces or wall paper.<br />
TOOLS NEEDED: Electric Drill, 1/4-inch masonary drill<br />
bit, screwdriver, adjustable wrench, pliers and steel wool.<br />
2<br />
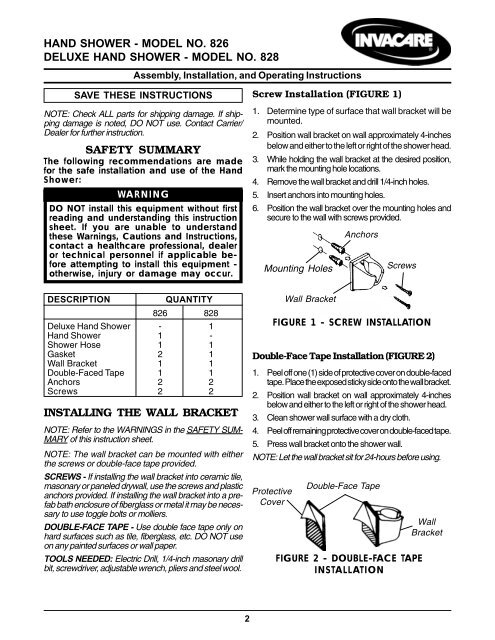
Screw Installation (FIGURE 1)<br />
1. Determine type of surface that wall bracket will be<br />
mounted.<br />
2. Position wall bracket on wall approximately 4-inches<br />
below and either to the left or right of the shower head.<br />
3. While holding the wall bracket at the desired position,<br />
mark the mounting hole locations.<br />
4. Remove the wall bracket and drill 1/4-inch holes.<br />
5. Insert anchors into mounting holes.<br />
6. Position the wall bracket over the mounting holes and<br />
secure to the wall with screws provided.<br />
Mounting Holes<br />
Double-Face Tape Installation (FIGURE 2)<br />
1. Peel off one (1) side of protective cover on double-faced<br />
tape. Place the exposed sticky side onto the wall bracket.<br />
2. Position wall bracket on wall approximately 4-inches<br />
below and either to the left or right of the shower head.<br />
3. Clean shower wall surface with a dry cloth.<br />
4. Peel off remaining protective cover on double-faced tape.<br />
5. Press wall bracket onto the shower wall.<br />
NOTE: Let the wall bracket sit for 24-hours before using.<br />
Protective<br />
Cover<br />
Wall Bracket<br />
Anchors<br />
Double-Face Tape<br />
Screws<br />
FIGURE 1 - SCREW INSTALLATION<br />
FIGURE 2 - DOUBLE-FACE TAPE<br />
INSTALLATION<br />
Wall<br />
Bracket