operating manual instrucciones de seguridad assembly ... - QVC.com
operating manual instrucciones de seguridad assembly ... - QVC.com
operating manual instrucciones de seguridad assembly ... - QVC.com

Create successful ePaper yourself
Turn your PDF publications into a flip-book with our unique Google optimized e-Paper software.
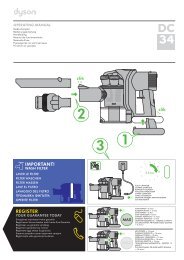
OPERATING MANUAL<br />
INSTRUCCIONES DE SEGURIDAD<br />
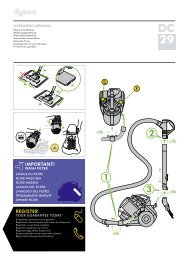
ASSEMBLY ARMADO<br />
clik<br />
clik<br />
clik<br />
WASH FILTERS<br />
Wash filters with cold water at least<br />
every month.<br />
LAVADO DE LOS FILTROS<br />
Lave los filtros con agua fría<br />
al menos cada mes.<br />
REGISTER TODAY<br />
3 easy ways to register your<br />
5 year warranty.<br />
REGISTRE HOY<br />
3 maneras faciles <strong>de</strong> registrarse<br />
sus 5 años <strong>de</strong> garantía.
IMPORTANT SAFETY INSTRUCTIONS<br />
BEFORE USING THIS APPLIANCE READ ALL INSTRUCTIONS AND CAUTIONARY MARKINGS IN THIS<br />
MANUAL AND ON THE APPLIANCE<br />
When using an electrical appliance, basic precautions should always be followed to reduce the risk of fire, electric<br />
shock, and injury to persons, including the following:<br />
WARNING<br />
TO REDUCE THE RISK OF FIRE, ELECTRIC SHOCK, OR INJURY:<br />
1. This Dyson appliance is not inten<strong>de</strong>d for use by young children or infirm persons with reduced physical, sensory or<br />
reasoning capabilities, or lack of experience and knowledge, unless they have been given supervision or instruction<br />
by a responsible person concerning use of the appliance to ensure that they can use it safely.<br />
2. Do not allow to be used as a toy. Close attention is necessary when used by or near children. Children should be<br />
supervised to ensure that they do not play with the appliance.<br />
3. Use only as <strong>de</strong>scribed in this Dyson Operating Manual. Do not carry out any maintenance other than that shown in<br />
this <strong>manual</strong>, or advised by the Dyson Helpline.<br />
4. Suitable for dry locations only. Do not use outdoors or on wet surfaces.<br />
5. Do not use to pick up water.<br />
6. Do not handle any part of the plug or appliance with wet hands.<br />
7. Do not use with a damaged cord or plug. If the supply cord is damaged it must be replaced by Dyson, its service<br />
agent or similarly qualified persons in or<strong>de</strong>r to avoid a hazard.<br />
8. If the appliance is not working as it should, has received a sharp blow, has been dropped, damaged, left outdoors,<br />
or dropped into water, do not use and contact the Dyson Helpline.<br />
9. Contact the Dyson Helpline when service or repair is required. Do not disassemble the appliance as incorrect<br />
re<strong>assembly</strong> may result in an electric shock or fire.<br />
10. Do not stretch the cord or place the cord un<strong>de</strong>r strain. Keep the cord away from heated surfaces. Do not close a<br />
door on the cord, or pull the cord around sharp edges or corners. Arrange the cord away from traffic areas and<br />
where it will not be stepped on or tripped over. Do not run the appliance over the cable.<br />
11. Do not unplug by pulling on the cord. To unplug, grasp the plug, not the cord. The use of an extension cord is not<br />
re<strong>com</strong>men<strong>de</strong>d.<br />
12. Do not use to pick up flammable or <strong>com</strong>bustible liquids, such as gasoline, or use in areas where they or their vapors<br />
may be present.<br />
13. Do not pick up anything that is burning or smoking, such as cigarettes, matches, or hot ashes.<br />
14. Keep hair, loose clothing, fingers, and all parts of the body away from openings and moving parts. Do not point the<br />
hose, wand or tools at your eyes or ears or put them in your mouth.<br />
15. Do not put any object into openings. Do not use with any opening blocked; keep free of dust, lint, hair, and anything<br />
that may reduce airflow.<br />
16. Use only Dyson re<strong>com</strong>men<strong>de</strong>d accessories and replacement parts.<br />
17. To avoid a tripping hazard rewind the cord when not in use.<br />
18. Do not use without the clear bin and filters in place.<br />
19. Do not leave the appliance when plugged in. Unplug when not in use and before servicing.<br />
20. Do not pull or carry by cord or use cord as a handle.<br />
21. Use extra care when cleaning on stairs. Do not work with the appliance above you on the stairs.<br />
22. Turn off all controls before unplugging. Unplug before connecting any tool or accessory.<br />
Do not pull on<br />
the cord.<br />
2<br />
READ AND SAVE THESE INSTRUCTIONS<br />
THIS DYSON APPLIANCE IS INTENDED FOR HOUSEHOLD USE ONLY<br />
POLARIZATION INSTRUCTIONS<br />
To reduce the risk of electric shock, this appliance has a polarized plug (one bla<strong>de</strong> is wi<strong>de</strong>r than the other). This plug<br />
will fit in a polarized outlet only one way. If the plug does not fit fully in the outlet, reverse the plug. If it still does not<br />
fit, contact a qualified electrician to install the proper outlet. Do not attempt to <strong>de</strong>feat this safety feature and do not<br />
change the plug in any way.<br />
Do not store near<br />
heat sources.<br />
Do not use near<br />
open flames.<br />
Do not run over<br />
the cord.<br />
Do not pick up<br />
water or liquids.<br />
Do not pick up<br />
burning objects.<br />
Do not use above<br />
you on the stairs.<br />
Do not put hands<br />
near the brush bar<br />
when the appliance<br />
is in use.
INSTRUCCIONES DE SEGURIDAD IMPORTANTES<br />
ANTES DE UTILIZAR ESTE APARATO, LEA TODAS LAS INSTRUCCIONES Y LA INDICACIONES DE<br />
PRECAUCIÓN QUE VIENEN TANTO EN ESTE MANUAL COMO EN EL APARATO<br />
Cuando se usa un aparato eléctrico, <strong>de</strong>ben seguirse las precauciones básicas para reducir riesgos <strong>de</strong> incendio,<br />
<strong>de</strong>scarga eléctrica y lesiones personales, que incluyen lo siguiente:<br />
PELIGRO<br />
PARA DISMINUIR EL RIESGO DE PROVOCAR UN INCENDIO, RECIBIR UNA DESCARGA ELÉCTRICA O LESIONES:<br />
1. Este aparato Dyson no fue diseñada para que ser utilizada por niños o personas débiles con capacida<strong>de</strong>s físicas,<br />
sensoriales o mentales reducidas, o que carezcan <strong>de</strong> conocimiento y experiencia al respecto, a menos que sean<br />
supervisadas o hayan recibido <strong>instrucciones</strong> por parte <strong>de</strong> una persona responsable.<br />
2. No permita que se utilice <strong>com</strong>o un juguete. Es necesaria la atención <strong>de</strong> un adulto cuando es utilizada por o cerca a<br />
un niño. Los niños <strong>de</strong>ben ser supervisados para asegurarse <strong>de</strong> que no jueguen con el aparato.<br />
3. Utilícela solamente <strong>com</strong>o se <strong>de</strong>scribe en este <strong>manual</strong> <strong>de</strong> funcionamiento Dyson. No realice ningún otro<br />
mantenimiento que no sea el mostrado en este <strong>manual</strong>, o el re<strong>com</strong>endado por la línea <strong>de</strong> ayuda <strong>de</strong> servicio al<br />
cliente Dyson.<br />
4. A<strong>de</strong>cuada solamente para lugares secos. No utilice para aspirar agua u otros líquidos.<br />
5. No utilice para aspirar agua u otros líquidos.<br />
6. No manipule el enchufe con las manos mojadas.<br />
7. No lo use si el cable o el enchufe están dañados. Si se ha dañado el cable <strong>de</strong> corriente, <strong>de</strong>berá ser reemplazado<br />
por Dyson, uno <strong>de</strong> sus representantes <strong>de</strong> servicio u otra persona igualmente capacitada a fin <strong>de</strong> evitar un peligro.<br />
8. Si el aparato no funciona <strong>com</strong>o es <strong>de</strong>bido, ha recibido un golpe fuerte o se ha caído, dañado, <strong>de</strong>jado a la<br />
intemperie, o sumergido en agua, no lo utilice y <strong>com</strong>uníquese con la línea <strong>de</strong> ayuda <strong>de</strong> servicio al cliente Dyson.<br />
9. Comuníquese con la línea <strong>de</strong> ayuda <strong>de</strong> servicio al cliente Dyson cuando se requiera mantenimiento o reparación.<br />
No <strong>de</strong>smonte el aparato, ya que un montaje incorrecto pue<strong>de</strong> provocar <strong>de</strong>scargas eléctricas o incendios.<br />
10. No estire el cable ni lo someta a tensión. Mantenga el cable alejado <strong>de</strong> superficies calientes. No atrape el cable<br />
al cerrar puertas, ni jale el cable sobre bor<strong>de</strong>s o esquinas filosas. Coloque el cable alejado <strong>de</strong> áreas <strong>de</strong> tráfico<br />
intenso, en un lugar don<strong>de</strong> nadie pueda pisar o tropezar con el cable. No pise el cable <strong>de</strong>l aparato.<br />
11. No <strong>de</strong>sconecte el aparato tirando <strong>de</strong>l cable. Para <strong>de</strong>sconectar, tome el enchufe y no el cable. No es re<strong>com</strong>endable<br />
utilizar una extensión <strong>de</strong> cable.<br />
12. No aspire líquidos inflamables o <strong>com</strong>bustibles <strong>com</strong>o gasolina, ni la utilice en áreas dón<strong>de</strong> pueda haber este tipo <strong>de</strong><br />
líquido.<br />
13. No aspire nada que se esté quemando o que emita humo, <strong>com</strong>o cigarrillos, fósforos o cenizas calientes.<br />
14. Mantenga el cabello, ropa suelta, los <strong>de</strong>dos y cualquier otra parte <strong>de</strong>l cuerpo alejados <strong>de</strong> las aberturas y <strong>de</strong> las<br />
partes móviles. No apunte con la manguera, la empuñadura o los accesorios a los ojos u orejas, ni se los meta en<br />
la boca.<br />
15. No obstruya las aberturas <strong>de</strong>l aparato con ningún objeto. No utilice el aparato si tiene alguna abertura obstruida;<br />
manténgalas libres <strong>de</strong> polvo, pelusas, cabellos o cualquier otra cosa que pueda reducir la circulación <strong>de</strong>l aire.<br />
16. Utilice solamente los accesorios y las piezas <strong>de</strong> repuesto re<strong>com</strong>endadas por Dyson.<br />
17. Para evitar un peligro <strong>de</strong> tropiezo, enrolle el cable cuando no este en uso.<br />
18. No utilice si el <strong>com</strong>partimiento cubo transparente y los filtros no están colocados en su lugar.<br />
19. No se aleje <strong>de</strong>l aparato si está conectato. Desconéctelo si no lo está usando y antes <strong>de</strong> darle servicio.<br />
20. No utilice el cable para jalar o transortar el aparato, ni use el cable <strong>com</strong>o si fuera una asa.<br />
21. Tenga mucho cuidado cuando utilice el aparato sobre una escalera. No trabaje con el aparato por encima <strong>de</strong> usted<br />
en la escalera.<br />
22. Apague todos los controles antes <strong>de</strong> <strong>de</strong>sconectar. Desenchufe antes <strong>de</strong> conectar cualquier herramienta o accesorio.<br />
CONSERVE ESTAS INSTRUCCIONES<br />
ESTE APARATO ES PARA USO DOMÉSTICO SOLAMENTE<br />
INSTRUCIONES DE POLARIZACIÓN<br />
Para disminuir el riesgo <strong>de</strong> choque eléctrico, este aparato lleva un enchufe polarizado (una clavija es más ancha<br />
que la otra). Este enchufe se conecta a una toma <strong>de</strong> corriente polarizada <strong>de</strong> una sola forma. Si el enchufe no entra<br />
totalmente en la toma <strong>de</strong> corriente, dé la vuelta al enchufe. Si sigue sin entrar bien, póngase en contacto con un<br />
electricista calificado para instalar una toma <strong>de</strong> corriente correcta. No intente violar este dispositivo <strong>de</strong> <strong>seguridad</strong>,<br />
ni haga modificación alguna al enchufe.<br />
No tire <strong>de</strong>l cable. No guar<strong>de</strong> el<br />
aparato cerca <strong>de</strong><br />
fuentes <strong>de</strong> calor.<br />
No utilice el<br />
aparato cerca <strong>de</strong><br />
una llama.<br />
No pise el cable. No aspire agua o<br />
líquidos.<br />
No aspire objetos<br />
que se estén<br />
quemando.<br />
No coloque el<br />
aparato por encima<br />
suyo cuando esté en<br />
una escalera.<br />
No ponga sus<br />
manos cerca <strong>de</strong>l<br />
cepillo cuando<br />
esté utilizando el<br />
aparato.<br />
3
4<br />
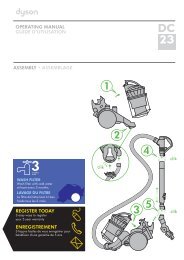
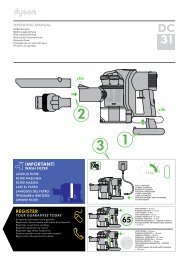
Operation<br />
Funcionamiento<br />
Emptying the clear bin<br />
Cómo vaciar el cubo transparente<br />
Looking for blockages<br />
Cómo buscar obstrucciones<br />
clik<br />
Storage<br />
Almacenamiento
nto<br />
Carrying the appliance<br />
Para trasladar el aparato<br />
Carpets or hard floors<br />
Alfombras o pisos<br />
clik<br />
Attachments<br />
Adjuntos<br />
Brush bar – clearing obstructions<br />
Cepillo: para eliminar obstrucciones<br />
5
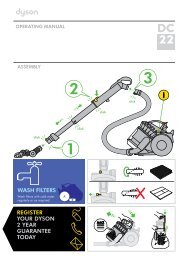
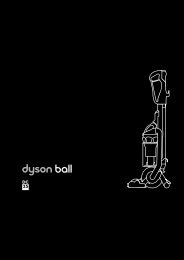
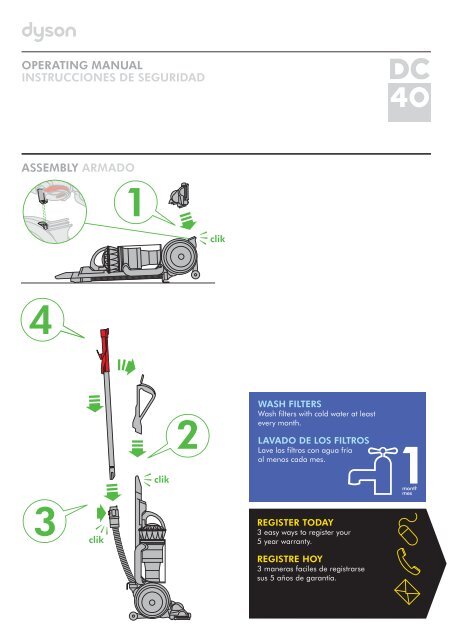
IMPORTANT!<br />
WASH FILTERS<br />
6<br />
A<br />
B<br />
¡IMPORTANTE!<br />
LAVADO DE LOS FILTROS<br />
Base plate dis<strong>assembly</strong> Desarmado <strong>de</strong> la placa base Base p
Base plate re<strong>assembly</strong> Rearmado <strong>de</strong> la placa base<br />
Wash filters with cold water at least every month.<br />
The filters may require more frequent washing if vacuuming fine dust.<br />
Lave los filtros con agua fría al menos cada mes.<br />
Si se aspira polvo fino, será necesario lavar el filtro con mayor frecuencia.<br />
clik<br />
clik<br />
clik<br />
clik<br />
clik<br />
clik<br />
7
8<br />
USING YOUR DYSON APPLIANCE<br />
PLEASE READ THE ‘IMPORTANT SAFETY INSTRUCTIONS’ IN THIS DYSON<br />
OPERATING MANUAL BEFORE PROCEEDING.<br />
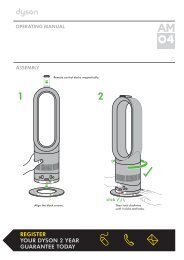
ASSEMBLY<br />
• Lie the appliance on its back.<br />
• Attach the cleaner head by sliding it on to the connections on the lower front<br />
part of the ball. Ensure the electrical plug on the cleaner head fits into the<br />
twin-block connection on the body of the appliance, which is directly above the<br />
airway. Push firmly: the cleaner head will click into place.<br />
• Stand the appliance up straight.<br />
• Attach the wand handle by sliding it on to the top of the appliance. The spring<br />
clip in the handle will click into place.<br />
• Ensure the hose is straight. Press the button on the hose. Sli<strong>de</strong> the wand into the<br />
hose.<br />
• Ensure the hose and wand sit in the recess of the handle. Sli<strong>de</strong> the end of the<br />
wand down into the handle to secure it<br />
• Close the wand cap.<br />
• Sli<strong>de</strong> the tool hol<strong>de</strong>r onto the si<strong>de</strong> of the duct as shown.<br />
• Ensure the cyclone and clear bin unit is secured to the main body of the<br />
appliance.<br />
• Attach the tools as shown. In use, the tools can be attached to either the hose or<br />
the wand.<br />
• Wind the cord counter-clockwise around the cord hooks. Secure with the clip.<br />
• To watch a short online vi<strong>de</strong>o visit: www.dyson.<strong>com</strong>/DC40gettingstarted<br />
OPERATION<br />
• Unwind the cord.<br />
• Plug the appliance into the main electricity supply.<br />
• To switch ‘ON’ or ‘OFF’ press the power button, located as shown.<br />
• To use, recline the handle. The stabilizer stand will automatically lift up.<br />
• After use, return the appliance to the upright position, pushing it firmly into<br />
place. The stabilizer wheels will automatically lower.<br />
• Then unplug the appliance, coil the cable safely and put the appliance away.<br />
• Switch ‘OFF’ the appliance, unplug and ensure it is upright before:<br />
– changing or using tools<br />
– removing the hose or airway inspection parts.<br />
• Use the cyclone carry handle to carry the appliance.<br />
ATTACHMENTS<br />
• To release the wand, open the wand cap and pull the red tube up and away<br />
from the handle until it clicks into place.<br />
• Should you wish to use the hose without the wand, follow the above instruction<br />
and press the red button to release the wand from the hose.<br />
CARPETS OR HARD FLOORS<br />
• The brush bar will always <strong>de</strong>fault to ‘ON’ (spinning) each time you switch the<br />
appliance ‘ON’ and recline it for cleaning.<br />
• The brush bar will not rotate when the appliance is upright.<br />
• To switch the brush bar ‘OFF’ (e.g. for <strong>de</strong>licate rugs and hard floors):<br />
– switch the appliance ‘ON’<br />
– recline the appliance<br />
– press the brush bar ‘ON/OFF’ button – the brush bar will stop spinning.<br />
• The brush bar will automatically stop if it be<strong>com</strong>es obstructed. See ‘Brush bar –<br />
clearing obstructions’.<br />
• Before vacuuming your flooring, rugs and carpets, check the manufacturer’s<br />
re<strong>com</strong>men<strong>de</strong>d cleaning instructions.<br />
• Some carpets may fuzz if a rotating brush bar is used when vacuuming. If this<br />
happens, we re<strong>com</strong>mend vacuuming in ‘hard floor’ mo<strong>de</strong> and consulting with<br />
the flooring manufacturer.<br />
• The brush bar on the appliance may damage some carpet types. If you are<br />
unsure, turn ‘OFF’ the brush bar.<br />
LOOKING AFTER YOUR DYSON APPLIANCE<br />
• Do not carry out any maintenance or repair work other than that shown in this<br />
Dyson Operating Manual, or advised by the Dyson Helpline.<br />
• Only use parts re<strong>com</strong>men<strong>de</strong>d by Dyson. If you do not this could invalidate your<br />
warranty.<br />
• Store the appliance indoors. Do not use or store it below 32°F (0°C). Ensure the<br />
appliance is at room temperature before <strong>operating</strong>.<br />
• Clean the appliance only with a dry cloth. Do not use any lubricants, cleaning<br />
agents, polishes or air fresheners on any part of the appliance.<br />
• If used in a garage, always wipe the base plate, ball and stabilizer wheels with<br />
a dry cloth after vacuuming to clean off any sand, dirt or pebbles that could<br />
damage <strong>de</strong>licate floors.<br />
VACUUMING<br />
CAUTION:<br />
• Do not use without the clear bin and filters in place.<br />
• Fine dust such as plaster dust or flour should only be vacuumed in very small<br />
amounts.<br />
• Do not use the appliance to pick up sharp hard objects, small toys, pins, paper<br />
clips, etc. They may damage the appliance.<br />
• When vacuuming, certain carpets may generate small static charges in the clear<br />
bin or wand. These are harmless and are not associated with the main electricity<br />
supply. To minimize any effect from this, do not put your hand or insert any<br />
object into the clear bin unless you have first emptied it and rinsed it out with<br />
cold water (see ‘Cleaning the clear bin’).<br />
• Powerful suction can cause the hose to ‘pull back’ – please take care.<br />
• Do not work with the appliance above you on the stairs.<br />
• Do not put the appliance on chairs, tables, etc.<br />
• Before vacuuming highly polished floors, such as wood or linoleum, first check<br />
that the un<strong>de</strong>rsi<strong>de</strong> of the floor tool and its brushes are free from foreign objects<br />
that could cause marking.<br />
• Do not leave the cleaner head in one place on <strong>de</strong>licate floors.<br />
• Do not use this vacuum cleaner outdoors. The Dyson Car Cleaning Kit<br />
(Mo<strong>de</strong>l 08909) is inten<strong>de</strong>d for use only insi<strong>de</strong> a garage.<br />
EMPTYING THE CLEAR BIN<br />
• Switch ‘OFF’ and unplug before emptying the clear bin.<br />
• Empty as soon as the dirt reaches the level of the MAX mark – do not overfill.<br />
• To remove the cyclone and clear bin unit, press down on the red button at the<br />
rear of the carrying handle on the cyclone.<br />
• To release the dirt, press all the way down on the red button at the rear of the<br />
carrying handle on the cyclone.<br />
• To minimize dust/allergen contact when emptying, encase the clear bin tightly in<br />
a plastic bag and empty.<br />
• Remove the clear bin carefully.<br />
• Seal the bag tightly, dispose as normal.<br />
• To refit:<br />
– close the clear bin base so it clicks into place<br />
– push the cyclone and clear bin unit into the main body of the appliance; it will<br />
click into place<br />
– ensure the cyclone and clear bin unit is secure.<br />
CLEANING THE CLEAR BIN<br />
• Remove the cyclone and clear bin (instructions above).<br />
• To separate the cyclone unit from the clear bin press the red button to open<br />
the clear bin base. This exposes a small silver button behind the red opening<br />
mechanism. Press the silver button and separate the cyclone unit from the<br />
clear bin.<br />
• Clean the clear bin with cold water only.<br />
• Ensure the clear bin is <strong>com</strong>pletely dry before replacing.<br />
• Do not use <strong>de</strong>tergents, polishes or air fresheners to clean the clear bin.<br />
• Do not put the clear bin in a dishwasher.<br />
• Do not immerse the whole cyclone unit in water or pour water into the cyclones.<br />
• Clean the cyclone shroud with a dry cloth or dry brush to remove lint and dust.<br />
• To refit:<br />
– fit the cyclone shroud into the clear bin so that the silver button clicks and<br />
engages<br />
– close the clear bin base so it clicks into place<br />
– push the cyclone and clear bin unit into the main body of the appliance;<br />
it will click into place<br />
– ensure the cyclone and clear bin unit is secure.<br />
WASHING YOUR FILTERS<br />
• Your appliance has two washable filters, located as shown.<br />
• Check and wash the filters regularly according to instructions to maintain<br />
performance.<br />
• Switch ‘OFF’ and unplug before checking or removing the filters.<br />
• The filters may require more frequent washing if vacuuming fine dust.<br />
• Wash with cold water only. Do not use <strong>de</strong>tergents.<br />
• Do not put the filters in a dishwasher, washing machine, tumble dryer, oven,<br />
microwave or near an open flame.<br />
• To remove filter A see the ‘Wash filters’ section in this Dyson Operating Manual.<br />
• After washing lay filter A on its si<strong>de</strong> and leave at least 24 hours to dry<br />
<strong>com</strong>pletely before refitting.<br />
• To remove filter B:<br />
– turn the central locking dial on the outer cover of the ball counter-clockwise<br />
until the cover is released<br />
– lift off the cover<br />
– turn the filter one-quarter counter-clockwise to release.<br />
• Filter B should be rinsed and tapped out until the water runs clean, then tapped<br />
out again to ensure all excess water is removed. Leave to dry <strong>com</strong>pletely for<br />
24 hours.<br />
• It is normal for the filter in the ball to turn grey in color.<br />
• To refit filter B:<br />
– refit the filter on to the ball<br />
– secure the filter by turning it one-quarter turn clockwise.<br />
• When refitting the outer cover of the ball, keep turning the central locking dial<br />
clockwise. When it starts to click it is locked.<br />
• To watch a short online vi<strong>de</strong>o visit: www.dyson.<strong>com</strong>/DC40filterwash
LOOKING FOR BLOCKAGES<br />
• Switch ‘OFF’ and unplug before looking for blockages. Failure to do so could<br />
result in personal injury.<br />
• Look for blockages in the wand, airways and cleaner head.<br />
• To remove the base plate to access an obstruction, see ‘Base plate –<br />
dis<strong>assembly</strong>/re<strong>assembly</strong>’.<br />
• To look for blockages in the airway between the ball and the cleaner head<br />
you will need to remove the cleaner head: see ‘Base plate – dis<strong>assembly</strong>/<br />
re<strong>assembly</strong>’ below on how to do this.<br />
• Beware of sharp objects when checking for blockages.<br />
• Refit all parts securely before using.<br />
• Clearing blockages is not covered by your warranty.<br />
CLEARING BLOCKAGES – THERMAL CUT-OUT<br />
• This appliance is fitted with an automatically resetting thermal cut-out.<br />
• Large items may block the tools or wand inlet. If any part be<strong>com</strong>es blocked the<br />
appliance may overheat and automatically cut-out.<br />
• Switch ‘OFF’ and unplug. Leave to cool down for 1-2 hours before checking the<br />
filters or for blockages.<br />
• Clear any blockage before restarting.<br />
• Clearing blockages is not covered by your warranty.<br />
BRUSH BAR – CLEARING OBSTRUCTIONS<br />
• If your brush bar is obstructed, it may shut off. If this happens, you will need to<br />
remove the blockage.<br />
• Switch ‘OFF’ and unplug before proceeding. Failure to do so could result in<br />
personal injury.<br />
• Beware of sharp objects when clearing obstructions.<br />
• If you still cannot clear the obstruction, please follow the instructions below to<br />
remove the base plate. This gives more access to the obstruction. Alternatively,<br />
contact a Dyson expert on the Dyson Helpline or visit the website. Clearing<br />
brush bar obstructions is not covered by your warranty.<br />
BASE PLATE - DISASSEMBLY/REASSEMBLY<br />
• Switch ‘OFF’ and unplug before proceeding. Failure to do so could result in<br />
personal injury.<br />
• Lie the appliance on its front.<br />
• Detach the red ‘C’ clip, which is on the connection between the cleaner head<br />
and the appliance. It is quite firm, but do not pull it off roughly. Use a constant,<br />
firm pressure.<br />
• Pull the cleaner head away from the appliance. Use a constant, firm pressure.<br />
• At each end of the cleaner head are two levers:<br />
– swing them out at right angles<br />
– the base plate will disengage<br />
– lift up the top edge (of the base plate), so it rotates to the upright position<br />
– lift out.<br />
• Beware of sharp objects when clearing obstructions.<br />
• To refit the base plate:<br />
– fit the 3 lugs on the lower edge of the base plate into the 3 slots in the base<br />
of the cleaner head<br />
– swing the upper edge of the base plate down; it will click into place.<br />
• To secure the base plate push both levers back into position so they are flush<br />
with the surface of the cleaner head.<br />
• Refit the red ‘C ‘clip onto the cleaner head. The flatter edge of the clip fits<br />
against the cleaner head. It is easier to sli<strong>de</strong> one lug into its slot before the other.<br />
• Lie the appliance on its back.<br />
• Attach the cleaner head by sliding it on to the connections on the lower front<br />
part of the ball. Ensure the electrical plug on the cleaner head fits into the<br />
twin-block connection on the body of the appliance, which is directly above the<br />
airway. Push firmly: the cleaner head will click into place.<br />
BRUSH BAR – TROUBLESHOOTING<br />
• If the brush bar has stopped spinning, follow the instructions above on clearing<br />
obstructions. Alternatively, contact a Dyson expert on the Dyson Helpline or visit<br />
the website.<br />
• To watch a short online vi<strong>de</strong>o visit: www.dyson.<strong>com</strong>/DC40brushbarmaintenance<br />
DYSON CUSTOMER CARE<br />
THANK YOU FOR CHOOSING TO BUY A DYSON APPLIANCE<br />
If you have a question about your Dyson appliance, call the Dyson Helpline with<br />
your serial number and <strong>de</strong>tails of where and when you bought the appliance<br />
Most questions can be solved over the phone by one of our Dyson Helpline staff.<br />
If your Dyson appliance needs service, call the Dyson Helpline so we can discuss<br />
the available options. If your Dyson appliance is un<strong>de</strong>r warranty, and it is a<br />
covered repair, it will be repaired at no cost.<br />
PLEASE REGISTER AS A DYSON APPLIANCE<br />
OWNER<br />
To help us ensure you receive prompt and efficient service, please register as a<br />
Dyson appliance owner. There are three ways to do this:<br />
• Online at www.dyson.<strong>com</strong><br />
• Telephone the Dyson Helpline, 1-866-277-4649.<br />
• Complete the enclosed Warranty Form and post it to us.<br />
This will confirm ownership of your Dyson appliance in the event of an insurance<br />
loss, and enable us to contact you if necessary.<br />
Your serial number can be found on your rating plate which is behind the<br />
clear bin.<br />
5 YEAR WARRANTY<br />
TERMS AND CONDITIONS OF THE DYSON 5 YEAR LIMITED<br />
WARRANTY.<br />
WHAT IS COVERED<br />
Your Dyson appliance is warranted against original <strong>de</strong>fects in material and<br />
workmanship for a period of 5 years from the date of purchase, when used for<br />
private household purposes in accordance with the Dyson Operating Manual.<br />
This warranty provi<strong>de</strong>s, at no extra cost to you, all labor and parts necessary<br />
to ensure your appliance is in proper <strong>operating</strong> condition during the warranty<br />
period. This limited warranty is subject to the following terms:<br />
WHAT IS NOT COVERED<br />
Dyson, Inc. shall not be liable for costs, damages or repairs incurred as a<br />
result of:<br />
• Appliances purchased from an unauthorized <strong>de</strong>aler.<br />
• Careless operation or handling, misuse, abuse and/or lack of maintenance or<br />
use not in accordance with the Dyson Operating Manual.<br />
• Use of the appliance other than for normal domestic purposes within the United<br />
States, e.g. for <strong>com</strong>mercial or rental purposes.<br />
• Use of parts not in accordance with the Dyson Operating Manual.<br />
• Use of parts and accessories other than those produced or re<strong>com</strong>men<strong>de</strong>d by<br />
Dyson, Inc.<br />
• External sources such as weather.<br />
• Repairs or alterations carried out by unauthorized parties or agents.<br />
• Clearing blockages from your vacuum.<br />
• Normal wear and tear, including normal wearing parts, such as clear bin, belt,<br />
filter, brush bar, hose <strong>assembly</strong> and power cord (or where external damage or<br />
abuse is diagnosed), carpet or floor damage due to use not in accordance with<br />
manufacturer’s instructions or failure to turn the brush bar off when necessary.<br />
WARRANTY SERVICE<br />
• Please fill out and return the Warranty Form, or register online at www.dyson.<br />
<strong>com</strong><br />
• Before service can take place, the terms of the limited warranty require that you<br />
contact the Dyson Helpline with your mo<strong>de</strong>l name/number, serial number, date<br />
and place of purchase.<br />
• Please keep your purchase receipt in a safe place to ensure you have this<br />
information.<br />
• All work will be carried out by Dyson, Inc. or its authorized agents.<br />
• Any replaced <strong>de</strong>fective parts will be<strong>com</strong>e the property of Dyson, Inc.<br />
• Service un<strong>de</strong>r this warranty will not extend the period of this warranty.<br />
• If your appliance is not functioning properly, please call the Dyson Helpline.<br />
Most issues can be rectified over the telephone by our trained Customer Care<br />
staff. If this is not possible Dyson, Inc. will arrange for your appliance to be<br />
repaired and returned in full working or<strong>de</strong>r at no extra cost to yourself.<br />
WARRANTY LIMITATION AND EXCLUSIONS<br />
• Any implied warranties relating to your appliance including but not limited to<br />
warranty of merchantability or warranty of fitness for a particular purpose, are<br />
limited to the duration of this warranty. This limitation is not allowed by some<br />
States and so this limitation may not apply to you.<br />
• Your remedy for breach of this warranty is limited to the warranty service<br />
<strong>de</strong>scribed above. Dyson, Inc. will not be liable for any consequential damages<br />
or inci<strong>de</strong>ntal damages you may incur in connection with your purchase and<br />
use of your appliance. This limitation is not allowed by some States and so this<br />
limitation may not apply to you.<br />
• This limited warranty gives you specific legal rights. You may also have other<br />
rights which vary by State.<br />
• This limited warranty is not transferable.<br />
IMPORTANT DATA PROTECTION INFORMATION<br />
Your <strong>de</strong>tails will be held by Dyson, Inc. or others on behalf of Dyson, Inc. so<br />
that we can assist you more quickly in our Customer Service <strong>de</strong>partment. From<br />
time to time, Dyson, Inc. may send you special offers and news of our latest<br />
innovations. Check the box on the Warranty Form within the Operating Manual<br />
if you do not wish to receive marketing or promotional information from Dyson,<br />
Inc. For more information about our data collection practices, please refer to the<br />
Dyson, Inc. privacy policy at www.dyson.<strong>com</strong>/privacy<br />
DISPOSAL INFORMATION<br />
Dyson products are ma<strong>de</strong> from high gra<strong>de</strong> recyclable materials and so should<br />
not be treated as household waste. To protect the environment please dispose of<br />
this product responsibly and recycle where possible.<br />
PRODUCT INFORMATION<br />
Please note: Small <strong>de</strong>tails may vary from those shown.<br />
9
USO DE SU APARATO DYSON<br />
ANTES DE CONTINUAR, SíRVASE LEER LAS “INSTRUCCIONES DE<br />
SEGURIDAD IMPORTANTES” DE ESTE MANUAL DE FUNCIONAMIENTO<br />
DYSON.<br />
ARMADO<br />
• Coloque el aparato en posición horizontal.<br />
• Fije el cabezal <strong>de</strong> la aspiradora <strong>de</strong>slizándolo sobre las conexiones <strong>de</strong> la parte<br />
<strong>de</strong>lantera inferior <strong>de</strong> la esfera giratoria. Compruebe que el enchufe eléctrico<br />
<strong>de</strong>l cabezal se ajusta en la conexión <strong>de</strong> bloque doble en el cuerpo <strong>de</strong>l aparato,<br />
que está directamente arriba <strong>de</strong>l conducto <strong>de</strong> ventilación. Empuje con firmeza:<br />
el cabezal emitirá un chasquido al ajustarse en su lugar.<br />
• Coloque el aparato en posición vertical.<br />
• Fije la manija <strong>de</strong>l tubo <strong>de</strong>slizándola en la parte superior <strong>de</strong>l aparato. La presilla<br />
<strong>de</strong> la manija emitirá un chasquido al ajustarse en su lugar.<br />
• Compruebe que la manguera está recta. Presione el botón en la manguera.<br />
Inserte el tubo en la manguera.<br />
• Compruebe que la manguera y la varilla se asientan en el hueco <strong>de</strong> la manija.<br />
Deslice el extremo <strong>de</strong> la varilla hacia abajo en la manija para asegurarla.<br />
• Cierre la tapa <strong>de</strong>l tubo.<br />
• Deslice el portaherramientas sobre el lateral <strong>de</strong>l conducto, <strong>com</strong>o se muestra.<br />
• Compruebe que la unidad <strong>de</strong> extractor <strong>de</strong>l polvo y cubo transparente está<br />
sujeta al cuerpo principal <strong>de</strong>l aparato.<br />
• Fije los accesorios según se ilustra, éstos se pue<strong>de</strong>n fijar a la manguera o al<br />
tubo.<br />
• Enrolle el cable en sentido opuesto al movimiento <strong>de</strong> las manecillas <strong>de</strong>l reloj,<br />
alre<strong>de</strong>dor <strong>de</strong> los ganchos especiales para el cable. Sujételo con el broche.<br />
• Para ver un breve ví<strong>de</strong>o en línea, visite: www.dyson.<strong>com</strong>/DC40gettingstarted<br />
FUNCIONAMIENTO<br />
• Desenrolle el cable.<br />
• Conecte el aparato al suministro <strong>de</strong> corriente eléctrica.<br />
• Para encen<strong>de</strong>r o apagar el aparato, presione el botón <strong>de</strong> encendido, localizado<br />
en el lugar que se ilustra.<br />
• Para utilizarlo, recline el mango. El soporte estabilizador se elevará<br />
automáticamente.<br />
• Después <strong>de</strong> utilizarlo, regrese el aparato a la posición vertical, empujando con<br />
firmeza para que que<strong>de</strong> en su lugar. Las ruedas estabilizadoras <strong>de</strong>scen<strong>de</strong>rán<br />
automáticamente.<br />
• Luego: <strong>de</strong>sconecte el aparato, enrolle el cable <strong>de</strong> manera segura, guar<strong>de</strong> el<br />
aparato.<br />
• Apague el aparato, <strong>de</strong>sconéctela y colóquela en posición vertical antes <strong>de</strong>:<br />
– cambiar o usar accesorios<br />
– quitar la manguera o las piezas para inspeccionar el paso <strong>de</strong>l aire.<br />
• Utilice la manija <strong>de</strong>l extractor <strong>de</strong> polvo para trasladar el aparato.<br />
ADJUNTOS<br />
• Para liberar el tubo, abra la tapa <strong>de</strong>l tubo y jale hacia arriba el tubo rojo para<br />
separarlo <strong>de</strong>l mango.<br />
• Si <strong>de</strong>sea utilizar la manguera sin el tubo, siga la instrucción anterior y presione<br />
el botón rojo para liberar el tubo <strong>de</strong> la manguera.<br />
ALFOMBRAS O PISOS<br />
• El cepillo está siempre activo (girando) en modo pre<strong>de</strong>terminado, cada vez que<br />
usted encien<strong>de</strong> el aparato y la reclina para efectuar la limpieza.<br />
• El cepillo no gira si el aparato está en posición vertical.<br />
• Para apagar el cepillo (por ejemplo, por ejemplo, al limpiar pisos o alfombras<br />
<strong>de</strong>licadas):<br />
– encienda el aparato<br />
– recline el aparato<br />
– presione el botón <strong>de</strong> encendido-apagado <strong>de</strong>l cepillo, éste <strong>de</strong>jará <strong>de</strong> girar.<br />
– encienda el aparato<br />
– recline el aparato<br />
– presione el botón <strong>de</strong> encendido-apagado <strong>de</strong>l cepillo, éste <strong>de</strong>jará <strong>de</strong> girar.<br />
• El cepillo <strong>de</strong>ja <strong>de</strong> funcionar automáticamente si se produce una obstrucción.<br />
Consulte “Cepillo: para eliminar obstrucciones”.<br />
• Antes <strong>de</strong> aspirar sus pisos, tapetes y alfombras, consulte las <strong>instrucciones</strong> <strong>de</strong><br />
limpieza que re<strong>com</strong>ienda el fabricante.<br />
• Algunas alfombras pue<strong>de</strong>n soltar pelusa si se emplea un cepillo giratorio<br />
al aspirar. Si esto ocurre, re<strong>com</strong>endamos que aspire en el modo <strong>de</strong> “piso<br />
expuesto” y consulte al fabricante <strong>de</strong>l piso.<br />
• El cepillo <strong>de</strong> este aparato pue<strong>de</strong> dañar ciertos tipos <strong>de</strong> alfombras. Si <strong>de</strong>sconfía,<br />
<strong>de</strong>sactive el cepillo.<br />
CÓMO CUIDAR SU APARATO DYSON<br />
• No efectúe ningún mantenimiento o reparación distintos a los que se ilustran en<br />
este Manual <strong>de</strong> Funcionamiento Dyson, o que se le sugiera en la línea <strong>de</strong> ayuda<br />
<strong>de</strong> Dyson.<br />
• Utilice únicamente las piezas que re<strong>com</strong>ienda Dyson. De no hacerlo podría<br />
anular su garantía.<br />
• Almacene el aparato en un espacio cerrado. No lo utilice si la temperatura es<br />
menor <strong>de</strong> 32° F (0° C). Compruebe que el aparato está a temperatura ambiente<br />
antes <strong>de</strong> ponerlo en funcionamiento.<br />
• Limpie el aparato únicamente con un paño seco. No utilice ningún lubricante,<br />
agente <strong>de</strong> limpieza, pulidor o aromatizador en ninguna parte <strong>de</strong>l aparato.<br />
• Si se utiliza en una cochera, limpie siempre la placa base, la esfera giratoria<br />
y las ruedas estabilizadoras con un paño seco luego <strong>de</strong> aspirar para limpiar<br />
arena, residuos o grava que puedan dañar pisos <strong>de</strong>licados.<br />
10<br />
PARA ASPIRAR<br />
PRECAUCIONES<br />
• No lo utilice si el <strong>com</strong>partimiento cubo transparente y los filtros no están<br />
colocados en su lugar.<br />
• Sólo <strong>de</strong>ben aspirarse cantida<strong>de</strong>s pequeñas <strong>de</strong> polvo fino <strong>com</strong>o por ejemplo<br />
residuos <strong>de</strong> yeso o harina.<br />
• No utilice el aparato para recoger objetos duros cortantes, juguetes pequeños,<br />
alfileres, sujetapapeles, etc., ya que podrían dañar el aparato.<br />
• Al aspirar, algunas alfombras se pue<strong>de</strong>n generar pequeñas <strong>de</strong>scargas <strong>de</strong><br />
estática en el cubo transparente o en el tubo. Éstas son totalmente inofensivas<br />
y no están asociadas al suministro <strong>de</strong> corriente eléctrica. Para minimizar<br />
sus efectos, no coloque su mano ni introduzca ningún objeto en el cubo<br />
transparente, a menos que primero lo haya vaciado y lavado con agua fría.<br />
• Si el aparato aspira a la máxima potencia, la manguera pue<strong>de</strong> retraerse.<br />
Tenga mucho cuidado.<br />
• No trabaje si el aparato está arriba <strong>de</strong> usted en las escaleras.<br />
• No suba el aparato a sillas, mesas, etc.<br />
• Antes <strong>de</strong> aspirar pisos con alto grado <strong>de</strong> pulido, <strong>com</strong>o los <strong>de</strong> ma<strong>de</strong>ra o linóleo,<br />
verifique primero que el lado inferior <strong>de</strong>l accesorio para pisos y sus cepillos no<br />
tienen objetos extraños que puedan producir marcas.<br />
• No <strong>de</strong>je el cabezal <strong>de</strong> la aspiradora en un solo lugar si está sobre pisos<br />
<strong>de</strong>licados.<br />
• No utilice este aparato a la intemperie. El Kit <strong>de</strong> limpieza para el coche Dyson<br />
(Mo<strong>de</strong>lo 08909) sólo se pue<strong>de</strong> utilizar <strong>de</strong>ntro <strong>de</strong> una cochera.<br />
CÓMO VACIAR EL CUBO TRANSPARENTE<br />
• Apague y <strong>de</strong>sconecte el aparato antes <strong>de</strong> vaciar el cubo transparente.<br />
• Vacíe el <strong>com</strong>partimiento cuando la basura llegue al nivel máximo. Evite<br />
sobrecargarlo.<br />
• Para quitar la unidad <strong>de</strong> extractor <strong>de</strong> polvo y cubo transparente, presione el<br />
botón rojo que se encuentra en la parte trasera <strong>de</strong> manija <strong>de</strong>l extractor <strong>de</strong><br />
polvo.<br />
• Para <strong>de</strong>scargar la suciedad, presione <strong>com</strong>pletamente hasta abajo el botón rojo<br />
que se encuentra en la parte trasera <strong>de</strong> manija <strong>de</strong>l extractor <strong>de</strong> polvo.<br />
• Para minimizar el contacto con polvo/alérgenos al efectuar el vaciado,<br />
introduzca el cubo transparente en una bolsa <strong>de</strong> plástico y vacíe el contenido.<br />
• Extraiga con cuidado el cubo transparente.<br />
• Selle perfectamente la bolsa, elimínela <strong>com</strong>o acostumbra hacerlo.<br />
• Para reajustar:<br />
– cierre la base <strong>de</strong>l cubo transparente hasta que emita un chasquido al<br />
ajustarse<br />
– empuje la unidad <strong>de</strong> extractor <strong>de</strong> polvo y cubo transparente en el cuerpo<br />
principal <strong>de</strong>l aparato; se escuchará un chasquido cuando se asiente en<br />
su lugar<br />
– <strong>com</strong>pruebe que la unidad <strong>de</strong> extractor <strong>de</strong> polvo y cubo transparente esté<br />
bien sujeta.<br />
CÓMO LIMPIAR EL CUBO TRANSPARENTE<br />
• Quite el extractor <strong>de</strong> polvo y el cubo transparente (conforme a las <strong>instrucciones</strong><br />
que antece<strong>de</strong>n).<br />
• Para separar el extractor <strong>de</strong> polvo <strong>de</strong>l cubo transparente presione el botón rojo<br />
para abrir la base <strong>de</strong>l cubo. Esto revela un botón plateado pequeño situado<br />
<strong>de</strong>trás <strong>de</strong>l mecanismo rojo <strong>de</strong> apertura. Presione el botón plateado y <strong>de</strong>sprenda<br />
la unidad <strong>de</strong>l extractor <strong>de</strong> polvo <strong>de</strong>l cubo transparente.<br />
• Lave el <strong>com</strong>partimiento cubo transparente únicamente con agua fría.<br />
• Asegúrese <strong>de</strong> que el <strong>com</strong>partimiento esté totalmente seco antes <strong>de</strong> colocarlo.<br />
• No utilice <strong>de</strong>tergente, líquido para encerar ni <strong>de</strong>sodorante <strong>de</strong> ambientes para<br />
limpiar el <strong>com</strong>partimiento.<br />
• No limpie el <strong>com</strong>partimiento en un lavavajillas.<br />
• No sumerja totalmente el extractor <strong>de</strong> polvo en agua ni ponga agua <strong>de</strong>ntro<br />
<strong>de</strong> éste.<br />
• Limpie la rejilla con un paño seco o un cepillo seco para eliminar la pelusa y<br />
el polvo.<br />
• Para reajustar:<br />
– ajuste la tapa <strong>de</strong>l extractor <strong>de</strong> polvo en el cubo transparente, <strong>de</strong> manera que<br />
el botón plateado emita un chasquido al acoplarse<br />
– cierre la base <strong>de</strong>l cubo transparente hasta que escuche un chasquido cuando<br />
se ajuste en su lugar<br />
– empuje la unidad <strong>de</strong> extractor <strong>de</strong> polvo y cubo transparente en el cuerpo<br />
principal <strong>de</strong>l aparato; se escuchará un chasquido cuando se asiente en<br />
su lugar<br />
– <strong>com</strong>pruebe que la unidad <strong>de</strong> extractor <strong>de</strong> polvo y cubo transparente esté<br />
bien fija.
CÓMO LAVAR LOS FILTROS<br />
• Este aparato tiene dos filtros, ubicados <strong>com</strong>o se muestra en las ilustraciones.<br />
• Revise y lave los filtros con periodicidad, conforme a las <strong>instrucciones</strong>, para<br />
mantener el rendimiento.<br />
• Apague el aparato y <strong>de</strong>sconéctelo antes <strong>de</strong> quitar los filtros.<br />
• Si se aspira polvo fino, será necesario lavar los filtros con mayor frecuencia.<br />
• Lave únicamente con agua fría. No utilice <strong>de</strong>tergentes.<br />
• No coloque los filtros en el lavavajillas, el lavarropas, la secadora, el horno, el<br />
microondas o cerca <strong>de</strong>l fuego.<br />
• Para quitar el filtro A, consulte la sección “Para lavar los filtros” <strong>de</strong> este Manual<br />
<strong>de</strong> Funcionamiento Dyson.<br />
• Después <strong>de</strong> lavarlo, <strong>de</strong>posite el filtro A sobre su costado y déjelo secar<br />
<strong>com</strong>pletamente por lo menos durante 24 horas antes <strong>de</strong> reajustarlo.<br />
• Para quitar el filtro B:<br />
– gire el selector central <strong>de</strong> bloqueo en la cubierta externa <strong>de</strong> la esfera<br />
giratoria en sentido opuesto a las manecillas <strong>de</strong>l reloj hasta que la cubierta<br />
se libere<br />
– <strong>de</strong>sprenda la cubierta<br />
– gire el filtro un cuarto <strong>de</strong> vuelta en sentido opuesto a las manecillas <strong>de</strong>l reloj<br />
para liberarlo.<br />
• El filtro B se <strong>de</strong>be lavar y golpear levemente gasta que fluya agua limpia, luego<br />
golpee levemente otra vez para <strong>com</strong>probar que haya <strong>de</strong>saparecido todo exceso<br />
<strong>de</strong> agua. Déjelo secar <strong>com</strong>pletamente durante 24 horas.<br />
• Es normal que el filtro que se encuentra en la parte inferior se vuelva <strong>de</strong><br />
color gris.<br />
• Para reajustar el filtro B:<br />
– reajuste el filtro en la esfera giratoria<br />
– fíjelo girando un cuarto <strong>de</strong> vuelta en el sentido <strong>de</strong> las manecillas <strong>de</strong>l reloj.<br />
• Cuando reajuste la cubierta exterior <strong>de</strong> la esfera giratoria, siga girando el<br />
selector central <strong>de</strong> bloqueo en el sentido <strong>de</strong> las manecillas <strong>de</strong>l reloj. Cuando<br />
<strong>com</strong>ience a emitir chasquidos, quedará bloqueada.<br />
• Para ver un breve ví<strong>de</strong>o en línea, visite: www.dyson.<strong>com</strong>/DC40filterwash<br />
CÓMO BUSCAR OBSTRUCCIONES<br />
• Apague y <strong>de</strong>sconecte antes <strong>de</strong> buscar obstrucciones. Si no lo hace, podría sufrir<br />
lesiones.<br />
• Inspeccione el tubo, los conductos <strong>de</strong> aire y el cabezal <strong>de</strong> la aspiradora en<br />
busca <strong>de</strong> obstrucciones.<br />
• Para quitar la placa base y po<strong>de</strong>r tener acceso a la obstrucción, consulte<br />
“Desarmado/rearmado <strong>de</strong> la placa base”.<br />
• Para inspeccionar posibles obstrucciones en el conducto <strong>de</strong> aire entre la esfera y<br />
la aspiradora, tendrá que <strong>de</strong>smontar el cabezal <strong>de</strong> la aspiradora: para hacerlo,<br />
consulte “Desarmado/rearmado <strong>de</strong> la placa base”, a continuación.<br />
• Tenga cuidado con los objetos filosos cuando inspeccione las obstrucciones.<br />
• Reinstale todas las partes correctamente antes <strong>de</strong> utilizarlo.<br />
• Su garantía limitada no cubre la eliminación <strong>de</strong> obstrucciones.<br />
PARA ELIMINAR BLOQUEOS: SISTEMA DE<br />
DESCONEXIÓN TÉRMICA<br />
• Este aparato posee un sistema <strong>de</strong> <strong>de</strong>sconexión térmica.<br />
• Los objetos gran<strong>de</strong>s pue<strong>de</strong>n obstruir los accesorios o la entrada <strong>de</strong>l tubo. Si se<br />
produce una obstrucción en cualquier parte, el aparato se pue<strong>de</strong> sobrecalentar<br />
y <strong>de</strong>sconectarse automáticamente.<br />
• Apague y <strong>de</strong>sconecte. Permita que se enfríe durante 1-2 horas antes <strong>de</strong><br />
inspeccionar los filtros en busca <strong>de</strong> obstrucciones.<br />
• Elimine cualquier obstrucción antes <strong>de</strong> reiniciar el funcionamiento.<br />
• Su garantía limitada no cubre la eliminación <strong>de</strong> obstrucciones.<br />
CEPILLO: PARA ELIMINAR OBSTRUCCIONES<br />
• Si la se obstruye el cepillo, se pue<strong>de</strong> apagar. Si esto ocurre, necesitará eliminar<br />
el bloqueo.<br />
• Apague y <strong>de</strong>sconecte antes <strong>de</strong> proce<strong>de</strong>r. Si no lo hace, podría sufrir lesiones.<br />
• Tenga cuidado con los objetos filosos cuando elimine las obstrucciones.<br />
• Si no pue<strong>de</strong> liberar la obstrucción, siga las <strong>instrucciones</strong> que se indican a<br />
continuación para quitar la placa base. Esto permitirá mayor acceso a la<br />
obstrucción. De forma alternativa, contacte a un experto <strong>de</strong> Dyson en la Línea<br />
Directa <strong>de</strong> Asistencia al Cliente <strong>de</strong> Dyson o visite el sitio web. La limpieza <strong>de</strong><br />
obstrucciones <strong>de</strong>l cepillo no tiene cobertura <strong>de</strong> garantía.<br />
DESARMADO/REARMADO DE LA PLACA BASE<br />
• Apague y <strong>de</strong>sconecte antes <strong>de</strong> proce<strong>de</strong>r. Si no lo hace, podría sufrir lesiones.<br />
• Recueste el aparato sobre su parte <strong>de</strong>lantera.<br />
• Desprenda el broche rojo en ‘C’ que se encuentra en la conexión entre el<br />
cabezal <strong>de</strong> la aspiradora y el aparato. Está fijo con firmeza, pero no lo jale con<br />
<strong>de</strong>masiada fuerza. Ejerza una presión constante y firme.<br />
• Extraiga el cabezal <strong>de</strong> la aspiradora <strong>de</strong>l aparato. Ejerza una presión constante<br />
y firme.<br />
• Hay dos palancas en cada extremo <strong>de</strong>l cabezal <strong>de</strong> la aspiradora:<br />
– gírelas hacia afuera en ángulos rectos<br />
– se <strong>de</strong>sconectará la placa base<br />
– levante el bor<strong>de</strong> superior, <strong>de</strong> modo que se abata a la posición vertical<br />
– abata hacia afuera.<br />
• Tenga cuidado con los objetos filosos cuando elimine las obstrucciones.<br />
• Para reajustar la placa base:<br />
– ajuste las 3 orejetas <strong>de</strong>l bor<strong>de</strong> inferior <strong>de</strong> la placa base en las 3 ranuras <strong>de</strong><br />
la base <strong>de</strong>l cabezal <strong>de</strong> la aspiradora<br />
– abata hacia abajo el bor<strong>de</strong> superior <strong>de</strong> la placa base; se escuchará un<br />
chasquido cuando se asiente en su lugar.<br />
• Para asegurar la placa base empuje las palancas hasta a<strong>com</strong>odarlas en su<br />
posición, <strong>de</strong> manera que que<strong>de</strong>n alineadas con la superficie <strong>de</strong>l cabezal <strong>de</strong> la<br />
aspiradora.<br />
• Reajuste el broche rojo en ‘C’ en el cabezal <strong>de</strong> la aspiradora. El bor<strong>de</strong> más<br />
plano <strong>de</strong>l broche se ajusta contra el cabezal. Es más fácil <strong>de</strong>slizar las orejetas<br />
una por una.<br />
• Recueste el aparato sobre su parte trasera.<br />
• Fije el cabezal <strong>de</strong> la aspiradora <strong>de</strong>slizándolo sobre las conexiones <strong>de</strong> la parte<br />
<strong>de</strong>lantera inferior <strong>de</strong> la esfera giratoria. Compruebe que la conexión eléctrica<br />
<strong>de</strong>l cabezal se ajusta en la conexión <strong>de</strong> bloque doble <strong>de</strong>l cuerpo <strong>de</strong>l aparato, la<br />
cual se encuentra directamente arriba <strong>de</strong>l conducto <strong>de</strong> ventilación. Empuje con<br />
firmeza: el cabezal emitirá un chasquido al ajustarse en su lugar.<br />
REPARACIÓN DE AVERíAS DE LA BARRA<br />
DE CEPILLO<br />
• Si el cepillo ha <strong>de</strong>jado <strong>de</strong> girar, siga las <strong>instrucciones</strong> anteriores para eliminar<br />
obstrucciones. Alternativamente, <strong>com</strong>uníquese con un experto <strong>de</strong> Dyson a la<br />
línea <strong>de</strong> ayuda <strong>de</strong> Dyson o visite el sitio web.<br />
• Para ver un breve ví<strong>de</strong>o en línea, visite:<br />
www.dyson.<strong>com</strong>/DC40brushbarmaintenance<br />
SERVICIO DE ATENCIÓN AL CLIENTE DYSON<br />
GRACIAS POR ELEGIR COMPRAR UN APARATO DYSON<br />
Si tiene alguna duda acerca <strong>de</strong> su aparato Dyson, llame a la línea <strong>de</strong> ayuda <strong>de</strong><br />
Dysonal con el número <strong>de</strong> serie e información <strong>de</strong> cuándo y dón<strong>de</strong> <strong>com</strong>pró el<br />
producto.<br />
Si tiene más preguntas, pue<strong>de</strong> consultar por teléfono a algún miembro <strong>de</strong> la<br />
línea <strong>de</strong> ayuda.<br />
Si su aparato Dyson necesita reparación llame a la Línea <strong>de</strong> ayuda <strong>de</strong> Dyson<br />
para po<strong>de</strong>r analizar las opciones disponibles. Si su aparato tiene garantía y la<br />
reparación necesaria está incluida <strong>de</strong>ntro <strong>de</strong> esa garantía, se reparará sin costo<br />
alguno.<br />
POR FAVOR REGíSTRESE COMO PROPIETARIO DE<br />
UN APARATO DYSON<br />
Para ayudarnos a asegurarle que reciba un servicio rápido y eficaz, por favor<br />
regístrese <strong>com</strong>o propietario <strong>de</strong> un aparato Dyson. Hay dos maneras <strong>de</strong> hacerlo:<br />
• En línea en www.dyson.<strong>com</strong><br />
• Llamando por teléfono a la Línea <strong>de</strong> ayuda <strong>de</strong> Dyson, 1-866-277-4649.<br />
• Enviando por correo el formulario <strong>de</strong> garantía que se anexa, dirigido a nuestra<br />
dirección.<br />
Esto confirmará que el aparato Dyson es <strong>de</strong> su propiedad en caso <strong>de</strong> que<br />
ocurra una pérdida cubierta por el seguro, y nos permitirá contactarle si<br />
fuese necesario.<br />
Encontrará el número <strong>de</strong> serie en la placa <strong>de</strong> datos <strong>de</strong> calificación que se<br />
encuentra <strong>de</strong>trás <strong>de</strong>l <strong>com</strong>partimiento cubo transparente.<br />
5 AÑOS DE GARANTíA<br />
TÉRMINOS Y CONDICIONES DE LA GARANTíA LIMITADA DE<br />
5 AÑOS DE DYSON.<br />
QUÉ ESTÁ CUBIERTO<br />
Su aparato Dyson está garantizado contra <strong>de</strong>fectos originales <strong>de</strong> material<br />
o mano <strong>de</strong> obra por un período <strong>de</strong> 5 años a partir <strong>de</strong> la fecha <strong>de</strong> <strong>com</strong>pra,<br />
cuando se utilice para fines domésticos privados y <strong>de</strong> acuerdo con el Manual<br />
<strong>de</strong> Instrucciones <strong>de</strong> Dyson. Esta garantía proporciona, sin costo para usted,<br />
toda la mano <strong>de</strong> obra y piezas para poner su aparato en perfectas condiciones<br />
<strong>de</strong> funcionamiento durante el plazo <strong>de</strong> garantía. Esta garantía está sujeta a los<br />
siguientes términos:<br />
QUÉ NO ESTÁ CUBIERTO<br />
Dyson, Inc. no será responsable <strong>de</strong> los costos incurridos <strong>com</strong>o resultado <strong>de</strong>:<br />
• Aparatos <strong>com</strong>prados a proveedores no autorizados.<br />
• El funcionamiento o manejo <strong>de</strong>scuidado, uso in<strong>de</strong>bido y/o falta <strong>de</strong><br />
mantenimiento o el uso <strong>de</strong> forma contraria al Manual <strong>de</strong> Instrucciones <strong>de</strong><br />
Dyson.<br />
• El uso <strong>de</strong>l aparato contrario a los usos domésticos normales <strong>de</strong>ntro <strong>de</strong> los<br />
Estados Unidos <strong>de</strong> América, por ejemplo, para el uso <strong>com</strong>ercial o alquiler.<br />
• El uso <strong>de</strong> piezas que no estén contempladas en el Manual <strong>de</strong> Instrucciones <strong>de</strong><br />
Dyson.<br />
• El uso <strong>de</strong> piezas y accesorios que no sean los producidos o re<strong>com</strong>endados por<br />
Dyson, Inc.<br />
• Factores externos, <strong>com</strong>o por ejemplo el clima.<br />
• Reparaciones o alteraciones llevadas a cabo por partes o agentes no<br />
autorizados.<br />
• Eliminar obstrucciones <strong>de</strong> su máquina.<br />
• Uso y <strong>de</strong>sgaste normal, incluido <strong>de</strong>sgaste normal <strong>de</strong> partes <strong>com</strong>o cubo<br />
transparente banda, filtro, cepillo, ensamble <strong>de</strong> la manguera, y cable <strong>de</strong><br />
corriente (o don<strong>de</strong> se diagnostique daño o abuso externo), daño a la alfrombra<br />
o piso <strong>de</strong>bido al uso no <strong>de</strong> acuerdo con las <strong>instrucciones</strong> <strong>de</strong>l fabricante dado al<br />
caso <strong>de</strong> no apager el cepillo cuando es necesario.<br />
SERVICIO DE GARANTíA<br />
• Por favor <strong>com</strong>plete y <strong>de</strong>vuelva el Formulario <strong>de</strong> registro <strong>de</strong>l producto, o<br />
regístrese en línea en www.dyson.<strong>com</strong><br />
• Antes <strong>de</strong> po<strong>de</strong>r realizar el servicio, los términos <strong>de</strong> la garantía exigen que se<br />
ponga en contacto con la Línea Directa <strong>de</strong> Asistencia al Cliente <strong>de</strong> Dyson y que<br />
proporcione el nombre/número <strong>de</strong>l mo<strong>de</strong>lo, número <strong>de</strong> serie, y la fecha y sitio<br />
<strong>de</strong> <strong>com</strong>pra.<br />
• Por favor mantenga la factura <strong>de</strong> <strong>com</strong>pra en un sitio seguro para asegurarse <strong>de</strong><br />
tener esta información.<br />
• Todo el trabajo lo llevará a cabo Dyson, Inc. o sus agentes autorizados.<br />
• El cambio <strong>de</strong> cualquier pieza <strong>de</strong>fectuosa no exten<strong>de</strong>rá el período <strong>de</strong> la misma.<br />
• El servicio según esta garantía no exten<strong>de</strong>rá el período <strong>de</strong> esta garantía.<br />
• Si su aparato no funciona correctamente, por favor llame a la Línea Directa<br />
<strong>de</strong> Asistencia al Cliente <strong>de</strong> Dyson. La mayoría <strong>de</strong> los problemas pue<strong>de</strong>n<br />
solucionarse por teléfono a través <strong>de</strong> nuestro personal capacitado en atención<br />
al cliente. Si esto no es posible, Dyson, Inc. hará que se repare y se le <strong>de</strong>vuelva<br />
su aparato en perfectas condiciones sin costo adicional para usted.<br />
11
12<br />
LIMITACIONES Y EXCLUSIONES DE LA GARANTíA<br />
• Cualquier garantía implícita relacionada con su aparato, incluyendo pero sin<br />
limitarse a una garantía <strong>de</strong> <strong>com</strong>erciabilidad o garantía <strong>de</strong> idoneidad para un<br />
propósito en particular, se limita a la duración <strong>de</strong> esta garantía. Esta limitación<br />
no está permitida por algunos estados, por lo que esta limitación pue<strong>de</strong> no<br />
aplicarse a usted.<br />
• El recurso por el incumplimiento <strong>de</strong> esta garantía se limita al servicio <strong>de</strong><br />
garantía <strong>de</strong>scrito anteriormente. Dyson, Inc. no será responsable <strong>de</strong> ningún<br />
daño consecuente o inci<strong>de</strong>ntal en el que se pueda incurrir en conexión con<br />
la <strong>com</strong>pra y uso <strong>de</strong> su aparato. Esta limitación no está permitida por algunos<br />
estados, por lo que esta limitación pue<strong>de</strong> no aplicarse a usted.<br />
• Esta garantía le otorga <strong>de</strong>rechos legales específicos<br />
• Esta garantía limitada no es transferible.<br />
INFORMACIÓN IMPORTANTE PARA LA<br />
PROTECCIÓN DE DATOS<br />
Sus <strong>de</strong>talles serán retenidos por Dyson, Inc. u otros en nombre <strong>de</strong> Dyson,<br />
Inc.<strong>de</strong> manera que nuestro <strong>de</strong>partamento <strong>de</strong> Servicio al cliente pueda<br />
brindarleasistencia con mayor rapi<strong>de</strong>z. Dyson, Inc. podrá enviarle<br />
periódicamenteofertas especiales y noticias relacionadas con nuestras más<br />
recientesinnovaciones. Marque la casilla que se encuentra en el Formulario<br />
<strong>de</strong> lagarantía que se incluye en el Manual <strong>de</strong> Instrucciones si usted no<br />
<strong>de</strong>searecibir información <strong>com</strong>ercial o promocional <strong>de</strong> Dyson, Inc. Para obtener<br />
másinformación acerca <strong>de</strong> nuestras prácticas <strong>de</strong> recopilación <strong>de</strong> datos, consulte<br />
lapolítica <strong>de</strong> privacidad <strong>de</strong> Dyson, Inc. en www.dyson.<strong>com</strong>/privacy<br />
INFORMACIÓN DE ELIMINACIÓN DE RESIDUOS<br />
Los productos Dyson están hechos a partir <strong>de</strong> materiales reciclables <strong>de</strong> alta<br />
calidad y, por tanto, no <strong>de</strong>ben tratarse <strong>com</strong>o residuos domésticos. Para proteger<br />
el medio ambiente, <strong>de</strong>seche este producto <strong>de</strong> forma responsable y recíclelo<br />
siempre que sea posible.<br />
INFORMACIÓN ACERCA DEL PRODUCTO:<br />
Recuer<strong>de</strong>: El producto pue<strong>de</strong> diferir en algunos pequeños <strong>de</strong>talles en<br />
<strong>com</strong>paración con las ilustraciones.
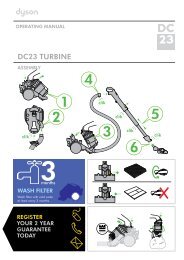
IMPORTANT!<br />
WASH FILTERS<br />
Wash filters with cold water at least every month.<br />
The filters may require more frequent washing if<br />
vacuuming fine dust.<br />
Dyson Customer Care<br />
If you have a question about your Dyson appliance, call the Dyson<br />
Helpline with your serial number and <strong>de</strong>tails of where and when<br />
you bought the appliance.<br />
Servicio <strong>de</strong> atención al cliente Dyson<br />
Si tiene alguna duda acerca <strong>de</strong> su aparato Dyson, llame a la línea<br />
<strong>de</strong> ayuda <strong>de</strong> Dysonal con el número <strong>de</strong> serie e información <strong>de</strong><br />
cuándo y dón<strong>de</strong> <strong>com</strong>pró el producto.<br />
DYSON CONTACT DETAILS<br />
Website: www.dyson.<strong>com</strong><br />
Dyson Helpline: 1-866-277-4649<br />
(7am – 9pm Monday to Friday, 9am – 6pm Saturday<br />
and Sunday).<br />
Servicio <strong>de</strong> atención al cliente Dyson:<br />
1-866-277-4649 (Lunes a viernes <strong>de</strong> 7 am a 9 pm,<br />
sábados y domingos <strong>de</strong> 9 am a 6 pm).<br />
JN.47057 PN.23481-01-02 27.03.12<br />
¡IMPORTANTE!<br />
LAVADO DE LOS FILTROS<br />
Lave los filtros con agua fría al menos cada mes.<br />
Si se aspira polvo fino, será necesario lavar el filtro<br />
con mayor frecuencia.<br />
www.dyson.<strong>com</strong>
Date of purchase | Fecha <strong>de</strong> <strong>com</strong>pra / /<br />
Serial number | Número <strong>de</strong> série<br />
Title | Tratamiento<br />
Last name | Apellido<br />
First name | Apellido<br />
Address | Dirección<br />
Zip Co<strong>de</strong> | Código postal<br />
email | email<br />
Telephone | Teléfono<br />
From time to time, we’d like to tell you about new<br />
Dyson technology and services or get your opinion<br />
about your purchase. If you’d prefer us NOT to<br />
keep in touch, please tick this box.<br />
De vez en cuando, querríamos <strong>de</strong>cirle acerca <strong>de</strong> la<br />
nueva tecnología <strong>de</strong> Dyson y servicios o conseguir su<br />
opinión acerca <strong>de</strong> su <strong>com</strong>pra. Marque esta casilla si<br />
prefiere que NO mantengamos contacto con usted.<br />
WARRANTY FORM • FORMULARIO DE GARANTÍA<br />
3 EASY WAYS TO REGISTER | 3 MANERAS FÁCILES DE REGISTRARSE<br />
ONLINE<br />
Convenient and instant.<br />
www.dyson.<strong>com</strong>/register<br />
EN LÍNEA<br />
Conveniente y al instante.<br />
www.dyson.<strong>com</strong>/register<br />
PHONE<br />
Dyson Helpline:<br />
1-866-277-4649 (7am – 9pm Monday<br />
to Friday, 9am – 6pm Saturday and<br />
Sunday).<br />
POR TELéFONO<br />
Servicio <strong>de</strong> atención al cliente Dyson:<br />
1-866-277-4649 (Lunes a viernes <strong>de</strong> 7<br />
am a 9 pm, sábados y domingos <strong>de</strong> 9<br />
am a 6 pm).<br />
MAIL<br />
Complete and return the<br />
form in the envelope supplied.<br />
POR CORREO<br />
Complete este formulario y envíelo.