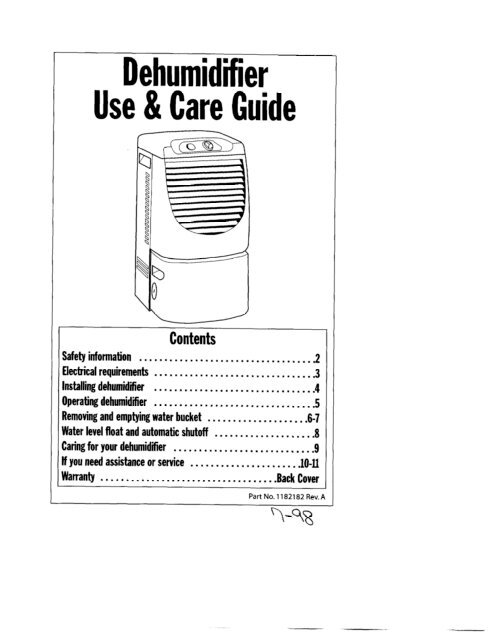
Dehumidifier Use & Care Guide - Whirlpool Corporation
Dehumidifier Use & Care Guide - Whirlpool Corporation
Dehumidifier Use & Care Guide - Whirlpool Corporation

Create successful ePaper yourself
Turn your PDF publications into a flip-book with our unique Google optimized e-Paper software.
<strong>Dehumidifier</strong><br />
<strong>Use</strong> & <strong>Care</strong> <strong>Guide</strong><br />
Contents<br />
Safety information ................................... 2<br />
Electrical requirements ................................ 3<br />
Installing dehumidifier ................................ 4<br />
Operating dehumidifier ................................ 5<br />
Removing and emptying water bucket ................... .6-7<br />
Water level float and automatic shutoff ................... .8<br />
Caring for your dehumidifier ............................ 9<br />
If you need assistance or service ..................... .lO-11<br />
Narranty ................................... Back Cover<br />
Part No. 1182182 Rev. A
Your safety and the safety of others<br />
is very important.<br />
We have provided many important safety messages in this manual and on<br />
your appliance. Always read and obey all safety messages.<br />
q t This<br />
l<br />
is the safety alert symbol. This symbol alerts you to hazards<br />
that can kill or hurt you and others. All safety messages will be<br />
preceded by the safety alert symbol and the word “DANGER” or<br />
“‘WARNING.“These words mean:<br />
You @Jl be killed or seriously injured if you don’t follow instructions.<br />
You can be killed or seriously injured if you don’t follow instructions.<br />
All safety messages will identify the hazard, tell you how to reduce the<br />
chance of injury, and tell you what can happen if the instructions are not<br />
followed.<br />
IMPORTANT SAFETY INSTRUCTIONS<br />
WARNING -To reduce the risk of fire, electrical shock, injury or<br />
sickness when using your dehumidifier, follow these basic precautions<br />
l Plug into a grounded 3 prong . Unplug dehumidifier before<br />
outlet. servicing.<br />
l Do not remove ground prong. l Do not drink water collected in the<br />
. Do not use an adapter.<br />
water bucket.<br />
l Do not use an extension cord.<br />
It is your responsibility to:<br />
- SAVE THESE INSTRUCTIONS -<br />
l Install the dehumidifier according to the Installation Instructions.<br />
l Connect the dehumidifier only to the proper kind of outlet, with the correct<br />
electrical supply and ground. See “Electrical requirements,” page 3.
Electrical Shock Hazard<br />
Plug into a grounded 3 prong<br />
outlet.<br />
Do not remove ground prong.<br />
Do not use an adapter.<br />
Do not use an extension cord.<br />
Failure to follow these<br />
instructions can result in death,<br />
fire, or electrical shock.<br />
4 115-volt (103.5 min., 126.5 max.),<br />
jO-Hz, AC-only, 15- or 20-ampere fused<br />
rnd properly grounded electrical<br />
upply is required. A time-delay fuse or<br />
ime-delay circuit breaker is<br />
,ecommended. <strong>Use</strong> a separate circuit tc<br />
:onnect only the dehumidifier.<br />
Grounding instructions:<br />
B=d Pllrg<br />
‘... . . . .<br />
For your personal safety, this<br />
dehumidifier must be grounded.This<br />
dehumidifier is equipped with a power<br />
supply cord having a 3-prong ground<br />
plug.<br />
To minimize possible shock hazard, the<br />
cord must be plugged into a mating<br />
3-prong ground-type outlet, grounded<br />
in accordance with local codes and<br />
ordinances. If a mating outlet is not<br />
available, it is the personal<br />
responsibility and obligation of the<br />
customer to have the properly<br />
grounded outlet installed by a qualified<br />
electrician.
Good air circulation is needed<br />
for best performance-allow<br />
at least 12-l 8 inches (30.5 -<br />
45.7 cm) of air space on all<br />
sides of the dehumidifier.<br />
Install dehumidifier on a level floor strong enough to support the<br />
dehumidifier with a full bucket of water.<br />
65”<br />
(18.3°c)<br />
Install your dehumidifier in an area<br />
where the temperature will not fall<br />
below 65°F (18.3”C). Lower temper-<br />
3tures will cause ice to form on coils.<br />
Keep all outside doors,<br />
windows and other<br />
openings closed when<br />
operating dehumidifier.<br />
Humid outdoor air will<br />
increase dehumidifier<br />
workload.<br />
If ice forms on coils, some dehumidifiers<br />
will continue to run. Some<br />
dehumidifiers have a de-icer feature<br />
that will automatically shut the<br />
compressor off when ice forms. (Fan<br />
continues to run.) Unplug either type of<br />
dehumidifier until ice melts and room<br />
temperature rises.
EMPTY/ADJUST BUCKET light: DRYNESS CONTROL:<br />
If this light is on, the dehumidifier is<br />
not running.This light indicates that<br />
you need to check:<br />
l If the bucket is full, empty bucket<br />
and replace.<br />
l If the bucket is not in position,<br />
remove bucket and replace. Make<br />
sure the bucket fits all the way into<br />
the dehumidifier and the light is off,<br />
or dehumidifier will not run.<br />
. .<br />
. . 0.<br />
. . . .<br />
. .<br />
. . . .<br />
. .._<br />
‘. . . . .<br />
FAN SPEED:<br />
Some models: this controls fan<br />
operation. <strong>Use</strong> desired setting.<br />
HIGH - for faster moisture removal.<br />
LOW - for slower moisture removal.<br />
This controls the amount of moisture in<br />
the room.Turn the control knob<br />
clockwise for more drying.Turn the<br />
control knob counterclockwise for less<br />
drying.Turn control knob to”NORMAL”<br />
to maintain average humidity<br />
conditions.<br />
NOTE: For the first few days of use, turn<br />
the Dryness Control clockwise to<br />
“DRYEST” to remove extra moisture<br />
from the furnishings as well as the<br />
room air.
Sickness Hazard<br />
Do not drink water collected in water bucket.<br />
Doing so can result in sickness.<br />
Bucket method:<br />
Bucket styles:<br />
2. Carry bucket to a large sink or tub.<br />
Pull bucket forward<br />
Go to Step 2.<br />
and remove.<br />
; 3. Pour water through opening into a<br />
: sink or tub.<br />
i 4. Replace bucket completely and<br />
! check that EMPTY/ADJUST BUCKET<br />
i light is off.<br />
1. Lift bucket from bottom. Pull bucket i<br />
forward and remove. Go to Step 2. i
Drain hose connection method:<br />
(to drain water from bucket continuously)<br />
1. If your dehumidifier does not have<br />
a drain hose connector cover, go to<br />
Step 2.<br />
If your dehumidifier has a drain<br />
hose connector cover, use a flat-<br />
blade screwdriver to remove cover<br />
from drain connector.Turn cover<br />
counterclockwise. Discard cover. It<br />
cannot be reused. Go to Step 2.<br />
1. Slide off the drain hose connector<br />
cover. Go to Step 2.<br />
. . Do Not<br />
X’ damage<br />
outside or<br />
connection<br />
will leak.<br />
center of’drain hose connector<br />
2. Drill out only the center of the drain<br />
hose connector. <strong>Use</strong> a minimum l/4”<br />
drill bit.<br />
3. Attach a garden hose to drain hose<br />
connector.The garden hose should<br />
not be longer than 8 feet (2.4 m). Run<br />
other end of garden hose into a floor<br />
drain. Check that the hose lies flat<br />
and in the drain.<br />
To use the bucket without the garden hose:<br />
For bucket style 1:<br />
<strong>Use</strong> a garden hose cap to seal the drain<br />
hose connector.<br />
For bucket style 2:<br />
<strong>Use</strong> a garden hose cap to seal the drain<br />
hose connector.<br />
Replace drain hose connector cover.
411 dehumidifiers have automatic<br />
shutoff and a water level float. Some<br />
dehumidifiers feature an adjustable<br />
water Level Float.The bucket must be<br />
properly aligned for the Water Level<br />
Float to work.<br />
For models with non-adjustable<br />
Water level float:<br />
The Water Level Float will shut off the<br />
dehumidifier automatically.<br />
For models with adjustable<br />
Water level Float:<br />
\\<br />
You can set the adjustable Water Level<br />
Float at the”high”or “low” position. Both<br />
settings will turn off the dehumidifier<br />
automatically.<br />
“High”setting: Water Level Float is<br />
preset to the”high” position-left side<br />
of opening.The dehumidifier will shut<br />
off automatically when bucket is 3/4<br />
full.<br />
“Low” setting: Slide Water Level Float to<br />
“low” position-right side of opening<br />
-to make the bucket lighter to carry.<br />
The dehumidifier will shut off<br />
automatically when bucket is l/2 full.<br />
\<br />
\
General cleaning and<br />
maintenance<br />
1. Dust the front grille and side panels<br />
with a soft brush or the dusting<br />
attachment of your vacuum.<br />
2. If cabinet paint chips, you can touch<br />
up the paint with a good grade<br />
enamel paint to prevent rust.<br />
Water bucket cleanin<br />
Every few weeks,<br />
rinse the inside of<br />
the water bucket<br />
with a mild<br />
detergent to<br />
prevent growth<br />
of mold, mildew<br />
and bacteria.<br />
Cleaning the interior coil<br />
For best efficiency, clean the coil at<br />
least once a year with the brush<br />
attachment of your vacuum. Be sure<br />
the coil is dry for easier cleaning.<br />
Tool needed:<br />
Phillips screwdriver<br />
Removing front of dehumidifier:<br />
Electrical Shock Hazard<br />
Unplug dehumidifier before<br />
cleaning.<br />
Replace all panels before<br />
operating.<br />
Failure to do so can result in<br />
I death or electrical shock.<br />
1. Unplug dehumidifier or disconnect<br />
power supply.<br />
2. Remove water bucket.<br />
Fliliwhead<br />
3. Remove 3 screws from each side of<br />
the front panel.<br />
4. Remove the front panel by holding<br />
the bottom sides and lifting up and<br />
out. Do not remove top cover or<br />
cabinet.<br />
5. Clean coils with brush attachment of<br />
your vacuum cleaner. Be careful -<br />
coil fins are sharp.<br />
NOTE: The refrigerant coil is all that<br />
needs to be cleaned on the inside of<br />
the dehumidifier.<br />
6. Replace the front panel and water<br />
bucket.<br />
7. Plug in dehumidifier or reconnect<br />
power supply.
If you need service or call with a question, have this information ready:<br />
Model number<br />
Senal number<br />
Purchase<br />
Phone number<br />
Store<br />
Model and serial numbers are located on the wall behind the water bucket.<br />
1. Before calling for<br />
assistance. . .<br />
Performance problems often result<br />
from little things you can find and fix<br />
yourself without tools of any kind.<br />
<strong>Dehumidifier</strong> will not run:<br />
. Is unit plugged into a live circuit with<br />
proper voltage?<br />
. Is unit turned on?<br />
* Is water bucket installed properly?<br />
. Does water bucket need emptying?<br />
l Has a house fuse blown or circuit<br />
breaker tripped?<br />
Unit runs but does not dehumidify:<br />
l Is unit in defrost cycle? (Provided on<br />
some models.)<br />
Normal operating sounds:<br />
When your dehumidifier is operating<br />
normally, you will hear sounds such as:<br />
l Compressor sounds-the compressor<br />
can be loud.This is normal.<br />
.“Clicking” sounds-can be heard when<br />
the unit or compressor turns off and<br />
on, and when the Automatic Shutoff<br />
Switch is working.<br />
l Air movement from the fan.<br />
Normal operating conditions:<br />
l Unit will put out heat.<br />
l Do not operate below 65°F (18.3”C).<br />
2. lf you need assistance in<br />
the U.S.A.. . .<br />
Call your local dealer or the <strong>Whirlpool</strong><br />
Consumer Assistance Center toll-free<br />
at l-800-253-1 301. When requesting<br />
assistance, please provide model<br />
number, serial number, date of<br />
purchase, and a complete description<br />
of the problem.This information is<br />
needed to better respond to your<br />
request.<br />
If you need further assistance,you can<br />
write to:<br />
Consumer Assistance Center<br />
c/o Correspondence Dept.<br />
2000 North M-63<br />
Benton Harbor, Ml 49022-2692<br />
Please include a daytime phone<br />
number in your correspondence.
3. tf you need assistance or<br />
service in Canada.. .<br />
Contact the dealer from whom you<br />
purchased your appliance, or call the<br />
Consumer Assistance Centre toll free,<br />
8~30 a.m. - 6:00 p.m. (EST),<br />
at I-800-461 -5681.<br />
OR<br />
Contact your nearest direct service<br />
branch or authorized servicing outlet<br />
to service your appliance. (See list<br />
below.)<br />
NOTE: When asking for help or<br />
service:<br />
Please provide a detailed description<br />
of the problem,your appliance’s<br />
complete model and serial numbers,<br />
and the purchase date.This<br />
information will help us respond<br />
properly to your request.<br />
Direct service branches:<br />
BRITISH<br />
COLUMBIA l-800-665-6788<br />
ALBERTA l-800-661-6291<br />
ONTARIO<br />
Ottawa area l-800-267-3456<br />
(except 807 area code)<br />
Outside the Ottawa area l-800-807-6777<br />
MANITOBA,<br />
SASKATCHEWAN<br />
and 807 area code in<br />
ONTARIO l-800-665-1 683<br />
QUEBEC Montreal<br />
(except South Shore) l-800-361 -3032<br />
South Shore Montreal l-800-361 -0950<br />
Quebec City l-800-361 -1523<br />
Sherbrooke l-800-567-6966<br />
ATLANTIC<br />
PROVINCES 1-800-565-l 598<br />
If you need further assistance, you can<br />
write to:<br />
Consumer Relations Department<br />
lnglis Limited<br />
1901 Minnesota Court<br />
Mississauga, Ontario L5N 3A7<br />
Please include a daytime phone<br />
number in your correspondence.
LENGTH OF WARRANTY WE WILL PAY FOR<br />
FULL ONE-YEAR WARRANTY Replacement parts and<br />
From Date of Purchase repair labor to correct defects<br />
in materials or workmanship.<br />
FULL FIVE-YEAR WARRANTY Replacement parts and<br />
From Date of Purchase repair labor to correct defects<br />
in materials or workmanship in<br />
the sealed refrigeration system.<br />
These parts are:<br />
1. Compressor 4. Drier-Strainer<br />
2. Evaporator 5. Connecting<br />
3. Condenser Tubing<br />
WE WILL NOT PAY FOR<br />
A. Service calls to:<br />
1. Correct the installation of your dehumidifier.<br />
2. Instruct you how to use your dehumidifier.<br />
3. Replace house fuses or correct house wiring.<br />
B. Pickup and delivery. This dehumidifier is designed to be repaired in<br />
the home.<br />
C. Damage to the dehumidifier caused by accident, misuse, fire,<br />
flood, acts of God or use of products not mentioned in this<br />
manual.<br />
D. Repairs to parts or systems resulting from unauthorized modifications<br />
made to the dehumidifier.<br />
E. In Canada, travel or transportation expenses for customers who<br />
reside in remote areas.<br />
Service under the full warranties must be provided by an authorized service<br />
:ompany.<br />
WHIRLPOOL CORPORATION SHALL NOT BE LIABLE FOR INCIDENTAL OR<br />
CONSEQUENTIAL DAMAGES. Some states or provinces do not allow the exclusion<br />
)r limitation of incidental or consequential damages, so this limitation or exclusion<br />
nay not apply to you. This warranty gives you specific legal rights, and you may als<br />
iave other rights which vary from state to state or province to province.<br />
Dutside the United States and Canada, a different warranty may also apply. For<br />
details, please contact your authorized dealer.<br />
If you need service, first see the ‘If you need assistance or service” section of thi<br />
oook. After checking “If you need assistance or service,” additional help can be<br />
found by calling the <strong>Whirlpool</strong> Consumer Assistance Center telephone number,<br />
1-800-253-1301, from anywhere in the U.S.A. For service in Canada, see “If you<br />
need assistance or service in Canada” for the service branch in your area.<br />
Part No. 1182182 Rev. A l/9<br />
81998 <strong>Whirlpool</strong> <strong>Corporation</strong> Printed in U.S.1
Manual de uso y<br />
cuidado del<br />
deshumidificador<br />
Contenido<br />
Informaci6n de seguridad . . . . . . . . . . . . . . . . . . . . . . . . . . . . . 2<br />
Requisitos elCctricos . . . . . . . . . . . . . . . . . . . . . . . . . . . . . . . . . 3<br />
C6mo in&alar el deshumidificador . . . . . . . . . . . . . . . . . . . . . . .4<br />
lnstrucciones de operacidn . . . . . . . . . . . . . . . . . . . . . . . . . . . . 5<br />
Cimo sacar y vaciar el balde de agua . . . . . . . . . . . . . . . . . . .6-7<br />
Flotador de nivel del agua y desconexiin automitica . . . . . . . . . .8<br />
Cuidado de su deshumidificador . . . . . . . . . . . . . . . . . . . . . . . .9<br />
Si necesita ayuda o servicio tecnico . . . . . . . . . . . . . . . . . . .10-U<br />
Garantia . . . . . . . . . . . . . . . . . . . . . . . . . . . . . . . . . . Contratapa<br />
Parte No. 1182182 Rev. A
Su seguridad y la de 10s dem& es muy<br />
importante para nosotros.<br />
Hemos incluido muchos mensajes importantes de seguridad en este<br />
manual y en su electrodomestico. Lea y obedezca siempre todos 10s<br />
mensajes de seguridad.<br />
Este es el simbolo de advertencia de seguridad. Este simbolo le<br />
f llamara la atencion sobre peligros que le pueden causar lesiones o<br />
0<br />
l<br />
la muerte a usted y otras personas. Todos 10s mensajes de<br />
seguridad estan precedidos por el simbolo de advertencia de seguridad y<br />
la palabra “PELIGRO” o “ADVERTENCIA”. Estas palabras significan:<br />
Si no sigue las instrucciones usted morir& o sufrird una lesi6n grave.<br />
Si no sigue las instrucciones usted DUede morir o sufrir una lesidn<br />
grave.<br />
Todos 10s mensajes de seguridad identifican el peligro, le informan c6mo<br />
reducir las posibilidades de sufrir una lesion y lo que puede suceder si no<br />
sigue las instrucciones.<br />
NSTRUCCIONES IMPORTANTES DE SEGURIDAD I<br />
ADVERTENCIA - Para reducir el riesgo de incendio, descarga<br />
elktrica, lesi6n o enfermedad al usar su deshumidificador, siga<br />
estas precauciones bhsicas:<br />
. Enchufelo en un contact0 de l No use cable alargador.<br />
pared de conexion a tierra con<br />
tres terminales.<br />
l Desenchufe el deshumidificador<br />
antes de darle mantenimiento o<br />
l No quite la terminal para conexion servicio.<br />
a tierra. l No tome el agua acumulada en el<br />
l No use adaptador. balde.<br />
- GUARDE ESTAS INSTRUCCIONES -<br />
2s su responsabilidad:<br />
lnstalar el deshumidificador de acuerdo con las instrucciones de instalacion.<br />
Enchufar el deshumidificador unicamente en el tipo de contact0 de pared<br />
adecuado, con la alimentacion electrica y la conexibn a tierra correctas. Vea<br />
“Requisitos electricos” en la pagina 3.
Peligro de descarga elktrica<br />
Enchtifelo en un contact0 de<br />
pared de conexi6n a tierra con<br />
tres terminales.<br />
No quite la terminal para<br />
conexi6n a tierra.<br />
No use adaptador.<br />
No use cable alargador.<br />
No seguir estas instrucciones<br />
puede ocasionar la muerte, un<br />
incendio o descarga ektrica.<br />
Se requiere una alimentacion electrica<br />
de 115 volt. (103.5 min, 126.5 mix), 60<br />
HZ, solo CA, o 20 amperes, con fusibles<br />
y debidamente conectada a tierra. Se<br />
recomienda emplear un a fusible de<br />
retard0 o interruptor de circuit0<br />
retardador. <strong>Use</strong> un circuit0 separado<br />
solo para el deshumidificador.<br />
lnstrucciones de conexih<br />
a tierra:<br />
contact0 de pad de conexkin a krra<br />
con tns termindes<br />
enchufe bipolar<br />
%.<br />
. . . . . .<br />
....<br />
con conexih<br />
0<br />
a Cetra ‘:.<br />
t&<br />
fly Pa<br />
COWlihl<br />
. ..-<br />
. . . .<br />
Para su seguridad personal, este<br />
deshumidificador debe estar conectado<br />
a tierra. Este deshumidificador esta<br />
equipado con un cable de alimentacion<br />
con un enchufe tripolar con conexion a<br />
tierra.<br />
Para reducir al minimo el peligro de una<br />
descarga electrica, el cable debe<br />
enchufarse en un contact0 de pared<br />
con tres terminales, del mismo tipo,<br />
conectado a tierra de acuerdo con<br />
todos 10s reglamentos y normas locales.<br />
Si no se dispone de un contact0 de<br />
pared del mismo tipo, es<br />
responsabilidad personal y obligation<br />
del cliente hater que un electricista<br />
calificado instale un contact0 de pared<br />
del mismo tipo, conectado a tierra<br />
correctamente.
Para mejor rendimiento, se<br />
necesita una buena<br />
circulation de aire-deje por<br />
lo menos 12-18 pulgadas<br />
(30.5-45.7 cm) de espacio<br />
para el aire alrededor del<br />
deshumidificador.<br />
Cuando este usando el<br />
deshumidificador,<br />
mantenga cerradas<br />
todas las puertas y<br />
ventanas que dan al<br />
exterior, y otras<br />
aberturas. El aire<br />
humedo del exterior<br />
aumentara la carga de<br />
trabajo del<br />
deshumidificador.<br />
.<br />
lnstale el deshumidificador en un piso a nivel lo suficientemente fuerte coma<br />
para soportar el deshumidificador con el balde de agua Ileno.<br />
\<br />
lnstale el deshumidificador en un area<br />
donde la temperatura no descienda a<br />
menos de 65°F (18.3”C). Las<br />
temperaturas mas bajas haran que se<br />
forme hielo en 10s serpentines.<br />
Si se forma hielo en 10s serp&ines,<br />
algunos deshumidificadores<br />
continuaran funcionando. Algunos<br />
deshumidificadores tienen una funcion<br />
de deshielo que automaticamente<br />
apaga el compresor cuando se forma<br />
hielo. (El ventilador continua<br />
funcionando). Desenchufe ambos tipos<br />
de deshumidificadores hasta que se<br />
derrita el hielo y suba la temperatura<br />
de la habitation.
UAChUUSTE la luz del BALDE: CONTROL DE SEQUEDAD:<br />
Si esta luz esta encendida, significa que<br />
el deshumidificador no estti<br />
funcionando.<br />
debe revisar:<br />
Esta 11.12 indica que usted<br />
l Si el balde esth lleno debe vaciarlo y<br />
volverlo a colocar.<br />
l Si el balde no estti bien colocado,<br />
saquelo y vuelva a colocarlo. Asegurese<br />
de que el balde quede totalmente<br />
insertado en el deshumidificador y que<br />
la luz este apagada; de lo contrario, el<br />
deshumidificador<br />
.-..<br />
no funcionara.<br />
. . . . “.. . . . . . . ‘X.<br />
VELOCIDAD DEL VENTILADOR:<br />
En algunos modelos: esto controla el<br />
funcionamiento del ventilador.<br />
Seleccione la position que desee.<br />
ALTO - para elimination m&i rapida de<br />
la humedad.<br />
BAJO - para elimination mas lenta de la<br />
humedad.<br />
Esto controla la cantidad de humedad<br />
en la habitation. Gire la perilla de<br />
control en el sentido de las manecillas<br />
del reloj para que haya mas sequedad.<br />
Gire la perilla de control en el sentido<br />
contrario al de las manecillas del reloj<br />
para que haya menos sequedad. Ponga<br />
la perilla de control en “NORMAL”para<br />
mantener las condiciones de humedad<br />
en un termino medio.<br />
NOTA: durante 10s primeros dias de<br />
uso, gire el Control de Sequedad en el<br />
sentido de las manecillas del reloj hasta<br />
“MAS SECO:’ para eliminar el exceso de<br />
humedad de 10s muebles y del aire de<br />
la habitation. :
Peligro para la salud<br />
No beba el agua acumulada en el balde de agua.<br />
No seguir esta instruccih puede perjudicar su salud.<br />
Ktodo para sacar y volver a vaciar el balde:<br />
Paso 2.<br />
1. Levante el balde sujet6ndolo por la ]<br />
base.Tire del balde hacia usted, para !<br />
sacarlo.Vaya al Paso 2.<br />
2. Lleve al balde a un sumidero o tina<br />
3. Vierta agua por el orificio en un<br />
: sumidero o tina.<br />
i 4.Vuelva a colocar el balde comple-<br />
i tamente y verifique que la Iuz de<br />
i VACfE/AJUSTE EL BALDE este<br />
I apagada.
HCtodo de conexih de la<br />
nanguera de desagiie:<br />
(para sacar agua del balde cotinuamente.)<br />
tapa del conector<br />
todos 10s modelos)<br />
I. Si su deshumidificador no tiene una<br />
tapa del conector de la manguera<br />
de desagiie, vaya al Paso 2.<br />
Si su deshumidificador tiene una<br />
tapa del conector de la manguera<br />
de desagiie, use un destornillador de<br />
hoja plana para quitar la tapa del<br />
conector de desague. Gire la tapa en<br />
el sentido contrario al de las<br />
manecillas del reloj. Deseche la tapa.<br />
No puede usarse de nuevo.Vaya al<br />
Paso 2.<br />
1. Deslice la tapa del conector de la<br />
manguera de desague para sacarla.<br />
Vaya al Paso 2.<br />
. . No darie el<br />
..‘. exterior para<br />
que Ia conexidn<br />
no tenga fugas.<br />
Centro del ionector de la manguera<br />
de desagiie<br />
2. Perfore unicamente el centro del<br />
conector de la manguera de desague.<br />
<strong>Use</strong> una broca de l/4” coma minimo.<br />
3. Coloque una manguera de patio en<br />
el conector de la manguera de<br />
desague. La manguera no debe tener<br />
una longitud mayor de 8 pies (2.4 m).<br />
Haga pasar el otro extremo de la<br />
manguera de patio por un desague<br />
de piso.Verifique que la manguera<br />
este plana yen el desague.<br />
Para usar el balde sin la manguera de patio:<br />
Para balde estilo 1:<br />
<strong>Use</strong> un casquete de manguera de patio<br />
para seller el conector de la manguera<br />
de desagiie.<br />
Para balde estilo 2:<br />
<strong>Use</strong> un casquete de manguera de patio<br />
para sellar el conector de la manguera<br />
de desague.<br />
Vuelva a colocar la tapa del conector de<br />
la manguera de desague.
odos 10s deshumidificadores tienen ! Para modelos con Flotador de<br />
necanismo de desconexion automatica 1<br />
I flotador de nivel del agua. Algunos f Nivel del Agua ajustable:<br />
leshumidificadores tienen un Flotador<br />
le Nivel del Agua ajustable. El balde<br />
;<br />
f<br />
,iene que estar debidamente alineado 1<br />
lara que funcione<br />
lel Agua.<br />
el Flotador de Nivel i<br />
Para modelos con Flotador de i<br />
Hive1 del Agua no ajustable: !<br />
!I Flotador de Nivel del Agua apagara<br />
sutomdticamente el deshumidificador.<br />
i Usted puede poner el Flotador de Nivel<br />
i del Agua en las posiciones de”high”<br />
i (alto) o”low”(bajo).Ambas posiciones<br />
i apagardn automaticamente el<br />
j deshumidificador.<br />
/<br />
! i<br />
n<br />
OQ-0<br />
i La position “High”: el Flotador de Nivel<br />
i del Agua esta preseleccionado en la<br />
i position de”high:al lado izquierdo de<br />
; la abertura. El deshumidificador se<br />
I apagard automdticamente cuando el<br />
; balde este 3/4 Ileno.<br />
La position “Low”: deslice el Flotador de<br />
Nivel del Agua a la position de”low:al<br />
lado derecho de la abertura, para que el<br />
balde este mas liviano. El<br />
deshumidificador se apagara<br />
automaticamente cuando el balde este<br />
l/2 Ileno.
Limpieza y mantenimiento<br />
generales<br />
1. Limpie la rejilla delantera y 10s paneles<br />
laterales con un cepillo suave 0 con la<br />
boquilla para quitar el polvo de su<br />
aspiradora.<br />
2. Si la pintura del gabinete se estd<br />
picando, puede retocar la pintura con<br />
pintura esmaltada de buena calidad<br />
para evitar que se oxide.<br />
Limpieza del balde de agua<br />
Cada ciertas semanas,<br />
enjuague el interior del<br />
balde de agua con un ,,<br />
detergente suave para<br />
evitar la formation de<br />
moho, mildiu y bacterias.<br />
Limpieza del serpentin interior<br />
Para lograr una mayor efrciencia, limpie e<br />
serpentin al menos una vez al ario con el<br />
accesorio tipo cepillo de su aspiradora.<br />
Asegurese de que el serpentin este seco<br />
para facilitar la limpieza.<br />
Herramienta que se necesita:<br />
Destornillador Phillips<br />
Cdmo quitar el frente del<br />
deshumidificador:<br />
Peligro de descarga electrica<br />
Desenchufe el deshumidificador<br />
antes de limpiarlo.<br />
Vuelva a colocar todos 10s paneles<br />
antes de usar el deshumidificador.<br />
No seguir estas instrucciones<br />
puede ocasronar la muerte o una<br />
descarga electrica.<br />
(<br />
1. Desenchufe el deshumidifrcador o<br />
desconecte la alimentacion electrica.<br />
2. Saque el balde de agua.<br />
3.Quite 10s 3 tornillos que estin a cada<br />
lado del panel delantero.<br />
4. Saque el panel delantero sosteniendo<br />
10s lados inferiores y levantandolo,<br />
para que salga. No quite la cubierta<br />
superior o el gabinete.<br />
5. Limpie 10s serpentines con el<br />
accesorio tipo cepillo de la<br />
aspiradora.Tenga cuidado-las<br />
puntas del serpentin son frlosas.<br />
NOTA: solo tiene que limpiar el<br />
serpentin de refrigeracibn en el interior<br />
del deshumidificador.<br />
6.Vuelva a colocar el panel delantero y<br />
el balde de agua.<br />
7. Enchufe el deshumidificador o vuelva<br />
a conectar la alimentacion electrica.
Si necesita sewicio tknico o llamar para hater alguna pregunta, tenga lista<br />
esta informacik:<br />
blurnero del modelo<br />
Numero de serve<br />
Fecha de compra<br />
Numero de telefono<br />
benda<br />
El numero del modelo y el numero de serie estan ubicados en la pared detrds del<br />
balde de agua.<br />
. Antes de llamar para [ est6 Interruptor funcionando<br />
Automdtico de Apagado<br />
solicitar ayuda . . . i l Movimiento de aire proveniente del<br />
,os problemas de funcionamiento con<br />
recuencia se deben a pequenas cosas<br />
lue usted mismo puede localizar y<br />
;<br />
:<br />
;<br />
i<br />
ventilador.<br />
Condiciones normales de<br />
funcionamiento:<br />
lrreglar sin necesidad de herramientas. i l La unidad generara calor.<br />
il deshumidificador no funciona:<br />
lEsta enchufada la unidad en un<br />
;<br />
i<br />
l No funciona a temperaturas<br />
a 10s 65°F (18.3”C).<br />
inferiores<br />
circuit0 active con el debido voltaje? i : 2. Si necesita ayuda en 10s<br />
iEstd encendida la unidad?<br />
iEst6 instalado debidamente el balde ] EE.UU.. . . .<br />
de agua? i Llame al distribuidor de su localidad o<br />
iNecesita vaciar el balde de agua? i llame gratis al Centro de Ayuda al<br />
iSe quemo un fusible o se disparo el ; Consumidor de <strong>Whirlpool</strong> al 1-800-253interruptor<br />
de circuito? ; 1301. Cuando llame para pedir ayuda,<br />
.a unidad funciona pero no<br />
i tenga listos el numero del modelo, el<br />
feshumidifica:<br />
t numero de serie, la fecha de compra y<br />
LSe encuentra la unidad en el ciclo de ; una description completa del<br />
descongelacion? (provisto en algunos ; problema. Esta information es necesaria<br />
modelos). 1 para poder atenderle mejor.<br />
ionidos normales de operacib:<br />
i Si necesita mas ayuda, puede escribir a:<br />
:uando su deshumidificador funciona ;<br />
lormalmente, usted oira sonidos tales i Consumer Assistance Center<br />
:omo: c/o Correspondence Dept.<br />
Sonidos del compresor-el compresor i 2000 North M-63<br />
puede sonar muy alto. Esto es normal. j Benton Harbor, Ml 49022-2692<br />
Ruidos secos (“clic”)-se pueden oir i lncluya por favor en su correspondencia<br />
cuando la unidad o el compresor se i un numero de telefono en el que se le<br />
apaga y se enciende y cuando el i pueda encontrar durante el dia.
3. Si necesita ayuda o<br />
servicio thnico en<br />
Canadai.. .<br />
Contacte al distribuidor que le vendio<br />
su aparato, o llame gratis al Centro de<br />
Ayuda al Consumidor,<br />
de 8:30 a.m. a 6:00 p.m. (EST),<br />
al l-800-461-5681.<br />
0<br />
Contacte a la sucursal de servicio<br />
direct0 o al centro de servicio<br />
autorizado m6s cercano para reparar<br />
o darle mantenimiento a su aparato.<br />
(Vea la lista abajo).<br />
NOTA: cuando solicite ayuda o<br />
servicio: De por favor una description<br />
detallada del problema, el numero<br />
del modelo y el numero de serie<br />
completes de su aparato y la fecha de<br />
compra. Esta information nos<br />
ayudard a atenderle mejor.<br />
Sucursales de servicio directo:<br />
COLliMBlA<br />
BRITANICA l-800-665-6788<br />
ALBERTA l-800-661-6291<br />
ONTARIO<br />
Area de Ottawa l-800-267-3456<br />
(except0 c6digo de Area 807)<br />
Fuera del Area de Ottawa l-800-807-6777<br />
MANITOBA,<br />
SASKATCHEWAN<br />
y c6digo de Area 807 en<br />
ONTARIO 1-800-665-l 683<br />
QUEBEC Montreal<br />
(except0 South Shore) l-800-361 -3032<br />
South Shore Montreal l-800-361 -0950<br />
Quebec Citv l-800-361-1523<br />
Sherbrooki<br />
l-800-567-6966<br />
PRObNClAS<br />
ATLANTICAS<br />
1-800-565-l 598<br />
Si necesita mas ayuda, puede escribir a:<br />
Consumer Relations Department<br />
lnglis Limited<br />
1901 Minnesota Court<br />
Mississauga, Ontario LSN 3A7<br />
lncluya por favor en su correspondencia<br />
un numero de telefono en el que se le<br />
pueda encontrar durante el dia.
TiRMlNO DE LA GARANTiA PAGAREMOS POR<br />
GARANTiA TOTAL POR UN AN0 Piezas de reemplazo y<br />
Desde la fecha de compra mano de obra de reparaciones<br />
para corregir defectos en materiales<br />
o mano de obra.<br />
GARANTiA TOTAL POR CINCO Piezas de reemplazo y mano<br />
AliOS de obra de reparaciones para<br />
corregir defectos en materiales o<br />
mano de obra en el sistema<br />
sellado de refrigeracibn. Estas<br />
piezas son:<br />
1. Compresor 4. Desecador-<br />
2. Evaporador colador<br />
3. Condensador 5. Tubos de<br />
conexion<br />
NO PAGAREMOS POR<br />
A. Llamadas de servicio para:<br />
1. Corregir la instalacion del deshumidificador.<br />
2. Enseriarle coma usar el deshumidificador.<br />
3. Reemplazar fusibles del hogar o para corregir las conexiones del<br />
hogar.<br />
B. Traslado y entrega de la unidad. Este product0 esta disenado para ser<br />
reparado en el hogar.<br />
C. Daiio al deshumidificador causado por accidente, uso incorrecto,<br />
incendio, inundation, cases de fuerza mayor o darle al product0 un uso<br />
no mencionado en este manual.<br />
D. Reparaciones a partes o sistemas ocasionadas por modificaciones no<br />
autorizadas del deshumidificador.<br />
E. En Canada, gastos de viaje o transporte de clientes que residen en zonas<br />
remotas.<br />
II servicio tecnico bajo las garantias totales debe ser hecho por una compania de<br />
;ervicio autorizada.<br />
NHIRLPOOL CORPORATION NO SERA RESPONSABLE DE DANOS INCIDENTALES<br />
1 INDIRECTOS. Algunos estados o provincias no permiten la exclusion o la<br />
imitacidn de 10s darios incidentales o indirectos, por lo que esta limitacibn o<br />
:xclusibn podria no ser aplicable a usted. Esta garantia le da derechos legales<br />
?specificos, y usted podria tener otros derechos que varian de estado a estado o<br />
le provincia a provincia.<br />
Qera de 10s E&ados Unidos y Canada, podria ser aplicable tambien una garantia<br />
iiferente. Para detalles, pongase en contact0 con su dlstrlbuidor autorizado.<br />
ji necesita servicio tecnico, consulte primer0 la section de “Si necesita ayuda o<br />
jervicio tecnico” de este manual. DespuQs de hacerlo, puede obtener ayuda<br />
adicional llamando al Centro de Ayuda al Consumidor de <strong>Whirlpool</strong> al tekfono<br />
L-SOD-253-1301, desde cualquier parte de 10s Estados Unidos. Para servicio en<br />
Canada, vea “Si necesita ayuda o servicio tecnico en Canada” para conocer la<br />
jucursal de servicio en su area.<br />
‘arte No. 1182182 Rev. A l/98<br />
B1998 <strong>Whirlpool</strong> <strong>Corporation</strong> lmpreso en 10s EE.UU.