

model 4ch69/9525 - Air & Water
model 4ch69/9525 - Air & Water
model 4ch69/9525 - Air & Water

Create successful ePaper yourself
Turn your PDF publications into a flip-book with our unique Google optimized e-Paper software.
la cabeza del ventilador. Saque los botones y los aros interiores de<br />
caucho. Tire suavemente de los extremos del yugo hasta que salgan<br />
y saque los ejes roscados de los orficios del yugo. Agarre suavemente<br />
la parte superior e inferior del ventilador. Presione lentamente sólo<br />
hasta que las cubiertas se desmonten. Limpie las aspas del ventilador<br />
con un paño humedecido. NO DEJE QUE EL AGUA ENTRE EN EL<br />
MOTOR. Vuelva a instalar las rejillas tal como se habian montado<br />
anteriormente invirtiendo el orden seguido para desmontarlas.<br />
Asegúrese de que el ventilador esté completamente seco antes<br />
de enchufarlo.<br />
6<br />
7<br />
16<br />
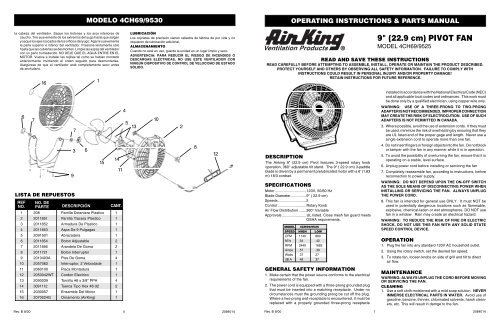
LISTA DE REPUESTOS<br />
REF<br />
NO.<br />
9<br />
7<br />
3<br />
MODELO 4CH69/9530<br />
1<br />
15<br />
14<br />
11<br />
NO. DE<br />
PARTE DESCRIPCIÓN CANT.<br />
1 208 Parrilla Delantera Plastico 1<br />
2 2011851 Parrilla Tracera Plastico 1<br />
3 2011852 Armadura De Plastico 1<br />
4 2011853 Aspa De 9 Pulgagas 1<br />
5 2091501 Abrazadera 1<br />
6 2011854 Boton Adjustable 2<br />
7 2011856 Arandela De Goma 2<br />
8 2011721 Boton Interruptor 1<br />
9 2010403A Pies De Goma 4<br />
10 2057062 Interruptor, 2 Velocidade 1<br />
11 2060100 Placa Montadura 1<br />
12 2050042WT Cordon Electrico 1<br />
13 2090039 Tornillo #8 x 3/8" PPH 4<br />
14 3091112 Tuerca Tipo Hex #8-32 2<br />
15 2030057 Ensamble Del Motor 1<br />
16 2070024G Ornamento (<strong>Air</strong>King) 1<br />
6<br />
4<br />
LUBRICACIÓN<br />
Los cojinetes de precisión vienen sellados de fábrica de por vida y no<br />
requieren de lubricación adicional.<br />
ALMACENAMIENTO<br />
Cuando no esté en uso, guarde la unidad en un lugar limpio y seco.<br />
ADVERTENCIA: PARA REDUCIR EL RIESGO DE INCENDIOS O<br />
DESCARGAS ELÉCTRICAS, NO USE ESTE VENTILADOR CON<br />
NINGÚN DISPOSITIVO DE CONTROL DE VELOCIDAD DE ESTADO<br />
SÓLIDO.<br />
Rev. B 8/00 4 2084014<br />
5 13<br />
10<br />
2<br />
8<br />
12<br />
OPERATING INSTRUCTIONS & PARTS MANUAL<br />
READ AND SAVE THESE INSTRUCTIONS<br />
READ CAREFULLY BEFORE ATTEMPTING TO ASSEMBLE, INSTALL, OPERATE OR MAINTAIN THE PRODUCT DESCRIBED.<br />
PROTECT YOURSELF AND OTHERS BY OBSERVING ALL SAFETY INFORMATION. FAILURE TO COMPLY WITH<br />
INSTRUCTIONS COULD RESULT IN PERSONAL INJURY AND/OR PROPERTY DAMAGE!<br />
RETAIN INSTRUCTIONS FOR FUTURE REFERENCE.<br />
DESCRIPTION<br />
The <strong>Air</strong>king 9" (22.9 cm) Pivot features 3-speed rotary knob<br />
operation, 360° adjustable tilt stand. The 9" ( 22.9 cm) 3-paddle<br />
blade is driven by a permanent prelubricated motor with a 6' (1.83<br />
m) 18/3 cordset.<br />
SPECIFICATIONS<br />
Motor .............................. 120V, 50/60 Hz<br />
Blade Diameter .............. 9" ( 22.9 cm)<br />
Speeds ........................... 2<br />
Control ........................... Rotary Knob<br />
<strong>Air</strong> Flow Distribution....... 360° Variable<br />
Approvals ....................... UL listed. Close mesh fan guard meets<br />
OSHA requirements.<br />
MODEL 4CH69/<strong>9525</strong><br />
SPEED HIGH LOW<br />
CFM 1140 880<br />
M3 /s .54 .42<br />
RPM 2449 1883<br />
Amps .57 .39<br />
Watts 37 27<br />
dB A 48 37<br />
GENERAL SAFETY INFORMATION<br />
1. Make certain that the power source conforms to the electrical<br />
requirements of the fan.<br />
2. The power cord is equipped with a three-prong grounded plug<br />
that must be inserted into a matching receptacle. Under no<br />
circumstances must the grounding prong be cut off the plug.<br />
Where a two-prong wall receptacle is encountered, it must be<br />
replaced with a properly grounded three-prong receptacle<br />
9" (22.9 cm) PIVOT FAN<br />
MODEL 4CH69/<strong>9525</strong><br />
installed in accordance with the National Electrical Code (NEC)<br />
and all applicable local codes and ordinances. This work must<br />
be done only by a qualified electrician, using copper wire only.<br />
WARNING: USE OF A THREE-PRONG TO TWO-PRONG<br />
ADAPTER IS NOT RECOMMENDED. IMPROPER CONNECTION<br />
MAY CREATE THE RISK OF ELECTROCUTION. USE OF SUCH<br />
ADAPTERS IS NOT PERMITTED IN CANADA.<br />
3. Where possible, avoid the use of extension cords. If they must<br />
be used, minimize the risk of overheating by ensuring that they<br />
are UL listed and of the proper gage and length. Never use a<br />
single extension cord to operate more than one fan.<br />
4. Do not insert fingers or foreign objects into the fan. Do not block<br />
or tamper with the fan in any manner while it is in operation.<br />
5. To avoid the possibility of overturning the fan, ensure that it is<br />
operating on a stable, level surface.<br />
6. Unplug power cord before installing or servicing the fan<br />
7. Completely reassemble fan, according to instructions, before<br />
reconnection to power supply.<br />
WARNING: DO NOT DEPEND UPON THE ON-OFF SWITCH<br />
AS THE SOLE MEANS OF DISCONNECTING POWER WHEN<br />
INSTALLING OR SERVICING THE FAN. ALWAYS UNPLUG<br />
THE POWER CORD.<br />
8. This fan is intended for general use ONLY. It must NOT be<br />
used in potentially dangerous locations such as flammable,<br />
explosive, chemical-laden or wet atmospheres. DO NOT use<br />
fan in a window. Rain may create an electrical hazard.<br />
WARNING: TO REDUCE THE RISK OF FIRE OR ELECTRIC<br />
SHOCK, DO NOT USE THIS FAN WITH ANY SOLID STATE<br />
SPEED CONTROL DEVICE.<br />
OPERATION<br />
1. Plug the fan into any standard 120V AC household outlet.<br />
2. Using the rotary switch, set the desired fan speed.<br />
3. To rotate fan, loosen knobs on side of grill and tilt to direct<br />
air flow.<br />
MAINTENANCE<br />
WARNING: ALWAYS UNPLUG THE CORD BEFORE MOVING<br />
OR SERVICING THE FAN.<br />
CLEANING<br />
1. Use a soft cloth moistened with a mild soap solution. NEVER<br />
IMMERSE ELECTRICAL PARTS IN WATER. Avoid use of<br />
gasoline, benzine, thinner, chlorinated solvents, harsh cleaners,<br />
etc. This will result in damge to the fan.<br />
Rev. B 8/00 1 2084014
2. To clean blade, unscrew the two knobs on either side of the<br />
fan's head. Remove knobs and rubber grommets. Gently pull<br />
the ends of the yoke apart and slip the threaded shafts out of<br />
the yoke holes. Gently hold top and bottom of fan. Slowly<br />
compress only until covers pop apart. Wipe the blades off with<br />
a damp cloth. DO NOT ALLOW WATER TO ENTER THE<br />
MOTOR. Reassemble by reversing the order of disassembly.<br />
Be certain that the fan is completely dry before plugging in.<br />
6<br />
REPLACEMENT PARTS LIST<br />
REF<br />
NO.<br />
7<br />
16<br />
PART<br />
NO. DESCRIPTION QTY.<br />
1 2011850 Front Housing 1<br />
2 2011851 Rear Housing 1<br />
3 2011852 Yoke 1<br />
4 2011853 9 Inch Fan Blade 1<br />
5 2091501 Clamp 1<br />
6 2011854 Adjustment Knob 2<br />
7 2011856 Rubber Washer 2<br />
8 2011721 Switch Knob 1<br />
9 2010403A Foot 4<br />
10 2057062 Switch, 2 Speed 1<br />
11 2060100 Mounting Plate 1<br />
12 2050042WT Cordset 1<br />
13 2090039 Screw #8 x 3/8" PPH 4<br />
14 3091112 Hex Nut #8-32 2<br />
15 2030057 Motor Assembly 1<br />
16 2070024G Bullseye (<strong>Air</strong>King) 1<br />
9<br />
7<br />
3<br />
6<br />
MODEL 4CH69/<strong>9525</strong><br />
1<br />
15<br />
14<br />
11<br />
4<br />
LUBRICATION<br />
Precision bearings are sealed at the factory for life and will not<br />
require any further lubrication.<br />
STORAGE<br />
When not in use, keep unit in a clean, dry place.<br />
WARNING: TO AVOID THE RISK OF FIRE OR ELECTRIC<br />
SHOCK, DO NOT USE FAN WITH ANY SOLID STATE SPEED<br />
DEVICE.<br />
Rev. B 8/00 2 2084014<br />
5 13<br />
10<br />
2<br />
8<br />
12<br />
MANUAL DE INSTRUCCIONES DE OPERACIÓN Y PARTES<br />
DESCRIPCIÓN<br />
El abanico <strong>Air</strong>King Pivote de 9 pulgadas (22.9 cm) ofrece 2 velocidades<br />
para su operacion, y 360 grados de inclinacion ajustable. La aspa de 9<br />
pulgadas (22.9 cm) con 3 palas es conducida con un motor con capacitor<br />
permanente con un cordon electrico de 6' (1.83 m) 18/3.<br />
9" (22.9 cm) PIVOTE VENTILADOR<br />
MODELO 4CH69/<strong>9525</strong><br />
LEA Y GUARDE ESTAS INSTRUCCIONES<br />
LÉALAS CUIDADOSAMENTE ANTES DE INTENTAR ARMAR, INSTALAR, OPERAR O DAR MANTENIMIENTO AL PRODUCTO<br />
DESCRITO. PROTÉJASE A SÍ MISMO Y A LOS DEMÁS OBSERVANDO TODA LA INFORMACIÓN SOBRE SEGURIDAD. ¡NO<br />
SEGUIR LAS INSTRUCCIONES PODRÍA RESULTAR EN LESIONES PERSONALES Y/O DAÑOS A LA PROPIEDAD!<br />
GUARDE LAS INSTRUCCIONES PARA REFERENCIAS FUTURAS.<br />
ESPECIFICATIONES Y FUNCIONAMIENTO<br />
Motor ............................................................. 120V, 50/60 Hz<br />
Tamano De Paletas ...................................... 9" ( 22.9 cm)<br />
Velocidades .................................................. 2<br />
Control .......................................................... Perillar Rotario<br />
Distribución Del Flujo De <strong>Air</strong>e ...................... 360° Variable<br />
Aprobaciones. ..................... Catalogación UL. El protector de malla<br />
cerrada del ventilador satisface las<br />
normas OSHA.<br />
MODELO 4CH69/<strong>9525</strong><br />
VELOC. ALTA BAJA<br />
CFM 1140 880<br />
M 3 /s .54 .42<br />
RPM 2449 1883<br />
Amps .57 .39<br />
Watts 37 27<br />
dB A 48 37<br />
INFORMACIÓN GENERAL SOBRE SEGURIDAD<br />
1. Cerciórese de que la fuente de electricidad se adapte a los<br />
requerimientos eléctricos del ventilador.<br />
2. El cordón eléctrico está equipado con una clavija a tierra de tres<br />
espigas que tiene que ser enchufada a un receptáculo del mismo<br />
diseño. Bajo ninguna circunstancia deberá cortarse la espiga a tierra<br />
de la clavija. De existir un receptáculo de pared de dos espigas, deberá<br />
reemplazarse por uno de tres espigas debidamente puesto a tierra e<br />
instalado de conformidad con el Código Nacional de Electricidad y<br />
todos los códigos y ordenanzas locales aplicables. El trabajo deberá<br />
hacerlo un electricista calificado, utilizando exclusivamente alambre<br />
de cobre.<br />
ADVERTENCIA: NO SE RECOMIENDA EL USO DE UN ADAPTADOR<br />
DE TRES A DOS ESPIGAS. LA CONEXIÓN INDEBIDA PODRÍA CREAR<br />
EL RIESGO DE SER ELECTROCUTADO. EL USO DE TALES<br />
ADAPTADORES NO ESTÁ PERMITIDO EN CANADÁ.<br />
3. Siempre que sea posible, evite el uso de extensiones eléctricas. Si<br />
tienen que usarse, minimice el riesgo de sobrecalentamiento<br />
asegurándose de que sean de catalogación UL y del calibre y la<br />
longitud adecuadas. Nunca use una sola extensión para operar más de<br />
un ventilador.<br />
4. No introduzca los dedos ni objetos extraños en el ventilador. No<br />
obstruya ni manipule indebidamente el ventilador mientras esté en<br />
operación.<br />
5. Para evitar toda posibilidad de que el ventilador se vaya de lado,<br />
asegúrese de colocarlo en una superficie estable y nivelada.<br />
6. Desenchufe el cordón eléctrico antes de instalar o dar servicio al<br />
ventilador.<br />
7. Vuelva a armar completamente el ventilador, de acuerdo con las<br />
instrucciones, antes de volver a conectarlo a la alimentación<br />
eléctrica.<br />
ADVERTENCIA: NO DEPENDA DEL INTERRUPTOR DE ENCENDIDO<br />
Y APAGADO COMO EL ÚNICO MEDIO PARA INTERRUMPIR LA<br />
ALIMENTACIÓN ELÉCTRICA CUANDO INSTALE O DÉ SERVICIO AL<br />
VENTILADOR. SIEMPRE DESENCHUFE EL CORDÓN ELÉCTRICO.<br />
8. Este ventilador es para uso general EXCLUSIVAMENTE. NO deberá<br />
usarse en localidades potencialmente peligrosas tales como atmósferas<br />
inflamables, explosivas, cargadas de gases o húmedas. NO utilice el<br />
ventilador en una ventana, ya que la lluvia podría crear un peligro<br />
eléctrico.<br />
ADVERTENCIA: PARA REDUCIR EL RIESGO DE INCENDIOS O<br />
DESCARGAS ELÉCTRICAS, NO USE ESTE VENTILADOR CON<br />
NINGÚN DISPOSITIVO DE CONTROL DE VELOCIDAD DE ESTADO<br />
SÓLIDO.<br />
OPERACIÓN<br />
1. Enchufe el ventilador en cualquier toma de corriente estándar de<br />
120V CA de la casa.<br />
2. Utilizando el conmutador rotativo, seleccione la velocidad deseada<br />
del ventilador.<br />
3. Para girar el ventilador, afloje los botones en el lado de la rejilla e<br />
incline el ventilador para dirigir el flujo del aire.<br />
MANTENIMIENTO<br />
ADVERTENCIA: DESCONECTE SIEMPRE EL CORDÓN ANTES DE<br />
MOVER O DAR SERVICIO AL VENTILADOR.<br />
LIMPIEZA<br />
1. Utilice un trapo suave, humedecido con una solución de jabón suave.<br />
NUNCA INMERSIONE LAS PIEZAS ELECTRICAS EN AGUA. Evite<br />
el uso de gasolina, bencina, diluyentes, solventes clorados, limpiadores<br />
ásperos, etc., ya que causarán daños al ventilador.<br />
2. Para limpiar las aspas,destornille los dos botones a ambos lados de<br />
Rev. B 8/00 3 2084014


