ECM250 - Monacor
ECM250 - Monacor
ECM250 - Monacor

Create successful ePaper yourself
Turn your PDF publications into a flip-book with our unique Google optimized e-Paper software.
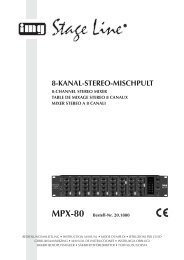
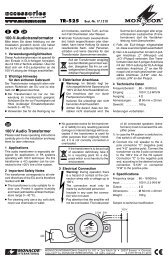
www.imgstageline.com<br />
ECM-250<br />
Best.-Nr. 23.3480<br />
D A CH Elektret-Mikrofon-Set<br />
Bitte lesen Sie die Bedienungsanleitung vor dem Betrieb gründlich<br />
durch und heben Sie sie für ein späteres Nachlesen auf.<br />
geschlos sen oder nicht fachgerecht repariert, kann<br />
keine Haftung für daraus resultierende Sach- oder<br />
Personenschäden und keine Garantie für die<br />
Mikrofone übernommen werden.<br />
nes Phantomspeisungsgerät (z. B. EMA-200 von<br />
„img Stage Line“) an das Audiogerät anschließen.<br />
3) An jedem Mikrofon die zwei versenkten Schalter mit<br />
einem schmalen Gegenstand (z. B. kleiner Schrau-<br />
1 Einsatzmöglichkeiten<br />
Die zwei Overhead-Mikrofone des Sets ECM-250 eignen<br />
sich optimal für die Schallabnahme am Schlagzeug<br />
(z. B. für Becken) und an Perkussionsinstrumen -<br />
ten. Sie werden mit 48-V-Phantomspeisung betrieben<br />
und verfügen jeweils über einen Low-Cut-Schalter<br />
und einen 10-dB-Abschwächschalter. Zum Lieferumfang<br />
gehören ein Kunststoffkoffer und zwei Halter.<br />
2 Hinweise für den sicheren Gebrauch<br />
Die Mikrofone entsprechen allen relevanten Richtlinien<br />
der EU und sind deshalb mit gekennzeichnet.<br />
● Setzen Sie die Mikrofone nur im Innenbereich ein<br />
und schützen Sie sie vor Feuchtigkeit und Hitze<br />
(zulässiger Einsatztemperaturbereich 0 – 40 °C).<br />
● Verwenden Sie für die Reinigung nur ein trockenes,<br />
weiches Tuch, niemals Chemikalien oder Wasser.<br />
3 Inbetriebnahme<br />
1) Die Mikrofone in die Halter schieben und diese auf<br />
Mikrofonstative schrauben: Bei Stativen mit 16-mm-<br />
Gewinde (<br />
bendreher) in die gewünschte Position stellen:<br />
a Mit dem oberen Schiebeschalter lässt sich ein<br />
Low-Cut-Filter (Hochpass) zur Absenkung tiefer<br />
Frequenzen einschalten (Position ).<br />
b Mit dem unteren Schiebeschalter lässt sich die<br />
Empfindlichkeit um 10 dB abschwächen (Position<br />
„-10dB“).<br />
4 Technische Daten<br />
Typ/Richtcharakteristik: . . . . Elektret/Niere<br />
Frequenzbereich, Impedanz: 50 – 16 000 Hz, 200 Ω<br />
Empfindlichkeit: . . . . . . . . . . . 18 mV/Pa („0dB“) bei 1 kHz,<br />
5,6 mV/Pa („-10dB“) bei 1 kHz<br />
Max. Schalldruck: . . . . . . . . . 130 dB<br />
Signal-Rausch-Abstand: . . . . 66 dB<br />
Stromversorgung: . . . . . . . . . Phantomspeisung 48 V<br />
Abmessungen, Gewicht: . . . ∅ 19 mm × 80 mm, 25 g<br />
Anschluss: . . . . . . . . . . . . . . XLR<br />
● Werden die Mikrofone zweckentfremdet, falsch an -<br />
Änderungen vorbehalten.<br />
5 ⁄8″) die Adapterschrauben an den Haltern<br />
entfernen und die Halter direkt aufschrauben.<br />
Bei Stativen mit 9-mm-Gewinde ( 3 Sollen die Mikrofone endgültig aus dem<br />
Betrieb genommen werden, übergeben Sie<br />
sie einem örtlichen Recyclingbetrieb zur<br />
umweltgerechten Entsorgung.<br />
⁄8″) die Halter<br />
über die Adapterschrauben befestigen.<br />
2) Die Mikrofone über Anschlusskabel (z. B. Kabel der<br />
MEC-Serie von „img Stage Line“) mit symme -<br />
trischen XLR-Mikrofoneingängen am Audiogerät<br />
(z. B. Mischpult) verbinden. Die Eingänge müssen<br />
jeweils mit einer Phantomspeisung von 48 V ausgestattet<br />
sein. Stellt das Audiogerät keine Phantomspeisung<br />
bereit, die Mikrofone über ein exter-<br />
GB<br />
Electret Microphone Set<br />
Please read these operating instructions carefully<br />
prior to operating the unit and keep them for later use.<br />
1 Applications<br />
The two overhead microphones of the set ECM-250<br />
are suitable in an optimum way for the sound pick-up<br />
on the drums (e. g. for the cymbals) and on percussion<br />
instruments. They are operated with 48 V phantom<br />
power and are each equipped with a low cut<br />
switch and a 10 dB attenuator switch. The set includes<br />
a plas tic case and two supports.<br />
2 Safety Notes<br />
The microphones correspond to all relevant directives<br />
of the EU and are therefore marked with .<br />
● The microphones are only suitable for indoor use.<br />
Protect them against humidity and heat (admissible<br />
ambient temperature range 0 – 40 °C).<br />
● For cleaning only use a dry, soft cloth, never use<br />
chemicals or water.<br />
● No guarantee claims for the microphones and no<br />
liability for any resulting personal damage or mate-<br />
F B CH Ensemble microphone<br />
électret<br />
Veuillez lire la présente notice avec attention avant le fonctionnement<br />
et conservez-la pour pouvoir vous y reporter ultérieurement.<br />
Possibilités dʼutilisation<br />
Les deux microphones Overhead de lʼensemble ECM-<br />
250 sont très bien adaptés pour la prise de son de batteries<br />
(p. ex. cymbales) et sur des instruments à percussion.<br />
Ils fonctionnent avec une alimentation<br />
fantôme 48 V et disposent chacun dʼun filtre commutable<br />
Low Cut passe-haut et dʼun atténuateur 10 dB.<br />
Un coffret plastique et deux pinces sont livrés.<br />
Conseils dʼutilisation et de sécurité<br />
Les micros répondent à toutes les directives nécessaires<br />
de lʼUnion européenne et portent donc le symbole .<br />
● Les microphones ne sont conçus que pour une utilisation<br />
en intérieur. Protégez les microphones de<br />
lʼhumidité et de la chaleur (plage de température de<br />
fonctionnement autorisée 0 – 40 °C).<br />
● Pour les nettoyer, utilisez uniquement un chiffon sec<br />
et doux, en aucun cas de produits chimiques ou dʼeau.<br />
● Nous déclinons toute responsabilité en cas de dom-<br />
(dB) -30<br />
-40<br />
-50<br />
-60<br />
-70<br />
-80<br />
➀<br />
low cut filter off ( )<br />
50 100 200 500 1k 2k 5k 10k 20k(Hz)<br />
rial damage will be accepted if the microphones are<br />
used for other purposes than originally intended, if<br />
they are not correctly connected or not repaired in<br />
an expert way.<br />
If the microphones are to be put out of operation<br />
definitively, take them to a local recycling<br />
plant for disposal which is not harmful to<br />
the environment.<br />
3 Operation<br />
1) Slide the microphones into the supports and screw<br />
the supports on the microphone stands: In case of<br />
stands with 16 mm ( 5 ⁄8″) thread remove the adapte r<br />
screws on the supports and directly screw on the<br />
supports. In case of stands with 9 mm ( 3 ⁄8″) thread<br />
fix the supports via the adapter screws.<br />
2) Connect the microphones via cables (e. g. cables<br />
of the MEC series from “img Stage Line”) to balanced<br />
XLR microphone inputs on the audio unit<br />
(e. g. mixer). Each input has to be equipped with a<br />
phantom power of 48 V . If the audio unit does not<br />
provide a phantom power, connect the micro-<br />
mages matériels ou corporels résultants si les<br />
microphones sont utilisés dans un but autre que<br />
celui pour lequel ils ont été conçus, sʼils ne sont pas<br />
correctement branchés ou sʼils ne sont pas réparés<br />
par une personne habilitée ; en outre, la garantie<br />
deviendrait caduque.<br />
Lorsque les microphones sont définitivement<br />
re tirés du circuit de distribution, vous devez les<br />
déposer dans une usine de recyclage adaptée<br />
pour contribuer à leur élimination non polluante.<br />
Mise en service<br />
1) Poussez les micros dans les pinces et vissez-les<br />
sur des pieds micro : Pour un pied avec un filetage<br />
16 mm ( 5 ⁄8″), retirez la vis dʼadaptation sur la pince<br />
et vissez directement la pince. Pour un pied avec<br />
un filetage 9 mm ( 3 ⁄8″), fixez la pince sur la vis<br />
dʼadaptation.<br />
2) Reliez les micros via un cordon (p. ex. cordon de la<br />
série MEC de la gamme “img Stage Line”) aux en -<br />
trées micro XLR symétriques de lʼappareil audio<br />
(p. ex. table de mixage). Les entrées doivent respectivement<br />
être dotées dʼune alimentation fan-<br />
(dB) -30<br />
-40<br />
-50<br />
-60<br />
-70<br />
-80<br />
➁<br />
low cut filter on ( )<br />
50 100 200 500 1k 2k 5k 10k 20k(Hz)<br />
phones via an external phantom power unit (e. g.<br />
EMA-200 from “img Stage Line”) to the audio unit.<br />
3) On each microphone set the two recessed<br />
switches to the desired position using a narrow<br />
object (e. g. small screw driver):<br />
a With the upper sliding switch it is possible to<br />
activate a low cut filter (high pass) to attenuate<br />
low frequencies (position ).<br />
b With the lower sliding switch it is possible to<br />
attenuate the sensitivity by 10 dB (position<br />
“-10dB”).<br />
4 Specifications<br />
Type/directivity: . . . . . . . . . . electret/unidirectional<br />
Frequency range, impedance: 50 – 16 000 Hz, 200 Ω<br />
Sensitivity: . . . . . . . . . . . . . . 18 mV/Pa (“0dB”) at 1 kHz,<br />
5.6 mV/Pa (“-10dB”) at 1 kHz<br />
Max. SPL: . . . . . . . . . . . . . . . 130 dB<br />
S/N ratio: . . . . . . . . . . . . . . . 66 dB<br />
Power supply: . . . . . . . . . . . . phantom power 48 V<br />
Dimensions, weight: . . . . . . . ∅ 19 mm × 80 mm, 25 g<br />
Connection: . . . . . . . . . . . . . XLR<br />
Subject to technical modification.<br />
tôme 48 V . Si lʼappareil audio ne propose dʼalimentation<br />
fantôme, reliez les micros via un appareil<br />
externe dʼalimentation fantôme (p. ex. EMA-<br />
200 de “img Stage Line”) à lʼappareil audio.<br />
3) Sur chaque micro, poussez les deux interrupteurs<br />
encastrés avec un objet de petites dimensions<br />
(p. ex. petit tournevis) dans la position souhaitée :<br />
a avec lʼinterrupteur supérieur, on peut commuter<br />
un filtre Low Cut (passe-haut) pour diminuer les<br />
fréquences graves (position ).<br />
b avec lʼinterrupteur inférieur, on peut diminuer la<br />
sensibilité de 10 dB (position “-10dB”).<br />
Caractéristiques techniques<br />
Type/directivité : . . . . . . . . . électret/cardioïde<br />
Bande passante, impédance : 50 – 16 000 Hz, 200 Ω<br />
Sensibilité : . . . . . . . . . . . . . 18 mV/Pa (“0 dB”) à 1 kHz,<br />
5,6 mV/Pa (“-10dB”) à 1 kHz<br />
Pression sonore max. : . . . . 130 dB<br />
Rapport signal/bruit : . . . . . . 66 dB<br />
Alimentation : . . . . . . . . . . . . alimentation fantôme 48 V<br />
Dimensions, poids : . . . . . . . ∅ 19 mm × 80 mm, 25 g<br />
Branchement : . . . . . . . . . . . XLR<br />
Tout droit de modification réservé.<br />
Frequenzgang<br />
Frequency response<br />
Courbe de réponse<br />
® MONACOR INTERNATIONAL GmbH & Co. KG • Zum Falsch 36 • 28307 Bremen • Germany<br />
Copyright © by MONACOR INTERNATIONAL. All rights reserved. A-0193.99.02.06.2011
www.imgstageline.com<br />
ECM-250<br />
Best.-Nr. 23.3480<br />
I Set di microfoni a elettrete<br />
Vi preghiamo di leggere attentamente le presenti istruzioni<br />
prima dellʼuso e di conservarle per un uso futuro.<br />
Possibilità dʼimpiego<br />
I due microfoni overhead del set ECM-250 sono adatti<br />
in modo ottimale per prelevare il suono della batteria<br />
(p. es. dei piatti) e di strumenti a percussioni. Funzionano<br />
con alimentazione phantom 48 V e dispongono<br />
ognuno di un interruttore low-cut e di un attenuatore<br />
di 10 dB. Sono in dotazione una valigetta di plastica e<br />
due supporti.<br />
Avvertenze di sicurezza<br />
I microfoni sono conformi a tutte le direttive rilevanti<br />
dellʼUE e pertanto portano la sigla .<br />
● Usare i microfoni solo allʼinterno di locali e proteggerli<br />
dallʼumidità e dal calore (temperatura dʼimpiego<br />
ammessa fra 0 e 40 °C).<br />
● Per la pulizia usare solo un panno morbido, asciut -<br />
to; non impiegare in nessun caso prodotti chimici o<br />
acqua.<br />
● Nel caso dʼuso improprio, di collegamenti sbagliati<br />
E<br />
Conjunto micros electret<br />
Lea atentamente las instrucciones de funcionamiento antes<br />
de utilizar el aparato y guárdelas para usos posteriores.<br />
1 Posibilidades de utilización<br />
Los dos micros Overhead del conjunto modelo ECM-<br />
250 se adaptan perfectamente a la toma de sonido de<br />
baterías (por ejemplo címbalo) y a los instrumentos<br />
de percusión. Funcionan con una alimentación phantom<br />
de 48 V y cada uno dispone de in filtro conmutable<br />
Low Cut pasa alto y de un atenuador de 10 dB.<br />
Junto con los micros de entregamos una maleta de<br />
plástico y dos pinzas de micro.<br />
2 Consejos de utilización y de seguridad<br />
Los micros cumplen con todas las directivas relevantes<br />
de la UE por lo tanto están marcados con el símbolo .<br />
● Los micros están fabricados únicamente para una<br />
utilización en interior. Proteja el micro de la humedad<br />
y del calor. (Temperatura de funcionamiento<br />
autorizada 0 – 40 °C).<br />
● Para limpiarlos, utilice únicamente un trapo seco y<br />
suave, en ningún caso productos químicos o agua.<br />
● Rechazamos toda responsabilidad en caso de<br />
PL Zestaw Mikrofonów Elektretowych<br />
Przed przystąpieniem do użytkowania urządzenia<br />
prosimy zapoznać się z instrukcją obsługi, a następnie<br />
zachować ją do wglądu.<br />
1 Zastosowanie<br />
Dwa mikrofony nagłowne ECM-250 przeznaczone są<br />
do odbioru dźwięków generowanych przez różnego<br />
rodzaju instrumenty perkusyjne. Zasilane są napięciem<br />
fantomowym 48 V. Wyposażone są w filtr górnoprzepustowy<br />
oraz przełącznik wytłumienia o 10 dB. W<br />
skład zestawu wchodzą ponadto plastikowe opakowanie<br />
oraz dwa uchwyty.<br />
2 Informacje Dotyczące Bezpieczeństwa<br />
Mikrofon spełniają wszystkie wymagania norm europejskich,<br />
dzięki czemu zostały oznaczone symbolem .<br />
● Mikrofon nadaje się do pracy wewnątrz pomieszczeń.<br />
Należy chronić go przed gorącem oraz wilgocią<br />
(dopuszczalny zakres temperatury pracy<br />
wynosi 0 – 40 °C).<br />
● Do czyszczenia urządzenia używać tylko suchej,<br />
delikatnej ścierki – nie używać wody, ani chemicznych<br />
środków czystościowych.<br />
● Jeśli urządzenie jest wykorzystywane niezgodnie z<br />
(dB) -30<br />
-40<br />
-50<br />
-60<br />
-70<br />
-80<br />
➀<br />
low cut filter off ( )<br />
50 100 200 500 1k 2k 5k 10k 20k(Hz)<br />
o di riparazione scorretta dei microfoni, non si as -<br />
sume nessuna responsabilità per eventuali danni<br />
consequenziali a persone o a cose e non si assume<br />
nessuna garanzia per i microfoni.<br />
Se si desidera eliminare i microfoni definitivamente,<br />
consegnarli per lo smaltimento ad<br />
unʼistituzione locale per il riciclaggio.<br />
Messa in funzione<br />
1) Inserire i microfoni sui supporti e avvitare questi<br />
sugli stativi per microfoni. Nel caso di stativi con<br />
filettatura di 16 mm ( 5 ⁄8″), togliere gli adattatori posti<br />
sui supporti e avvitare i supporti direttamente sugli<br />
stativi. Con stativi con filettatura di 9 mm ( 3 ⁄8″)<br />
occorre usare gli adattatori.<br />
2) Collegare i microfoni con gli ingressi XLR simmetrici<br />
dellʼapparecchio audio (p. es. del mixer) servendosi<br />
di appositi cavi di collegamento (p. es. della serie<br />
MEC di “img Stage Line”). Gli ingressi devono possedere<br />
ognuno unʼalimentazione phantom 48 V .<br />
Se lʼapparecchio audio non dispone di alimentazio -<br />
ne phantom occorre collegare i microfoni per mez -<br />
daños materiales o corporales si los micros se utilizan<br />
en una finalidad distinta para la cual han sidos<br />
fabricados, si no están correctamente conectados<br />
o reparados por una persona habilitada y calificada<br />
; además por todos estos mismo motivos los<br />
aparatos carecerían de todo tipo de garantía.<br />
Cuando los micros están definitivamente<br />
sacados del servicio, debe depositarlos en<br />
una fábrica de reciclaje para contribuir a una<br />
eliminación no contaminante.<br />
3 Puesta en marcha<br />
1) Introduzca los micros en las pinzas y atornille la<br />
pinza sobre el pie de micro: Para un pie con una<br />
rosca de 16 mm ( 5 ⁄8″), saque la tuerca de adaptación<br />
y atornille directamente la pinza. Para un pie<br />
con una rosca de 9 mm ( 3 ⁄8″), fije la pinza sobre la<br />
tuerca de adaptación.<br />
2) Conecte los micros vía un cable (por ejemplo un<br />
cable de la serie MEC de la gama “img Stage Line”<br />
con la entradas micro XLR simétricas del aparato<br />
audio (p. ej. mesa de mezcla). Las entradas deben<br />
respectivamente disponer de una alimentación<br />
jego przeznaczeniem, jest niewłaściwe podłą -<br />
czane, lub gdy naprawy dokonywane są przez<br />
osoby nieupoważnione pełną odpowiedzialność za<br />
szkody ponosi użytkownik.<br />
Jeżeli urządzenie nie będzie już nigdy używane<br />
na leży oddać je do miejsca utylizacji<br />
odpadów, gdzie zostanie zniszczone bez<br />
szkody dla środowiska.<br />
3 Obsługa<br />
1) Wsunąć mikrofony w uchwyty. Uchwyty dokręcić do<br />
statywów mikrofonowych: W przypadku, gdy średnica<br />
gwintu statywu mikrofonowego wynosi 16 mm<br />
( 5 ⁄8″), należy usunąć śrubę adaptacyjną uchwytu i<br />
dokręcić go bezpośrednio do statywu. Jeżeli średnica<br />
gwintu statywu wynosi 9 mm ( 3 ⁄8″), należy zamocować<br />
do niego uchwyt stosując śrubę adaptacyjną.<br />
2) Połączyć mikrofony za pomocą odpowiednich kabli<br />
(np.: kabli serii MEC z oferty “img Stage Line”) z<br />
symetrycznym wejściem mikrofonowym urządzenia<br />
audio (np.: miksera). Wejście mikrofonowe musi<br />
być wyposażone w zasilanie fantomowe 48 V prądu<br />
stałego. Jeżeli urządzenie audio nie posiada wejścia<br />
mikrofonowego wyposażonego w zasilanie<br />
(dB) -30<br />
-40<br />
-50<br />
-60<br />
-70<br />
-80<br />
➁<br />
low cut filter on ( )<br />
50 100 200 500 1k 2k 5k 10k 20k(Hz)<br />
zo di un alimentatore phantom esterno (p. es. EMA-<br />
200 di “img Stage Line”) sul apparec chio audio.<br />
3) Su ogni microfono impostare la posizione desiderata<br />
dei due interruttori incassati con lʼaiuto di un<br />
oggetto stretto (p. es. di un piccolo cacciavite):<br />
a con lʼinterruttore superiore si può attivare un filtro<br />
low-cut (passaalto) per abbassare le frequenze<br />
basse (posizione ).<br />
b con lʼinterruttore inferiore si può attenuare la<br />
sensibilità di 10 dB (posizione “-10dB”).<br />
Dati tecnici<br />
Tipo/proprietà direzionale: . . elettrete/cardioide<br />
Banda di frequenze: . . . . . . . 50 – 16 000 Hz<br />
Impedenza: . . . . . . . . . . . . . . 200 Ω<br />
Sensibilità: . . . . . . . . . . . . . . 18 mV/Pa (“0 dB”) a 1 kHz,<br />
5,6 mV/Pa (“-10 dB”) a 1 kHz<br />
Pressione sonora max.: . . . . 130 dB<br />
Rapporto S/R: . . . . . . . . . . . 66 dB<br />
Alimentazione: . . . . . . . . . . . alimentazione phantom 48 V<br />
Dimensioni, peso: . . . . . . . . . ∅ 19 mm × 80 mm, 25 g<br />
Collegamento: . . . . . . . . . . . XLR<br />
Con riserva di modifiche tecniche.<br />
phantom de 48 V . Si el aparato audio no dispone<br />
de alimentación phantom, conecte los micros vía un<br />
aparato externo de alimentación phantom (p. ej.<br />
EMA-200 de “img Stage Line”) al aparato audio.<br />
3) En cada micro, pulse los dos interruptores empotrados<br />
con un objeto de pequeñas dimensiones<br />
(p. ej. atornillador pequeño) en la posición deseada:<br />
a) con el interruptor superior, puede conmutar un<br />
filtro Low Cut (pasa alto) para disminuir las frecuencias<br />
graves (posición ).<br />
b) con el interruptor inferior, puede disminuir la<br />
sensibilidad de 10 dB (posición “-10dB”).<br />
4 Características técnicas<br />
Tipo / Directividad: . . . . . . . . . electret / cardioide<br />
Banda pasante, impedancia: 50 – 16 000 Hz, 200 Ω<br />
Sensibilidad: . . . . . . . . . . . . . 18 mV/Pa (“0 dB”) a 1 kHz,<br />
5,6 mV/Pa (“-10 dB”) a 1 kHz<br />
Presión sonora máxima: . . . . 130 dB<br />
Relación señal / ruido: . . . . . . 66 dB<br />
Alimentación: . . . . . . . . . . . . alimentación phantom 48 V<br />
Dimensiones, peso: . . . . . . . ∅ 19 mm × 80 mm, 25 g<br />
Conexión: . . . . . . . . . . . . . . . XLR<br />
Sujeto a modificaciones técnicas.<br />
fantomowe, należy zastosować zewnętrzny zasilacz<br />
fantomowy (np.: EMA-200 z oferty “img Stage<br />
Line”) pomiędzy mikrofonem, a wejściem audio.<br />
3) W obu mikrofonach należy odpowiednio do wy magań<br />
ustawić dwa przełączniki (za pomocą niewielkiego<br />
śrubokręta), które odpowiedzialne są za<br />
następujące funkcje:<br />
a Górny przełącznik służy do włączenia filtra górnoprzepustowego,<br />
wyciszającego niskie częstotliwości<br />
(pozycja ).<br />
b Dolny przełącznik służy do włączania wytłu mienia<br />
sygnału o 10 dB (pozycja “-10 dB”).<br />
4 Dane Techniczne<br />
Typ/charakterystyka: . . . . . . elektretowy/kierunkowa<br />
Zakres częstotliwości: . . . . . . 50 – 16 000 Hz<br />
Impedancja: . . . . . . . . . . . . . 200 Ω<br />
Czułość: . . . . . . . . . . . . . . . 18 mV/Pa (“0dB”) przy 1 kHz,<br />
5,6 mV/Pa (“-10dB”) przy 1 kHz<br />
Maks. SPL: . . . . . . . . . . . . . 130 dB<br />
Współczynnik S/N: . . . . . . . 66 dB<br />
Zasilanie: . . . . . . . . . . . . . . . antomowe 48 V<br />
Wymiary, waga: . . . . . . . . . . ∅ 19 mm × 80 mm, 25 g<br />
Gniazdo wyjściowe: . . . . . . . . XLR<br />
Z zastrzeżeniem możliwość zmian.<br />
Risposta in frequenza<br />
Respuesta de frecuencia<br />
Wykresy charakterystyk częstotliwości<br />
® MONACOR INTERNATIONAL GmbH & Co. KG • Zum Falsch 36 • 28307 Bremen • Germany<br />
Copyright © by MONACOR INTERNATIONAL. All rights reserved. A-0193.99.02.06.2011