

RE432 TOP 432SA TOP A433N / TOP RG58 - Came Europe
RE432 TOP 432SA TOP A433N / TOP RG58 - Came Europe
RE432 TOP 432SA TOP A433N / TOP RG58 - Came Europe

Create successful ePaper yourself
Turn your PDF publications into a flip-book with our unique Google optimized e-Paper software.
<strong>TOP</strong> <strong>A433N</strong><br />
<strong>RG58</strong><br />
<strong>RE432</strong> <strong>TOP</strong> <strong>432SA</strong><br />
12<br />
24V 12VNO1 C1 NO2C2<br />
<strong>RE432</strong><br />
1<br />
RADIOCOMANDI | RADIO CONTROLS | RADIOMANDOS<br />
<strong>RE432</strong><br />
12<br />
24V 12VNO1 C1 NO2C2<br />
<strong>TOP</strong>-<strong>432SA</strong><br />
<strong>RE432</strong><br />
2<br />
12V<br />
24V<br />
3<br />
12<br />
+ -<br />
24V 12V OUT1 OUT2<br />
1 2<br />
1 2<br />
5<br />
<strong>RE432</strong><br />
1<br />
2<br />
91<br />
6<br />
27<br />
1 2<br />
1 2<br />
46<br />
23<br />
108<br />
(mm)<br />
<strong>TOP</strong> <strong>A433N</strong> / <strong>TOP</strong> <strong>RG58</strong><br />
Part. A<br />
TRA03<br />
6<br />
A<br />
B<br />
5<br />
8<br />
2<br />
Documentazione<br />
Tecnica<br />
T59<br />
rev. 0.1<br />
06/2004<br />
CANCELLI AUTOMATICI 119RT59<br />
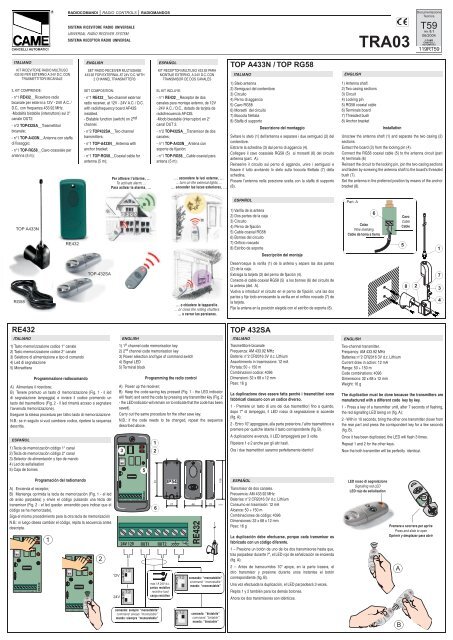
ITALIANO<br />
KIT RICEVITORE RADIO MULTIUSO<br />
433.92 PER ESTERNO A 24V D.C. CON<br />
TRASMETTITORI BICANALE<br />
IL KIT COMPRENDE:<br />
- n°1 <strong>RE432</strong>__Ricevitore radio<br />
bicanale per esterni a 12V - 24V A.C. /<br />
D.C., con frequenza 433.92 MHz.<br />
-Modalità bistabile (interruttore) sul 2°<br />
canale OUT2.<br />
- n°2 <strong>TOP</strong><strong>432SA</strong>__Trasmettitori<br />
bicanale;<br />
- n°1 <strong>TOP</strong>-<strong>A433N</strong>__Antenna con staffa<br />
di fi ssaggio;<br />
- n°1 <strong>TOP</strong>-<strong>RG58</strong>__Cavo coassiale per<br />
antenna (5 m);<br />
ITALIANO<br />
1) Tasto memorizzazione codice 1° canale<br />
2) Tasto memorizzazione codice 2° canale<br />
3) Selettore di alimentazione e tipo di comando<br />
4) Led di segnalazione<br />
5) Morsettiera<br />
Programmazione radiocomando<br />
SISTEMA RICEVITORE RADIO UNIVERSALE<br />
UNIVERSAL RADIO RECEIVER SYSTEM<br />
SISTEMA RECEPTOR RADIO UNIVERSAL<br />
ENGLISH<br />
SET RADIO RECEIVER MULTIUSAGE<br />
433.92 FOR EXTERNAL AT 24V D.C. WITH<br />
2 CHANNEL TRANSMITTERS<br />
SET COMPOSITION:<br />
A) Alimentare il ricevitore;<br />
B) Tenere premuto un tasto di memorizzazione (Fig. 1 - il led<br />
di segnalazione lampeggia) e inviare il codice premendo un<br />
tasto del trasmettitore (Fig. 2 - il led rimarrà acceso a segnalare<br />
l’avvenuta memorizzazione).<br />
Eseguire la stessa procedura per l’altro tasto di memorizzazione<br />
N.B.: se in seguito si vuol cambiare codice, ripetere la sequenza<br />
descritta.<br />
ESPAÑOL<br />
1) Tecla de memorización código 1° canal<br />
2) Tecla de memorización código 2° canal<br />
3) Selector de alimentación y tipo de mando<br />
4) Led de señalisation<br />
5) Caja de bornes<br />
Programación del radiomando<br />
A) Encienda el receptor;<br />
B) Mantenga oprimida la tecla de memorizaciòn (Fig. 1 - el led<br />
de aviso parpadea) y envìe el còdigo pulsando una tecla del<br />
transmisor (Fig. 2 - el led quedar· encendido para indicar que el<br />
còdigo se ha memorizado).<br />
Siga el mismo procedimiento para la otra tecla de memorización<br />
N.B.: si luego desea cambiar el còdigo, repita la secuencia antes<br />
descripta.<br />
- n°1 <strong>RE432</strong>__Two-channel external<br />
radio receiver, at 12V - 24V A.C. / D.C.<br />
with radiofrequency board AF43S<br />
installed.<br />
- Bistable function (switch) on 2nd channel.<br />
- n°2 <strong>TOP</strong><strong>432SA</strong>__Two channel<br />
transmitters;<br />
- n°1 <strong>TOP</strong>-<strong>A433N</strong>__Antenna with<br />
anchor bracket;<br />
- n°1 <strong>TOP</strong>-<strong>RG58</strong>__Coaxial cable for<br />
antenna (5 m);<br />
Per attivare l’allarme, ...<br />
To activate alarm, ...<br />
Para activar la alarma, ...<br />
ENGLISH<br />
ESPAÑOL<br />
KIT RECEPTOR MULTIUSO 433.92 PARA<br />
MONTAJE EXTERNO, A 24V D.C. CON<br />
TRANSMISOR DE DOS CANALES<br />
EL KIT INCLUYE:<br />
- n°1 <strong>RE432</strong>__Receptor de dos<br />
canales para montaje externo, de 12V<br />
- 24V A.C. / D.C., dotado de tarjeta de<br />
radiofrecuencia AF43S.<br />
-Modo biestable (interruptor) en 2°<br />
canal OUT 2.<br />
- n°2 <strong>TOP</strong><strong>432SA</strong>__Transmisor de dos<br />
canales;<br />
- n°1 <strong>TOP</strong>-<strong>A433N</strong>__Antena con<br />
soporte de fi jación;<br />
- n°1 <strong>TOP</strong>-<strong>RG58</strong>__Cable coaxial para<br />
antena (5 m);<br />
1) 1 st channel code memorisation key<br />
2) 2 nd channel code memorisation key<br />
3) Power selection and type of command switch<br />
4) Signal LED<br />
5) Terminal block<br />
Programming the radio control<br />
A) Power up the receiver;<br />
B) Keep the code-saving key pressed (Fig. 1 - the LED indicator<br />
will fl ash) and send the code by pressing any transmitter key (Fig. 2<br />
- the LED indicator will remain on to indicate that the code has been<br />
saved).<br />
Carry out the same procedure for the other save key.<br />
N.B.: if the code needs to be changed, repeat the sequence<br />
described above.<br />
comando: sempre “monostabile”<br />
command: always “monostable”<br />
mando: siempre “monoestable”<br />
max 1A 24V d.c.<br />
carico resistivo<br />
resistive load<br />
carga resistiva<br />
... accendere le luci esterne, ...<br />
... turn on the external lights, ...<br />
... encender las luces exteriores, ...<br />
IP54<br />
... o chiudere le tapparelle.<br />
... or close the rolling shutters.<br />
... o cerrar las persianas.<br />
comando: “monostabile”<br />
command: “monostable”<br />
mando: “monoestable”<br />
comando: “bistabile”<br />
command: “bistable”<br />
mando: “biestable”<br />
ITALIANO<br />
1) Stelo antenna<br />
2) Semigusci del contenitore<br />
3) Circuito<br />
4) Perno di aggancio<br />
5) Cavo <strong>RG58</strong><br />
6) Morsetti del circuito<br />
7) Boccola fi lettata<br />
8) Staffa di supporto<br />
Descrizione del montaggio<br />
Svitare lo stelo (1) dell’antenna e separare i due semigusci (2) del<br />
contenitore.<br />
Estrarre la schedina (3) dal perno di aggancio (4).<br />
Collegare il cavo coassiale <strong>RG58</strong> (5) ai morsetti (6) del circuito<br />
antenna (part. A).<br />
Reinserire il circuito sul perno di aggancio, unire i semigusci e<br />
fi ssare il tutto avvitando lo stelo sulla boccola fi lettata (7) della<br />
schedina.<br />
Fissare l’antenna nella posizione scelta con la staffa di supporto<br />
(8).<br />
ESPAÑOL<br />
1) Varilla de la antena<br />
2) Dos partes de la caja<br />
3) Circuito<br />
4) Perno de fi jación<br />
5) Cable coaxial <strong>RG58</strong><br />
6) Bornes del circuito<br />
7) Orifi cio roscado<br />
8) Estribo de soporte<br />
Descripción del montaje<br />
Desenrosque la varilla (1) de la antena y separe las dos partes<br />
(2) de la caja.<br />
Extraiga la tarjeta (3) del perno de fi jación (4).<br />
Conecte el cable coaxial <strong>RG58</strong> (5) a los bornes (6) del circuito de<br />
la antena (det. A).<br />
Vuelva a introducir el circuito en el perno de fi jación, una las dos<br />
partes y fi je todo enroscando la varilla en el orifi cio roscado (7) de<br />
la tarjeta.<br />
Fije la antena en la posición elegida con el estribo de soporte (8).<br />
ITALIANO<br />
Trasmettitore bicanale<br />
Frequenza: AM 433.92 MHz<br />
Batterie: n°2 CR2016 3V d.c. Lithium<br />
Assorbimento in trasmissione: 12 mA<br />
Portata: 50 ÷ 150 m<br />
Combinazioni codice: 4096<br />
Dimensioni: 32 x 68 x 12 mm<br />
Peso: 16 g<br />
La duplicazione deve essere fatta perchè i trasmettitori sono<br />
fabbricati ciascuno con un codice diverso.<br />
1 - Premere un tasto di uno dei due trasmettitori fi no a quando,<br />
dopo 7” di lampeggio, il LED rosso di segnalazione si accende<br />
(fi g. A);<br />
2 - Entro 10” appoggiare, alla parte posteriore, l’altro trasmettitore e<br />
premere per qualche istante il tasto corrispondente (fi g. B).<br />
A duplicazione avvenuta, il LED lampeggierà per 3 volte.<br />
Ripetere 1 e 2 anche per gli altri tasti.<br />
Ora i due trasmettitori saranno perfettamente identici!<br />
ESPAÑOL<br />
Transmisor de dos canales.<br />
Frecuencia: AM 433.92 MHz<br />
Baterías: n°2 CR2016 3V d.c. Lithium<br />
Consumo en trasmisión: 12 mA<br />
Alcance: 50 ÷ 150 m<br />
Combinaciones de código: 4096<br />
Dimensiones: 32 x 68 x 12 mm<br />
Peso: 16 g<br />
La duplicación debe efectuarse, porque cada transmisor es<br />
fabricado con un código diferente.<br />
1 – Presione un botón de uno de los dos transmisores hasta que,<br />
tras parpadear durante 7”, el LED rojo de señalización se encienda<br />
(fi g. A);<br />
2 – Antes de transcurridos 10” apoye, en la parte trasera, el<br />
otro transmisor y presione durante unos instantes el botón<br />
correspondiente (fi g. B).<br />
Una vez efectuada la duplicación, el LED parpadeará 3 veces.<br />
Repita 1 y 2 también para los demás botones.<br />
Ahora los dos transmisores son idénticos.<br />
ENGLISH<br />
1) Antenna shaft<br />
2) Two casing sections<br />
3) Circuit<br />
4) Locking pin<br />
5) <strong>RG58</strong> coaxial cable<br />
6) Terminals board<br />
7) Threaded bush<br />
8) Anchor bracket<br />
Installation<br />
© CAME<br />
CANCELLI<br />
AUTOMATICI<br />
Unscrew the antenna shaft (1) and separate the two casing (2)<br />
sections.<br />
Extract the board (3) from the locking pin (4).<br />
Connect the <strong>RG58</strong> coaxial cable (5) to the antenna circuit (part<br />
A) terminals (6)<br />
Reinsert the circuit to the locking pin, join the two casing sections<br />
and fasten by screwing the antenna shaft to the board’s threaded<br />
bush (7).<br />
Set the antenna in the preferred position by means of the anchor<br />
bracket (8).<br />
Calza<br />
Wire shielding<br />
Cable de toma a tierra<br />
ENGLISH<br />
Two-channel transmitter.<br />
Frequency: AM 433.92 MHz<br />
Batteries: n°2 CR2016 3V d.c. Lithium<br />
Current draw in action: 12 mA<br />
Range: 50 ÷ 150 m<br />
Code combinations: 4096<br />
Dimensions: 32 x 68 x 12 mm<br />
Weight: 16 g<br />
LED rosso di segnalazione<br />
Signalling red LED<br />
LED rojo de señalisation<br />
Cavo<br />
Cable<br />
Cable<br />
The duplication must be done because the transmitters are<br />
manufactured with a different code key by key.<br />
1 - Press a key of a transmitter until, after 7 seconds of fl ashing,<br />
the red signalling LED being on (fi g. A);<br />
2 - With in 10 seconds, bring the other one transmitter closer from<br />
the rear part and press the corrispondent key for a few seconds<br />
(fi g. B).<br />
Once it has been duplicated, the LED will fl ash 3 times.<br />
Repeat 1 and 2 for the other keys.<br />
Now the both transmitter will be perfectly identical.<br />
Premere e scorrere per aprire<br />
Press and slide to open<br />
Oprimir y desplazar para abrir<br />
1<br />
7<br />
3<br />
4
<strong>TOP</strong> <strong>A433N</strong><br />
<strong>RG58</strong><br />
<strong>RE432</strong> <strong>TOP</strong> <strong>432SA</strong><br />
12<br />
24V 12VNO1 C1 NO2C2<br />
<strong>RE432</strong><br />
1<br />
RADIOCOMMANDES | ONTVANGER | FUNKSTEUERUNGEN<br />
<strong>RE432</strong><br />
12<br />
24V 12VNO1 C1 NO2C2<br />
<strong>TOP</strong>-<strong>432SA</strong><br />
<strong>RE432</strong><br />
2<br />
12V<br />
24V<br />
3<br />
12<br />
+ -<br />
24V 12V OUT1 OUT2<br />
1 2<br />
1 2<br />
5<br />
<strong>RE432</strong><br />
1<br />
2<br />
91<br />
6<br />
27<br />
1 2<br />
1 2<br />
46<br />
23<br />
108<br />
(mm)<br />
<strong>TOP</strong> <strong>A433N</strong> / <strong>TOP</strong> <strong>RG58</strong><br />
Part. A<br />
TRA03<br />
6<br />
A<br />
B<br />
5<br />
8<br />
2<br />
Documentazione<br />
Tecnica<br />
T59<br />
rev. 0.1<br />
06/2004<br />
CANCELLI AUTOMATICI 119RT59<br />
FRANÇAIS<br />
KIT RÉCEPTEUR RADIO POUR<br />
EXTÉRIEUR 24V COMMANDE 2<br />
FONCTIONS - MULTI USAGES<br />
L’ENSEMBLE COMPREND:<br />
- n°1 <strong>RE432</strong>__Récepteur radio bicanal<br />
extérieur à 12V - 24V C.A. / C.C. avec<br />
carte radio AF43S à 433.92 MHz.<br />
- Mode bistable sur 2éme canal.<br />
- n°2 <strong>TOP</strong><strong>432SA</strong>__Emetteur bicanal;<br />
- n°1 <strong>TOP</strong>-<strong>A433N</strong>__Antenne avec<br />
bride de fi xation;<br />
- n°1 <strong>TOP</strong>-<strong>RG58</strong>__Câble coaxial pour<br />
antenne (5 m);<br />
FRANÇAIS<br />
1) Touche de mémorisation code 1 ère canal<br />
2) Touche de mémorisation code 2 éme canal<br />
3) Selecteur d’alimentation et type de commande<br />
4) Led de fonctionnement<br />
5) Plaque à borne<br />
Programmation radiocommande<br />
SYSTÈME RÉCEPTEUR RADIO UNIVERSAL<br />
UNIVERSEEL RADIO-ONTVANGSYSTEEM<br />
UNIVERSAL-FUNKEMPFANGSSYSTEM<br />
NEDERLANDS<br />
RADIO-ONTVANGER KIT VOOR EXTERN<br />
GEBRUIK-VOEDING (24V) 2 MOGELIJKE<br />
FUNCTIES-MULTIGEBRUIK<br />
SET COMPOSITION:<br />
A) Alimenter le récepteur;<br />
B) Appuyer sur une touche de mémorisation (Fig. 1 - le voyant de<br />
signalisation clignote) et enregistrer le code en appuyant sur une<br />
touche de l’émetteur (Fig. 2 - le voyant reste allumé pour signaler<br />
que la mémorisation a été effectuée).<br />
Procéder de la même façon pour l’autre touche de mémorisation<br />
N.B.: répéter cette séquence pour changer éventuellement de<br />
code par la suite.<br />
DEUTSCH<br />
1) Speicherungstaste für Kodex 1. Kanel<br />
2) Speicherungstaste für Kodex 2. Kanel<br />
3) Wählschalter Auswahl van Speisung und Befehlsart<br />
4) LED Funktionskontrolle<br />
5) Klemmbrett<br />
Programmierung der Funksteuerung<br />
A) Den Strom am Empfänger einschalten.<br />
B) Eine der Speichertasten gedrückt halten (Abb. 1 - das LED<br />
blinkt) und den Code durch Drücken einer Taste vom Funksender<br />
übertragen (Abb. 2 - das LED leuchtet auf, sobald das Abspeichern<br />
vom Code erfolgt ist).<br />
Die andere Speichertaste auf die gleiche Weise programmieren,<br />
Hinweis: Wenn der Code später geändert werden soll, die hier<br />
beschriebene Programmierung wiederholen.<br />
- n°1 <strong>RE432</strong>__2 kanaals radioontvanger<br />
12V - 24V A.C. / D.C. voor<br />
extern gebruik met frequentieprint<br />
AF43S op 433.92 MHz.<br />
- Functie bistabiel op 2de kanaal.<br />
- n°2 <strong>TOP</strong><strong>432SA</strong>__2 kanaals zender;<br />
- n°1 <strong>TOP</strong>-<strong>A433N</strong>__Antenne met<br />
bevestigingsbeugel;<br />
- n°1 <strong>TOP</strong>-<strong>RG58</strong>__Coax kabel voor<br />
antenne (5 m);<br />
Commande d’une alarme, ...<br />
Bediening van een alarm, ...<br />
Zur Alarmaktivierung, ...<br />
NEDERLANDS<br />
1) Programmeertoets eerste kanaal<br />
2) Programmeertoets tweede kanaal<br />
3) Dip-switch<br />
4) Controleled<br />
5) Aansluitklemmen<br />
DEUTSCH<br />
KIT FÜR MEHRZWECK-<br />
FUNKEMPFÄNGER 433.92 FÜR<br />
DRAUSSEN 24V W.S. MIT ZWEIKANAL-<br />
SENDER<br />
DAS KIT UMFASST:<br />
- n°1 <strong>RE432</strong>__Zweikanal-<br />
Funkempfänger für draußen 12V - 24V<br />
W.S. / G.S. mit Funkfrequenzkarte<br />
AF43S.<br />
-Bistabiler Modus (Schalter) auf dem<br />
2° Kanal (OUT2)<br />
- n°2 <strong>TOP</strong><strong>432SA</strong>__Vierkanal-Sender;<br />
- n°1 <strong>TOP</strong>-<strong>A433N</strong>__Antenne mit<br />
Befestigungsbügel;<br />
- n°1 <strong>TOP</strong>-<strong>RG58</strong>__Koaxiales Kabel für<br />
Antennen (5 m);<br />
... commande d’eclairage, ...<br />
... bediening van een verlichting, ...<br />
... Einschaltung der Außenbeleuchtung, ...<br />
... commande de volet roulant.<br />
... bediening van een rolluik.<br />
... oder zum Schließen der Rollläden.<br />
Programmatie van de zender<br />
A) Sluit de voeding aan op de ontvanger;<br />
B) Druk op de programmatietoets (Fig. 1 – de signalisatieled<br />
knippert) en stuur de code door d.m.v. de zender (Fig. 2 - de<br />
signalisatieled blijft branden om aan te duiden dat de programmatie<br />
geslaagd is).<br />
Volg dezelfde werkwijze voor het tweede kanaal.<br />
N.B.: Indien u een andere code wenst te programmeren, volg dan<br />
dezelfde werkwijze.<br />
IP54<br />
max 1A 24V d.c.<br />
charge résistive<br />
max. belasting<br />
ohmsher belastung<br />
commande: toujours “monostable”<br />
commando: altijd “Puls”<br />
Einstellung: Immer “monostabil”<br />
commande: “monostable”<br />
commando: “Puls”<br />
Einstellung: “monostabil”<br />
commande: “bistable”<br />
commando: “ON-OFF”<br />
Einstellung: “bistabil”<br />
FRANÇAIS<br />
1) Tige de l’antenne<br />
2) Deux moitiés du boîtier<br />
3) Circuit<br />
4) Goujon de fi xation<br />
5) Câble coaxial <strong>RG58</strong><br />
6) Bornes du circuit<br />
7) Douille fi letée<br />
8) Bride de support<br />
Description du montage<br />
Dévisser la tige (1) de l’antenne et séparer les deux moitiés (2)<br />
du boîtier.<br />
Extraire la carte (3) du goujon de fi xation (4).<br />
Brancher le câble coaxial <strong>RG58</strong> (5) aux bornes (6) du circuit<br />
antenne (part. A).<br />
Remettre le circuit sur le goujon de fi xation, assembler les deux<br />
moitiés et fi xer le tout en vissant la tige à la douille fi letée (7) de<br />
la carte.<br />
Fixer l’antenne dans la position voulue avec la bride de support<br />
(8).<br />
DEUTSCH<br />
1) Antennenstange<br />
2) Gehäusehälften<br />
3) Stromkreis<br />
4) Sitz herausziehen<br />
5) Koaxialkabel <strong>RG58</strong><br />
6) Klemmen<br />
7) Gewindebuchse<br />
8) Halterungsbügel<br />
Montagebeschreibung<br />
Die Stange der Antenne (1) abschrauben und die beiden<br />
Gehäusehälften (2) auseinandernehmen.<br />
Die Karte (3) aus ihrem Sitz (4) herausziehen.<br />
Das Koaxialkabel <strong>RG58</strong> (5) an die Klemmen (6) vom<br />
Antennenstromkreis anschließen (Teil A).<br />
Die Karte wieder in ihren Sitz stecken, die beiden Gehäusehälften<br />
zusammenfügen und alles befestigen. Dazu die Antennenstange in<br />
die Gewindebuchse (7) der Karte einschrauben.<br />
Die Antenne mit dem Halterungsbügel (8) in der gewünschten<br />
position anbringen.<br />
FRANÇAIS<br />
Emetteur à deux canaux<br />
Frequence: AM 433.92 MHz<br />
Batteries: n°2 CR2016 3V d.c. Lithium<br />
Consommation en transmission: 12 mA<br />
Portée: 50 ÷ 150 m<br />
Combinaisons de code: 4096<br />
Dimensions: 32 x 68 x 12 mm<br />
Poids: 16 g<br />
La duplication doit être fait sur chaque émetteur parce que<br />
les émetteurs ont des codes différents quand ils sortent<br />
d‘usines.<br />
1 - Appuyer sur une des touches d’un des deux émetteurs jusqu’à<br />
ce que le VOYANT rouge de signalisation s’allume après avoir<br />
clignoté pendant 7 secondes (fi g. A).<br />
2 – Poser l’autre émetteur contre la partie arrière dans les 10<br />
secondes qui suivent et appuyer pendant quelques instants sur la<br />
touche correspondante (fi g. B).<br />
Le LED clignote trois fois pour signaler que le code a été<br />
mémorisé.<br />
Répéter les points 1) et 2) pour les autres touches.<br />
Les deux émetteurs sont maintenant parfaitement identiques !<br />
DEUTSCH<br />
Zweikanal-Funksender<br />
Frequenz: AM 433.92 MHz<br />
Batterien: n°2 CR2016 3V d.c. Lithium<br />
Verbrauch beim Sender: 12 mA<br />
Reichweite: 50 ÷ 150 m<br />
Code kombinationen: 4096<br />
Abmessungen: 32 x 68 x 12 mm<br />
Gewicht: 16 g<br />
Die Sender müssen kopiert werden, weil jeder mit einem<br />
unterschiedlichen Code hergestellt wurde.<br />
1 - Die Taste von einem der beiden Sender betätigen, bis sich<br />
nach 7” Blinken das rote Anzeige-LED einschaltet (Abb.A);<br />
2 - Innerhalb von 10” den anderen Sender an der Rückseite<br />
anlehnen und für einen Augenblick die entsprechende Taste<br />
(Abb.B) betätigen.<br />
Nach erfolgtem Kopieren, blinkt das LED drei Mal.<br />
Die Vorgänge 1 und 2 auch für die anderen Tasten wiederholen.<br />
Nun sind beide Sender vollkommen gleich!<br />
NEDERLANDS<br />
1) Antenne staaf<br />
2) Twee delen van de behuizing<br />
3) Print<br />
4) Bevestigingsnokje<br />
5) Coaxkabel <strong>RG58</strong><br />
6) Aaansluitklem<br />
7) Draadbus<br />
8) Bevestigingsbeugel<br />
Beschrijving van de montage<br />
© CAME<br />
CANCELLI<br />
AUTOMATICI<br />
Demonteer de antenne staff (1) en open de behuizing (2).<br />
Verwijder de print (3) van het bevestigingsnokje (4).<br />
Sluit de coaxkabel <strong>RG58</strong> (5) aan op de aansluitklemmen (6) van<br />
de print (part A).<br />
Plaats de print terug op het bevestigingsnokje, voeg de twee<br />
delen samen en schroef deze vast door middel van de antenne<br />
staaf op de draadbus (7) van de print.<br />
Bevestig de antenne in de gewenste positie met de<br />
bevestigingsbeugel (8).<br />
Gaine<br />
Kabel-afscherming<br />
Umklöppelung<br />
NEDERLANDS<br />
Twee kanalen zender.<br />
Frequentie: AM 433.92 MHz<br />
Batterijen: n°2 CR2016 3V d.c. Lithium<br />
Verbruik bij gebruik: 12 mA<br />
Bereik: 50 ÷ 150 m<br />
Combinatie van de codes: 4096<br />
Afmetingen: 32 x 68 x 12 mm<br />
Gewicht: 16 g<br />
LED rouge de signalisation<br />
LED rood voor signalisatie<br />
LED rot zur Anzeige<br />
Câble<br />
Kabel<br />
Kabel<br />
Het kopiëren van de zenders is noodzakelijk omdat de<br />
zenders een verschillende code hebben wanneer ze de<br />
fabriek verlaten.<br />
1 - Druk op de te coderen toets van de zender MA. De led zal 7<br />
seconden knipperen en daarna vast blijven branden (fi g. A).<br />
2 - Wanneer de led vast blijft branden, heeft u 10 seconden om<br />
de code van de oude zender door te sturen naar de <strong>TOP</strong>434-MA<br />
door deze (oude zender) erachter te plaatsen en te drukken op<br />
één van de toetsen (fi g. B).<br />
De zender MA bevestigt dat de code goed is doorgegeven<br />
wanneer de led 3 x knippert.<br />
De MA zender is nu klaar voor gebruik. Herhaal 1) et 2) voor de<br />
codering van de andere MA toetsen.<br />
Appuyer et faire défi ler pour ouvrir<br />
Indrukken en laten verschuiven voor opening<br />
Zum Öffnen hier drücken und schieben<br />
1<br />
7<br />
3<br />
4