Montageanleitung Installation instructions Montage Montage van ...
Montageanleitung Installation instructions Montage Montage van ...
Montageanleitung Installation instructions Montage Montage van ...

You also want an ePaper? Increase the reach of your titles
YUMPU automatically turns print PDFs into web optimized ePapers that Google loves.
<strong><strong>Montage</strong>anleitung</strong><br />
<strong>Installation</strong> <strong>instructions</strong><br />
<strong>Montage</strong><br />
<strong>Montage</strong> <strong>van</strong><br />
Istruzioni di montaggio<br />
Montaje instrucciones<br />
Instrukcja montażu<br />
Kippspiegel mit Beleuchtung<br />
Adjustable mirror lighting<br />
Miroir basculant éclaire<br />
Kantelspiegel met verlichting<br />
Specchio inclinabile con luce<br />
Espejo abatible con iluminación<br />
Lustro uchylne z oświetleniem<br />
801.01.200<br />
801.01.201<br />
Achtung!<br />
Der elektrische Anschluß ist nach DIN<br />
VDE 0100/Teil 701 von einem Fachmann<br />
auszuführen!<br />
Attention!<br />
The electric lights should be wired by<br />
qualified electricians 240V!<br />
Attention!<br />
Le raccordement électrique devra<br />
être effectué par un spécialiste!<br />
Attentie!<br />
De elektrische aansluiting moetvolgens<br />
DIN VDE 0100/deel 701 door<br />
een vakman uitgevoerd worden!<br />
Attenzione!<br />
L’allacciamento elettrico deve venir<br />
effettuato secondo le norme DIN VDE<br />
0100/701!<br />
Atención!<br />
Le recordamos que la instalación<br />
electrica debe ser hecha por un profesional.<br />
Uwaga!<br />
Produkt musi zostać przyłączony do<br />
sieci elektrycznej zgodnie z normą<br />
DIN VDE 0100, część 701, przez<br />
wykwalifikowanego elektryka!<br />
M801.02M © Copyright 03/06<br />
1 2 3 4 5<br />
Kippspiegelaufbau<br />
Kippspiegel (1), Drehgriff (2), Beleuchtung<br />
(3).<br />
<strong>Installation</strong><br />
Adjustable mirror (1), knop (2), lighting<br />
(3).<br />
Construction du miroir basculant<br />
(1) miroir, (2) poigne e de rotation,<br />
(3) éclairange.<br />
Bestaand uit<br />
(1) Kantelspiegel, (2) bedienings handeltje,<br />
(3) verlichting.<br />
Struttura della specchio<br />
(1) Specchio inclinabile, (2) manopoladirotazione,<br />
con luce (3).<br />
Estructura del espejo abatible<br />
con iluminación.<br />
(1) espejo, (2) tirador giratorio, (3) lámpara.<br />
Konstrukcja lustra uchylnego<br />
Lustro uchylne (1), Uchwyt obrotowy (2),<br />
Oświetlenie (3)<br />
Bereich für Kabelführung (4) beachten<br />
Dübellöcher anzeichnen und bohren-<br />
<strong>Montage</strong>höhe von Oberkante Fertigfußboden<br />
bis Unterkante Kippspiegel ca.<br />
1300 mm.<br />
Mark and drill holes for plugs. <strong>Installation</strong><br />
heigt between upper floor level and<br />
bottom edge mirror 1300 mm.<br />
Tenir compte de la zone de passage du<br />
câble (4). Marquer l’emplacement des<br />
trous à chevilles puis les percer.<br />
Letten op plaats <strong>van</strong> bekabeling (4).<br />
Pluggaten aftekenen en boren.<br />
Tenendo conto del cavo elettrico, segnare<br />
la posizione dei fori e quindi forare<br />
la parete.<br />
Marcar y taladrar agujeros con taco (4).<br />
La altura de la instalación, desde la base<br />
hasta la parte inferior del espejo es de<br />
1300 mm.<br />
Zapewnić miejsce dla kabla (4). Zaznaczyć<br />
pozycje otworów pod kołki i<br />
wywiercić otwory - wysokość montażowa<br />
liczona od górnej krawędzi<br />
podłogi gotowej do dolnej krawędzi<br />
lustra uchylnego ok. 1300 mm.<br />
Verriegelung (5) mit Schraubendreher<br />
lösen. Deckel durch Ziehen an Laschen<br />
(6) öffnen.<br />
Undo lock (5) with screwdriver. Pull tabs<br />
(6) to open cover.<br />
A l‘aide d‘un tourne-vis, défaire le verrouillage<br />
(5). Ouvrir le couvercle en tirant<br />
surles pattes (6).<br />
Vergrendeling (5) met schroeve draaier<br />
los maken. Deksel openen door aan<br />
lipje (6) te trekken.<br />
Sganciare con un cacciavite il blocco<br />
(5). Aprire il coperchio tirando le<br />
linguette (6)<br />
Desbloquear (5) con un destornillado.<br />
Abrir la cubierta tirando de las lenguetas<br />
(6).<br />
Zwolnić element blokujący (5) śrubokrętem.<br />
Otworzyć pokrywę, pociągając<br />
wypusty (6).<br />
Leitung durch Leitungsdurchführung (7)<br />
stecken. Leitungsmantel muß von<br />
Leitungsdurchführung (7) umschlossen<br />
sein.<br />
Insert electric lead through the hole provided<br />
for it (7). Ensure that lead jacket is<br />
well in hole.<br />
Introduire la ligne par le passage (7). La<br />
gaine intégrale du câble doit être elle<br />
même ceintureé par la gaine passecâble<br />
(7).<br />
Bedrading door kabeldoorvoer (7)<br />
steken. Isolatiemantel moet door kabeldoorvoer<br />
(7) omsloten zijn.<br />
Far passare il cavo dentro la guida (7),<br />
facendo attenzione che la guaina del<br />
cavo sia completamente avvolta dalla<br />
guida.<br />
Insertar el cable eléctrico a través del<br />
agujero (7) provisto para ello. Asegurarse<br />
de que la vaina del cable este completamente<br />
introducida en el agujero.<br />
Przeprowadzić przewód przez przepust<br />
(7). Przepust (7) musi obejmować izolację<br />
przewodu.<br />
Unterkonstruktion handfest anschrauben.<br />
Exzenterscheibe (8), Kunststoffscheibe<br />
(9).<br />
Tighten mounting base by hand. Eccentric<br />
disc (8), plastic washer (9).<br />
Visser le plan inférieur à la main (sansserrer).<br />
Rondelle excentrique (8), rondelleen<br />
plastique (9).<br />
Centreerschijf, (8) kunststofschijf (9s).<br />
Onderconstructie richten, handvast<br />
aandraaien.<br />
Avvitare il telaio alla parete, senzastringere<br />
completamente le viti. Disco<br />
eccentrico (8); rondella in plastica (9).<br />
Apretar la base del montaje con la<br />
mano. Disco excentrico (8), arandela<br />
de plástico (9).<br />
Przykręcić wstępnie podstawę. Podkładka<br />
mimośrodowa (8), podkładka z<br />
tworzywa sztucznego (9).<br />
6<br />
Unterkonstruktion über Exzenterscheibe<br />
(8) mit Schraubendreher ausrichten.<br />
Schrauben festdrehen.<br />
Straighten up mounting base with<br />
screwdriver and eccentric disc (8).<br />
Tighten screws.<br />
Par le biais de la rondelle excentrique<br />
(8), ajuster la position du plan inférieur<br />
au moyen du tournevis. Visser les vis à<br />
fond.<br />
Onderconstructie d.m.v. centreerschijf<br />
(8) met schroevedraaier stellen. Schroeven<br />
aandraaien.<br />
Regolare la posizione del telaio, agendo<br />
con un cacciavite sul disco eccentrico<br />
(8). Quindi fissare le viti fino in fondo.<br />
Enderezar la base con un destornillador<br />
y un disco excéntrico (8). Apretar los tornillos.<br />
Ustawić podstawę w odpowiedniej<br />
pozycji, obracając podkładkę mimośrodową<br />
(8) śrubokrętem. Dokręcić wkręty.<br />
7<br />
VDE geprüften Kompensationskondensator<br />
C1 (1,5 µF ± 10 %, 250 V) mit-<br />
Steckklemme (nicht im Lieferumfang)<br />
nur in Stromversorgungsnetzen ohne<br />
Rundsteuerung anschließen.<br />
Connect VDE-tested compensation<br />
capacitor C1 (1.5 µF ± 10 %, 250 V [A])<br />
with terminal (not included in delivery)<br />
only to power circuits without a centralized<br />
multistation.<br />
Ne brancher un condensateur d’amortissement<br />
C1 homologue VDE (1,5µF<br />
±10%, 250V [A]) à borne d’ enfichage<br />
(non compris dans les fournitures)<br />
que‘en presence de lignes de secteur<br />
sans tele commande.<br />
VDE geteste condensator C1<br />
(1,5 µF ± 10 %, 250V [A]) met steekklem<br />
niet bij levering ingesloten aansluiten.<br />
Collegare il condensatore di compensazione<br />
C1, omologato VDE (1,5 µF<br />
± 10 %, 250 V) con la morsettiera (non<br />
compresa nel prezzo) solamente se la<br />
rete è senza comando centralizzato.<br />
Conectar el capacitador de compensación<br />
C1 homologado VDE (1,5 mF ± 10<br />
%, 250 V [A]) con terminal (no incluido)<br />
solamente para alimentar circuitos sin<br />
una multiestación centralizada.<br />
Atestowany zgodnie z normą VDE<br />
kondensator energetyczny C1 (1,5 µF ±<br />
10 %, 250 V) przyłączyć przy użyciu<br />
zacisku wtykowego (nie zawartego w<br />
zakresie dostawy) tylko w sieciach elektrycznych<br />
bez sterowania okrężnego.<br />
Anschlußbedingungen des örtlichen<br />
Energieversorgungsunternehmens<br />
beachten.<br />
Please observe the connection conditions<br />
laid down by your local power utility<br />
company.<br />
Respecter les conditions de branchement<br />
spécifiées par votre compagnie<br />
locale/nationale distributrice d’électricité.<br />
Aansluitvoorwaarden <strong>van</strong> plaatselijk<br />
energiebedrijf volgen.<br />
Rispettare le norme di allacciamento<br />
dell’azienda elettrica locale.<br />
Por favor estudiar las condiciones de<br />
conexión especificadas por vuestro distribuidor<br />
eléctrico local/nacional.<br />
Przestrzegać warunków przyłączania<br />
urządzeń do sieci miejscowego przedsiębiorstwa<br />
energetycznego.<br />
8<br />
Adern an Klemmen X1:2.1 und 1.1<br />
anschließen. Deckel spaltfrei und hörbar<br />
einrastend schließen.<br />
Connect cores to terminals X1:2.1 and<br />
1.1. Close cover to be flushed and so<br />
that it clicks into position.<br />
Brancher les fils aux bornes X1<br />
(2.1et1.1). Refermer le couvercle qui<br />
doit audiblement encocher et ne laisser<br />
aucun interstice visible.<br />
Bedrading op klemmen. X1:2.1 en<br />
x1:1.1 aansluiten. Deksel naadloos en<br />
hoorbaar vast klikken.<br />
Collegare i fili ai morsetti X1:2.1e X1:1.1.<br />
Chiudere bene il coperchio in modo<br />
chessenta lo scatto dell’incastro<br />
avvenuto.<br />
Conectar los hilos a los bornes X1 (2.1 y<br />
1.1). Cerrar la cubierta de forma que<br />
encaje correctamente.<br />
Przyłączyć żyły do zacisków X1: 2.1 i<br />
1.1. Zamknąć szczelnie pokrywę tak, by<br />
słyszalnie się zatrzasnęła.
9 10 11 12<br />
Griff aufschieben (beide Stege (10) weisen<br />
nach oben). Verdrehsicherungszapfen<br />
in Dübelloch (11) einstecken. Griff<br />
mit Sockel handfest verschrauben.<br />
Kappe aufdrücken.<br />
Assemble as drawing, ensure spigot is<br />
in hole (11) projections pieces (10) are at<br />
the top. Tighten screw to wall, do not<br />
overtighten which will restrict lever rotation.<br />
Snap on cap.<br />
Enfiler la poignée (les deux nervures (10)<br />
regardent vers le haut). Enfoncer les<br />
tenons de sécurité dans le trou percé.<br />
Visser la poignée sur son socle. Enfoncer<br />
le capuchon.<br />
Greep erop schuiven (beide verbindingslipjes<br />
(10) wijzen naar boven). Autindraaistift<br />
in boorgat (11) steken. Greep<br />
met sokkel aan elkaar schroeven.<br />
Afdekkap erop duwen.<br />
Infilare la base dalla manopola in modo<br />
che entrambe le alette siano rivolte<br />
verso l’alto (10). Infilare il perno di sicurezza<br />
antirotazione nel foro (11). Avvitare<br />
la manopola alla basetta. Infine applicare<br />
il coperchietto.<br />
Realizar el montaje tal y como se<br />
observa en la figura, asegúrese de que<br />
la espiga (11) quede dentro del agujero<br />
y las piezas proyectadas (10) hacia<br />
arriba. Atornillar a la pared, sin excederse<br />
ya que se limitaría el eje de rotación.<br />
Encajar la tapa.<br />
Nasunąć uchwyt (oba wypusty (10)<br />
wskazują do góry). Wsunąć wypust<br />
zabezpieczający przed przekręceniem<br />
do otworu pod kołek (11). Wstępnie<br />
skręcić uchwyt z podstawą. Wcisnąć<br />
nasadkę.<br />
Kippmechanik senkrecht stellen. Seil<br />
durch Ziehen am Seilende spannen.<br />
Kippmechanik in 30° Endstellung ziehen.<br />
Knotenpunkt (A) mit Finger fixieren.<br />
With adjustable mechanism in its vertical<br />
position, pull end of rope to tension it.<br />
Pull adjustable mechanism to final position<br />
at 30°. Put your finger on the pointwhere<br />
the knot is to be tied.<br />
Placer le mécanisme de basculement à<br />
la verticale. Tendre le cordon en tirant<br />
sur son extrémité. Tirer sur le mécanisme<br />
de basculement pour l’amener en<br />
position finale (30°). Avec un doigt,<br />
repérer l’emplacement du noeud (A).<br />
Kantelmechanisme loodrecht plaatsen.<br />
Koord spannen door trekken aan het<br />
koordeinde. Kantelmechanisme in 30°<br />
eindstand trekken. Plaats <strong>van</strong> de knoop<br />
(A) met de vinger fixeren.<br />
Mantenendo il telaio in posizione verticale,<br />
tendere la corda tirandola per<br />
l’estremità. Tirare il meccanismo di ribaltamento<br />
nella posizione limite a 30°.<br />
Segnare con le dita il corrispondente<br />
punto (A) dove la corda va annodata.<br />
Colocar mecanismo de ajuste en posición<br />
vertical, tensionar la cuerda tirando<br />
del extremo. Tirar del mecanismo de<br />
ajuste hasta la posición final (30º). Haga<br />
un nudo (A).<br />
Ustawić mechanizm uchylny w pozycji<br />
pionowej. Napiąć linkę, naciągając jej<br />
koniec. Przesunąć mechanizm uchylny<br />
w położenie końcowe 30°. Przytrzymać<br />
punkt węzła (A) palcem.<br />
Unterkonstruktion in Senkrechtstellung<br />
drücken. Seil durch Ziehen am Seilende<br />
spannen. Knoten an fixierter Stelle (A)<br />
setzen. Seil ca. 10 mm hinter dem Knoten<br />
trennen. Griff drehen bis Knoten<br />
anliegt.<br />
Put mounting base upright. Pull end of<br />
rope to tension it again. Knot rope. Cut<br />
off end of robe with a distance of<br />
approx. 10 mm. Turn knop to pull knot<br />
as far as it will go.<br />
Pousser le plan inférieur pour l’amener en<br />
position verticale. Tendre le cordon en tirant<br />
sur son extrémité. Faire le noeud à l’endroit<br />
préalablement repéré. Couper le cordon environ<br />
1 cm aprés le noeud. Faire pivoter la poignée<br />
jusqu’à ce que le noeud soit en applique.<br />
Onderconstructie in loodrecht staande<br />
stelling duwen. Koord spannen door<br />
trekken aan koordeinde. Op gefixeerde<br />
plaats een knoop leggen. Koord ca.<br />
10 mm achter de knoop afknippen.<br />
Greep draaien tot knoop vast aanligt.<br />
Spingere il telaio in posizione verticale.<br />
Tendere la corda tirandola per l’estremità.<br />
Annodare la corda nel punto fissato<br />
e tagliarla a ca.10 cm aldi là del<br />
nodo. Girare quindi la manopola, finché<br />
il nodo non si blocca.<br />
Colocar la base en posición vertical.<br />
tensionar la cuerda tirando del extremo.<br />
Hacer un nudo. Cortar el extremo de la<br />
cuerda a una distancia aprox. de<br />
10 mm. Alejar el nudo lo máximo posible.<br />
Wcisnąć podstawę w położenie pionowe.<br />
Napiąć linkę, naciągając jej<br />
koniec. Zawiązać węzeł w przytrzymanym<br />
palcem punkcie (A). Odciąć<br />
linkę ok. 10 mm za węzłem. Obrócić<br />
uchwyt tak, żeby węzeł został dociągnięty.<br />
Spiegelaufhängung in Ausnehmung (12)<br />
einsetzen. Spiegel plan auf Unterkonstruktion<br />
drücken in Aufnahme gleiten<br />
lassen bis Verriegelung einrastet. Spiegelposition<br />
kontrollieren.<br />
Place mirror into recess (12). Press<br />
mirror against mounting base until it<br />
slides into its holder and lock clicks into<br />
position.<br />
Poser le système d’accrochage du<br />
miroir dans l’évidement (12). Pousser le<br />
miroir uniformément contre le plan<br />
inférieur et le faire glisser dans le logement<br />
jusqu’à ce que le verrouillage<br />
encoche.<br />
Spiegelophanging in daarvoor bestemde<br />
ruimte (12) plaatsen. Spiegel zelfoponderconstructie<br />
laten glijden tot de vergrendeling<br />
vast klikt.<br />
Inserire i supporti dello specchio nelle<br />
feritoie (12). Spingere lo specchio dritto<br />
contro il telaio facendolo scendere verso<br />
il basso, fino che non scatta il sistema di<br />
bloccaggio.<br />
Colocar el espejo en el hueco (12). Presionar<br />
el espejo sobre la base hasta que<br />
encaje en su soporte.<br />
Włożyć zawieszenie lustra do otworu<br />
(12). Wcisnąć lustro płasko na podstawę<br />
i wsunąć je tak, by zatrzasnął się<br />
element blokujący. Skontrolować pozycję<br />
lustra.<br />
Einsatz/Austausch der Lampen<br />
Kappen durch Drehen gegen den Uhrzeigersinn<br />
abschrauben. Beide Lampen<br />
herausziehen und neue Lampen einstecken.<br />
Kappen bündig bis zum<br />
Anschlag aufschrauben.<br />
Insertion/Replacement of light bulbs<br />
Always replace both light bulbs, even if<br />
only one is defective. Turn lamp covers<br />
anticlockwise to undo them. After replacing<br />
light bulbs, re-tighten covers as far<br />
as they will go.<br />
Remplacement des ampoules<br />
Changer les deux ampoules ensemble.<br />
Dévisser les coiffes dans le sens inverse<br />
des aiguilles d’une montre. Une fois les<br />
coiffes retirées, tourner les coiffes jusqu’à<br />
la butée.<br />
Einsatz/Lampen verwisselen<br />
Bij het verwisselen <strong>van</strong> de lampen beide<br />
lampen ver<strong>van</strong>gen. Opaal beschermkappen<br />
verwijderen door tegen de klok in te<br />
draaien. Na verwisseling <strong>van</strong> de lampen de<br />
kappen tot de aanslag vast draaien.<br />
Sostituzione delle luci<br />
Dovendo sostituire le luci, metterle tutte<br />
due nuove. Togliere i coperchietti ruotandoli<br />
in senso antiorario. Dopo aver<br />
sostituito le luci rimettere i coperchietti<br />
ruotandoli fino in fondo.<br />
Insertar/sustituir las bombillas.<br />
Siempre cambie las dos bombillas. Gire<br />
la cubierta de la lampara en setido contrario<br />
a las agujas del relój para desmontarla.<br />
Después de cambiar las bombillas,<br />
apretarlas a su base el máximo<br />
posible.<br />
Instalowanie i wymiana żarówek<br />
Odkręcić nasadki, obracając je w kierunku<br />
odwrotnym do kierunku ruchu<br />
wskazówek zegara. Wyjąć obie żarówki<br />
i wcisnąć nowe żarówki. Równo, do<br />
oporu, dokręcić nasadki.<br />
1 2<br />
Demontage<br />
Rückansicht: Verriegelung mit Schraubendreher<br />
lösen.<br />
To remove<br />
Rear view: Undo lock with screwdriver.<br />
Démontage<br />
Vue de dos: défaire le verrouillage au<br />
moyen d’un tourne-vis.<br />
Demontage<br />
Aan de achterkant: vergrendling met<br />
schroevedraaier los maken.<br />
Smontaggio<br />
Vista posteriore: sganciare il bloccaggio<br />
con un cacciavite.<br />
Desmontaje<br />
Vista posterior. Desatornillar.<br />
Demontaż<br />
Widok z tyłu: Zwolnić element blokujący<br />
śrubokrętem.<br />
Spiegel etwas anheben, nach vorne<br />
abnehmen. Unterkonstruktion lösen.<br />
Lift mirror slightly and tilt it forwards to<br />
remove it. Detach mounting base.<br />
Soulever un peu le miroir, le retirer par<br />
de<strong>van</strong>t. Défaire le plan inféreur.<br />
Spiegel iets optillen, naar voren eruit<br />
nemen. Onderconstructie verwijderen.<br />
Sollevare un po’lo specchio e tirarlo<br />
quindi verso di sè. Smontare il telaio.<br />
Le<strong>van</strong>tar ligeramente el espejo y empujarlo<br />
hacia delante para retirarlo. Desmontar<br />
la base<br />
Lekko unieść lustro, wyjąć je do przodu.<br />
Odkręcić podstawę.<br />
3<br />
Kappe mit Stemmeisen oder dergl.<br />
abhebeln.<br />
Remove cap with chisel or similar tool.<br />
Déboîter le capuchon a` l’aide d’un<br />
ciseau à bois ou assimilé.<br />
Afdekkap met steebeitel o.i.d. los wirkken.<br />
Togliere il coperchietto con un cacciavite.<br />
Retirar la tapa con un cincel o similar.<br />
Wyważyć nasadkę dłutem lub podobnym<br />
narzędziem.
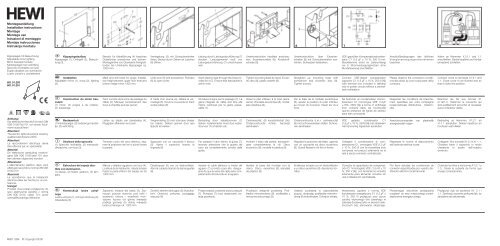
Elektroanschluss für Kippspiegel mit Beleuchtung<br />
der Serie 801 und LifeSystem<br />
<strong>Montage</strong>hinweis / mounting information / conseils de montage / montage aanwijzing / indicazioni per il montaggio<br />
130<br />
79<br />
140<br />
102 108<br />
HEWI . Postfach 1260 . D-34442 Bad Arolsen 08/03<br />
ø 8<br />
*<br />
154<br />
1300<br />
* Richtwert von HEWI.<br />
MH8020.01