Drufosmart - Dreve Dentamid
Drufosmart - Dreve Dentamid
Drufosmart - Dreve Dentamid

Create successful ePaper yourself
Turn your PDF publications into a flip-book with our unique Google optimized e-Paper software.
Bedienungsanleitung · Working instructions<br />
Mode d‘emploi · Instrucciones de trabajo<br />
Istruzioni d’uso<br />
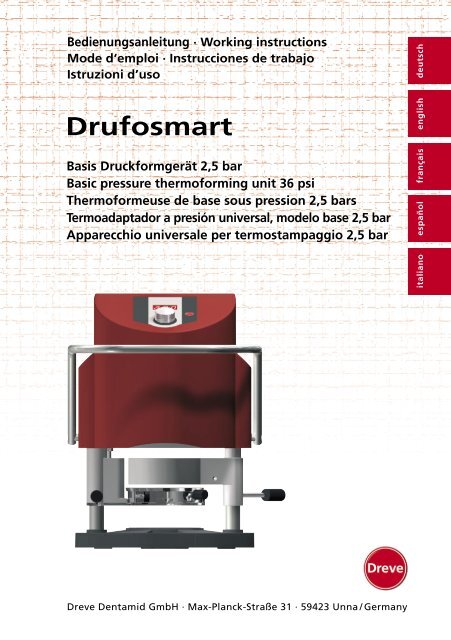
<strong>Drufosmart</strong><br />
english <br />
deutsch<br />
Basis Druckformgerät 2,5 bar<br />
Basic pressure thermoforming unit 36 psi<br />
Thermoformeuse de base sous pression 2,5 bars<br />
Termoadaptador a presión universal, modelo base 2,5 bar<br />
Apparecchio universale per termostampaggio 2,5 bar<br />
français<br />
italiano<br />
español<br />
<strong>Dreve</strong> <strong>Dentamid</strong> GmbH · Max-Planck-Straße 31 · 59423 Unna / Germany
deutsch<br />
Inhalt<br />
1. Gerätebeschreibung 6<br />
2. Technische Daten 6<br />
3. Konformitätserklärung 7<br />
4. Sicherheitshinweise 8<br />
5. Inbetriebnahme – Lieferumfang 9<br />
6. Funktionselemente 10<br />
7. Bedienung 11<br />
7.1 Einstellung der Heizzeit 11<br />
7.2 Programmstart 12<br />
7.3 Tiefziehen 13<br />
7.4 Öffnen der Druckkammer 14<br />
8. Abweichungen vom Regelfall 15<br />
8.1 Änderungen von vorgegebenen<br />
Zeiten 15<br />
8.2 Plastifizieren von Folien mit<br />
unbekannter Aufheizzeit 15<br />
8.3 Programmabbruch/<br />
-Beendigung 15<br />
9. Optionale Zusatzfunktion 16<br />
9.1 Anfertigung von Gussformteilen<br />
16<br />
10. Auswechseln der Gerätesicherung<br />
17<br />
11. Allgemeine Hinweise 18<br />
12. Pflege und Wartung 18<br />
13. Garantie 19<br />
14. Störungshilfen 20<br />
15. Ersatzteillisten 22<br />
16. Explosionszeichnung 91<br />
17. Wirkschaltplan 92<br />
18. Pneumatikplan 93<br />
Contents<br />
1. Description of unit 23<br />
2. Technical data 23<br />
3. Declaration of conformity 24<br />
4. Safety advice 25<br />
5. Initiation – scope of delivery 26<br />
6. Functional components 27<br />
7. Operation 28<br />
7.1 Adjustment heating time 28<br />
7.2 Start of programme 29<br />
7.3 Thermoforming 30<br />
7.4 Opening of the pressure<br />
chamber 31<br />
8. Deviation to the rule 32<br />
8.1 Modification of given times 32<br />
8.2 Plasticizing of blanks with<br />
unknown heating times 32<br />
8.3 Abort / termination of<br />
programme 32<br />
9. Additional optional functions 33<br />
9.1 Fabrication of cast form parts 33<br />
10. Exchange of fuses 34<br />
11. General advice 35<br />
12. Care and maintenance 35<br />
13. Guarantee 36<br />
14. Trouble shooting 37<br />
15. Spare part list 39<br />
16. Explosion sketch 91<br />
17. Operating diagram 92<br />
18. Pneumatic plan 93<br />
italiano espanol francais english
deutsch<br />
Contenu<br />
1. Description de l’appareil 40<br />
2. Données techniques 40<br />
3. Déclaration de conformité 41<br />
4. Avis de sécurité 42<br />
5. Mise en marche –<br />
Contenu de livraison 43<br />
6. Éléments de fonction 44<br />
7. Opération 45<br />
7.1 Réglage du temps de<br />
chauffage 45<br />
7.2 Mise en marche du<br />
programme 46<br />
7.3 Thermoformage 47<br />
7.4 Ouverture de la chambre<br />
de pression 48<br />
8. Anomalies 49<br />
8.1 Ajustement manuel des<br />
temps préprogrammés 49<br />
8.2 Plastification de feuilles<br />
avec un temps de chauffage<br />
inconnu 49<br />
8.3 Arrêt / terminaison du<br />
programme 49<br />
9. Fonctions additionnelles<br />
en option 50<br />
9.1 Production de chapes 50<br />
10. Changement de fusibles 51<br />
11. Avis généraux 52<br />
12. Soin et entretien 52<br />
13. Garantie 53<br />
14. Conseils en cas de panne 54<br />
15. Liste de pièces détachées 56<br />
16. Dessin d’explosion 91<br />
17. Diagramme 92<br />
18. Plan pneumatique 93<br />
Contenido<br />
1. Descripción del equipo 57<br />
2. Datos técnicos 57<br />
3. Declaración de conformidad 58<br />
4. Indicaciones de seguridad 59<br />
5. Puesta en marcha/volumen<br />
de entrega 60<br />
6. Elementos de función 61<br />
7. Manejo 62<br />
7.1 Ajuste del tiempo de<br />
calentamiento 62<br />
7.2 Inicio del programa 63<br />
7.3 Termoadaptación 64<br />
7.4 Apertura de la cámara de<br />
presión 65<br />
8. Desviaciones con respecto<br />
a la norma general 66<br />
8.1 Modificación de los tiempos<br />
programados 66<br />
8.2 Plastificación de láminas<br />
con tiempo de calentamiento<br />
desconocido 66<br />
8.3 Interrupción/finalización de<br />
programas 66<br />
9. Funciones adicionales<br />
opcionales 67<br />
9.1 Preparación de piezas de<br />
molde de fundición 67<br />
10. Sustitución de los fusibles 68<br />
11. Advertencias generales 69<br />
12. Cuidados y mantenimiento 69<br />
13. Garantía 70<br />
14. Solución de problemas 71<br />
15. Listas de recambios 73<br />
16. Despiece 91<br />
17. Plano de circuitos detallado 92<br />
18. Plano neumático 93<br />
Indice<br />
1. Descrizione dell’apparecchio 74<br />
2. Dati tecnici 74<br />
3. Dichiarazione di conformità 75<br />
4. Avvertenze di sicurezza 76<br />
5. Messa in funzione –<br />
Fornitura 77<br />
6. Elementi funzionali 78<br />
7. Comando 79<br />
7.1 Impostazione del tempo<br />
di riscaldamento 79<br />
7.2 Avvio del programma 80<br />
7.3 Termostampaggio 81<br />
7.4 Apertura della camera di<br />
pressione 82<br />
8. Eccezioni alla regola 83<br />
8.1 Modifica dei tempi previsti 83<br />
8.2 Plastificazione di fogli con<br />
tempo di riscaldamento<br />
non noto 83<br />
8.3 Interruzione/fine del<br />
programma 83<br />
9. Funzioni opzionali 84<br />
9.1 Produzione di cappette<br />
per la tecnica di fusione 84<br />
10. Sostituzione dei fusibili<br />
dell’apparecchio 85<br />
11. Avvertenze generali 86<br />
12. Cura e manutenzione 86<br />
13. Garanzia 87<br />
14. Eliminazione di guasti 88<br />
15. Elenchi delle parti<br />
di ricambio 90<br />
16. Vista esplosa 91<br />
17. Schema elettrico 92<br />
18. Schema pneumatico 93<br />
italiano espanol francais english
<strong>Drufosmart</strong><br />
deutsch<br />
1. Gerätebeschreibung<br />
Der <strong>Drufosmart</strong> ist ein Basis-Druckformgerät<br />
als Alternative zu herkömmlichen<br />
Vakuum-Tiefziehgeräten für den täglichen<br />
Betrieb im Dental- und Praxislabor.<br />
Einfachste Bedienung sowie stetige<br />
digitale und akustische Kontrolle aller<br />
2. Technische Daten<br />
B x H x T<br />
Gewicht<br />
Netzspannung<br />
Max. Leistungsaufnahme<br />
Gerätesicherung<br />
Betriebsdruck<br />
Min. Betriebsdruck<br />
Max. Leitungsdruck<br />
Arbeitsphasen sichern ein problemloses<br />
Arbeiten auch mit geringen Vorkenntnissen.<br />
Ein Anformdruck von 2,5 bar in Verbindung<br />
mit der vertikal anformenden Folie<br />
garantiert präzise Ergebnisse.<br />
320 x 420 x 290 mm<br />
15 kg<br />
230 V/50-60 Hz, 115 V/50-60 Hz<br />
315 W<br />
T 3,15 A<br />
2,5 bar<br />
2 bar<br />
10 bar<br />
3. Konformitätserklärung<br />
Gemäß Maschinenrichtlinie (2006/42/EG), Anhang II A, gemäß EMV-Richtlinie<br />
(2004/108/EG) und Niederspannungsrichtlinie (2006/95/EG).<br />
Hiermit erklären wir, dass das nachstehend beschriebene Gerät in seiner Konzipierung<br />
und Bauart sowie in der von uns in Verkehr gebrachten Ausführung den grundlegenden<br />
Sicherheits- und Gesundheitsanforderungen der EG-Richtlinien entspricht. Bei einer nicht<br />
mit uns abgestimmten Änderung der Maschine verliert diese Erklärung ihre Gültigkeit.<br />
Bezeichnung der Maschine:<br />
Maschinentyp:<br />
Zutreffende EG-Richtlinien:<br />
2006/42/EG<br />
2006/95/EG<br />
2004/108/EG<br />
<strong>Drufosmart</strong><br />
D-3200/D-3200-A/D-32001/D-32001-A<br />
Druck-Tiefziehgerät<br />
Maschinenrichtlinie<br />
Niederspannungs-Richtlinie<br />
EMV-Richtlinie<br />
Angewandte harmonisierte Normen:<br />
DIN EN ISO 12100-1:2004-04 Sicherheit von Maschinen – Grundbegriffe, Allge-<br />
DIN EN ISO 12100-1/A1 2009-10 meine Gestaltungsleitsätze; Teil 1: Grundsätzliche<br />
Terminologie, Methodik (ISO 12100-1:2003)<br />
DIN EN ISO 12100-2:2004-04 Sicherheit von Maschinen – Grundbegriffe, Allge-<br />
DIN EN ISO 12100-2/A1 2009-10 meine Gestaltungsleitsätze; Teil 2: Technische Leitsätze<br />
und Spezifikationen (ISO 12100-2:2003)<br />
EN 13732-1:2006 Ergonomie der Thermischen Umgebung – Bewertungsverfahren<br />
für menschliche Reaktionen bei Kontakt mit Oberflächen; Teil 1:<br />
Heiße Oberflächen (ISO 13732-1:2006)<br />
EN 60204-1:2006 Sicherheit von Maschinen: Elektrische Ausrüstung von Maschinen;<br />
Teil 1: Allgemeine Anforderungen [IEC 60204-1:2005]<br />
EN 61010-1:2001 Sicherheitsbestimmungen für elektrische Mess-, Steuer-, Regel- und<br />
Laborgeräte; Teil 1: Allgemeine Anforderungen [IEC 61010-1:2001]<br />
EN 61326-1:2006 Elektrische Mess-, Steuer-, Regel- und Laborgeräte – EMV-Anforderung;<br />
Teil1: Allgemeine Anforderungen (IEC 61326-1:2005);<br />
Emission nach Wohnbereich, Gewerbebereich und Kleinbetriebe;<br />
Störfestigkeit nach Industriebereich<br />
italiano espanol francais english<br />
<strong>Dreve</strong> <strong>Dentamid</strong> GmbH<br />
Max-Planck-Straße 31 · 59423 Unna/Germany<br />
Tel.: +49 2303 8807-40 · Fax: +49 2303 8807-55<br />
E-Mail: info@dreve.de · www.dreve.com<br />
6<br />
7
<strong>Drufosmart</strong><br />
deutsch<br />
4. Sicherheitshinweise<br />
Achtung! Lesen Sie diese Hinweise vor dem Anschließen und der Inbetriebnahme<br />
des Gerätes sorgfältig durch. Die Betriebssicherheit und die Funktion des Gerätes<br />
können nur dann gewährleistet werden, wenn sowohl die allgemeinen Sicherheits- und<br />
Unfallverhütungsvorschriften des Gesetzgebers als auch die Sicherheitshinweise in der<br />
Bedienungsanleitung beachtet werden.<br />
1. Das Gerät darf nur entsprechend der<br />
vorliegenden Bedienungsanleitung verwendet<br />
werden. Wir übernehmen keine<br />
Haftung für Schäden, die durch unsachgemäßen<br />
Gebrauch, bzw. fehlerhafte<br />
Bedienung entstehen.<br />
2. Das Gerät muss auf einem ebenen<br />
Untergrund stehen und für das etwa<br />
16 kg schwere Betriebsgewicht ausreichend<br />
stabil und belastbar sein.<br />
gelesen und verstanden hat. Erst dann<br />
darf der Bediener das Gerät in Betrieb<br />
nehmen.<br />
8. Das Gerät ist vor jedem Betrieb<br />
auf ordnungsgemäßen Zustand und<br />
Betriebsicherheit zu überprüfen. Falls<br />
der Zustand nicht einwandfrei ist, darf<br />
das Gerät nicht benutzt werden und<br />
muss entsprechend gekennzeichnet<br />
werden.<br />
16. Schilder und Aufkleber müssen<br />
stets in gut lesbarem Zustand gehalten<br />
werden und dürfen nicht entfernt<br />
werden.<br />
17. Vor der Reinigung und der Wartung<br />
des Gerätes oder dem Auswechseln von<br />
Teilen ist unbedingt der Netzstecker zu<br />
ziehen.<br />
18. Das Öffnen des Gerätes und Instandsetzungen<br />
dürfen nur von zugelassenen<br />
Fachkräften durchgeführt werden.<br />
19. Es dürfen nur Zubehör und Ersatzteile<br />
verwendet werden, die vom Hersteller<br />
freigegeben sind. Für Schäden, die durch<br />
den Einsatz fremder Teile entstehen,<br />
übernehmen wir keine Haftung.<br />
20. Eigenmächtige Umbauten und Veränderungen<br />
sind aus Sicherheitsgründen<br />
unzulässig.<br />
21. Die vorgeschriebenen Betriebsund<br />
Wartungsbedingungen dieser<br />
Gebrauchsanleitung sind zwingend<br />
einzuhalten. Beim Arbeiten mit dem<br />
<strong>Drufosmart</strong> sind die allgemeinen Unfallverhütungsvorschriften<br />
zu beachten.<br />
italiano espanol francais english<br />
3. Um Eindringen von Wasser in das<br />
Gerät (z. B. Spritzwasser) zu vermeiden,<br />
sollte das Gerät in trockener Umgebung<br />
aufgestellt werden.<br />
4. Bewahren Sie keine leichtentzündlichen<br />
Stoffe in unmittelbarer Umgebung<br />
des Gerätes auf.<br />
5. Die angegebene Spannung auf dem<br />
Typenschild muss mit der Spannung der<br />
Stromquelle übereinstimmen.<br />
6. Das Gerät nur an einer Steckdose<br />
mit Schutzleiter betreiben. Den Netzstecker<br />
niemals mit feuchten Händen<br />
anfassen.<br />
7. Zugelassene Bediener: Der Betreiber<br />
der Maschine muss dem Bediener die<br />
Betriebsanleitung zugänglich machen<br />
und sich vergewissern, dass er sie<br />
9. Der Druck der Druckluftleitung darf<br />
10 bar nicht überschreiten.<br />
10. Keine Gegenstände in das Gerät<br />
einführen.<br />
11. Die Bedienungselemente des Gerätes<br />
nicht arretieren.<br />
12. Den herabfahrenden Kolben nicht<br />
blockieren.<br />
13. Nicht unter den herabfahrenden<br />
Kolben greifen.<br />
14. Das schwenkbare Gehäuse des<br />
Heizstrahlers erreicht im Betrieb hohe<br />
Temperaturen und darf deswegen auch<br />
kurzfristig nicht berührt werden.<br />
15. Das Gerät ist bei längerfristiger<br />
Nichtbenutzung vom Netz zu trennen.<br />
5. Inbetriebnahme<br />
Vor der Inbetriebnahme sicherstellen,<br />
dass die auf dem Typenschild angegebene<br />
Netzspannung mit der Spannung<br />
der Stromquelle übereinstimmt.<br />
Anschließen des Gerätes an einen<br />
Druckluft-Kompressor. Dafür den mitgelieferten<br />
Druckschlauch auf die<br />
Schlauchtülle (9) des Gerätes schieben<br />
und mittels einer Schlauchklemme fixieren.<br />
Am anderen Ende des Schlauches<br />
die Schnellkupplung montieren und mit<br />
der Druckleitung verbinden.<br />
Der Leitungsdruck darf 10 bar nicht<br />
überschreiten.<br />
Netzkabel in die Gerätesteckdose (33)<br />
stecken und Netzverbindung mit dem<br />
Euro/USAStecker herstellen.<br />
Wichtig: Vor der ersten Inbetriebnahme<br />
unbedingt die Gebrauchsinformation<br />
gründlich lesen. Bei Verständnisunsicherheiten<br />
ggfs. Rücksprache mit dem<br />
zuständigen Depot oder direkt mit der<br />
Firma <strong>Dreve</strong> <strong>Dentamid</strong> GmbH nehmen.<br />
Lieferumfang<br />
1 <strong>Drufosmart</strong><br />
1 Granulatschublade<br />
1 Einsatzschale und Noppenplatte<br />
1 Spannring mit Ablassventil<br />
1 Basissortiment Folien<br />
1 Netzkabel<br />
1 Druckluftschlauch inkl. Schlauchklemmen<br />
und Schnellkupplung<br />
1 Gebrauchsanleitung 5-sprachig<br />
1 Infobroschüre Tiefziehfolien<br />
8<br />
9
<strong>Drufosmart</strong><br />
deutsch<br />
6. Funktionselemente 7. Bedienung<br />
34<br />
27<br />
44<br />
Hauptschalter (43) auf der Rückseite<br />
des Gerätes einschalten, das Display<br />
(27) an der Frontseite wird aktiviert und<br />
7.1 Einstellung der Heizzeit<br />
Mit Hilfe des Dreh/Druckreglers (44)<br />
kann jede Zeit zwischen 0:05 Min. und<br />
9:55 Min. durch Drehen im Uhrzeigersinn<br />
eingegeben werden. Die Einstellung<br />
erfolgt in 5 Sek.-Schritten.<br />
zeigt 0:00. Ein Signalton zeigt die Einsatzbereitschaft<br />
des Gerätes an.<br />
Die optimalen Werte für das <strong>Dreve</strong> Tiefziehsortiment<br />
entnehmen Sie der beigefügten<br />
Infobroschüre.<br />
english<br />
francais<br />
espanol<br />
9<br />
13<br />
10<br />
11<br />
20<br />
5<br />
12<br />
6<br />
7<br />
italiano<br />
Nr. Bezeichnung<br />
5 Handgriff Heizung<br />
6 Noppenplatte und Einsatzschale<br />
7 Granulatschublade<br />
9 Druckluftanschluss<br />
10 Handgriff Plattenteller<br />
11 Plattenteller<br />
12 Entlüftungsventil<br />
13 Spannring<br />
20 Heizung<br />
27 Display<br />
33 Netzanschluss/Sicherungshalter<br />
34 Aktivierungshebel<br />
43 Hauptschalter<br />
44 Dreh/Druckregler<br />
43 33<br />
9<br />
10<br />
11
<strong>Drufosmart</strong><br />
deutsch<br />
7.2 Programmstart<br />
Vor dem Start der eingestelltem Aufheizzeit<br />
legen Sie die entsprechende Folie<br />
auf den Plattenteller (11) und fixieren<br />
diese mit Hilfe des Spannringes (13).<br />
Das Modell wird wahlweise auf die<br />
Noppenplatte (6) oder durch Entnahme<br />
der Noppenplatte mittels Granulat in<br />
der Einsatzschale fixiert.<br />
Info<br />
Für eine optimale Adaption der<br />
Folie an das Modell fixieren Sie<br />
die Modelle immer mit den Frontzähnen<br />
zur Folienmitte. Bei der<br />
Verwendung von harten Tiefziehfolien<br />
empfiehlt sich die Einbettung<br />
in Granulat. Modelle, die auf<br />
der Noppenplatte fixiert werden,<br />
sollten ein max. Höhe von 23 mm<br />
nicht überschreiten.<br />
Schwenken Sie den Plattenteller am<br />
Griffstück (10) bis zum Anschlag (Magnetische<br />
Arretierung) ins Zentrum unter<br />
das Gerät. Schwenken Sie den Heizstrahler<br />
(20) am Griffstück (5) ebenfalls bis<br />
zum Anschlag ins Zentrum des Gerätes.<br />
Schließen Sie das Entlüftungsventil<br />
(12) des Spannringes (13). Zum Start<br />
des Aufheizprozesses drücken Sie auf<br />
den Dreh/Druckregler (44), im Display<br />
läuft die voreingestellte Heizzeit rückwärts<br />
gegen 0:00 ab.<br />
Info<br />
Aus Sicherheitsgründen ist die Heizung<br />
mit einem Endschalter ausgestattet<br />
und funktioniert ausschließlich<br />
im eingeschwenkten<br />
Zustand nach dem Start eines Programms.<br />
Wird der Heizungshalter<br />
(20) an dem Bedienhebel (5) während<br />
der aktiven Heizphase ausgeschwenkt,<br />
wird diese automatisch<br />
unterbrochen. Die Anzeige im Display<br />
stoppt und zeigt den Restwert<br />
an. Durch Wiedereinschwenken<br />
des Heizungshalters (20) wird<br />
das Programm reaktiviert.<br />
Achtung! Das schwenkbare Gehäuse<br />
des Heizstrahlers erreicht<br />
hohe Temperaturen und darf<br />
deswegen auch kurzzeitig nicht<br />
berührt werden.<br />
Nach Ablauf der eingestellten Aufheizzeit<br />
ertönt ein Signalton, die<br />
Anzeige im Display blinkt für 4 Sek.<br />
und die Abkühlzeit wird automatisch<br />
wieder hoch gezählt.<br />
7.3 Tiefziehen<br />
Nach Ablauf der Aufheizzeit ertönt ein<br />
Signalton, die Heizzeit im Display steht<br />
auf 0:00. Die Heizung schaltet automatisch<br />
ab. Schwenken Sie den Heizungshalter<br />
(20) mit der rechten Hand am<br />
Handgriff (5) komplett aus dem Gerätezentrum<br />
heraus. Mit der linken Hand<br />
wird anschließend der Aktiverungshebel<br />
(34) bis zum Anschlag nach unten<br />
gedrückt.<br />
Durch das nochmalige Anziehen des<br />
Heizungs-Handgriffes (5) für ca. 3 Sek.<br />
bis in den gefederten Anschlag setzt<br />
automatisch die Druckbeaufschlagung<br />
des Kolbens ein. Bestätigt wird diese<br />
mit einem Signalton.<br />
Info<br />
Aus Sicherheitsgründen wird die<br />
Druckkammer erst dann mit Druckluft<br />
versorgt, wenn diese bereits<br />
vollständig manuell abgesenkt<br />
wurde. Immer darauf achten, dass<br />
sich beim Schließen des Kolbens<br />
keine Gegenstände im Kontaktbereich<br />
Kolben und Einsatzschale<br />
befinden! Um das Bedienpersonal<br />
verlässlich vor Quetschungen<br />
der Finger zu schützen kann der<br />
Druckaufbau nur stattfinden wenn<br />
das Gerät gleichzeitig mit beiden<br />
Händen bedient wird. (Zweihandsicherung).<br />
Der Anformdruck der Druckkammer wird<br />
permanent überprüft und ggfs. nachreguliert.<br />
In der Anzeige wird die Dauer<br />
seit Abschalten der Heizung (Abkühlphase)<br />
angezeigt. Der maximal anzeigbare<br />
Wert liegt bei 9:55 Min. Die optimale<br />
Abkühlzeit für die genutzte <strong>Dreve</strong><br />
Folie entnehmen Sie der beigestellten<br />
Infobroschüre.<br />
italiano espanol francais english<br />
12<br />
13
<strong>Drufosmart</strong><br />
deutsch<br />
7.4 Öffnen der Druckkammer<br />
Um eine vollständige Rückkühlung der<br />
Tiefziehfolie zu erreichen sollte nach 2/3<br />
der vorgegebenen Kühlzeit das Ventil<br />
am Spannring (12) leicht geöffnet<br />
werden. Hierdurch kann die aufgewärmte<br />
Luft der Druckkammer entweichen<br />
und wird aufgrund der automatischen<br />
Druckregulierung durch kalte<br />
Luft ersetzt. Nach Ablauf der Kühlzeit<br />
Handgriff der Heizung (5) noch einmal<br />
bis zum Anschlag ziehen und in<br />
dieser Position (ca. 3 Sek.) halten bis<br />
der Signalton ertönt. Handgriffheizung<br />
loslassen, der Druck wird automatisch<br />
abgebaut.<br />
Plattenteller (11) am Handgriff (10) herausschwenken,<br />
Spannring und Tiefziehergebnis<br />
entnehmen.<br />
8. Abweichungen vom Regelfall<br />
8.1 Änderungen von vorgegebenen Zeiten<br />
Vorgegebene Zeiten können bei Bedarf<br />
individuell verlängert oder verkürzt werden.<br />
Info<br />
Die Leistung der Heizung kann<br />
nach 1000 Betriebsstunden leicht<br />
nachlassen. Durch eine Verlängerung<br />
der Heizzeiten von 5-10 Sek.<br />
können dann wieder optimale<br />
Tiefziehergebnisse erreicht werden.<br />
Die vorgegebenen Zeiten<br />
sind Mittelwerte und für den allgemeinen<br />
Gebrauch ausgelegt. Bei<br />
besonders stark unter sich gehenden<br />
Gebieten oder sehr hohen<br />
Modellen kann eine Verlängerung<br />
der Heizzeit die Ergebnisse<br />
optimieren.<br />
8.2 Plastifizieren von Folien mit unbekannter Aufheizzeit<br />
italiano espanol francais english<br />
Anschließend die Druckkammer durch<br />
Zurückführen des Aktivierungshebels<br />
(34) wieder in die Ausgangsposition<br />
bringen.<br />
Erstellen Sie einen der Folienstärke angepassten<br />
Aufheizprozess mit ausreichender<br />
Verlängerung der Heizzeit.<br />
(s. Punkt 7.1). Programm starten<br />
(s. Punkt 7.2). Den Plastifizierungsgrad<br />
der Folie können Sie mittels eines stumpfen<br />
Metallinstruments (z. B. Wachsmesser)<br />
abtasten.<br />
Info<br />
Die vollständige Verformbarkeit<br />
der Folie kann nur am Rand ertastet<br />
werden, da hier die Wärme<br />
durch Metallkontakte abfließt<br />
und die erforderliche Flexibilität<br />
zuletzt erreicht wird!<br />
Nach Erreichen der notwendigen Flexibilität<br />
Tiefziehprozess auslösen (s. Punkt<br />
7.3). Die Kühlphase kann jederzeit<br />
durch Ziehen des Heizungs-Handgriffes<br />
(5) abgebrochen werden. Eine ausreichende<br />
Abkühlzeit sollte jedoch eingehalten<br />
werden da sich eine warme<br />
Folie beim Entformen verziehen und<br />
somit zu schlechten bzw. nicht brauchbaren<br />
Tiefziehergebnissen führt.<br />
8.3 Programmabbruch/-beendigung<br />
Der <strong>Drufosmart</strong> ermöglicht den Abbruch/<br />
die Beendigung aller Aktionen durch<br />
Drücken des Dreh/Druckreglers (44) für<br />
mindestens 3 Sek.<br />
14<br />
15
<strong>Drufosmart</strong><br />
deutsch<br />
9 Optionale Zusatzfunktionen<br />
9.1 Anfertigung von Gussformteilen<br />
Mit dem K-7 Einsatz können bis zu<br />
7 Kunststoffkappen für die Kronen- und<br />
Brückentechnik gleichzeitig tiefgezogen<br />
werden. Einzelstümpfe mittels eines flexiblen<br />
Ausblockmaterials (z. B. Fillin) in<br />
den, dafür vorgesehenen Aussparungen<br />
des K-7 Einsatzes fixieren. Noppenplatte<br />
aus der Einsatzschale entnehmen und<br />
durch den K-7 Einsatz ersetzen.<br />
Alle weiteren Arbeitsschritte wie ab<br />
Punkt 7.1 beschrieben.<br />
10. Auswechseln der Gerätesicherung<br />
Stromkabel vom Netz trennen. Der<br />
Sicherungshalter befindet sich auf der<br />
Geräterückseite integriert in den Netzanschluss.<br />
Für die Kontrolle oder Wechsel der<br />
Sicherungen Druckraster des Halters<br />
eindrücken, gedrückt halten und den<br />
Halter aus dem Gerät herausziehen.<br />
Nach dem Wechsel den Sicherungshalter<br />
mit leichtem Druck wieder ins<br />
Gehäuse einsetzen bis die Fixierung<br />
merklich einrastet.<br />
italiano espanol francais english<br />
Die defekte Sicherung mit leichtem Zug<br />
aus der Klemmhalterung herausziehen<br />
und durch eine neue, gleichwertige<br />
Sicherung ersetzen.<br />
Wichtig: Nur die auf der Rückseite<br />
angegebene Sicherungsstärke verwenden.<br />
16<br />
17
<strong>Drufosmart</strong><br />
deutsch<br />
11. Allgemeine Hinweise<br />
Reparatur und Instandsetzungsarbeiten<br />
am <strong>Drufosmart</strong> dürfen nur von autorisierten<br />
Fachkräften ausgeführt werden.<br />
Die Stromzufuhr zum Gerät ist in jedem<br />
Fall zu unterbrechen. Die Firma <strong>Dreve</strong><br />
ist nur dann für die Sicherheit, Zuverlässigkeit<br />
und Leistung des Gerätes verantwortlich,<br />
wenn:<br />
· das Gerät nur für den entsprechenden<br />
Anwendungszweck verwendet wird.<br />
· die Bedienung nur durch fachlich geschultes<br />
Personal erfolgt.<br />
12. Pflege und Wartung<br />
Vor Pflege- und Wartungsarbeiten<br />
grundsätzlich den Netzstecker vom<br />
Stromnetz trennen.<br />
· das Gerät in Übereinstimmung mit<br />
dieser Bedienungsanleitung verwendet<br />
wird.<br />
· Erweiterungen, Neueinstellungen,<br />
Änderungen oder Reparaturen durch<br />
von ihr ermächtige Personen ausgeführt<br />
werden.<br />
Da wir ständig an der Weiterentwicklung<br />
unserer Erzeugnisse arbeiten, behalten<br />
wir uns technische Änderungen vor.<br />
gungsmittel. Wasser und Reinigungsmittel<br />
dürfen nicht in das Gerät gelangen.<br />
13. Garantie<br />
Die Garantiezeit beträgt 2 Jahre ab Lieferdatum.<br />
Die Garantieleistung gilt nur<br />
für Material- oder Fabrikationsfehler.<br />
Die Garantieansprüche beziehen sich<br />
nicht auf natürliche Abnutzung, ferner<br />
nicht auf Schäden, die nach Gefahrenübergang<br />
infolge fehlerhafter oder nicht<br />
bestimmungsgemäßer Behandlung,<br />
übermäßiger Beanspruchung, ungeeigneter<br />
Betriebsmittel und solcher chemischer,<br />
elektrochemischer oder elektrischer<br />
Einflüsse entstehen, die nach<br />
dem Vertrag nicht vorausgesetzt sind.<br />
Durch etwa seitens des Bestellers oder<br />
Dritter unsachgemäß vorgenommene<br />
Änderungen oder Instandsetzungs- und<br />
Wartungsarbeiten sowie im Falle der<br />
Verletzung von Plomben werden Garantieansprüche<br />
ausgeschlossen.<br />
Mängelhaftung<br />
Mängelansprüche verjähren mit Ablauf<br />
eines Jahres ab Lieferung. Die Mängelansprüche<br />
beziehen sich nicht auf<br />
natürliche Abnutzung, ferner nicht auf<br />
Schäden, die nach Gefahrenübergang<br />
infolge fehlerhafter oder nicht bestimmungsgemäßer<br />
Behandlung, übermäßiger<br />
Beanspruchung, ungeeigneter<br />
Betriebsmittel und solcher chemischer,<br />
elektrochemischer oder elektrischer Einflüsse<br />
entstehen, die nach dem Vertrag<br />
nicht vorausgesetzt sind. Durch etwa<br />
seitens des Bestellers oder Dritter<br />
unsachgemäß vorgenommene Änderungen<br />
oder Instandsetzungs- und<br />
Wartungsarbeiten sowie im Falle der<br />
Verletzung von Plomben werden Mängelansprüche<br />
ausgeschlossen.<br />
italiano espanol francais english<br />
Die Reinigung erfolgt idealerweise trocken<br />
mit einem weichen Tuch, ggfs.<br />
mittels eines leicht angefeuchteten<br />
Schwamm und einem milden Reini-<br />
Die O-Ringe sollten in regelmäßigen<br />
Abständen mit Silikonfett leicht eingefettet<br />
werden.<br />
18<br />
19
<strong>Drufosmart</strong><br />
deutsch<br />
14. Störungshilfen<br />
Störung<br />
Ursache<br />
Fehlerbehebung<br />
Störung<br />
Ursache<br />
Fehlerbehebung<br />
english<br />
Gerät zeigt keine<br />
Funktion<br />
Hauptschalter leuchtet,<br />
Elektronik zeigt keine<br />
Funktion<br />
Kolben lässt sich nicht<br />
herunterführen<br />
Kolben ist unten,<br />
Gerät geht nicht in<br />
Selbsthaltung<br />
Netzverbindung nicht<br />
korrekt<br />
Hauptschalter aus<br />
Feinsicherung defekt<br />
Elektronik defekt<br />
Heizung wurde nicht<br />
ausgeschwenkt<br />
Mindestdruck von 2 bar<br />
wurde nicht erreicht<br />
Netzverbindung<br />
kontrollieren<br />
Hauptschalter einschalten<br />
Feinsicherung überprüfen<br />
ggf. auswechseln<br />
die Elektronik muss vom<br />
Fachmann überprüft<br />
werden<br />
Heizung ausschwenken<br />
Auslösemechanismus<br />
länger halten,<br />
s. Anleitung<br />
Elektronik lässt sich<br />
einstellen, Heizung<br />
startet nicht<br />
Heizzeit läuft ab,<br />
Gerät heizt aber nicht<br />
Heizzeit abgelaufen,<br />
Folie nicht ausreichend<br />
plastifiziert<br />
Heizstrahler nicht richtig<br />
eingeschwenkt<br />
Mikroschalter defekt<br />
Quarzstrahler ist defekt<br />
Temperaturwächter hat<br />
ausgelöst<br />
Lebensdauer Quarzstrahler<br />
überschritten<br />
Heizzeit zu kurz<br />
Heizstrahler richtig<br />
einschwenken<br />
Mikroschalter vom<br />
Fachmann austauschen<br />
lassen<br />
Quarzstrahler<br />
austauschen<br />
Temperaturwächter<br />
austauschen<br />
Quarzstrahler<br />
austauschen<br />
Heizzeit um 5-10 Sek.<br />
verlängern<br />
italiano espanol francais<br />
Elektronik defekt<br />
Gerät muss vom Fachmann<br />
überprüft werden<br />
Gerät erreicht nicht den<br />
voreingestellten Druck<br />
Leitungsdruck zu niedrig<br />
Leitungsdruck erhöhen<br />
Kolben lässt sich nicht<br />
herauffahren<br />
Gerät ist nicht an<br />
Druckluft angeschlossen<br />
Taster falsch bedient<br />
Anpressdruck wurde<br />
nicht abgebaut<br />
Endschalter defekt<br />
Gerät mit der Druckluft<br />
verbinden<br />
Taster 3 Sek. lang ziehen<br />
Anpressdruck ablassen,<br />
s. Anleitung<br />
Endschalter vom Fachmann<br />
austauschen<br />
lassen<br />
Gerät erzeugt zischende<br />
Geräusche während des<br />
Tiefziehprozesses<br />
Entlüftungsventil<br />
nicht geschlossen<br />
Spannring falsch in<br />
die Plattenaufnahme<br />
eingelegt<br />
Verbindungsschlauch<br />
zwischen Ventil und<br />
Zylinder undicht<br />
Entlüftungsventil<br />
schließen<br />
Spannring richtig<br />
platzieren<br />
Gerät vom Fachmann<br />
überprüfen lassen,<br />
ggf. Schlauchstück<br />
austauschen<br />
Magnetventil oder<br />
Elektronik defekt<br />
Gerät muss vom Fachmann<br />
überprüft werden<br />
20<br />
21
<strong>Drufosmart</strong><br />
deutsch<br />
15. Ersatzteilliste<br />
Nr. Bezeichnung Art.-Nr.<br />
5 Handgriff Heizung D-6505519<br />
6 Einsatzschale mit Noppenplatte 55591/50592<br />
7 Granulatschublade 5565<br />
9 Druckreduzierventil 55637<br />
10 Handgriff Plattenteller D-6505519<br />
11 Plattenteller D-6505512<br />
12 Entlüftungsventil 50761<br />
13 Spannring 50038<br />
17 Gehäuse<br />
rot<br />
55500rot<br />
silber<br />
55500silber<br />
19 Microschalter 55790<br />
20 Heizungsgehäuse D-6505513<br />
21 Quarz-Infrarot-Strahler D-6505542<br />
22 Temperaturwächter 5542<br />
23 Säule Heizungselement 55773<br />
25 Magnetventil 52021-24<br />
26 Zylinder 52020<br />
27 Displayfolie klebbar 55820<br />
28 Anschlag Plattenteller xxxxx<br />
29 Halter Plattenteller D-6505514<br />
30 Säule Plattenteller 55772<br />
31 Bodenplatte 5511<br />
33 Netzanschluss/Sicherungshalter 51208<br />
34 Aktivierungshebel D-65885<br />
35 Verbinder Hebel/Achse xxxxx<br />
36 Laufbuchsen 55708<br />
37 Endschlater Aktivierungshebel 5521<br />
38 Endschlater Heizung 50037<br />
39 Rückholfeder 55861/55862<br />
40 Hebelachse 55847<br />
43 Hauptschalter 50841<br />
1. Description of unit<br />
The <strong>Drufosmart</strong> is a basic pressure thermoforming<br />
unit as an alternative to<br />
common vacuum thermoforming units<br />
for daily use in the dental laboratory<br />
and dental surgery.<br />
Simplest handling as well as continuous<br />
digital and acoustic control of all working<br />
steps ensure problem-free working,<br />
even with poor precognition.<br />
2. Technical data<br />
W x H x D<br />
Weight<br />
Supply voltage<br />
Max. power consumption<br />
Fuse of unit<br />
Operating pressure<br />
Min. operating pressure<br />
Max. pressure in pipe<br />
A forming pressure of 2.5 bars in connection<br />
with a vertically forming blank<br />
guarantee for very precise results.<br />
320 x 420 x 290 mm<br />
15 kg<br />
230 V/50-60 Hz, 115 V/50-60 Hz<br />
315 W<br />
T 3.15 A<br />
2.5 bars<br />
2 bars<br />
10 bars<br />
italiano espanol francais english<br />
ohne Zeichnungsnr.<br />
Netzkabel Europa 51021<br />
Netzkabel England 51213 + 51021<br />
Netzkabel Amerika 51207 + 51163<br />
Elektronik inkl. Display, Tastatur, Verbindungskabel 5540<br />
Sicherung F3,15 AT 51321<br />
O-Ringe 112 x 3 mm 51077<br />
Kabelbaum komplett 55520<br />
22<br />
23
<strong>Drufosmart</strong><br />
deutsch<br />
3. Declaration of Conformity<br />
According to the guideline machines (2006/42/EC), annex II A, according to EC-guideline<br />
for electromagnetic compatibility EMC (2004/108/EC) and guideline for electrical<br />
appliances for low voltage (2006/95/EC).<br />
Herewith we declare that the machine described below is in its conception and design<br />
and in the shape delivered by us in accordance with the fundamental requirement for<br />
safety and health as prescribed in the applicable EC-guidelines. In the case of any change<br />
or modification of the machine not authorised by us this declaration becomes invalid.<br />
Designation of machine:<br />
Type of machine:<br />
<strong>Drufosmart</strong><br />
D-3200/D-3200-A/D-32001/D-32001-A<br />
Pressure thermoforming unit<br />
Applicable EC-guidelines:<br />
2006/42/EC<br />
EC-guideline machines<br />
2006/95/EC<br />
EC-guideline for electrical appliances for low voltage<br />
2004/108/EC<br />
EC-guideline for electromagnetic compatibility EMC<br />
Applied harmonised standards:<br />
DIN EN ISO 12100-1:2004-04 Safety of machinery; basic concepts, general prin-<br />
DIN EN ISO 12100-1/A1 2009-10 ciples for design; part 1: basic methodology (ISO<br />
12100-1:2003)<br />
DIN EN ISO 12100-2:2004-04 Safety of machinery; basic concepts, general prin-<br />
DIN EN ISO 12100-2/A1 2009-10 ciples for design; part 2: technical principles and<br />
specifications (ISO 12100-2:2003)<br />
EN 13732-1: 2006 Ergonomics of the thermal environment – Methods for the assessment<br />
of human responses to contact with surfaces; part 1: Hot<br />
surfaces (ISO 13732-1:2006)<br />
EN 60204-1:2006 Safety of machinery: electric equipment of machinery; part 1:<br />
General requirements (IEC 60204-1:2005)<br />
EN 61010-1:2001 Safety requirements for electrical equipment for measurement,<br />
control and laboratory use; part 1: general requirements<br />
EN 61326-1:2006 Electrical equipment for measurement, control and laboratory<br />
use – EMC requirements; part 1: General requirements (IEC 61326-1:<br />
2005); emission according to living area, ranch of commercial and small<br />
enterprises; interference resistance according to industrial area<br />
<strong>Dreve</strong> <strong>Dentamid</strong> GmbH<br />
Max-Planck-Straße 31 · 59423 Unna/Germany<br />
Tel.: +49 2303 8807-40 · Fax: +49 2303 8807-55<br />
E-mail: info@dreve.de · www.dreve.com<br />
4. Safety advice<br />
Attention! Read the following notes before connecting and putting the unit into<br />
service. The operating service and the function of the unit can only be guaranteed for,<br />
if the general safety and accident prevention instructions of the legislation as well as<br />
the safety instructions of the working instructions are observed.<br />
1. This unit must only be used according<br />
to the present working instructions.<br />
We cannot be held liable for damages<br />
which have been caused by improper<br />
treatment resp. faulty manners of operation.<br />
2. Put the unit on a stable and even<br />
basis which is suitable for the operation<br />
weight of approx. 16 kg of the unit.<br />
3. In order to avoid the intrusion of<br />
water into the unit (e. g. splash water)<br />
the unit is to be placed into a dry surrounding.<br />
4. Do not store any flammable substances<br />
in the close surrounding of<br />
the unit.<br />
5. The indicated voltage on the type<br />
plate has to meet the voltage of the<br />
power source.<br />
6. The unit must only be connected<br />
with a socket with protective conductor.<br />
Never touch the plug with wet hands.<br />
7. Authorised operators: The operating<br />
company of the machine has to hold<br />
the working instructions at the operators’<br />
disposal and has to make sure<br />
that authorised operators have read<br />
and understood the manual. Only in<br />
that case the operators may operate<br />
the unit.<br />
8. The unit has to be examined before<br />
operation in view of proper condition<br />
and operating safety. If the unit is not<br />
in proper condition, it must not be used<br />
and has to be marked accordingly.<br />
9. The pressure of the compressed air<br />
line must not exceed 10 bars.<br />
10. Do not intrude any objects into<br />
the unit.<br />
11. Do not lock-up the operation elements<br />
of the unit.<br />
12. Do not block the downwards-moving<br />
piston.<br />
13. Do not touch the downwards-moving<br />
piston.<br />
14. The swivelling housing of the radiator<br />
reaches high temperatures and must<br />
therefore not be touched – not even for<br />
short moments.<br />
15. If the unit is not used, please disconnect<br />
the mains.<br />
italiano espanol francais english<br />
24<br />
25
<strong>Drufosmart</strong><br />
deutsch<br />
16. Plates and labels have to be maintained<br />
in a well legible condition and<br />
must not be removed.<br />
17. Before cleaning and maintenance<br />
of the unit or the exchange of parts the<br />
plug has to be disconnected.<br />
18. The opening of the unit and repairs<br />
are only to be carried out by accordingly<br />
trained experts.<br />
20. Arbitrary rebuilding or modifications<br />
are not permitted due to safety<br />
reasons.<br />
21. The required operation and maintenance<br />
conditions mentioned in these<br />
working instructions are to be complied<br />
with imperatively. When working with<br />
the <strong>Drufosmart</strong> the general accident<br />
prevention regulations have to be<br />
observed.<br />
6. Functional components<br />
34<br />
27<br />
44<br />
espanol francais english<br />
19. Only those appliances and spare<br />
parts may be used which are released by<br />
the manufacturer. We are not responsible<br />
for damages caused by the use of<br />
foreign parts.<br />
5. Initiation<br />
Before initiation make sure that the voltage<br />
indicated on the type plate meets<br />
the voltage of the power source.<br />
Connect the unit to an air compressor.<br />
For that purpose push the pressure hose<br />
that is included in delivery onto the hose<br />
clip (9) of the unit and fix it by means of<br />
a hose clamp. Assemble the fast coupling<br />
at the other end of the tube and<br />
connect it with the pressure line.<br />
The pressure of the compressed<br />
air line must not exceed 10 bars.<br />
Put the power cord into the female<br />
connector (33) and create a connection<br />
with the Euro/USA plug.<br />
Important: Before the first initiation<br />
please read the working instructions<br />
thoroughly. In case of comprehension<br />
problems contact your responsible<br />
dealer or <strong>Dreve</strong> <strong>Dentamid</strong> GmbH,<br />
if necessary.<br />
Scope of delivery<br />
1 <strong>Drufosmart</strong><br />
1 drawer for granules<br />
1 insert bowl and nub plate<br />
1 tension ring with exhaust valve<br />
1 base range of blanks<br />
1 power cord<br />
1 air connection hose<br />
incl. hose clamps and fast coupling<br />
1 working instructions in 5 languages<br />
1 information folder thermoforming foils<br />
9<br />
13<br />
10<br />
11<br />
No. Description<br />
5 Heating handle<br />
6 Nub plate and insert bowl<br />
7 Drawer for granules<br />
9 Compressed air supply<br />
10 Handle plate reception<br />
11 Plate reception<br />
12 Ventilation valve<br />
13 Tension ring<br />
20 Heating<br />
27 Display<br />
33 Mains supply/fuse carrier<br />
34 Activation lever<br />
43 Main switch<br />
44 Turnable pressure controller<br />
20<br />
5<br />
12<br />
43 33<br />
6<br />
7<br />
9<br />
italiano<br />
26<br />
27
<strong>Drufosmart</strong><br />
deutsch<br />
7. Operation<br />
Turn the unit on by means of the main<br />
switch (43) at the back of the unit. By<br />
this the display (27) at the front of the<br />
7.1 Adjustment heating time<br />
By means of the turnable pressure controller<br />
(44) every time between 0:05 min.<br />
and 9:55 min. can be adjusted by turning<br />
the controller clockwise. Adjustment<br />
is effected in 5 sec. steps.<br />
unit will be activated and shows 0:00.<br />
An acoustic signal shows that the unit<br />
is ready for operation.<br />
Please refer to the enclosed information<br />
folder in order to find out the optimum<br />
times for <strong>Dreve</strong> thermoforming foils.<br />
7.2 Start of programme<br />
Before starting the adjusted heating<br />
time put a corresponding blank into<br />
the plate reception (11) and fix it by<br />
means of the tension ring (13).<br />
The model can either be put onto the<br />
nub plate (6) or fixed by taking out the<br />
nub plate and embedding it into granules<br />
directly in the insert bowl.<br />
Info<br />
For an optimum adaptation of the<br />
blank towards the model always<br />
place the models in a way that<br />
the anterior teeth are directed<br />
towards the centre of the blank.<br />
When using hard blanks it is recommended<br />
to embed the models<br />
into granules. Models that<br />
are placed onto the nub plate<br />
should not exceed a max. height<br />
of 23 mm.<br />
Swivel the plate reception inwards at<br />
the handle (10) just up to the mechanical<br />
interlock in the centre of the unit<br />
(magnetic interlocking). Also swivel in<br />
the heating element (20) at the corresponding<br />
handle (5) just up to the<br />
mechanical interlock in the centre of the<br />
unit. Close the ventilation valve (12) of<br />
the tension ring (13). In order to start<br />
the heating process press the turnable<br />
pressure controller (44). The display<br />
shows a countdown towards 0:00 of<br />
the adjusted time.<br />
Info<br />
For safety reasons the heating is<br />
equipped with a final switch and<br />
only works in swivelled in position<br />
after having started a programme.<br />
If the heating carrier (20) is swivelled<br />
outwards at the handle (5)<br />
after having started a programme,<br />
the heating process will be interrupted<br />
automatically. The indication<br />
in the display will stop and<br />
show the remaining time. By swivelling<br />
the heating carrier (20) back<br />
in the programme will be re-activated.<br />
Attention! The swivelling housing<br />
of the heating element reaches<br />
high temperatures. Therefore it<br />
must not be touched – even not<br />
for short moments.<br />
After the adjusted time has elapsed,<br />
there will be an acoustic signal, the<br />
indicator in the display will blink<br />
for 4 seconds and the cooling time<br />
will be counted up again automatically.<br />
italiano espanol francais english<br />
28<br />
29
<strong>Drufosmart</strong><br />
deutsch<br />
7.3 Thermoforming<br />
After the heating time has elapsed there<br />
will be an acoustic signal; the heating<br />
time in the display will be 0:00. The<br />
heating will be switched off automatically.<br />
Pull the heating carrier (20) with<br />
the right hand at the handle (5) completely<br />
out of the centre of the unit.<br />
Then push the activation lever (34)<br />
with the left hand downwards as far<br />
as it will go.<br />
By pulling the heating handle (5) again<br />
for approx. 3 seconds as far as it will go<br />
pressurising of the piston will be carried<br />
out automatically. This is confirmed by<br />
an acoustic signal.<br />
Info<br />
For safety reasons the pressure<br />
chamber can only be pressurised,<br />
if it has been moved downwards<br />
completely manually. Always make<br />
sure that no objects are in the contact<br />
area between piston and insert<br />
bowl while the piston is closing! In<br />
order to protect the operating personnel<br />
securely against bruises of<br />
the fingers, pressurising can only<br />
be effected, if the unit is operated<br />
with two hands at the same time<br />
(two-hand control).<br />
The forming pressure will be verified<br />
continuously and regulated, if necessary.<br />
The display shows the duration<br />
since turning off the heating (cooling<br />
time). The maximum time that can be<br />
shown is 9:55 min. Please refer to the<br />
enclosed information folder in order to<br />
find out the optimum cooling times for<br />
the used <strong>Dreve</strong> thermoforming foil.<br />
7.4 Opening of the pressure chamber<br />
In order to attain a complete cool down<br />
of the thermoforming blank the valve<br />
at the tension ring (12) is to be opened<br />
slightly after 2/3 of the adjusted cooling<br />
time. Through this the warm air inside<br />
the piston will be released and replaced<br />
by cool air due to the automatic pressure<br />
regulation. After the cooling time<br />
has elapsed pull the heating handle (5)<br />
as far as it will go and maintain it in this<br />
position (approx. 3 seconds) until an<br />
acoustic signal can be heard. Release<br />
the heating handle and the pressure<br />
will be relieved automatically.<br />
Then swivel the pressure chamber into<br />
its original position by leading back the<br />
activation lever (34).<br />
Swivel out the plate reception (11) at<br />
the corresponding handle (10) and<br />
remove tension ring and thermoformed<br />
result.<br />
italiano espanol francais english<br />
30<br />
31
<strong>Drufosmart</strong><br />
deutsch<br />
8. Deviation to the rule<br />
8.1 Modification of given times<br />
9 Optional additional functions<br />
9.1 Fabrication of cast form parts<br />
english<br />
The specified times may be prolonged or<br />
shortened individually, if required.<br />
Info<br />
The performance of the heating<br />
might decrease slightly after 1000<br />
operating hours. By prolonging the<br />
heating times by 5-10 seconds optimum<br />
thermoforming results can<br />
be attained again. The given times<br />
are average times and designed<br />
for general use. In case of extreme<br />
undercut areas or very high models<br />
a prolongation of the heating time<br />
can optimise the results.<br />
With the K-7 insert it is possible to<br />
thermoform up to 7 resin bases for the<br />
crown and bridge technique at the same<br />
time. Fix the single dies by means of a<br />
flexible blocking out material (e. g. Fillin)<br />
in the holes of the K-7 insert.<br />
francais<br />
espanol<br />
8.2 Plasticizing of blanks with unknown heating times<br />
Create a heating programme corresponding<br />
to the foil thickness in question<br />
with a sufficient prolongation of<br />
the heating time (see point 7.1). Start<br />
the programme (see point 7.2). You<br />
may test the plasticization degree of the<br />
blank by means of an edgeless metal<br />
instrument (e. g. wax knife).<br />
Info<br />
The complete deformability of the<br />
blank can only be tested at the<br />
edges, as that is where warmth<br />
will leak through the metal contacts<br />
and the necessary flexibility<br />
will be attained at last!<br />
After the blank has attained the necessary<br />
flexibility initiate the thermoforming<br />
process (see point 7.3). The cooling<br />
time can be terminated at any time by<br />
pushing the heating handle (5). However,<br />
a sufficient cooling down time is to<br />
be observed, as warm foils may deform<br />
during removing them from the model<br />
and therefore lead to bad resp. useless<br />
thermoforming results.<br />
All further working steps as described<br />
from point 7.1 on.<br />
italiano<br />
8.3 Abort/termination of programme<br />
It is possible to abort/terminate all<br />
actions of the <strong>Drufosmart</strong> by pushing<br />
the turnable pressure controller (44) for<br />
at least 3 seconds.<br />
32<br />
33
<strong>Drufosmart</strong><br />
deutsch<br />
10. Exchange of fuses<br />
Disconnect the unit from mains supply.<br />
The fuse carrier is situated at the<br />
rear of the unit, integrated in the mains<br />
supply.<br />
In order to control or exchange the<br />
fuses push the push catch of the carrier,<br />
keep it pressed and remove the<br />
carrier from the unit.<br />
After exchanging the fuse insert the<br />
fuse carrier into the housing applying<br />
slight pressure until the fixation latches<br />
noticeably.<br />
11. General advice<br />
Repairs on the <strong>Drufosmart</strong> units may<br />
only be executed by experts. Disconnect<br />
the unit from mains supply at any rate.<br />
<strong>Dreve</strong> company is only responsible for<br />
the safety, reliability and performance<br />
of the unit, if:<br />
· the unit is exclusively used for the corresponding<br />
field of application.<br />
· operation is only carried out by accordingly<br />
trained personnel.<br />
· the unit is operated in accordance with<br />
these working instructions.<br />
· extensions, new adjustments, changes<br />
or repairs are executed by persons<br />
authorised by the company.<br />
As we are currently developing our products,<br />
we reserve the right for technical<br />
changes.<br />
english<br />
francais<br />
espanol<br />
12. Care and maintenance<br />
Generally disconnect the unit from<br />
mains supply before executing care<br />
and maintenance.<br />
with a slightly humid sponge and a mild<br />
cleaning liquid. Water and cleaning liquids<br />
must not get into the unit.<br />
italiano<br />
Pull the defective fuse out of the clamp<br />
carrier applying slight traction and<br />
replace it by a new, equivalent one.<br />
Ideally cleaning is to be effected dryly<br />
with a soft piece of cloth, if necessary<br />
The O-rings should be greased regularly<br />
with silicone grease.<br />
Important: Only use the fuse<br />
strength indicated on the rear.<br />
34<br />
35
<strong>Drufosmart</strong><br />
deutsch<br />
13. Guarantee<br />
The guarantee time amounts to two<br />
years after the date of delivery. Guarantee<br />
is only accepted in case of material<br />
or fabrication defects. The guarantee<br />
obligation does not refer to natural<br />
wear and tear or to damage occurring<br />
after the transfer of risk due to improper<br />
or unsuitable handling, excessive stressing,<br />
unsuitable operating material, and<br />
chemical, electrochemical or electrical<br />
influences of a nature not provided for<br />
according to the contract. On improper<br />
alterations, repairs or maintenance or<br />
breach of seals carried out by the purchaser<br />
or third parties our warranty obligations<br />
and liability for consequences<br />
caused thereby are rendered void.<br />
Liability<br />
The right of the purchaser to bring<br />
actions arising out of defects shall in<br />
all cases be in lapse one year after the<br />
date of delivery. The warranty obligation<br />
does not refer to natural wear<br />
and tear or to damage occurring after<br />
the transfer of risk due to improper or<br />
unsuitable handling, excessive stressing,<br />
unsuitable operating material, and<br />
chemical, electrochemical or electrical<br />
influences of a nature not provided for<br />
according to the contract. On improper<br />
alterations, repairs or maintenance or<br />
breach of seals carried out by the purchaser<br />
or third parties our warranty obligations<br />
and liability for consequences<br />
caused thereby are rendered void.<br />
14. Trouble shooting<br />
Problem<br />
Unit does not work<br />
Main breaker on,<br />
electronics show no<br />
function<br />
Piston cannot move<br />
downwards<br />
Piston has moved<br />
downwards,<br />
unit does not take over<br />
self-maintenance<br />
Cause<br />
Power line is not correct<br />
Main breaker is off<br />
Miniature fuse is defect<br />
Electronics are out<br />
of order<br />
Heating is not swivelled<br />
outwards<br />
Minimum pressure<br />
of 2 bars has not been<br />
reached<br />
Electronics are out<br />
of order<br />
Aid<br />
Control power supply<br />
Switch on main breaker<br />
Check miniature fuse<br />
and exchange it,<br />
if necessary<br />
Electronics have to be<br />
exchanged by an expert<br />
Swivel heating outwards<br />
Hold escapement for<br />
longer, see working<br />
instructions<br />
Electronics have to be<br />
checked by an expert<br />
italiano espanol francais english<br />
Unit is not connected<br />
to compressed air<br />
Connect unit to<br />
compressed air<br />
Piston does not<br />
move upwards<br />
Wrong operation of<br />
push button<br />
Contact pressure has<br />
not been relieved<br />
Final switch is defect<br />
Magnet valve or<br />
electronics are defect<br />
Pull push button<br />
for 3 sec.<br />
Relieve contact<br />
pressure, see working<br />
instructions<br />
Final switch has to be<br />
exchanged by an expert<br />
Unit has to be<br />
controlled by an expert<br />
36<br />
37
<strong>Drufosmart</strong><br />
deutsch<br />
Problem<br />
Electronics can be set,<br />
but radiator does not<br />
heat<br />
Heating time elapses,<br />
but radiator does not<br />
heat<br />
Heating time elapsed,<br />
blank is not plasticized<br />
sufficiently<br />
Unit does not reach the<br />
pre-adjusted pressure<br />
Unit makes fizzy sounds<br />
during thermoforming<br />
Cause<br />
Heating element is not<br />
swivelled-in completely<br />
Micro-switch defect<br />
Quartz radiator defect<br />
Temperature monitor<br />
was activated<br />
Lifetime of quartz<br />
radiator exceeded<br />
Heating time was<br />
too short<br />
Line pressure too low<br />
Ventilation valve<br />
not closed<br />
Tension ring has<br />
been placed wrongly<br />
into plate reception<br />
Connection hose<br />
leaky between valve<br />
and cylinder<br />
Aid<br />
Swivel the heating<br />
element in correctly<br />
Micro-switch has to be<br />
exchanged by an expert<br />
Exchange quartz<br />
radiator<br />
Exchange temperature<br />
monitor<br />
Exchange quartz<br />
radiator<br />
Prolong heating time<br />
by 5-10 sec.<br />
Increase line pressure<br />
Close ventilation valve<br />
Put tension ring into<br />
correct position<br />
Unit has to be<br />
controlled by an<br />
expert, connection hose<br />
has to be exchanged,<br />
if necessary<br />
15. Spare part list<br />
No. Description Item-no.<br />
5 Heating handle D-6505519<br />
6 Insert bowl with nub plate 55591/50592<br />
7 Drawer for granules 5565<br />
9 Pressure reduction valve 55637<br />
10 Handle plate reception D-6505519<br />
11 Plate reception D-6505512<br />
12 Ventilation valve 50761<br />
13 Tension ring 50038<br />
17 Housing<br />
red<br />
55500rot<br />
silver<br />
55500silber<br />
19 Micro-switch 55790<br />
20 Heating housing D-6505513<br />
21 Quartz-infrared-radiator D-6505542<br />
22 Temperature monitor 5542<br />
23 Pillar heating element 55773<br />
25 Magnetic valve 52021-24<br />
26 Cylinder 52020<br />
27 Display foil, adhesive 55820<br />
28 Limit plate reception xxxxx<br />
29 Support plate reception D-6505514<br />
30 Pillar plate reception 55772<br />
31 Bottom plate 5511<br />
33 Mains supply/fuse carrier 51208<br />
34 Activation lever D-65885<br />
35 Connector lever/axis xxxxx<br />
36 Bushings 55708<br />
37 Final switch activation lever 5521<br />
38 Final switch heating 50037<br />
39 Recuperating spring 55861/55862<br />
40 Lever axis 55847<br />
43 Main switch 50841<br />
without drawing no.<br />
Power cord Europe 51021<br />
Power cord England 51213 + 51021<br />
Power cord America 51207 + 51163<br />
Electronics incl. display, key pad, connection cable 5540<br />
Fuse F3.15 AT 51321<br />
O-rings 112 x 3 mm 51077<br />
Cable harness complete 55520<br />
italiano espanol francais english<br />
38<br />
39
<strong>Drufosmart</strong><br />
1. Description de l’appareil<br />
La <strong>Drufosmart</strong> est une thermoformeuse<br />
de base sous pression, pour l’opération<br />
journalière dans le laboratoire et<br />
le cabinet dentaire.<br />
Une manipulation simple ainsi qu’un<br />
contrôle digital et acoustique permanent<br />
de toutes étapes de travail assurent un<br />
2. Données techniques<br />
L x H x P<br />
Poids<br />
Voltage<br />
Puissance max.<br />
Fusible de l’appareil<br />
Pression d’opération<br />
Pression d’opération min.<br />
Pression du conduit max.<br />
travail sans problèmes, même avec peu<br />
de connaissance préalable.<br />
Une pression de formage de 2,5 bars en<br />
connexion avec une feuille formant de<br />
manière verticale, garantit des résultats<br />
absolument précis.<br />
320 x 420 x 290 mm<br />
15 kg<br />
230 V / 50-60 Hz, 115 V / 50-60 Hz<br />
315 W<br />
T 3,15 A<br />
2,5 bars<br />
2 bars<br />
10 bars<br />
3. Déclaration de Conformité<br />
Suivant la UE-Directive machines (2006 / 42 / UE), appendice II A, la Directive compatibilité<br />
électromagnétique (2004 / 108 / UE) et la Directive basse tension (2006 / 95 / UE).<br />
Par la présente nous déclarons, que la machine décrite ci-après en ce qui concerne la<br />
conception, la technique de construction et la construction réalisée et livrée par nous<br />
est conforme aux demandes fondamentales de la sécurité et de la santé des UE-Directives<br />
applicables. En cas de chaque changement ou modification ne pas autorisée par<br />
nous, cette déclaration devient invalide.<br />
Désignation de la machine :<br />
Type de la machine :<br />
<strong>Drufosmart</strong><br />
D-3200 / D-3200-A / D-32001 / D-32001-A<br />
Appareil de thermoformage sous pression<br />
UE-Directives applicables :<br />
2006 / 42 / UE Directive machines<br />
2006 / 95 / UE Directive basse tension<br />
2004 / 108 / UE Directive compatibilité électromagnétique<br />
Normes harmonisées appliquées :<br />
DIN EN ISO 12100 -1 : 2004 - 04 Sécurité des machines; conception de base, prin-<br />
DIN EN ISO 12100 -1 / A1 2009 -10 cipes généraux concernant le design; Part 1 : terminologie<br />
de base, méthodologie (ISO 12100 -1 :<br />
2003)<br />
DIN EN ISO 12100 - 2 : 2004 - 04 Sécurité des machines; conception de base, prin-<br />
DIN EN ISO 12100 - 2 / A1 2009 -10 cipes généraux concernant le design; Part 2 : principes<br />
techniques et spécifications (ISO 12100 - 2 :<br />
2003)<br />
EN 137320 -1 : 2006 Ergonomie des ambiances thermiques – Méthodes d‘évaluation<br />
de la réponse humaine au contact avec des surfaces ; partie 1 :<br />
Surfaces chaudes (ISO 13732 -1 : 2006)<br />
EN 60204 -1: 2006 Sécurité des machines ; equipement électrique des machines ;<br />
partie 1 : Règles générales (IEC 60204 -1 : 2005)<br />
EN 61010 -1 : 2001 Règles de sécurité pour appareils électriques de mesurage, de régulation<br />
et de laboratoire; partie 1 : Règles générales (IEC 61010 -1:<br />
2001)<br />
EN 61326 -1 : 2006 Matériel électrique de mesure, de commande et de laboratoire –<br />
Exigences relatives à la CEM ; partie 1 : Règles générales<br />
(CEI 61326 -1 : 2005) ; Emission selon sphère habitée, secteur<br />
industrie et petites entreprises ; immunité au bruit selon industrie<br />
italiano<br />
espanol<br />
francais<br />
english<br />
deutsch<br />
<strong>Dreve</strong> <strong>Dentamid</strong> GmbH<br />
Max-Planck-Straße 31 · 59423 Unna / Germany<br />
Tél. : +49 2303 8807-40 · Fax : +49 2303 8807-55<br />
E-mail : info@dreve.de · www.dreve.com<br />
40<br />
41
<strong>Drufosmart</strong><br />
4. Avis de sécurité<br />
Attention! Lire attentivement ces indications avant le branchement et la mise en<br />
marche de l’appareil. L’assurance du fonctionnement et des fonctions de l’appareil ne<br />
peuvent être seulement garanties lorsque les instructions concernant la sécurité ainsi<br />
que la protection des accidents mentionnées dans le mode d’emploi ont été suivies.<br />
1. L’appareil doit être seulement utilisé<br />
d’après la description du mode d’emploi.<br />
Nous déclinons toute responsabilité<br />
pour des dommages dus à un<br />
emploi faux ou mal interprété.<br />
2. L’appareil doit être placé à une place<br />
assez stable pour le poids d’opération<br />
d’environ 16 kg et à niveau plat.<br />
3. Pour éviter la pénétration d’eau dans<br />
la machine (p. ex. eau d’arrosage), la<br />
machine doit être placé dans un endroit<br />
sec.<br />
4. Ne stockez pas des substances<br />
inflammables dans l’endroit de la<br />
machine.<br />
5. La tension donnée sur la plaque<br />
signalétique doit correspondre avec la<br />
tension sur la source de courant.<br />
6. Brancher l’appareil à une prise de<br />
courant avec prise de terre. Ne jamais<br />
toucher la prise de courant avec des<br />
mains humides.<br />
7. Utilisateur autorisé: L’opérateur de<br />
la machine doit mettre le mode d’emploi<br />
à la disposition d’utilisateur et doit<br />
s’assurer, que celui-ci l’avait lu et compris.<br />
Seulement après cela l’utilisateur<br />
doit mettre la machine en opération.<br />
8. Contrôler si état ainsi que sécurité de<br />
service de l’appareil sont conformes. Si<br />
ce n’est pas le cas, l’appareil ne doit pas<br />
être utilisé et doit être marqué.<br />
9. La pression du conduit ne doit pas<br />
excéder 10 bars.<br />
10. Ne faire pénétrer aucun objet dans<br />
l’appareil.<br />
11. Ne pas bloquer les éléments d’opération<br />
de l’appareil.<br />
12. Ne pas bloquer le piston descendant.<br />
13. Ne pas empoigner sous le piston<br />
descendant.<br />
14. La carrosserie tournante du radiateur<br />
atteint des températures élevées<br />
durant l’opération. Pour cela il ne faut<br />
pas la toucher, même pas pour des<br />
moments courts.<br />
15. Si l’appareil n’est pas utilisé, veuillez<br />
le débrancher.<br />
16. Plaques et autocollants doivent<br />
toujours être lisibles et ne doivent pas<br />
être retirés.<br />
17. Avant d’entreprendre soins et nettoyage<br />
de l’appareil ou bien vouloir<br />
changer des pièces, il faut absolument<br />
le débrancher.<br />
18. Ouverture de l’appareil et réparations<br />
ne doivent être effectués que par<br />
des spécialistes autorisés.<br />
19. Il ne doit être employé qu’accessoires<br />
et pièces de rechange autorisés<br />
par le fabricant. Pour dommages produits<br />
par l’emploi d’articles non conformes<br />
nous déclinons toute responsabilité.<br />
5. Mise en marche<br />
Avant de mettre la machine en marche,<br />
assurer, que la tension donnée sur la<br />
plaque signalétique correspond avec la<br />
tension sur la source de courant.<br />
Connecter l’appareil avec un compresseur<br />
d’air comprimé. Pour cela, pousser<br />
le tuyau de pression livrée sur la douille<br />
de tuyau (9) de l’appareil et la fixer avec<br />
une pince de tuyau. Monter le couplage<br />
rapide à l’autre côté du tuyau et brancher<br />
avec le conduit d’air.<br />
La pression du conduit ne doit pas<br />
excéder 10 bars.<br />
Mettre le câble du réseau dans la fiche<br />
femelle (33) et créer une connexion<br />
avec la fiche Euro / USA.<br />
20. Des transformations arbitraires et<br />
modifications ne sont pas permises pour<br />
raisons de sécurité.<br />
21. Il faut absolument observer les<br />
conditions d’opération et entretien, qui<br />
fi-gurent dans ce mode d’emploi. Durant<br />
le travail avec la <strong>Drufosmart</strong> il faut<br />
également observer des prescriptions de<br />
prévention des accidents générales.<br />
Important : Avant de mettre la machine<br />
en marche la première fois, il faut absolument<br />
lire le mode d’emploi soigneusement.<br />
S’il y a des problèmes de compréhension,<br />
veuillez contacter votre dépôt<br />
responsable ou la société <strong>Dreve</strong> <strong>Dentamid</strong><br />
GmbH, si nécessaire.<br />
Contenu de livraison<br />
1 <strong>Drufosmart</strong><br />
1 tiroir pour granulés<br />
1 insert et plaque de cône<br />
1 bague de tension avec valve<br />
de ventilation<br />
1 assortiment de feuilles de base<br />
1 câble de réseau<br />
1 tuyau de pression avec douilles<br />
de tuyau et couplage rapide<br />
1 mode d’emploi en 5 langues<br />
1 brochure d’information plaques<br />
de thermoformage<br />
italiano<br />
espanol<br />
francais<br />
english<br />
deutsch<br />
42<br />
43
<strong>Drufosmart</strong><br />
6. Eléments de fonction 7. Opération<br />
34<br />
9<br />
13<br />
10<br />
11<br />
27<br />
44<br />
20<br />
5<br />
12<br />
6<br />
7<br />
Allumer l’interrupteur principal (43) au<br />
dos de l’appareil, le display (27) au front<br />
sera activé et montre 0 :00. Un signal<br />
7.1 Réglage du temps de chauffage<br />
A l’aide du régulateur de pression<br />
tournant (44) il est possible d’enregistrer<br />
chaque temps entre 0 : 05 min. et 9 : 55<br />
min. en tournant le régulateur dans<br />
le sens horaire. Le réglage se fait en<br />
étapes de 5 secondes.<br />
acoustique indique, que la machine est<br />
prête à l’usage.<br />
Veuillez référer à la brochure d’information<br />
ci-jointe pour vous informer des<br />
valeurs optimales des plaques de thermoformage<br />
<strong>Dreve</strong>.<br />
italiano<br />
espanol<br />
francais<br />
english<br />
deutsch<br />
N° Désignation<br />
5 Poignée de chauffage<br />
6 Plaque de cône et insert<br />
7 Tiroir pour granulés<br />
9 Branchement d’air comprimé<br />
10 Poignée support de plaques<br />
11 Support de plaques<br />
12 Valve de ventilation<br />
13 Bague de tension<br />
20 Chauffage<br />
27 Display<br />
33 Branchement au secteur / porte-fusible<br />
34 Levier d’activation<br />
43 Interrupteur principal<br />
44 Régulateur de pression tournant<br />
43 33<br />
9<br />
44<br />
45
<strong>Drufosmart</strong><br />
7.2 Mise en marche du programme<br />
Avant de démarrer le temps de chauffage<br />
réglé, mettez une feuille dans le<br />
support de plaques (11) et fixez-la à<br />
l’aide de la bague de tension (13).<br />
Soit on met le modèle sur la plaque de<br />
cône (6), soit on enlève la plaque de<br />
cône et fixe le modèle à l’aide des granulés<br />
directement dans l’insert.<br />
Infos<br />
Pour obtenir une adaptation optimale<br />
de la feuille vers le modèle,<br />
toujours fixez les modèles de<br />
manière, que les dents antérieures<br />
montrent vers le centre de<br />
la feuille. En cas des feuilles dures,<br />
nous recommandons d’enrober les<br />
modèles dans les granulés. Si on<br />
met les modèles sur la plaque de<br />
cône, leur hauteur ne doit pas<br />
dépasser 23 mm.<br />
de ventilation (12) de la bague de tension<br />
(13). Pour démarrer le processus<br />
de chauffage, poussez le régulateur de<br />
pression tournant (44), dans le display<br />
on peut voir le temps de chauffage<br />
ajusté expirer en arrière vers 0 : 00.<br />
Infos<br />
Pour des raisons de sécurité le<br />
radiateur est équipé avec un<br />
interrupteur final et ne fonctionne<br />
qu’en position tournée vers l’intérieur<br />
après le commencement<br />
d’un programme. Si le porte-radiateur<br />
(20) sera tourné vers l’extérieur<br />
à l’aide de la poignée (5) dans<br />
la phase de chauffage active, le<br />
processus de chauffage sera interrompu<br />
automatiquement. L’indication<br />
dans le display termine et<br />
montre la valeur résiduelle. Par<br />
tourner le porte-radiateur (20)<br />
vers l’intérieur encore une fois le<br />
programme sera réactivé.<br />
Attention ! La carrosserie tournante<br />
du radiateur atteint des<br />
températures élevées durant<br />
l’opération. Pour cela il ne faut<br />
pas la toucher, même pas pour<br />
des moments courts.<br />
7.3 Thermoformage<br />
Après terminaison du temps de chauffage<br />
il y aura un signal acoustique, le<br />
temps de chauffage dans le display<br />
sera 0 : 00. Le chauffage s’éteint automatiquement.<br />
Pivotez le porte-radiateur<br />
(20) à la poignée (5) avec la main<br />
droite complètement vers l’extérieur.<br />
Puis, poussez le levier d’activation (34)<br />
avec la main gauche jusqu’à l’arrêt vers<br />
le bas.<br />
En poussant la poignée (5) encore<br />
une fois jusqu’à l’arrêt suspendu pour<br />
approx. 3 secondes, la mise en pression<br />
aura lieu automatiquement. Il y<br />
aura un signal acoustique pour la confirmation.<br />
Infos<br />
Pour raisons de sécurité, la chambre<br />
de pression sera seulement alimentée<br />
de l’air comprimé, au cas<br />
où celle-ci ait baissé complètement<br />
manuellement. Toujours observer,<br />
qu’il n’y a pas d’objets dans<br />
la zone de contact entre le piston<br />
et l’insert durant la fermeture du<br />
piston ! Pour protéger le personnel<br />
opérant la machine sûrement<br />
contre des ecchymoses des doigts,<br />
la mise en pression peut seulement<br />
être activée, si l’appareil est opéré<br />
avec deux mains en même temps<br />
(contrôle de deux mains).<br />
La pression de formage dans la chambre<br />
de pression sera contrôlée constamment<br />
et modifiée, si nécessaire. Le display<br />
montre le temps dès l’arrêt du chauffage<br />
(temps de refroidissement). La<br />
valeur maximale s’élève à 9 : 55 minutes.<br />
Veuillez référer à la brochure d’information<br />
ci-jointe pour vous informer<br />
de la valeur optimale de refroidissement<br />
de la plaque de thermoformage <strong>Dreve</strong>,<br />
que vous avez utilisé.<br />
italiano<br />
espanol<br />
francais<br />
english<br />
deutsch<br />
Tournez le support de plaques à l’aide<br />
de la poignée (10) jusqu’à l’arrêt mécanique<br />
dans le centre de l’appareil. Egalement<br />
tournez le radiateur (20) à l’aide<br />
de la poignée (5) jusqu’à l’arrêt dans<br />
le centre de l’appareil. Fermez la valve<br />
Après le temps réglé a expiré, il<br />
y a un signal acoustique, l’indication<br />
du display clignote pour 4<br />
secondes et compte le temps de<br />
refroidissement en avant automatiquement.<br />
46<br />
47
<strong>Drufosmart</strong><br />
7.4 Ouverture de la chambre de pression<br />
Pour atteindre un refroidissement complet<br />
de la feuille de thermoformage, la<br />
valve à la bague de tension (12) doit<br />
être ouverte légèrement après 2/3 du<br />
temps de refroidissement ajustée. Par<br />
cela l’air chaude dans le piston fuite et<br />
sera remplacé par l’air froide, grâce à<br />
la régulation de pression automatique.<br />
Après le temps de refroidissement a<br />
expiré, pousser la poignée (5) encore<br />
une fois jusqu’à l’arrêt et la maintenir<br />
dans cette position (environ 3 secondes)<br />
jusqu’à ce qu’il y aura un signal<br />
acoustique. Puis, lâcher la poignée et<br />
la pression sera ventilée.<br />
Ensuite mettre la chambre de pression<br />
dans sa position originale en retourner<br />
le levier d’activation (34).<br />
Tourner le support de plaques (11) à<br />
l’aide de la poignée (10) vers l’extérieur,<br />
enlever la bague de tension et le<br />
résultat thermoformé.<br />
8. Anomalies<br />
8.1 Ajustement manuel des temps préprogrammés<br />
Des temps préprogrammés peuvent être<br />
prolongés ou raccourcies individuellement,<br />
si nécessaire.<br />
Infos<br />
La performance du chauffage peut<br />
devenir un peu plus faible après<br />
1000 heures d’opération. Par prolonger<br />
les temps de chauffage par<br />
5-10 secondes, on peut atteindre<br />
8.2 Plastification de feuilles avec un temps de chauffage<br />
inconnu<br />
Créez un programme de chauffe adapté<br />
à la feuille en question avec une prolongation<br />
suffisante du temps de chauffage<br />
(voir point 7.1). Vous pouvez tester le<br />
degré de plastification avec un instrument<br />
métallique émoussé (p. ex. couteau<br />
de cire).<br />
Infos<br />
Il faut tester la déformabilité complète<br />
au bord, comme c’est là où<br />
la chaleur s’échappe par les contacts<br />
métalliques et pour cela la<br />
flexibilité nécessaire sera atteinte<br />
le plus tard !<br />
des résultats de thermoformage<br />
optimaux. Les temps préprogrammés<br />
sont des valeurs moyennes<br />
pour l’usage général. En cas de<br />
cavités extrêmes ou des modèles<br />
très hautes, une prolongation des<br />
temps de chauffage peut optimiser<br />
les résultats.<br />
Après la flexibilité nécessaire est<br />
atteinte, exécutez le processus de thermoformage<br />
(voir point 7.3). On peut<br />
toujours interrompre la phase de refroidissement<br />
en poussant la poignée (5).<br />
Cependant il faut respecter un temps de<br />
refroidissement suffisant, comme des<br />
feuilles chaudes se peuvent déformer<br />
durant l’enlèvement et par cela peuvent<br />
conduire aux résultats mauvais ou non<br />
utilisables.<br />
italiano<br />
espanol<br />
francais<br />
english<br />
deutsch<br />
8.3 Arrêt / terminaison du programme<br />
La <strong>Drufosmart</strong> rend possible l’arrêt / terminaison<br />
de toutes actions en poussant<br />
le régulateur de pression tournant (44)<br />
pour au moins 3 secondes.<br />
48<br />
49
<strong>Drufosmart</strong><br />
9 Fonctions additionnelles en option<br />
9.1 Production de chapes<br />
L’insert K-7 rend possible de thermoformer<br />
jusqu’à 7 bases en résine pour<br />
la technique de couronnes et bridges<br />
en même temps. Fixez les moignons<br />
singles avec un matériau de blocage<br />
flexible (p. ex. Fillin) dans les espaces<br />
de l’insert K-7 désignées à cet effet.<br />
Enlevez la plaque de cône de l’insert et<br />
remplacez-la par l’insert K-7.<br />
Toutes les autres étapes de travail<br />
comme décrit à partir du chapitre 7.1.<br />
10. Changement de fusibles<br />
Séparer le conduit du réseau. Le portefusible<br />
se trouve au dos de l’appareil,<br />
intégré dans l’alimentation sur secteur.<br />
Pour changer ou contrôler le fusible,<br />
poussez le bouton-poussoir du portefusible,<br />
le maintenir poussé et défaire<br />
le porte-fusible de l’appareil.<br />
Insérez le porte-fusible dans l’appareil<br />
avec une pression légère jusqu’à ce que<br />
la fixation s’enclenche sensiblement.<br />
italiano<br />
espanol<br />
francais<br />
english<br />
deutsch<br />
Tirez le fusible défectueux prudemment<br />
du porte-borne et remplacez-le par un<br />
fusible équivalent.<br />
Important : Seulement utilisez<br />
les fusibles indiqués au dos de<br />
l’appareil.<br />
50<br />
51
<strong>Drufosmart</strong><br />
11. Avis généraux<br />
Réparation et installation de l’équipement<br />
de la <strong>Drufosmart</strong> doivent être<br />
faites par des experts autorisés. Ne<br />
pas oublier d’interrompre le courant.<br />
La maison <strong>Dreve</strong> est seulement responsable<br />
pour la sûreté, la garantie et le<br />
rendement de l’appareil, lorsque :<br />
· celui-ci est utilisé pour l’emploi qui<br />
est prévu.<br />
· l’utilisation n’a lieu que par des personnes<br />
ayant l’habitude de se servir<br />
de l’appareil.<br />
12. Soin et entretien<br />
Débrancher l’appareil du réseau avant<br />
d’exécuter des travaux de soin et entretien.<br />
· l’appareil est utilisé d’après la description<br />
exacte de ce mode d’emploi.<br />
· agrandissement, nouveau branchement,<br />
modification ou réparation sont<br />
exécutés par des ateliers prévus à cet<br />
effet.<br />
Du fait que nos produits sont en développement<br />
permanent, il se trouve toujours<br />
la possibilité d’annoncer de nouveaux<br />
détails techniques.<br />
L’eau et les agents de nettoyage ne<br />
doivent pas pénétrer à l’intérieur de<br />
l’appareil.<br />
13. Garantie<br />
La durée de la garantie se prescrive au<br />
bout de deux ans à partir de la livraison.<br />
La garantie ne concerne ni l’usure naturelle<br />
ni les dommages qui surviennent<br />
après le transfert du risque à la suite<br />
de manipulation défectueuse ou non<br />
conforme aux rescriptions, de sollicitation<br />
extrême, de moyens d’exploitation<br />
inadéquats et influences chimiques,<br />
électrochimiques ou électriques qui ne<br />
sont pas présupposées par le contrat.<br />
Les modifications effectuées incorrectement<br />
par l’auteur de la commande ou<br />
par un tiers ou les travaux de réparation<br />
et d’entretien, ainsi que la destruction<br />
de plombages éliminent les droits de<br />
garantie.<br />
Responsabilité de défauts<br />
Les droits résultant des défauts se<br />
prescrivent au bout d’un an à partir<br />
de la livraison. Les droits résultant des<br />
défauts ne concernent ni l’usure naturelle<br />
ni les dommages qui surviennent<br />
après le transfert du risque à la suite<br />
de manipulation défectueuse ou non<br />
conforme aux prescriptions, de sollicitation<br />
extrême, de moyens d’exploitation<br />
inadéquats et d’influences chimiques,<br />
électrochimiques ou électriques qui ne<br />
sont pas présupposées par le contrat.<br />
Les modifications effectuées incorrectement<br />
par l’auteur de la commande ou<br />
par un tiers ou les travaux de réparation<br />
et d’entretien, ainsi que la destruction<br />
de plombages éliminent les droits résultant<br />
des défauts.<br />
italiano<br />
espanol<br />
francais<br />
english<br />
deutsch<br />
Le nettoyage se fait en sec avec un tissu<br />
souple, si nécessaire avec une éponge<br />
humide et un agent de nettoyage doux.<br />
Les anneaux d’étanchéité doivent être<br />
régulièrement traités avec de la graisse<br />
siliconée.<br />
52<br />
53
<strong>Drufosmart</strong><br />
14. Conseils en cas de panne<br />
Panne<br />
L’appareil ne montre<br />
aucune fonction<br />
L’interrupteur principal est<br />
allumé, l’électronique ne<br />
montre aucune fonction<br />
Le piston ne se laisse<br />
pas descendre<br />
Le piston est<br />
descendu, l’appareil<br />
ne se maintient pas<br />
Cause<br />
Connexion avec le<br />
réseau n’est pas correct<br />
L’interrupteur principal<br />
est éteint<br />
Fusible est défectueux<br />
Electronique est<br />
défectueuse<br />
Chauffage n’a pas été<br />
pivotée vers l’extérieur<br />
Pression minimale de<br />
2 bars n’a pas été atteinte<br />
Depannage<br />
Contrôler connexion<br />
avec le réseau<br />
Allumer l’interrupteur<br />
principal<br />
Vérifier le fusible et<br />
l’échanger, si nécessaire<br />
Un expert doit vérifier<br />
l’électronique<br />
Pivoter le chauffage<br />
vers l’extérieur<br />
Pousser plus long sur le<br />
mécanisme de déclenche,<br />
voir mode d’emploi<br />
Panne<br />
Electronique en fonction,<br />
mais chauffage ne<br />
marche pas<br />
Temps de chauffage se<br />
termine, mais l’appareil<br />
ne chauffe pas<br />
Temps de chauffage est<br />
terminé, mais la feuille<br />
n’est pas plastifiée suffisamment<br />
Cause<br />
Radiateur n’est pas<br />
tourné vers l’intérieur<br />
complètement<br />
Micromanipulateur<br />
défectueux<br />
Radiateur à quartz est<br />
défectueux<br />
Garde de température<br />
a déclenché<br />
Durée de vie du radiateur<br />
à quartz a dépassé<br />
Temps de chauffage a<br />
été trop court<br />
Depannage<br />
Tourner radiateur<br />
vers l’intérieur<br />
complètement<br />
Un expert doit changer<br />
le micromanipulateur<br />
Changer le radiateur<br />
à quartz<br />
Changer le garde<br />
de température<br />
Changer le radiateur<br />
à quartz<br />
Prolonger le temps<br />
de chauffage par<br />
5-10 secondes<br />
italiano<br />
espanol<br />
francais<br />
english<br />
deutsch<br />
Electronique est<br />
défectueuse<br />
Un expert doit vérifier<br />
l’appareil<br />
L’appareil n’atteint pas<br />
la pression ajustée<br />
La pression dans le<br />
conduit est trop faible<br />
Augmenter la pression<br />
dans le conduit<br />
Le piston ne s’élève pas<br />
L’appareil n’a pas été<br />
branché à l’air comprimé<br />
Opération fausse du<br />
bouton-poussoir<br />
Pression de formage n’a<br />
pas été diminuée<br />
Interrupteur fin de<br />
course est défectueux<br />
Brancher l’appareil<br />
à l’air comprimé<br />
Tirer le bouton-poussoir<br />
pendant 3 secondes<br />
Diminuer pression de formage,<br />
voir mode d’emploi<br />
Un expert doit<br />
changer l’interrupteur<br />
fin de course<br />
L’appareil fait des<br />
bruits sifflants durant<br />
le processus de thermoformage<br />
La valve de ventilation<br />
n’est pas fermée<br />
La bague de tension<br />
a été mise de manière<br />
fausse dans le support<br />
de plaques<br />
Le tuyau de connexion<br />
entre la valve et le<br />
cylindre fuit<br />
Fermer la valve<br />
de ventilation<br />
Placer la bague de<br />
tension correctement<br />
Un expert doit vérifier<br />
l’appareil et changer<br />
la pièce du tuyau, si<br />
nécessaire<br />
Electrovanne ou électronique<br />
sont défectueuses<br />
Un expert doit vérifier<br />
l’appareil<br />
54<br />
55
<strong>Drufosmart</strong><br />
deutsch<br />
15. Liste de pièces détachées<br />
N° Désignation Réf.<br />
5 Poignée chauffage D-6505519<br />
6 Insert avec plaque de cône 55591/50592<br />
7 Tiroir pour granulés 5565<br />
9 Réducteur de pression 55637<br />
10 Poignée support de plaques D-6505519<br />
11 Support de plaques D-6505512<br />
12 Valve de ventilation 50761<br />
13 Bague de tension 50038<br />
17 Carrosserie<br />
rouge<br />
55500rot<br />
argenté<br />
55500silber<br />
19 Micromanipulateur 55790<br />
20 Carrosserie du chauffage D-6505513<br />
21 Radiateur a quartz infrarouge D-6505542<br />
22 Garde de température 5542<br />
23 Pilier élément de chauffage 55773<br />
25 Electrovanne 52021-24<br />
26 Cylindre 52020<br />
27 Feuille du display, collante 55820<br />
28 Arrêt support de plaques xxxxx<br />
29 Manche support de plaques D-6505514<br />
30 Pilier support de plaques 55772<br />
31 Plaque de fond 5511<br />
33 Alimentation sur secteur / porte-fusible 51208<br />
34 Levier d’activation D-65885<br />
35 Connecteur levier / axe xxxxx<br />
36 Douilles 55708<br />
37 Interrupteur fin de course du levier d’activation 5521<br />
38 Interrupteur fin de course du chauffage 50037<br />
39 Ressort de rappel 55861/55862<br />
40 Axe de levier 55847<br />
43 Interrupteur principal 50841<br />
1. Descripción del equipo<br />
El <strong>Drufosmart</strong> es un termoadaptador<br />
a presión de base como alternativa a<br />
los termoadaptadores de vacío convencionales<br />
para el uso diario en el laboratorio<br />
dental.<br />
Su fácil manejo y su control constante<br />
digital y acústico de todas las fases de<br />
2. Datos técnicos<br />
L x A x P<br />
Peso<br />
Alimentación<br />
Consumo máximo<br />
Fusible<br />
Presión de trabajo<br />
Presión mínima de servicio<br />
Presión máxima de servicio<br />
trabajo garantizan una labor segura<br />
incluso con pocos conocimientos previos.<br />
Una presión de moldeo de 2,5 bar en<br />
combinación con la lámina de termoadaptación<br />
vertical asegura resultados<br />
precisos.<br />
320 x 420 x 290 mm<br />
15 kg<br />
230 V/50-60 Hz, 115 V/50-60 Hz<br />
315 W<br />
T 3,15 A<br />
2,5 bar<br />
2 bar<br />
10 bar<br />
italiano espanol francais english<br />
sans n° de dessin<br />
Cordon électrique Europe 51021<br />
Cordon électrique Angleterre 51213 + 51021<br />
Cordon électrique Amérique 51207 + 51163<br />
Electronique, y inclus display, clavier, cordon de raccordement 5540<br />
Fusible F3,15 AT 51321<br />
Bagues d’étanchéité 112 x 3 mm 51077<br />
Câble à tisser complet 55520<br />
56<br />
57
<strong>Drufosmart</strong><br />
3. Declaración de conformidad<br />
Según directiva para máquinas (2006/42/EG EMV-directiva (2004/108/EG) y directiva<br />
de baja presión (2006/95/EG).<br />
Por la presente declaramos que el aparato descrito a continuación, en su concepción y<br />
construcción así como en la versión comercializada por nosotros, cumple con los requisitos<br />
básicos de seguridad y salud de las directivas EU. Cualquier alteración realizada<br />
sin nuestro consentimiento anulará la validez de esta declaración.<br />
Denominación de la máquina: <strong>Drufosmart</strong><br />
D-3200/D-3200-A/D-32001/D-32001-A<br />
Tipo de máquina:<br />
Termoadaptador a presión<br />
Directivas comunitarias aplicables:<br />
2006/42/EG<br />
Directiva para máquinas<br />
2006/95/EG<br />
Directiva de baja presión<br />
2004/108/EG<br />
Directiva EMV<br />
Normas armonizadas aplicadas:<br />
DIN EN ISO 12100-1:2004-04 Seguridad de las máquinas – conceptos básicos,<br />
DIN EN ISO 12100-1/A1 2009-10 principios generales para el diseño; Parte 1: Terminología<br />
básica, metodología (ISO 12100-1:2003)<br />
DIN EN ISO 12100-2:2004-04 Seguridad de las máquinas – conceptos básicos,<br />
DIN EN ISO 12100-2/A1 2009-10 principios generales para el diseño; Parte 2: Principios<br />
y especificaciones técnicas (ISO 12100-2:<br />
2003)<br />
EN 13732-1:2006 Ergonomía del entorno térmico: Métodos para la evaluación de la<br />
respuesta humana al contacto con superficies; Parte 1: Superficies<br />
calientes (ISO 13732-1:2006)<br />
EN 60204-1:2006 Seguridad de las máquinas; Elektrische Ausrüstung von Maschinen;<br />
Parte 1: Requisitos generales(IEC 60204-1:2005)<br />
EN 61010-1:2001 Disposiciones de seguridad para instrumentos eléctricos de medición,<br />
control y instrumentación, laboratorio; Parte 1: Requisitos<br />
generales IEC 61010-1:2001)<br />
EN 61326-1:2006 Material eléctrico para medida, control y uso en laboratorio. Requisitos<br />
de compatibilidad electromagnética (CEM); Parte 1: Requisitos<br />
generales (IEC 61326-1:2005), emisión según zona residencial,<br />
Gewerbebereich und Kleinbetriebe; resistencia a interferencias<br />
según zona industrial<br />
<strong>Dreve</strong> <strong>Dentamid</strong> GmbH<br />
Max-Planck-Straße 31 · 59423 Unna/Germany<br />
Tel.: +49 2303 8807-40 · Fax: +49 2303 8807-55<br />
E-mail: info@dreve.de · www.dreve.com<br />
4. Indicaciones de seguridad<br />
Atención! Lea estas indicaciones antes de conectar y poner en marcha el aparato. La<br />
funcionalidad y seguridad del aparato sólo están garantizadas si se cumplen tanto los<br />
requisitos de seguridad y prevención de accidentes exigidos por la legislación como las<br />
indicaciones de seguridad recogidas en el manual de instrucciones.<br />
1. El aparato debe ser utilizado únicamente<br />
de acuerdo con el presente<br />
manual de instrucciones. Declinamos<br />
cualquier responsabilidad por daños<br />
debido a un uso y manejo incorrecto.<br />
2. El aparato debe colocarse sobre una<br />
base plana y suficientemente sólida para<br />
soportar el peso operativo del mismo de<br />
aproximadamente 16 kg.<br />
3. Para evitar que entre agua en el<br />
equipo (p. ej. salpicaduras de agua),<br />
éste se deberá colocar en un entorno<br />
seco.<br />
4. No guarde materiales fácilmente<br />
inflamables en las inmediaciones del<br />
equipo.<br />
5. La tensión consignada en la placa de<br />
características debe coincidir con la tensión<br />
de la fuente de alimentación.<br />
6. El aparato debe ser enchufado únicamente<br />
a una toma con conductor de<br />
protección. No coger nunca el enchufe<br />
de red con las manos mojadas.<br />
7. Usuarios autorizados: el instalador<br />
de la máquina debe facilitar al usuario<br />
el acceso al manual de instrucciones y<br />
asegurarse de que lo ha leído y com-<br />
prendido correctamente. Sólo entonces<br />
podrá el usuario poner en marcha<br />
el equipo.<br />
8. Se debe asegurar el perfecto estado<br />
funcional y de seguridad del aparato<br />
antes de su uso. Si el estado no es perfecto<br />
abstenerse de utilizar el aparato e<br />
indicarlo como corresponda.<br />
9. La presión de la tubería de aire comprimido<br />
no debe superar los 10 bar.<br />
10. No debe introducirse ningún objeto<br />
en el interior del equipo.<br />
11. No deben bloquearse los elementos<br />
de manejo del equipo.<br />
12. No se debe bloquear nunca el<br />
émbolo de descenso.<br />
13. No se debe tocar debajo del émbolo<br />
de descenso.<br />
14. La caja giratoria del calefactor<br />
puede alcanzar temperaturas elevadas<br />
durante el funcionamiento y por lo tanto<br />
no se debe tocar ni por un instante.<br />
15. El equipo se debe desconectar de la<br />
red eléctrica si no se va a utilizar.<br />
italiano<br />
espanol<br />
francais<br />
english<br />
deutsch<br />
58<br />
59
<strong>Drufosmart</strong><br />
16. Los rótulos y adhesivos deben ser<br />
siempre bien legibles y no se deben retirar<br />
de su sitio.<br />
17. El equipo debe desconectarse de la<br />
red eléctrica antes de limpiarse, realizar<br />
trabajos de mantenimiento o sustituir<br />
alguna pieza.<br />
18. El equipo sólo debe ser abierto y<br />
reparado por personal especializado y<br />
debidamente autorizado.<br />
19. Sólo deben utilizarse recambios y<br />
accesorios originales autorizados por el<br />
5. Puesta en marcha<br />
Antes de la puesta en marcha se debe<br />
comprobar que la tensión de red indicada<br />
en la placa de características coincide<br />
con la de la fuente de alimentación.<br />
Conexión del equipo a un compresor de<br />
aire. Introduzca la manguera de presión<br />
suministrada en la boquilla portatubo<br />
(9) del equipo y fíjela mediante<br />
una abrazadera para tubo flexible.<br />
Monte el acoplamiento rápido en el<br />
otro extremo de la manguera y conéctelo<br />
con la tubería de presión.<br />
La presión de la tubería no debe<br />
superar los 10 bar.<br />
Inserte el cable de alimentación en<br />
la toma de corriente del equipo (32)<br />
y conéctelo a la red con el enchufe<br />
Euro/USA.<br />
fabricante. Declinamos toda responsabilidad<br />
por daños causados por el uso<br />
de piezas no autorizadas.<br />
20. Por motivos de seguridad, no están<br />
permitidas las modificaciones o alteraciones<br />
por cuenta propia.<br />
21. Se deben cumplir obligatoriamente<br />
las condiciones de servicio y mantenimiento<br />
especificadas en este manual<br />
de instrucciones. Al trabajar con el<br />
<strong>Drufosmart</strong> se deben tener en cuenta<br />
las normas generales de prevención de<br />
accidentes.<br />
Importante: Antes de poner en marcha<br />
el equipo por primera vez, lea detenidamente<br />
las instrucciones de uso. Si<br />
tiene alguna duda en su comprensión,<br />
consulte con el proveedor correspondiente<br />
o directamente con la empresa<br />
<strong>Dreve</strong> <strong>Dentamid</strong> GmbH.<br />
Volumen de suministro<br />
1 <strong>Drufosmart</strong><br />
1 Cajón de granulado<br />
1 Pieza de inserción y placa moteada<br />
1 Anillo tensor con válvula de escape<br />
1 Surtido básico de láminas<br />
1 Cable de alimentación<br />
1 Manguera de aire comprimido<br />
incl. abrazaderas para tubo flexible<br />
y acoplamiento rápido<br />
1 Instrucciones de trabajo (en 5 idiomas)<br />
1 Folleto de informaciones sobre<br />
las láminas<br />
6. Elementos funcionales<br />
34<br />
9<br />
13<br />
10<br />
11<br />
No. Denominación<br />
5 Mando calefacción<br />
6 Placa moteada y pieza de inserción<br />
7 Cajón de granulado<br />
9 Alimentación de aire comprimido<br />
10 Mando plato giratorio<br />
11 Plato giratorio<br />
12 Válvula de salida de aire<br />
13 Anillo tensor<br />
20 Calefacción<br />
27 Pantalla<br />
33 Conexión a red/fusible<br />
34 Palanca de activación<br />
43 Interruptor principal<br />
44 Pulsador-regulador giratorio<br />
27<br />
44<br />
20<br />
5<br />
12<br />
43 33<br />
6<br />
7<br />
9<br />
italiano<br />
espanol<br />
francais<br />
english<br />
deutsch<br />
60<br />
61
<strong>Drufosmart</strong><br />
7. Manejo<br />
Conecte el interruptor principal (43) en<br />
la parte trasera del equipo, se activa la<br />
pantalla (27) en el frontal que indica<br />
7.1 Ajuste del tiempo de calentamiento<br />
Con ayuda del pulsador-regulador<br />
giratorio (44) se puede introducir cualquier<br />
tiempo entre 0:05 min y 9:55<br />
min girando el regulador en el sentido<br />
horario. El ajuste se realiza en pasos<br />
de 5 segundos.<br />
0:00. Una señal acústica indica que<br />
el equipo está listo para el funcionamiento.<br />
Para los valores óptimos para el surtido<br />
de embutición <strong>Dreve</strong> consulte el folleto<br />
informativo que se adjunta.<br />
7.2 Inicio del programa<br />
Antes de iniciarse el tiempo programado<br />
de calentamiento, introduzca la<br />
lámina correspondiente sobre el plato<br />
giratorio (11) y fíjela con ayuda del anillo<br />
tensor (13).<br />
El modelo se puede fijar sobre la placa<br />
moteada (6) o también, tras extraer la<br />
placa moteada, fijarla mediante granulado<br />
en la pieza de inserción.<br />
Información<br />
Para conseguir una adaptación<br />
óptima de la lámina al modelo,<br />
fije el modelo siempre con los<br />
dientes frontales hacia el centro<br />
de la lámina. Si se utilizan láminas<br />
de termoadaptación duras, se<br />
recomienda embutirlas en granulado.<br />
Los modelos que se fijan<br />
sobre la placa moteada no deberían<br />
sobrepasar una altura máxima<br />
de 23 mm.<br />
Gire el plato giratorio con el mando (10)<br />
hasta que quede enclavado magnéticamente<br />
en el centro por debajo del<br />
equipo. Gire el calefactor (20) con el<br />
mando (5) igualmente hasta que quede<br />
enclavado en el centro del equipo. Cierre<br />
la válvula de salida de aire (12) del<br />
anillo tensor (13). Para iniciar el proceso<br />
de calentamiento, accione el pulsadorregulador<br />
giratorio (44); en la pantalla<br />
comenzará a contar el tiempo prefijado<br />
hacia atrás, hacia 0:00.<br />
Información<br />
Por motivos de seguridad, el calefactor<br />
está equipado con un interruptor<br />
de fin de carrera y, una vez<br />
iniciado un programa, únicamente<br />
funciona cuando está girado hacia<br />
dentro. Si se gira hacia fuera el<br />
calefactor (20) por su mando (5)<br />
durante la fase activa de calefacción,<br />
ésta se interrumpirá automáticamente.<br />
El tiempo en pantalla<br />
se parará y mostrará el tiempo<br />
restante. Cuando se reinserta el<br />
calefactor (20), el programa se<br />
reactiva y continúa.<br />
Atención! La caja extraíble del<br />
calefactor puede alcanzar temperaturas<br />
elevadas durante el<br />
funcionamiento y por lo tanto<br />
no se debe tocar ni por un instante.<br />
Una vez transcurrido el tiempo<br />
prefijado, se emite una señal acústica,<br />
la pantalla parpadea durante<br />
4 segundos y empieza automáticamente<br />
a contar hacia arriba el<br />
tiempo de enfriamiento.<br />
italiano<br />
espanol<br />
francais<br />
english<br />
deutsch<br />
62<br />
63
<strong>Drufosmart</strong><br />
7.3 Termoadaptación<br />
Tras finalizar el tiempo de calentamiento,<br />
suena una señal acústica y el<br />
tiempo en la pantalla se queda en 0:00.<br />
La calefacción se desconecta automáticamente.<br />
Extraiga completamente el<br />
calefactor (20) con la mano derecha y<br />
por el mando (5) del centro del aparato.<br />
Con la mano izquierda apriete la<br />
palanca de activación (34) hacia abajo<br />
y hasta el tope.<br />
Información<br />
Por motivos de seguridad, el aire<br />
comprimido se aplica a la cámara<br />
sólo cuando ésta ha descendido<br />
manualmente del todo. ¡Compruebe<br />
siempre que al cerrar el<br />
émbolo no haya ningún objeto en<br />
el área de contacto del émbolo y<br />
en la pieza de inserción! Para proteger<br />
de forma fiable a los operarios<br />
de posibles lesiones en los<br />
dedos, el aumento de presión sólo<br />
puede tener lugar cuando el aparato<br />
se maneja simultáneamente<br />
con las dos manos. (Seguro de dos<br />
manos).<br />
7.4 Apertura de la cámara de presión<br />
Para conseguir un reenfriamiento completo<br />
de la lámina de termoadaptación,<br />
se debe abrir ligeramente la válvula del<br />
anillo tensor (12) al transcurrir dos terceras<br />
partes del tiempo de enfriamiento<br />
introducido. De este modo se expulsa el<br />
aire calentado del émbolo y, debido a la<br />
regulación de la presión de la electrónica,<br />
se sustituye por aire frio. Una vez<br />
transcurrido el tiempo de enfriamiento,<br />
volver a desplazar el mando calefactor<br />
(5) hasta el tope y mantenerlo en esta<br />
posición (unos 3 s) hasta que se active<br />
la señal acústica. Suelte el mando calefactor<br />
y la presión se elimina automáticamente.<br />
Extraiga el plato giratorio (11) por su<br />
mando (10) y extraiga el anillo tensor<br />
y la pieza conformada.<br />
italiano<br />
espanol<br />
francais<br />
english<br />
deutsch<br />
Manteniendo de nuevo el mando calefactor<br />
(5) durante unos 3 s presionado<br />
contra el tope amortiguado se activa<br />
automáticamente la aplicación de presión<br />
sobre el émbolo. Como confirmación<br />
se emite una señal acústica.<br />
La presión de moldeo de la cámara<br />
se comprueba permanentemente y, si<br />
hace falta, se regula. En la pantalla se<br />
muestra el tiempo transcurrido desde<br />
la desconexión de la calefacción (fase<br />
de enfriamiento). El valor máximo que<br />
puede indicarse en la pantalla es de<br />
9:55 min. El tiempo óptimo de enfriado<br />
para la lámina <strong>Dreve</strong> utilizada se indica<br />
en el folleto informativo adjunto.<br />
A continuación, devuelva la cámara de<br />
presión a su posición de salida retornando<br />
a su posición inicial la palanca<br />
de activación (34).<br />
64<br />
65
<strong>Drufosmart</strong><br />
8. Desviaciones con respecto a la norma general<br />
8.1 Modificación de los tiempos programados<br />
Los tiempos programados se pueden<br />
ampliar o reducir individualmente<br />
cuando haga falta.<br />
Información<br />
La potencia del calentamiento<br />
puede disminuir ligeramente tras<br />
1000 horas de funcionamiento. Se<br />
pueden volver a conseguir resultados<br />
de termodaptación óptimos<br />
alargando los tiempos de calentamiento<br />
entre 5 y 10 segundos.<br />
Los tiempos predeterminados son<br />
valores medios diseñados para uso<br />
general. En zonas de socavación<br />
especialmente profunda o modelos<br />
muy altos, la prolongación del<br />
tiempo de calentamiento puede<br />
optimizar los resultados.<br />
8.2 Plastificación de láminas con tiempo de calentamiento<br />
desconocido<br />
9 Funciones adicionales opcionales<br />
9.1 Preparación de piezas de molde de fundición<br />
Con la pieza de inserción K-7 se pueden<br />
termoadaptar hasta 7 bases de material<br />
sintético al mismo tiempo para la<br />
técnica de coronas y puentes. Fije los<br />
diferentes troqueles por medio de un<br />
material desbloqueante flexible (p. ej.<br />
Fillin) en las escotaduras de la pieza<br />
de inserción K-7 previstas a tal efecto.<br />
Extraiga la placa moteada de la pieza<br />
de inserción y sustitúyala por la pieza<br />
de inserción K-7.<br />
Todos los demás pasos se realizan como<br />
se describe a partir del punto 7.1.<br />
italiano<br />
espanol<br />
francais<br />
english<br />
deutsch<br />
Cree un programa de temporización<br />
individual con tiempos de calentamiento<br />
y enfriamiento elevados (véase<br />
apartado 7.1). Inicie el programa (véase<br />
apartado 7.2). Puede comprobar el<br />
grado de plastificación de la lámina<br />
tocándola con un instrumento de metal<br />
sin punta (p.ej. un aplicador de cera).<br />
Información<br />
La deformabilidad completa de<br />
la lámina sólo se puede comprobar<br />
en el borde, pues aquí el calor<br />
fluye hacia el exterior por el contacto<br />
con el metal, por lo que es la<br />
zona donde más tarde se alcanza<br />
la flexibilidad necesaria.<br />
Una vez alcanzada la flexibilidad necesaria,<br />
inicie el proceso de termoadaptación<br />
(véase apartado 7.3). La fase<br />
de enfriamiento puede interrumpirse<br />
en cualquier momento por extracción<br />
del mando del calefactor (5). No obstante,<br />
se recomienda cumplir un tiempo<br />
suficiente de enfriamiento, ya que en<br />
su extracción del molde, una lámina<br />
aún caliente podría deformarse y producir<br />
una pieza final de mala calidad<br />
o inútil.<br />
8.3 Interrupción/finalización de programas<br />
El <strong>Drufosmart</strong> permite la interrupción/<br />
finalización de todas las acciones mediante<br />
pulsación del pulsador-regulador<br />
giratorio (44) durante al menos 3 s.<br />
66<br />
67
<strong>Drufosmart</strong><br />
10. Sustitución de los fusibles<br />
Desenchufe el cable de electricidad de<br />
la red. El soporte de fusibles se encuentra<br />
en la parte posterior, integrado en<br />
la conexión a la red eléctrica.<br />
Para comprobar o cambiar los fusibles,<br />
apriete hacia dentro la lengüeta<br />
del soporte, manténgala apretada y<br />
extraiga el soporte del fusible.<br />
Una vez cambiado el fusible, inserte de<br />
nuevo el soporte en la carcasa hasta<br />
notar que engarza correctamente en<br />
su lugar.<br />
11. Advertencias generales<br />
Los trabajos de reparación y mantenimiento<br />
de los aparatos <strong>Drufosmart</strong><br />
deben ser llevados a cabo únicamente<br />
por personal técnico, y en cualquier<br />
caso interrumpiendo el suministro de<br />
corriente. El grupo de empresas <strong>Dreve</strong><br />
sólo responde de la seguridad, fiabilidad<br />
y prestaciones del aparato a condición<br />
de que:<br />
· éste sea utilizado exclusivamente para<br />
su uso previsto.<br />
· sólo lo maneje personal debidamente<br />
formado.<br />
· el aparato se use de acuerdo con lo<br />
detallado en estas instrucciones.<br />
· las ampliaciones, nuevas instalaciones,<br />
modificaciones y reparaciones sean<br />
efectuadas por personal autorizado<br />
por <strong>Dreve</strong>.<br />
Debido a que no cesamos de trabajar<br />
en la mejora de nuestros productos,<br />
nos reservamos el derecho a introducir<br />
modificaciones técnicas sin previo<br />
aviso.<br />
italiano<br />
espanol<br />
francais<br />
english<br />
deutsch<br />
12. Cuidados y mantenimiento<br />
Extraiga el fusible defectuoso, que<br />
está insertado a presión en el soporte,<br />
y sustitúyalo por otro con carácterísticas<br />
equivalentes.<br />
Atención: Utilice únicamente fusibles<br />
de la intensidad indicada en<br />
la parte trasera del equipo.<br />
Desonectar el enchufe de red antes de<br />
efectuar trabajos de cuidado y mantenimiento.<br />
Se recomienda realizar la limpieza en<br />
seco con un paño suave y, si fuera necesario,<br />
con una esponja algo humedecida<br />
y un detergente suave. Evite que<br />
entre agua y detergente al interior del<br />
aparato.<br />
Las juntas tóricas deben engrasarse<br />
regularmente con grasa de silicona.<br />
68<br />
69
<strong>Drufosmart</strong><br />
13. Garantía<br />
El tiempo de garantía es de 2 años a<br />
partir de la fecha de entrega. Las prestaciones<br />
por garantía se aplican solamente<br />
por fallos del material o de fabricación.<br />
Los derechos de reclamación<br />
por garantía no incluyen el desgaste<br />
natural, ni tampoco los daños que sean<br />
consecuencia de una cesión de riesgo<br />
debido a un uso erróneo o inadecuado,<br />
solicitación excesiva, medios de servicio<br />
inadecuados o influencias químicas,<br />
electroquímicas o eléctricas que<br />
no sean contempladas en el contrato.<br />
Toda modificación, reparación o labor<br />
de mantenimiento indebidamente realizada<br />
por el comprador o por terceros,<br />
así como posibles desperfectos en los<br />
precintos, anulará la validez de la presente<br />
garantía.<br />
Responsabilidad por defectos<br />
Los derechos de reclamación caducan<br />
al transcurrir un año desde la entrega.<br />
No se aceptan derechos de reclamación<br />
por desgaste natural, ni por daños causados<br />
por el uso incorrecto o indebido,<br />
uso excesivo, materiales inadecuados<br />
e influencias químicas, electroquímicas<br />
o eléctricas no previstas en el contrato<br />
después de la cesión del riesgo.<br />
Toda modificación, reparación o labor<br />
de mantenimiento indebidamente realizada<br />
por el comprador o por terceros,<br />
así como posibles desperfectos en los<br />
precintos, anulará la validez de la presente<br />
responsabilidad por defectos.<br />
14. Solución de problemas<br />
Fallo<br />
El equipo no se enciende<br />
Interruptor principal<br />
encendido pero la<br />
electrónica no funciona<br />
No se puede bajar el<br />
émbolo<br />
El émbolo ha bajado,<br />
el aparato no mantiene<br />
la presión<br />
Causa<br />
El equipo no está bien<br />
conectado a la red<br />
Interruptor principal<br />
desconectado<br />
Fusible para baja<br />
intensidad defectuoso<br />
Electrónica defectuosa<br />
No se ha extraído el<br />
calefactor<br />
No se ha alcanzado la<br />
presión mínima de 2 bar<br />
Solución<br />
Compruebe la conexión<br />
a la red<br />
Conecte el interruptor<br />
principal<br />
Compruebe el fusible<br />
en caso necesario,<br />
sustitúyalo<br />
La electrónica debe<br />
ser comprobada por un<br />
especialista<br />
Extraiga el calefactor<br />
Mantenga más tiempo<br />
el mecanismo de<br />
activación, véase manual<br />
de instrucciones<br />
italiano<br />
espanol<br />
francais<br />
english<br />
deutsch<br />
Electrónica defectuosa<br />
El equipo debe ser<br />
comprobado por un<br />
especialista<br />
El equipo no tiene aire<br />
comprimido<br />
Compruebe la tubería<br />
de presión y, en caso<br />
necesario, conéctela<br />
El émbolo no sube<br />
El pulsador no<br />
se ha accionado<br />
correctamente<br />
No se ha descargado la<br />
presión de embutición<br />
Interruptor de fin de<br />
carrera defectuoso<br />
Válvula magnética<br />
defectuosa o electrónica<br />
defectuosa<br />
Mantener accionado<br />
el pulsador durante<br />
3 segundos<br />
Elimine totalmente la<br />
presión de embutición<br />
consulte las instrucciones<br />
Pida a un técnico que<br />
sustituya el interruptor<br />
de fin de carrera<br />
El equipo debe ser<br />
comprobado por un<br />
especialista<br />
70<br />
71
<strong>Drufosmart</strong><br />
Fallo<br />
La electronica se puede<br />
ajustar, no se inicia el<br />
calentamiento<br />
El tiempo de calentamiento<br />
transcurre, pero<br />
el equipo no calienta<br />
El tiempo de calentamiento<br />
finaliza, pero la<br />
lámina no está suficientemente<br />
plastificada<br />
El equipo no alcanza<br />
la presión previamente<br />
ajustada<br />
El aparato produce<br />
silbidos durante el<br />
proceso de embutición<br />
Causa<br />
El calefactor no está<br />
girado correctamente<br />
hacia dentro<br />
Microinterruptor<br />
defectuoso<br />
Calefactor de cuarzo<br />
defectuoso<br />
Ha saltado el controlador<br />
de temperatura<br />
Se ha excedido el tiempo<br />
de vida del calefactor de<br />
cuarzo<br />
Tiempo de calentamiento<br />
demasiado corto<br />
Presión de la tubería<br />
demasiado baja<br />
Válvula de ventilación no<br />
cerrada<br />
El anillo tensor no está<br />
correctamente colocado<br />
en el plato giratorio<br />
Fuga en el tubo flexible<br />
de conexión entre la<br />
válvula y el cilindro<br />
Solución<br />
Gire el calefactor correctamente<br />
hacia dentro<br />
Encargue a un especialista<br />
que sustituya el<br />
microinterruptor<br />
Sustituya el calefactor de<br />
cuarzo<br />
Sustituya el controlador<br />
de temperatura<br />
Sustituya el calefactor de<br />
cuarzo<br />
Prolongue 5-10 segundos<br />
el tiempo de calentamiento<br />
Aumente la presión de<br />
la tubería<br />
Cierre la válvula de<br />
ventilación<br />
Coloque correctamente<br />
el anillo tensor<br />
Un especialista debe<br />
comprobar el equipo y en<br />
el caso necesario sustituir<br />
el tubo flexible<br />
15. Lista de recambios<br />
No. Denominación No. ref.<br />
5 Mando calefacción D-6505519<br />
6 Pieza de inserción y placa moteada 55591/50592<br />
7 Cajón de granulado 5565<br />
9 Reductor de presión 55637<br />
10 Mando plato giratorio D-6505519<br />
11 Plato giratorio D-6505512<br />
12 Válvula de ventilación 50761<br />
13 Anillo tensor 50038<br />
17 Carcasa<br />
roja<br />
55500rot<br />
argentea<br />
55500silber<br />
19 Microinterruptor 55790<br />
20 Carcasa de calentamiento D-6505513<br />
21 Calefactor de cuarzo de infrarrojos D-6505542<br />
22 Protector contra sobretemperatura 5542<br />
23 Larguero brazo calefactor 55773<br />
25 Válvula magnética 52021-24<br />
26 Cilindro 52020<br />
27 Lámina adhesiva para pantalla 55820<br />
28 Chapa de tope plato giratorio xxxxx<br />
29 Soporte plato giratorio D-6505514<br />
30 Larguero soporte plato giratorio 55772<br />
31 Placa de base 5511<br />
33 Conexión a red/soporte de fusibles 51208<br />
34 Palanca de activación D-65885<br />
35 Conector palanca/eje xxxxx<br />
36 Casquillos 55708<br />
37 Interruptor de fin de carrera de palanca de activación 5521<br />
38 Interruptor de tope de calefacción 50037<br />
39 Muelle de recuperación 55861/55862<br />
40 Eje de palanca 55847<br />
43 Interruptor principal 50841<br />
recambios sin no.<br />
Cable de alimentación para Europa 51021<br />
Cable de alimentación para Inglaterra 51213 + 51021<br />
Cable de alimentación para América 51207 + 51163<br />
Electrónica incl. pantalla, teclado, cable de conexión 5540<br />
Fusible F3,15 AT 51321<br />
Aros 112 x 3 mm 51077<br />
Mazo de cables, completo 55520<br />
italiano<br />
espanol<br />
francais<br />
english<br />
deutsch<br />
72<br />
73
<strong>Drufosmart</strong><br />
1. Descrizione dell’apparecchio<br />
<strong>Drufosmart</strong> è un apparecchio di base<br />
per termostampaggio alternativa alle<br />
macchine sutto vuoto per l’utilizzo quotidiano<br />
in laboratorio odontoiatrico.<br />
L‘impiego semplice e il controllo acustico<br />
e digitale in tutti i fasi di lavoro<br />
2. Dati tecnici<br />
L x A x P<br />
Peso<br />
Tensione di rete<br />
Potenza assorbita max.<br />
Fusibile dell‘apparecchio<br />
Pressione di funzionamento<br />
Pressione di funzionamento min.<br />
Pressione max. nel condotto<br />
garantiscono risultati precisi anche agli<br />
utenti meno esperti.<br />
La pressione operativa di formatura di<br />
2,5 bar e il foglio di formatura verticale<br />
consentono di ottenere risultati estremamente<br />
precisi.<br />
320 x 420 x 290 mm<br />
15 kg<br />
230 V/50-60 Hz, 115 V/50-60 Hz<br />
315 W<br />
T 3,15 A<br />
2,5 bar<br />
2 bar<br />
10 bar<br />
3. Dichiarazione di conformità<br />
secondo la Direttiva Macchine (2006/42/CE), Appendice II A, secondo la Direttiva CEM<br />
(2004/108/CE) e la Direttiva Basse Tensioni (2006/42/CE).<br />
Dichiariamo con la presente, che l’apparecchio qui di seguito indicato, in base alla sua<br />
concezione e al tipo di costruzione, e nella versione da noi introdotta sul mercato, è<br />
conforme ai relativi requisiti fondamentali di sicurezza e di sanità delle direttive CE. In<br />
caso di modifica apportate alla macchina senza il nostro accordo, questa dichiarazione<br />
perde la sua validità.<br />
Nome della macchina:<br />
Tipo di macchina:<br />
Direttive CE pertinenti:<br />
2006/42/CE<br />
2006/42/CE<br />
2004/108/CE<br />
<strong>Drufosmart</strong><br />
D-3200/D-3200-A/D-32001/D-32001-A<br />
Termostampante in versione Pressure<br />
Direttiva macchine<br />
Direttiva basse tensioni<br />
Direttiva CEM (Test Report 110108/L1T)<br />
Norme armonizzate applicate:<br />
DIN EN ISO 12100-1:2004-04 Sicurezza del macchinario – Concetti fondamentali,<br />
DIN EN ISO 12100-1/A1 2009-10 principi generali di progettazione; Parte 1: Terminologia<br />
di base, metodologia (ISO 12100-1:2003)<br />
DIN EN ISO 12100-2:2004-04 Sicurezza del macchinario – Concetti fondamentali,<br />
DIN EN ISO 12100-2/A1 2009-10 principi generali di progettazione; Parte 2: Principi<br />
tecnici e specifiche (ISO 12100-2:2003)<br />
EN 13732-1:2006 Ergonomia degli ambienti termici – Metodi per la valutazione della<br />
risposta dell‘uomo al contatto con le superfici; Parte 1: Superfici<br />
calde (ISO 13732-1:2006)<br />
EN 60204-1:2006 Sicurezza del macchinario; Equipaggiamento elettrico delle macchine;<br />
Parte 1: Prescrizioni generali (IEC 60204-1:2005)<br />
EN 61010-1:2001 Prescrizioni di sicurezza per apparecchi elettrici di controllo e per<br />
utilizzo in laboratorio; Parte 1: Esigenze generali (IEC 61010-1:<br />
2001)<br />
EN 61326-1:2006 Apparecchi elettrici di misura, controllo e laboratorio – Prescrizioni<br />
di compatibilità elettromagnetica; Parte 1: Prescrizioni generali<br />
(IEC 61326-1:2005); Emissione di disturbi per ambienti residenziali,<br />
commerciali e dell’industria leggera; commerciali e dell’industria<br />
leggera; immunità ai disturbi secondo ambito industriale<br />
<strong>Dreve</strong> <strong>Dentamid</strong> GmbH<br />
Max-Planck-Straße 31 · 59423 Unna/Germany<br />
Tel.: +49 2303 8807-40 · Fax: +49 2303 8807-55<br />
E-mail: info@dreve.de · www.dreve.com<br />
italiano<br />
espanol<br />
francais<br />
english<br />
deutsch<br />
74<br />
75
<strong>Drufosmart</strong><br />
4. Avvertenze di sicurezza<br />
Attenzione! Leggere accuratamente queste avvertenze prima del collegamento e della<br />
messa in funzione dell’apparecchio. E’ possibile garantire la sicurezza di funzionamento<br />
e il funzionamento dell’apparecchio solo in caso di rispetto delle prescrizioni generali<br />
di sicurezza e di prevenzione antinfortunistica del legislatore, nonché delle avvertenze<br />
di sicurezza contenute nelle istruzioni per l’uso.<br />
1. L’uso dell’apparecchio è consentito<br />
solo in conformità con le presenti<br />
istruzioni per l’uso. Decliniamo qualsiasi<br />
responsabilità per danni derivanti<br />
da uso improprio o da errori di manipolazione.<br />
2. Collocare l’apparecchio su una solida<br />
base piana, in grado di sopportare un<br />
peso di esercizio di circa 15 kg.<br />
3. E’opportuno che l’ambiente nel quale<br />
si trova l’apparecchio sia asciutto, per<br />
evitare che possa penetrarvi acqua (ad<br />
es. spruzzi d’acqua).<br />
4. Non conservare sostanze facilmente<br />
infiammabili in prossimità immediata<br />
dell’apparecchio.<br />
5. La tensione indicata sulla targhetta<br />
deve corrispondere a quella della rete<br />
locale.<br />
6. Inserire la spina dell’apparecchio solo<br />
in una presa con terra. Mai toccare la<br />
spina con le mani umide.<br />
7. Utente abilitato: il gestore della<br />
macchina deve mettere a disposizione<br />
dell’utente le istruzioni per l’uso accertandosi<br />
che questi le legga e le capisca,<br />
altrimenti sarà vietato all’utente l’utilizzo<br />
dell’apparecchio.<br />
8. Prima di ogni utilizzo dell’apparecchio,<br />
verificarne la sicurezza di funzionamento<br />
e accertarsi che si trovi in ottimo<br />
stato. Qualora lo stato non sia ineccepibile,<br />
non utilizzare l’apparecchio e contrassegnarlo<br />
in modo adeguato.<br />
9. La pressione nel condotto dell’aria<br />
compressa non deve superare i 10 bar.<br />
10. Non introdurre alcun oggetto nell’<br />
apparecchio.<br />
11. Non bloccare i comandi dell’apparecchio.<br />
12. Non bloccare il pistone in discesa.<br />
13. Non mettere le mani sotto il pistone<br />
in discesa.<br />
14. Il corpo girevole del riscaldatore<br />
per irraggiamento raggiunge, durante<br />
il funzionamento, temperature elevate<br />
e per questa ragione evitare di toccarlo,<br />
anche per un istante.<br />
15. Staccare l’apparecchio dalla rete<br />
elettrica quando non in uso.<br />
16. Targhette ed adesivi devono essere<br />
sempre leggibili; è proibito rimuoverli.<br />
17. Prima di pulire e manutentare l’apparecchio,<br />
o sostituire parti, staccare<br />
sempre la spina dalla presa di corrente.<br />
18. Solo personale autorizzato può<br />
aprire e riparare l’apparecchio.<br />
19. Utilizzare solo accessori e parti di<br />
ricambio autorizzati dal costruttore.<br />
Decliniamo qualsiasi responsabilità<br />
per danni derivanti dall’uso di parti<br />
non originali.<br />
5. Messa in funzione<br />
Prima della messa in funzione, assicurarsi<br />
che la tensione indicata sulla targhetta<br />
corrisponda a quella della rete<br />
locale. Collegare l’apparecchio a un<br />
compressore pneumatico, inserendo il<br />
tubetto per pressione (compreso nella<br />
fornitura) nel bocchettone (9) dell’apparecchio<br />
e fissando con un morsetto per<br />
tubi. Montare, all’altro capo del tubo,<br />
l’attacco rapido e collegare al tubo di<br />
mandata.<br />
La pressione nel condotto non<br />
deve superare i 10 bar.<br />
Collegare il cavo di alimentazione alla<br />
presa sull’apparecchio (33); inserire<br />
la spina Euro/USA nella presa di corrente.<br />
20. Sono vietate, per ragioni di sicurezza,<br />
le trasformazioni e le modifiche.<br />
21. Rispettare imperativamente le condizioni<br />
di utilizzo e manutenzione contenute<br />
nelle presenti istruzioni per l’uso.<br />
L’uso di <strong>Drufosmart</strong> esige anche l’osservanza<br />
delle norme per la prevenzione<br />
degli infortuni sul lavoro in generale.<br />
Importante: Prima della prima messa<br />
in funzione è indispensabile leggere<br />
attentamente le istruzioni per l’uso. Se<br />
si ha l’impressione di non capire qualcosa,<br />
contattare immediatamente il proprio<br />
rivenditore o direttamente l’azienda<br />
<strong>Dreve</strong> <strong>Dentamid</strong> GmbH.<br />
La fornitura comprende:<br />
1 <strong>Drufosmart</strong><br />
1 cassetto granulato<br />
1 vaschetta di inserto e disco nodoso<br />
1 anello di tensione con valvola di<br />
scarico<br />
1 confezione base di fogli<br />
1 cavo di alimentazione<br />
1 tubo dell’aria compressa, includente<br />
morsetti per tubi e attacco rapido<br />
1 istruzioni per l’uso in 5 lingue<br />
1 depliant fogli di termostampaggio<br />
italiano<br />
espanol<br />
francais<br />
english<br />
deutsch<br />
76<br />
77
<strong>Drufosmart</strong><br />
6. Elementi funzionali 7. Comando<br />
34<br />
9<br />
13<br />
10<br />
11<br />
27<br />
44<br />
20<br />
5<br />
12<br />
6<br />
7<br />
Accendere l’interruttore principale (43)<br />
posto sul retro dell’apparecchio; il<br />
display (27) situato sul davanti si attiva<br />
ed indica 0:00. Un segnale acustico<br />
indica che l’apparecchio è operativo.<br />
7.1 Impostazione del tempo di riscaldamento<br />
Con l’ausilio del regolatore di pressione<br />
(44), è possibile inserire qualunque<br />
tempo compreso tra 0:05 Min. e 9:55<br />
Min. girando in senso orario. L’impostazione<br />
avviene con scatti di 5 secondi.<br />
In merito all’assortimento del termostampaggio<br />
<strong>Dreve</strong>, trovate i valori ottimali<br />
nell’opuscolo informativo allegato.<br />
italiano<br />
espanol<br />
francais<br />
english<br />
deutsch<br />
No. Nome<br />
5 Manopola del riscaldamento<br />
6 Vaschetta di inserto e disco nodoso<br />
7 Cassetto granulato<br />
9 Presa d’aria<br />
10 Manopola del piatto portaplacca<br />
11 Piatto portaplacca<br />
12 Valvola di sfiato<br />
13 Anello di tensione<br />
20 Riscaldamento<br />
27 Display<br />
33 Presa di rete/portafusibili<br />
34 Leva di comando<br />
43 Interruttore principale<br />
44 Manopola rotativa di regolazione<br />
43 33<br />
9<br />
78<br />
79
<strong>Drufosmart</strong><br />
7.2 Avvio del programma<br />
Prima di avviare il programma selezionato,<br />
porre sul piatto portaplacca<br />
(11) il foglio in funzione del programma,<br />
quindi fissare il foglio con l’anello di<br />
tensione (13).<br />
Il modello è fissato, a scelta, o sul disco<br />
nodoso (6) o, estraendo il disco nodoso,<br />
direttamente nella vaschetta dell’inserto<br />
per mezzo del granulato.<br />
Info<br />
Al fine di realizzare un adattamento<br />
ottimale del foglio al modello, fissare<br />
i modelli con i denti frontali<br />
rivolti sempre verso il centro del<br />
foglio. Quando si usano fogli di<br />
termostampaggio duri, si consiglia<br />
il collocamento in granulato.<br />
L’altezza massima dei modelli da<br />
fissare sul disco nodoso non deve<br />
superare i 23 mm.<br />
le valvole di sfiato (12) dell’anello di<br />
tensione (13). Per iniziare il processso<br />
di riscaldamento premere la manopola<br />
rotativa di regolazione (44). Il display<br />
mostra il countdown del tempo di riscaldamento<br />
preimpostato; conta alla rovescia<br />
fino al raggiungimento di 0:00.<br />
Info<br />
Per ragioni di sicurezza, il riscaldamento<br />
è dotato di finecorsa<br />
e funziona unicamente se girato<br />
in dentro dopo avvio di un programma.<br />
Nel caso in cui il corpo<br />
del riscaldatore (20) tramite l’impugnatura<br />
(5) sia girato in fuori<br />
durante la fase attiva di riscaldamento,<br />
il processo di riscaldamento<br />
si interrompe automaticamente<br />
e il conteggio del tempo si<br />
arresta. L’indicatore sul display si<br />
ferma allora sul valore restante.<br />
Una volta il corpo del riscaldatore<br />
(20) nuovamente girato in<br />
dentro, il programma si riattiva.<br />
Attenzione! Il corpo girevole del<br />
riscaldatore per irraggiamento<br />
raggiunge temperature elevate<br />
e per questa ragione evitare di<br />
toccarlo, anche per un istante.<br />
7.3 Termostampaggio<br />
Un segnale acustico è udibile allo spirare<br />
del tempo di riscaldamento. L’indicatore<br />
del tempo di riscaldamento indica<br />
sul display 00:00. Il riscaldamento si<br />
spenge automaticamente. Svitate completamente<br />
il riscaldamento (20) con<br />
la mano destra sull’asta del pulsante<br />
(5) dal centro dell’apparecchio. Con la<br />
mano sinistra spingere quindi verso il<br />
basso la leva di attivazione (34), fino<br />
all’arresto.<br />
Tirando nuovamente per ca. 3 secondi<br />
l’asta del pulsante del riscaldamento (5)<br />
fino all’arresto molleggiato, la camera<br />
di pressione forma automaticamente<br />
la pressione interna del pistone. Un<br />
segnale acustico risuona a conferma<br />
dell’immissione di pressione.<br />
Informazione<br />
Per motivi di sicurezza, la pressione<br />
nella camera di pressione<br />
può essere attivata solo se questa<br />
è già stata manualmente abbassata<br />
del tutto. Assicurarsi sempre<br />
che alla chiusura del pistone non vi<br />
siano oggetti nello spazio di contatto<br />
tra il pistone e la vaschetta<br />
dell’inserto! Per proteggere in<br />
modo affidabile il personale<br />
dallo schiacciamento delle dita,<br />
la formazione di pressione avviene<br />
solo se l’apparecchio viene utilizzato<br />
contemporaneamente con<br />
entrambe le mani (dispositivo di<br />
controllo a due mani).<br />
La pressione di stampaggio della camera<br />
di pressione è verificata costantemente<br />
e, se necessario, corretta. Sul display è<br />
indicata la durata dallo spegnimento<br />
del riscaldamento (fase di raffreddamento).<br />
Il valore massimo visualizzabile<br />
è di 9:55 Min. Il tempo di raffreddamento<br />
ottimale per il foglio <strong>Dreve</strong> utilizzato<br />
è indicato nell’opuscolo informativo<br />
fornito.<br />
italiano<br />
espanol<br />
francais<br />
english<br />
deutsch<br />
Girare il piatto portaplacca tramite l’impugnatura<br />
(10) fino all’arresto meccanico<br />
(magnetico) situato al centro sotto<br />
l’apparecchio. Girare anche il riscaldatore<br />
per irraggiamento (20) tramite l’impugnatura<br />
(5) fino all’arresto situato al<br />
centro sotto l’apparecchio. Chiudere<br />
Un segnale acustico è udibile allo<br />
spirare del tempo di riscaldamento.<br />
l’indicatore sul display lampeggia<br />
per 4 secondi e conta il tempo dal<br />
momento in cui è spirato il tempo<br />
di riscaldamento.<br />
80<br />
81
<strong>Drufosmart</strong><br />
7.4 Apertura della camera di pressione<br />
Per il raffreddamento completo del<br />
foglio di termostampaggio, aprire leggermente<br />
la valvola agendo sull’anello<br />
di tensione (12) una volta trascorsi 2/3<br />
del tempo di raffreddamento definito.<br />
Ne consegue l’espulsione dell’aria calda<br />
dal pistone, e la sostituzione della stessa<br />
con aria fredda. Allo spirare del tempo<br />
di raffreddamento tirare l‘asta del pulsante<br />
del riscaldamento fino all’arresto<br />
e tenerla in questa posizione (per<br />
ca. 3 secondi) fino alla emissione di<br />
un segnale acustico. Lasciar andare<br />
l’asta del pulsante del riscaldamento.<br />
La pressione viene rilasciata automaticamente.<br />
Successivamente, spingendo indietro<br />
la leva di attivazione (34) la camera di<br />
pressione torna nuovamente in posizione<br />
iniziale.<br />
Svitare il piatto portaplacca (11) con<br />
la mano sull’asta del pulsante (10),<br />
togliere l’annello di tensione e il foglio<br />
termoformato.<br />
8. Eccezioni alla regola<br />
8.1 Modifica dei tempi previsti<br />
E’possibile, all’occorrenza, prolungare<br />
o accorciare i tempi impostati.<br />
Info<br />
Le prestazioni del riscaldamento<br />
possono calare leggermente dopo<br />
1000 ore di funzionamento. Prolungare<br />
i tempi di riscaldamento<br />
(da 5 a 10 sec.) per ottenere nuovamente<br />
risultati di termostampaggio<br />
ottimali.<br />
8.2 Plastificazione di fogli con tempo di riscaldamento non<br />
noto<br />
Creare un programma orario specifico<br />
con tempi elevati di riscaldamento<br />
(vedi punto 7.1). Avviare il programma<br />
(vedi punto 7.2). Determinare il grado di<br />
plastificazione del foglio con uno strumento<br />
metallico non aguzzo (ad es. un<br />
coltello per cera).<br />
Info<br />
La malleabilità reale del foglio può<br />
essere determinata unicamente<br />
sul bordo, in quanto è proprio<br />
sul bordo che il calore defluisce a<br />
seguito del contatto con il metallo.<br />
I tempi previsti contenuti nel<br />
codice a barre sono valori medi,<br />
adatti per un uso generico. In presenza<br />
di zone particolarmente<br />
marginali (undercut/sottosquadri)<br />
o qualora l’altezza dei modelli sia<br />
molto elevata, prolungare i tempi<br />
di riscaldamento può consentire di<br />
ottimizzare i risultati.<br />
La flessibilità richiesta si ottiene<br />
solo alla fine!<br />
Raggiunta la flessibilità necessaria,<br />
azionare il processo di termostampaggio<br />
(cfr. punto 7.3). La fase di raffreddamento<br />
può essere interrotta in<br />
qualunque momento, tirando la presa<br />
del riscaldamento (5). Un tempo di<br />
raffreddamento sufficiente andrebbe<br />
tuttavia rispettato, in quanto un foglio<br />
caldo può contrarsi mentre è tolto dallo<br />
stampo, portando quindi a risultati scadenti<br />
ovvero non utilizzabili.<br />
italiano<br />
espanol<br />
francais<br />
english<br />
deutsch<br />
8.3 Interruzione/fine del programma<br />
L’interruzione/ la fine di tutte le attività<br />
del <strong>Drufosmart</strong> può avvenire premendo<br />
la manopola rotativa di regolazione (44)<br />
per min. 3 secondi.<br />
82<br />
83
<strong>Drufosmart</strong><br />
9 Funzioni opzionali<br />
9.1 Produzione di cappette per la tecnica di fusione<br />
L’inserto K-7 permette il termostampaggio<br />
simultaneo di massimo 7 basi di<br />
plastica per corone e ponti. Per mezzo<br />
di un materiale sbloccante flessibile<br />
(ad es. Fillin), fissare i singoli punzoni<br />
negli incavi dell’inserto K-7 previsti a<br />
questo scopo. Estrarre il disco nodoso<br />
dalla vaschetta dell inserto e sostituire<br />
con inserto K-7.<br />
Eseguire il resto della procedura come<br />
descritto ai punti 7.1. e sgg.<br />
10. Sostituzione dei fusibili dell’apparecchio<br />
Staccare il cavo di alimentazione elettrica.<br />
La sede del fusibile si trova sul<br />
retro dell’apparecchio, integrata nella<br />
presa di corrente.<br />
Per il controllo o la sostituzione dei fusibili,<br />
premere la griglia del portafusibile,<br />
tenere premuto ed estrarre il portafusibile.<br />
Dopo la sostituzione, reinserire il portafusibile<br />
nel vano esterno, finché il fissaggio<br />
scatta in modo evidente.<br />
italiano<br />
espanol<br />
francais<br />
english<br />
deutsch<br />
Togliere il fusibile dalla sede tirando<br />
leggermente e sostituirlo con un nuovo<br />
fusibile di equivalente amperaggio.<br />
Attenzione: Utilizzare solo fusibili<br />
il cui amperaggio corrisponda alle<br />
indicazioni sul retro dell apparecchio.<br />
84<br />
85
<strong>Drufosmart</strong><br />
11. Avvertenze generali<br />
Solo specialisti sono abilitati a eseguire<br />
interventi di riparazione su <strong>Drufosmart</strong><br />
L’alimentazione di corrente verso l’apparecchio<br />
va in ogni caso interrotta.<br />
L’azienda <strong>Dreve</strong> è responsabile della<br />
sicurezza, affidabilità e delle prestazioni<br />
dell’apparecchio solo se:<br />
· l’apparecchio viene impiegato solo conformemente<br />
alla sua destinazione.<br />
· l’apparecchio viene messo in funzione<br />
solo da personale specializzato appositamente<br />
istruito.<br />
12. Cura e manutenzione<br />
· l’apparecchio viene impiegato conformemente<br />
alle istruzioni per l’uso.<br />
· aggiunte, nuove impostazioni, modifiche<br />
o riparazioni vengono eseguite da<br />
persone autorizzate da <strong>Dreve</strong>.<br />
Ci riserviamo di apportare modifiche di<br />
carattere tecnico, perché siamo costantemente<br />
impegnati nell’evoluzione dei<br />
nostri prodotti.<br />
13. Garanzia<br />
La garanzia ha una durata di 2 anni<br />
dalla data di consegna. La garanzia vale<br />
solo per difetti del materiale o di fabbricazione.<br />
Il diritto alla garanzia non<br />
copre l’usura naturale, né i danni causati<br />
da uso errato o non conforme a<br />
destinazione, sforzo eccessivo, materiali<br />
inadeguati, né influssi di natura<br />
chimica, elettrochimica o elettrica non<br />
contemplati dal contratto. La garanzia<br />
perde validità in caso di modifiche o<br />
operazioni di manutenzione e riparazione<br />
eseguiti in modo non idoneo dall’acquirente<br />
o da terzi.<br />
Responsabilità per vizi<br />
Il diritto alla garanzia per vizi cade in<br />
prescrizione dopo 1 anno a partire dalla<br />
consegna. Il diritto alla garanzia per vizi<br />
non copre l’usura naturale, né i danni<br />
causati da uso errato o non conforme<br />
a destinazione, sforzo eccessivo, materiali<br />
inadeguati, né influssi di natura chimica,<br />
elettrochimica o elettrica non contemplati<br />
dal contratto. La garanzia per<br />
vizi perde validità in caso di modifiche<br />
o operazioni di manutenzione e riparazione<br />
eseguiti in modo non idoneo<br />
dall’acquirente o da terzi.<br />
italiano<br />
espanol<br />
francais<br />
english<br />
deutsch<br />
Prima delle operazioni di cura e manutenzione<br />
staccare sempre la spina dalla<br />
presa di corrente.<br />
un detergente delicato. Acqua e detergenti<br />
non devono penetrare all’interno<br />
dell’apparecchio.<br />
Pulire, preferibilmente senza bagnare,<br />
con un panno morbido o, al limite, con<br />
una spugna leggermente inumidita con<br />
Periodicamente lubrificare leggermente<br />
gli o-ring con grasso siliconico.<br />
86<br />
87
<strong>Drufosmart</strong><br />
14. Eliminazione di guasti<br />
Guasto<br />
L’apparecchio non<br />
funziona<br />
L’interruttore principale<br />
è acceso, l’elettronica<br />
non funziona<br />
Il pistone non scende.<br />
Il pistone è sceso,<br />
l’apparecchio non va<br />
in arresto automatico<br />
Il pistone non sale<br />
Causa<br />
Collegamento a rete<br />
non corretto<br />
Interruttore principale<br />
spento<br />
Fusibile per correnti<br />
deboli guasto<br />
Elettronica guasta<br />
Riscaldamento non è<br />
girato in fuori<br />
Pressione minima di<br />
2 bar non raggiunta<br />
Elettronica guasta<br />
Apparecchio senza aria<br />
compressa<br />
Tasto azionato in modo<br />
sbagliato<br />
La pressione non si<br />
è consumata<br />
Tasto guasto<br />
Soluzione<br />
Controllare il<br />
collegamento a rete<br />
Accendere l’interruttore<br />
principale<br />
Controllare ed eventualmente<br />
sostituire il fusibile<br />
per correnti deboli<br />
L’elettronica va controllata<br />
da un tecnico specializzato.<br />
Girare il riscaldamento<br />
in fuori<br />
Azionare più a lungo<br />
il meccanismo di scatto;<br />
vedi istruzioni<br />
L’elettronica va<br />
controllata da un<br />
tecnico specializzato<br />
Controllare la presa<br />
d’aria compressa;<br />
eventualmente collegare<br />
Mantenere premuto il<br />
tasto per 3 sec.<br />
Scaricare la pressione<br />
(vedi manuale)<br />
Il tasto va sostituito da<br />
un tecnico specializzato<br />
Guasto<br />
E’ possibile impostare<br />
l’elettronica, il riscaldamento<br />
non si avvia<br />
Il tempo di riscaldamento<br />
è in corso, ma<br />
l’apparecchio non<br />
riscalda<br />
Tempo di riscaldamento<br />
trascorso; il foglio, però,<br />
non è sufficientemente<br />
plastificato<br />
L’apparecchio non<br />
raggiunge la pressione<br />
preimpostata.<br />
L’apparecchio emette<br />
un rumore stridente<br />
durante il processo di<br />
termostampaggio<br />
Causa<br />
Riscaldatore per irraggiamento<br />
non girato<br />
correttamente in dentro<br />
Microinterruttore<br />
guasto<br />
Radiatore al quarzo<br />
guasto<br />
Termostato scattato<br />
Durata di vita radiatore<br />
al quarzo superata<br />
Tempo di riscaldamento<br />
troppo breve<br />
Pressione nel condotto<br />
troppo bassa<br />
Valvole di sfiato<br />
non chiuse<br />
Anello di tensione<br />
inserito male nella sede<br />
della placca<br />
Il tubetto di collegamento<br />
fra la valvola e<br />
il cilindro non tiene<br />
Soluzione<br />
Girare il riscaldatore<br />
per irraggiamento<br />
correttamente in dentro<br />
Il microinterruttore va<br />
sostituito da un tecnico<br />
specializzato<br />
Sostituire il radiatore al<br />
quarzo<br />
Sostituire il termostato<br />
Sostituire il radiatore al<br />
quarzo<br />
Prolungare il tempo<br />
di riscaldamento di<br />
5-10 sec.<br />
Aumentare la pressione<br />
nel condotto<br />
Chiudere le valvole<br />
di sfiato<br />
Posizionare<br />
correttamente l’anello<br />
di tensione<br />
L’apparecchio va<br />
controllato da un<br />
tecnico specializzato,<br />
eventualmente<br />
sostituire il tubetto<br />
italiano<br />
espanol<br />
francais<br />
english<br />
deutsch<br />
Elettrovalvola o<br />
elettronica guaste<br />
L’apparecchio va<br />
controllato da un<br />
tecnico specializzato<br />
88<br />
89
<strong>Drufosmart</strong><br />
15. Elenco delle parti di ricambio<br />
No. Nome Art. n°<br />
5 Manopola del riscaldamento D-6505519<br />
6 Vaschetta di inserto e disco nodoso 55591/50592<br />
7 Cassetto granulato 5565<br />
9 Valvola di riduzione della pressione 55637<br />
10 Manopola del piatto portaplacca D-6505519<br />
11 Piatto portaplacca D-6505512<br />
12 Valvola di sfiato 50761<br />
13 Anello di tensione 50038<br />
17 Corpo<br />
rosso<br />
55500rot<br />
argento<br />
55500silber<br />
19 Microinterruttore 55790<br />
20 Corpo del radiatore D-6505513<br />
21 Riscaldatore al quarzo a raggi infrarossi D-6505542<br />
22 Termofusibile 5542<br />
23 Asta braccio del radiatore 55773<br />
25 Elettrovalvola 52021-24<br />
26 Cilindro 52020<br />
27 Film adesivo di protezione del display 55820<br />
28 Lamiera di arresto piatto portaplacca xxxxx<br />
29 Sostegno piatto portaplacca D-6505514<br />
30 Asta piatto portaplacca sostegno 55772<br />
31 Disco di base 5511<br />
33 Presa di rete/interruttore 51208<br />
34 Leva di comando D-65885<br />
35 Leva di abbinamento/asse xxxxx<br />
36 Boccole di scorrimento 55708<br />
37 Interruttore della leva di comando 5521<br />
38 Interruttore del riscaldamento 50037<br />
39 Molla di ritorno 55861/55862<br />
40 Asse di leva 55847<br />
43 Interruttore principale 50841<br />
senza codice<br />
Cavo di alimentazione Europa 51021<br />
Cavo di alimentazione Inghilterra 51213 + 51021<br />
Cavo di alimentazione America 51207 + 51163<br />
Elettronica includente display, tastiera, cavo di collegamento 5540<br />
Fusibile F3, 15 AT 51321<br />
O-ring 112 x 3 mm 51077<br />
Gruppo cavetti elettrici completo 55520<br />
16. Explosionszeichung<br />
Explosion sketch<br />
Dessin d’explosion<br />
Despiece<br />
Vista esplosa<br />
italiano espanol francais english deutsch<br />
90<br />
91
<strong>Drufosmart</strong><br />
17. Wirkschaltplan<br />
Operating diagram<br />
Diagramme<br />
Plano de circuitos detallado<br />
Schema elettrico<br />
18. Pneumatikplan<br />
Pneumatic plan<br />
Plan pneumatique<br />
Plano neumático<br />
Schema pneumatico<br />
italiano<br />
espanol<br />
deutsch<br />
english<br />
francais<br />
92
<strong>Drufosmart</strong><br />
B&D Design 110909-MENGE-ARTIKELNR<br />
<strong>Dreve</strong> <strong>Dentamid</strong> GmbH · Max-Planck-Straße 31 · 59423 Unna/Germany<br />
Tel +49 2303 8807-0 · Fax: +49 2303 8807-55 · info@dreve.de · www.dreve.com