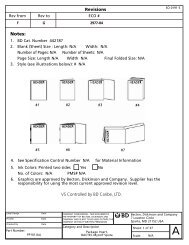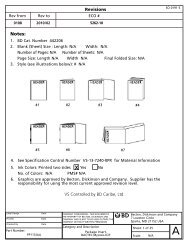
Revisions Notes: - BD
Revisions Notes: - BD
Revisions Notes: - BD

Create successful ePaper yourself
Turn your PDF publications into a flip-book with our unique Google optimized e-Paper software.
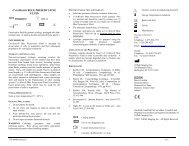
CLEARING PROCEDURE<br />
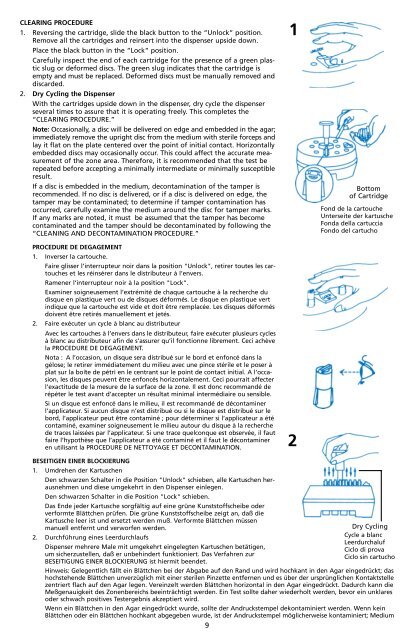
1. Reversing the cartridge, slide the black button to the “Unlock” position.<br />
Remove all the cartridges and reinsert into the dispenser upside down.<br />
Place the black button in the “Lock” position.<br />
Carefully inspect the end of each cartridge for the presence of a green plastic<br />
slug or deformed discs. The green slug indicates that the cartridge is<br />
empty and must be replaced. Deformed discs must be manually removed and<br />
discarded.<br />
2. Dry Cycling the Dispenser<br />
With the cartridges upside down in the dispenser, dry cycle the dispenser<br />
several times to assure that it is operating freely. This completes the<br />
“CLEARING PROCEDURE.”<br />
Note: Occasionally, a disc will be delivered on edge and embedded in the agar;<br />
immediately remove the upright disc from the medium with sterile forceps and<br />
lay it flat on the plate centered over the point of initial contact. Horizontally<br />
embedded discs may occasionally occur. This could affect the accurate measurement<br />
of the zone area. Therefore, it is recommended that the test be<br />
repeated before accepting a minimally intermediate or minimally susceptible<br />
result.<br />
If a disc is embedded in the medium, decontamination of the tamper is<br />
recommended. If no disc is delivered, or if a disc is delivered on edge, the<br />
tamper may be contaminated; to determine if tamper contamination has<br />
occurred, carefully examine the medium around the disc for tamper marks.<br />
If any marks are noted, it must be assumed that the tamper has become<br />
contaminated and the tamper should be decontaminated by following the<br />
“CLEANING AND DECONTAMINATION PROCEDURE.”<br />
PROCEDURE DE DEGAGEMENT<br />
1. Inverser la cartouche.<br />
Faire glisser l’interrupteur noir dans la position "Unlock", retirer toutes les cartouches<br />
et les réinsérer dans le distributeur à l’envers.<br />
Ramener l’interrupteur noir à la position "Lock".<br />
Examiner soigneusement l’extrémité de chaque cartouche à la recherche du<br />
disque en plastique vert ou de disques déformés. Le disque en plastique vert<br />
indique que la cartouche est vide et doit être remplacée. Les disques déformés<br />
doivent être retirés manuellement et jetés.<br />
2. Faire exécuter un cycle à blanc au distributeur<br />
Avec les cartouches à l’envers dans le distributeur, faire exécuter plusieurs cycles<br />
à blanc au distributeur afin de s’assurer qu’il fonctionne librement. Ceci achève<br />
la PROCEDURE DE DEGAGEMENT.<br />
Nota : A l’occasion, un disque sera distribué sur le bord et enfoncé dans la<br />
gélose; le retirer immédiatement du milieu avec une pince stérile et le poser à<br />
plat sur la boîte de pétri en le centrant sur le point de contact initial. A l’occasion,<br />
les disques peuvent être enfoncés horizontalement. Ceci pourrait affecter<br />
l’exactitude de la mesure de la surface de la zone. Il est donc recommandé de<br />
répéter le test avant d’accepter un résultat minimal intermédiaire ou sensible.<br />
Si un disque est enfoncé dans le milieu, il est recommandé de décontaminer<br />
l’applicateur. Si aucun disque n’est distribué ou si le disque est distribué sur le<br />
bord, l’applicateur peut être contaminé ; pour déterminer si l’applicateur a été<br />
contaminé, examiner soigneusement le milieu autour du disque à la recherche<br />
de traces laissées par l’applicateur. Si une trace quelconque est observée, il faut<br />
faire l’hypothèse que l’applicateur a été contaminé et il faut le décontaminer<br />
en utilisant la PROCEDURE DE NETTOYAGE ET DECONTAMINATION.<br />
1<br />
2<br />
Bottom<br />
of Cartridge<br />
Fond de la cartouche<br />
Unterseite der kartusche<br />
Fonda della cartuccia<br />
Fondo del cartucho<br />
BESEITIGEN EINER BLOCKIERUNG<br />
1. Umdrehen der Kartuschen<br />
Den schwarzen Schalter in die Position "Unlock" schieben, alle Kartuschen herausnehmen<br />
und diese umgekehrt in den Dispenser einlegen.<br />
Den schwarzen Schalter in die Position "Lock" schieben.<br />
Das Ende jeder Kartusche sorgfältig auf eine grüne Kunststoffscheibe oder<br />
verformte Blättchen prüfen. Die grüne Kunststoffscheibe zeigt an, daß die<br />
Kartusche leer ist und ersetzt werden muß. Verformte Blättchen müssen<br />
manuell entfernt und verworfen werden.<br />
2. Durchführung eines Leerdurchlaufs<br />
Dispenser mehrere Male mit umgekehrt eingelegten Kartuschen betätigen,<br />
um sicherzustellen, daß er unbehindert funktioniert. Das Verfahren zur<br />
BESEITIGUNG EINER BLOCKIERUNG ist hiermit beendet.<br />
Dry Cycling<br />
Cycle a blanc<br />
Leerdurchaluf<br />
Ciclo di prova<br />
Ciclo sin cartucho<br />
Hinweis: Gelegentlich fällt ein Blättchen bei der Abgabe auf den Rand und wird hochkant in den Agar eingedrückt; das<br />
hochstehende Blättchen unverzüglich mit einer sterilen Pinzette entfernen und es über der ursprünglichen Kontaktstelle<br />
zentriert flach auf den Agar legen. Vereinzelt werden Blättchen horizontal in den Agar eingedrückt. Dadurch kann die<br />
Meßgenauigkeit des Zonenbereichs beeinträchtigt werden. Ein Test sollte daher wiederholt werden, bevor ein unklares<br />
oder schwach positives Testergebnis akzeptiert wird.<br />
Wenn ein Blättchen in den Agar eingedrückt wurde, sollte der Andruckstempel dekontaminiert werden. Wenn kein<br />
Blättchen oder ein Blättchen hochkant abgegeben wurde, ist der Andruckstempel möglicherweise kontaminiert; Medium<br />
9