SR 595 CD Bedienungsanleitung/Garantie Stereo-Radio ... - Clatronic
SR 595 CD Bedienungsanleitung/Garantie Stereo-Radio ... - Clatronic
SR 595 CD Bedienungsanleitung/Garantie Stereo-Radio ... - Clatronic

Create successful ePaper yourself
Turn your PDF publications into a flip-book with our unique Google optimized e-Paper software.
5....-05-<strong>SR</strong> <strong>595</strong> <strong>CD</strong> neu 09.01.2004 11:06 Uhr Seite 34<br />
GB<br />
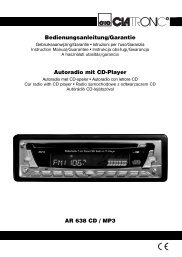
1 <strong>CD</strong> compartment<br />
2 Handle<br />
3 PROGRAM button<br />
(<strong>CD</strong> programming)<br />
4 I SKIP/SEARCH button<br />
(skip forwards)<br />
5 I SKIP/SEARCH button<br />
(skip backwards)<br />
6 LED display<br />
7 / II <strong>CD</strong> PLAY/PAUSE button<br />
8 <strong>CD</strong> STOP button<br />
9 Loudspeaker<br />
10 REPEAT button<br />
Overview of the Components<br />
11 PHONES (headphone connection)<br />
12 Tab for opening the <strong>CD</strong> compartment<br />
13 Station scale<br />
14 Regulator TUNING<br />
15 Band selection switch (FM<br />
ST/FM/AM)<br />
16 AC connection<br />
17 Battery compartment<br />
18 VHF/FM aerial<br />
19 POWER switch (AC/DC)<br />
20 Function selector<br />
(<strong>CD</strong>/POWER OFF/TUNER)<br />
21 VOLUME (volume control)<br />
Start-up of the device/introduction<br />
• Read the operating instructions thoroughly before the start-up!<br />
• Select an appropriate location for the device, e.g. a dry, flat, non-slip surface on<br />
which the device can be easily operated.<br />
• Make sure that the device is adequately ventilated!<br />
Power supply<br />
Insert the mains plug (see battery compartment) into a correctly installed 230 volt,<br />
50 hertz shockproof socket. Please ensure that the mains voltage corresponds to<br />
the information on the type plate. Please ensure that during mains operation the<br />
POWER switch (19) on the back is turned to AC, and during battery operation to<br />
DC.<br />
Inserting the Batteries (not supplied)<br />
• Open the battery compartment lid (17) on the bottom by pressing simultaneously<br />
on the indentations and pushing the cover towards the back in the direction<br />
of the arrows.<br />
• Insert 8 batteries of type UM2/R14 1,5V (not supplied). Please ensure that the<br />
polarity is correct (see the inside of the battery compartment)! If the device is<br />
not used for a long period of time, remove the batteries to avoid the spilling of<br />
battery acid.<br />
• Close the battery compartment, making sure not to trap the mains lead.<br />
Note: Do not dispose of batteries in the domestic waste. Please return used batteries<br />
to the relevant collection points or the shop where they were bought.<br />
Never throw batteries into a fire.<br />
34