curvadora electrohidráulica electrohydraulic pipe bender - Ega Master
curvadora electrohidráulica electrohydraulic pipe bender - Ega Master
curvadora electrohidráulica electrohydraulic pipe bender - Ega Master

Create successful ePaper yourself
Turn your PDF publications into a flip-book with our unique Google optimized e-Paper software.
MANUAL DE INSTRUCCIONES<br />
OPERATING INSTRUCTIONS<br />
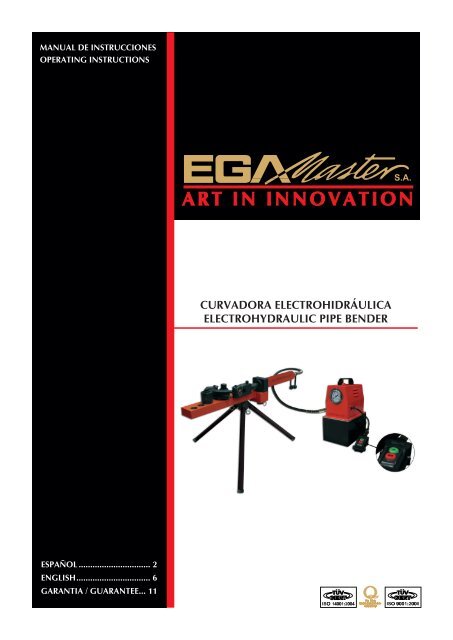
CURVADORA ELECTROHIDRÁULICA<br />
ELECTROHYDRAULIC PIPE BENDER<br />
ESPAÑOL................................ 2<br />
ENGLISH................................. 6<br />
GARANTIA / GUARANTEE.... 11
ESPAÑOL<br />
LEYENDA<br />
1. Cuerpo del curvatubos.<br />
2. Diábolo.<br />
3. Galleta.<br />
4. Cilindro.<br />
5. Manguera de acoples rápidos.<br />
6. Trípode.<br />
7. Bomba electro hidráulica.<br />
8. Mando para avance/retroceso del pistón.<br />
9. Pasador de seguridad.<br />
MONTAJE DEL CURVATUBOS<br />
1. Montar las patas con sus correspondientes pasadores de seguridad formando un trípode.<br />
2. Montar el cuerpo del curvatubos.<br />
3. Colocar el cilindro con su pasador de seguridad.<br />
4. Colocar las galletas guías adecuadas para el tubo que se desea curvar y el diábolo en el cuerpo<br />
del curvatubos.<br />
5. Conectar el curvatubos a la electro bomba mediante la manguera con los acoples rápidos,<br />
correctamente apretados para evitar fugas.<br />
6. Enchufar la bomba a la red eléctrica.<br />
7. El curvatubos está listo para ser utilizado.<br />
8. Desde el mando controlaremos el avance/retroceso del pistón.<br />
2
CÓMO PURGAR EL SISTEMA HIDRÁULICO<br />
Para purgar el sistema hay que retirar la carcasa exterior de<br />
la bomba y separar la placa con todos los componentes, del<br />
depósito de aceite. Una vez realizada esta acción quedará a la<br />
vista todo el sistema hidráulico de la bomba.<br />
Soltar el tornillo indicado en la imagen. También hay que<br />
sacar el muelle y la esfera metálica que se encuentran dentro del<br />
agujero del cual hemos retirado el tornillo.<br />
Una vez hecho esto, hay que introducir el chupón de aceite<br />
dentro de un recipiente con aceite hidráulico y poner la bomba<br />
en funcionamiento (con el botón de avance del pistón) hasta que<br />
salga aceite y el circuito deje de tener aire. El proceso de purga<br />
se debe realizar en un lugar adecuado y teniendo en cuenta que<br />
al poner en marcha la bomba, el aceite saldrá a presión por el<br />
orificio.<br />
La salida de aceite continua, indica que ya no queda aire en el circuito y que por lo tanto,<br />
podremos volver a montar la bomba.<br />
INSTRUCCIONES DE SEGURIDAD<br />
¡Atención! Cuide su seguridad.<br />
1. No utilice prendas colgantes que se puedan enganchar en los elementos en movimiento.<br />
2. Utilice siempre guantes.<br />
3. Emplee siempre los accesorios destinados a la máquina ya que sin su utilización puede resultar<br />
lesionado.<br />
4. No manipular ni utilizar la máquina desde la zona delantera (zona de curvado de tubo) cuando<br />
esté en funcionamiento. El usuario siempre se debe situar en la zona trasera (zona del pistón<br />
hidráulico).<br />
5. Colocar siempre la pata delantera perfectamente alineada con el pistón hidráulico para<br />
garantizar la seguridad durante el uso.<br />
CARACTERÍSTICAS TÉCNICAS<br />
Capacidad 3/8” – 1.1/2”<br />
Inox/acero<br />
hasta 4.5mm<br />
Presión de trabajo<br />
9 Tm<br />
Voltaje/Frecuencia<br />
cod. 60090 230V/50Hz<br />
cod. 60091 110V/60Hz<br />
Peso<br />
150kg aprox.<br />
3
MANTENIMIENTO<br />
- Es muy importante verificar el nivel del aceite.<br />
- Se recomienda cambiar el aceite periódicamente, si se trabaja en ambientes sucios y se<br />
realizan continuas conexiones y desconexiones de mangueras (por lo menos una vez al año).<br />
- Antes de añadir el aceite es recomendable filtrarlo para eliminar impurezas.<br />
- Tanto el cable como el enchufe deben encontrarse en condiciones óptimas. Examínelos<br />
periódicamente.<br />
- También es recomendable sustituir la junta de estanqueidad cuando ésta se encuentre<br />
deteriorada.<br />
- En caso de trabajar en ambientes corrosivos o agresivos proteja la máquina y límpiela<br />
regularmente.<br />
¡¡IMPORTANTE!!<br />
- Antes de realizar cualquier trabajo en la máquina, desconectar el enchufe de la toma de<br />
corriente.<br />
- Las reparaciones se deben hacer por personal especializado.<br />
SOLUCIÓN A POSIBLES PROBLEMAS<br />
Problema Causa Solución<br />
El motor<br />
eléctrico no<br />
gira.<br />
1. La unidad no está conectada.<br />
2. Rotura de la cubierta del cable o<br />
defectos en el cordón o terminal de<br />
conexiones.<br />
3. Defectos en enchufe<br />
4. Sobrecalentamiento del motor.<br />
5. Motor defectuoso<br />
1. Conectar la unidad a la red.<br />
2. Reemplazar las partes defectuosas.<br />
3. Verificar y reemplazar, si es<br />
necesario.<br />
4. Dejar enfriar el motor antes de<br />
arrancarlo nuevamente.<br />
5. Reparar o reemplazar el motor.<br />
Problema Causa Solución<br />
El vástago<br />
avanza<br />
parcialmente o<br />
erráticamente.<br />
1. Nivel demasiado bajo.<br />
2. Aflojamiento de la manguera de<br />
conexión entre la bomba y el<br />
curvatubos.<br />
3. Aire en el sistema.<br />
4. Suciedad en la bomba o filtros.<br />
5. Aceite helado o demasiado espeso. (El<br />
aceite hidráulico tiene una viscosidad<br />
más alta que la necesaria.)<br />
6. La válvula de alivio a baja presión<br />
descarga.<br />
7. Baja presión por desgaste.<br />
1. Rellenar de aceite mediante un<br />
embudo con el vástago retraído<br />
hasta alcanzar el nivel.<br />
2. Verificar el conexionado y apretarlo<br />
si es necesario. Verificar el<br />
aflojamiento en los acoples.<br />
3. Purgar el sistema o la línea de<br />
succión, si es necesario.<br />
4. Limpiar el filtro de la bomba, y si<br />
es necesario, desmantelar la bomba<br />
e inspeccionar y limpiar todas sus<br />
partes.<br />
5. Cambie a una viscosidad más baja.<br />
6. Reajustar según la necesidad.<br />
7. Reparar o reemplazarlas piezas<br />
necesarias.<br />
4
Problema Causa Solución<br />
La bomba<br />
no levanta<br />
presión.<br />
1. Fallo en el manómetro.<br />
2. Verificar las fugas externas.<br />
1. Calibrar el manómetro o cambiarlo si<br />
es necesario.<br />
2. Averiguar cualquier fuga en los<br />
acoples.<br />
NOTAS<br />
¡IMPORTANTE!<br />
El fabricante no se responsabiliza de los daños o mal funcionamiento de la máquina en caso de<br />
que no se use correctamente o se haya utilizado para trabajos para los que no está diseñada.<br />
Según la directiva sobre residuos eléctricos de aparatos eléctricos y electrónicos<br />
(RAEE), éstos deberán recogerse y tratarse por separado. Si en el futuro tiene que deshacerse de<br />
este producto, no se deshaga de él junto con la basura doméstica. Póngase en contacto con su<br />
distribuidor para proceder a su reciclaje de manera gratuita cuando sea posible.<br />
GARANTÍA<br />
El fabricante garantiza al comprador de ésta máquina la garantía total durante 12 meses de las<br />
piezas con defectos de fabricación.<br />
Esta garantía no cubre aquellas piezas que por su uso normal tienen un desgaste.<br />
Nota: para obtener la validez de la garantía, es absolutamente imprescindible que complete y<br />
remita al fabricante el documento de “CERTIFICADO DE GARANTIA”, dentro de los siete dias a<br />
partir de la fecha de compra.<br />
5
ENGLISH<br />
LEGEND<br />
1. Body of <strong>pipe</strong> vender.<br />
2. Resting forms.<br />
3. Forms.<br />
4. Cylinder.<br />
5. Hose with quick fittings.<br />
6. Tripod.<br />
7. Electro-hydraulic pump.<br />
8. Control to forward/reverse the piston.<br />
9. Safety spindle.<br />
PIPE BENDER ASSEMBLY<br />
1. 1. Assemble the legs with their corresponding safety spindle forming a tripod.<br />
2. Assemble the body of the <strong>pipe</strong> <strong>bender</strong>.<br />
3. Put the cylinder with its safety spindle.<br />
4. Put the correct forms for the <strong>pipe</strong> that it is needed to bend and put also the resting forms in the<br />
body of the <strong>pipe</strong> <strong>bender</strong>.<br />
5. Connect the <strong>pipe</strong> <strong>bender</strong> to the electro pump through the hose with quick fittings, properly tight<br />
to prevent escape.<br />
6. Plug in the bomb to the power supply.<br />
7. Pipe <strong>bender</strong> is ready to be used.<br />
8. Regulate the forward/reverse of the piston from the control.<br />
6
HOW TO PURGE THE HYDRAULIC SYSTEM<br />
To purge the system it is needed to remove the housing of the<br />
pump and to separate the plate with all components of the oil<br />
deposit. Once this action has been done, all the hydraulic system<br />
of the pump can be seen. Release the screw indicated in the<br />
picture. It is also necessary release the spring and the spherical<br />
metal which are inside the hole where we have removed the<br />
screw. Once this has been done, introduce the piece where the<br />
pump takes oil from in a recipient with hydraulic oil and put<br />
the pump into operation (with the forward button of the piston)<br />
until oil goes out and the circuit give up of having air. The purge<br />
process has to make in the right place. It is important to know<br />
that when the pump starts working, the oil is going to get out on<br />
pressure through the hole.<br />
The continuous oil output indicates that there is no air in the circuit and that therefore, it<br />
will be able to return to mount the pump.<br />
SAFETY INSTRUCTIONS<br />
Attention! Be careful.<br />
1. Do not wear loose clothing. They could be caught by moving parts of the machine.<br />
2. Always wear gloves.<br />
3. Always use the machine´s accessories because if you don´t do it, could lead to risk of personal<br />
injury.<br />
4. Don’t use or manipulate the machine standing in front of it (<strong>pipe</strong> welding area). User should<br />
always stand at the back of the machine (hydraulic piston area).<br />
5. Place always the forward supporting leg perfectly lined with the hydraulic piston to guarantee<br />
the use safety.<br />
TECHNICAL SPECIFICATIONS<br />
Capacity 3/8” – 1.1/2”<br />
Inox/Steel<br />
until 4.5mm<br />
Work pressure<br />
9 Tm<br />
Voltaje/Frecuency<br />
cod. 60090 230V/50Hz<br />
cod. 60091 110V/60Hz<br />
Weight<br />
150kg aprox.<br />
7
MAINTENANCE<br />
- It is very important to check the oil level.<br />
- It is recommended to change the oil periodically, if it works in dirty environments and if it is<br />
done in continuous connections and disconnections of hose (at least once a year).<br />
- Before adding the oil, it is recommended to filter to eliminate impurities.<br />
- Both the cable and the plug must be in optimal conditions. Inspect them regularly.<br />
- It is also recommended to change the gasket when this is spoiled.<br />
- In case of work in corrosive or aggressive environments protect the machine and clean it<br />
regularly.<br />
IMPORTANT!<br />
- Before doing any work on the machine, disconnect the plug from the power point.<br />
- Repairs should be done by specialized personal.<br />
POSSIBLE SOLUTION TO PROBLEMS<br />
Problem Cause Solution<br />
The electric<br />
motor does not<br />
spin.<br />
1. 1. The unit is not connect<br />
2. Breakage of the cable cover or defects<br />
in the bead or terminal connections<br />
3. Defects in the plug<br />
4. Overheating of the engine<br />
5. Faulty engine<br />
1. 1. Connect the unit to the power<br />
point<br />
2. Replace the defective parts<br />
3. Check and replace, if necessary<br />
4. Allow the engine to cool before<br />
starting again<br />
5. Repair or replace the engine.<br />
Problem Cause Solution<br />
The piston<br />
rod moves<br />
erratically or<br />
partially.<br />
1. Too low level<br />
2. Loosening of the connecting hose<br />
between the pump and the <strong>pipe</strong><br />
<strong>bender</strong><br />
3. Air in the system<br />
4. Dirt on the pump or filters<br />
5. Frozen oil or oil too thick (The<br />
hydraulic oil has a higher viscosity<br />
than necessary)<br />
6. Low pressure by wear.<br />
1. Fill with oil through a funnel with the<br />
piston rod retracted until reaching<br />
the level<br />
2. Check the connections and tighten<br />
if necessary. Check the loosening of<br />
fittings.<br />
3. Purge the system or the suction line,<br />
if necessary<br />
4. Clean the pump filter, and if<br />
necessary, to dismantle the pump<br />
and inspect and clean all their parts.<br />
5. Change to a lower viscosity<br />
6. Repair or replacement the needed<br />
parts.<br />
8
Problem Cause Solution<br />
The pump<br />
does not raise<br />
pressure.<br />
1. Fault in the gauge<br />
2. Check the external leaks.<br />
1. Calibrate the pressure gauge or<br />
replace it if necessary<br />
2. Find out any leak in the fittings.<br />
NOTES<br />
IMPORTANT!<br />
The maker will not take responsibility for damage or malfunction as a result of the machine<br />
being incorrectly used or, applied for a purpose for which it was not intended.<br />
According to Waste Electrical and Electronic Equipment directive (WEEE), these ones must<br />
be collected and arranged separately. If you have to throw them out, please, do not use the usual<br />
rubbish. Please, contact your distributor for free recycling.<br />
GUARANTEE<br />
The maker guarantees to the machine owner 12 months against any manifacture defect.<br />
This guaranteee do not cover the parts wich are consumables.<br />
Note: to apply the guarantee its necesary to send the “GUARANTEE CERTIFICATE” duly filled<br />
within one week after purchased the machine to the maker.<br />
9
CERTIFICADO DE GARANTIA<br />
GUARANTEE CERTIFICATE<br />
CERTIFICAT DE GARANTIE<br />
ARTICULO / ITEM / ARTICLE:.....................................................................................................................<br />
Nº DE SERIE / SERIE Nº / Nº SERIE:............................................................................................................<br />
DISTRIBUIDOR / DISTRIBUTOR / DISTRIBUTEUR:....................................................................................<br />
PAIS / COUNTRY / PAYS:..............................................................................TEL.:....................................<br />
FECHA DE VENTA / SALE DATE / DATE VENTE:.........................................................................................<br />
NOMBRE DEL COMPRADOR / BUYER NAME / NOM DE L’ACHETEUR:...................................................<br />
TEL. COMPRADOR / BUYER TEL. / TEL. DE L’ACHETEUR:.........................................................................<br />
EGA MASTER GARANTIZA AL COMPRADOR DE ESTA MAQUINA LA GARANTIA TOTAL (DURANTE 12 MESES), DE LAS PIEZAS CON DEFECTOS DE FABRICACION. ESTA<br />
GARANTIA NO CUBRE AQUELLAS PIEZAS QUE POR SU USO NORMAL TIENEN UN DESGASTE. PARA OBTENER LA VALIDEZ DE LA GARANTIA , ES ABSOLUTAMENTE<br />
IMPRESCINDIBLE QUE COMPLETE Y REMITA ESTE DOCUMENTO A EGA MASTER , DENTRO DE LOS SIETE DIAS A PARTIR DE LA FECHA DE COMPRA.<br />
EGA MASTER GUARANTEES TO THE BUYER OF THIS MACHINE THE TOTAL WARRANTY (DURING 12 MONTHS), OF THE PIECES WITH MANUFACTURING FAULTS.<br />
THIS GUARANTEE DOES NOT COVER THOSE PIECES WORN OUT DUE TO A NORMAL USE. IN ORDER TO OBTAIN THE VALIDITY OF THIS WARRANTY , IT IS<br />
ABSOLUTELY NECESSARY TO FULFILL THIS DOCUMENT AND RESEND IT TO EGA MASTER WITHIN 7 DAYS FROM SALE DATE.<br />
EGA MASTER GARANTIE A L’ACHETEUR DE CETTE MACHINE LA GARANTIE TOTALE (PENDANT 12 MOIS) DES PIECES AVEC DEFAUTS DE FABRICATION. CETTE GARANTIE<br />
NE COUVRE PAS LES PIECES QUE PAR UN USAGE NORMAL, SOIENT DETERIOREES. POUR OBTENIR LA VALIDITE DE LA GARANTIE, IL EST ABSOLUMENT IMPERATIF<br />
COMPLETER ET ENVOYER CE DOCUMENT EGA MASTER, DANS UN DELAI DE 7 JOURS A PARTIR DE LA DATE D’ACHAT.<br />
SELLO / STAMP / CACHET<br />
EJEMPLAR PARA EGA MASTER / COPY FOR EGA MASTER / EXEMPLAIRE POUR EGA MASTER<br />
CERTIFICADO DE GARANTIA<br />
GUARANTEE CERTIFICATE<br />
CERTIFICAT DE GARANTIE<br />
ARTICULO / ITEM / ARTICLE:.....................................................................................................................<br />
Nº DE SERIE / SERIE Nº / Nº SERIE:............................................................................................................<br />
DISTRIBUIDOR / DISTRIBUTOR / DISTRIBUTEUR:....................................................................................<br />
PAIS / COUNTRY / PAYS:..............................................................................TEL.:....................................<br />
FECHA DE VENTA / SALE DATE / DATE VENTE:.........................................................................................<br />
NOMBRE DEL COMPRADOR / BUYER NAME / NOM DE L’ACHETEUR:...................................................<br />
TEL. COMPRADOR / BUYER TEL. / TEL. DE L’ACHETEUR:.........................................................................<br />
EGA MASTER GARANTIZA AL COMPRADOR DE ESTA MAQUINA LA GARANTIA TOTAL (DURANTE 12 MESES), DE LAS PIEZAS CON DEFECTOS DE FABRICACION. ESTA<br />
GARANTIA NO CUBRE AQUELLAS PIEZAS QUE POR SU USO NORMAL TIENEN UN DESGASTE. PARA OBTENER LA VALIDEZ DE LA GARANTIA , ES ABSOLUTAMENTE<br />
IMPRESCINDIBLE QUE COMPLETE Y REMITA ESTE DOCUMENTO A EGA MASTER , DENTRO DE LOS SIETE DIAS A PARTIR DE LA FECHA DE COMPRA.<br />
EGA MASTER GUARANTEES TO THE BUYER OF THIS MACHINE THE TOTAL WARRANTY (DURING 12 MONTHS), OF THE PIECES WITH MANUFACTURING FAULTS.<br />
THIS GUARANTEE DOES NOT COVER THOSE PIECES WORN OUT DUE TO A NORMAL USE. IN ORDER TO OBTAIN THE VALIDITY OF THIS WARRANTY , IT IS<br />
ABSOLUTELY NECESSARY TO FULFILL THIS DOCUMENT AND RESEND IT TO EGA MASTER WITHIN 7 DAYS FROM SALE DATE.<br />
EGA MASTER GARANTIE A L’ACHETEUR DE CETTE MACHINE LA GARANTIE TOTALE (PENDANT 12 MOIS) DES PIECES AVEC DEFAUTS DE FABRICATION. CETTE GARANTIE<br />
NE COUVRE PAS LES PIECES QUE PAR UN USAGE NORMAL, SOIENT DETERIOREES. POUR OBTENIR LA VALIDITE DE LA GARANTIE, IL EST ABSOLUMENT IMPERATIF<br />
COMPLETER ET ENVOYER CE DOCUMENT EGA MASTER, DANS UN DELAI DE 7 JOURS A PARTIR DE LA DATE D’ACHAT.<br />
SELLO / STAMP / CACHET<br />
EJEMPLAR PARA EL CLIENTE / COPY FOR THE CUSTOMER / EXEMPLAIRE POUR LE CLIENT
C/ ZORROLLETA 11, POL. IND. JUNDIZ<br />
01015 VITORIA, SPAIN P.O.B. APTDO. 5005<br />
TEL. 34 - 945 290 001 FAX. 34 - 945 290 141<br />
master@egamaster.com<br />
www.egamaster.com