Pliko P3 “CLASSICO”
Pliko P3 “CLASSICO”
Pliko P3 “CLASSICO”
Create successful ePaper yourself
Turn your PDF publications into a flip-book with our unique Google optimized e-Paper software.
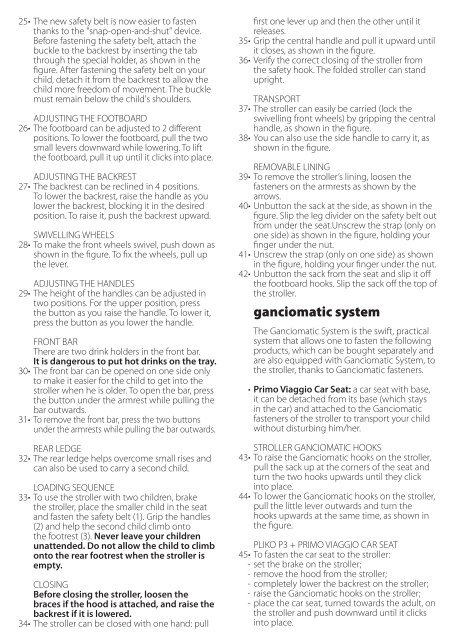
25• The new safety belt is now easier to fasten<br />
thanks to the "snap-open-and-shut" device.<br />
Before fastening the safety belt, attach the<br />
buckle to the backrest by inserting the tab<br />
through the special holder, as shown in the<br />
figure. After fastening the safety belt on your<br />
child, detach it from the backrest to allow the<br />
child more freedom of movement. The buckle<br />
must remain below the child's shoulders.<br />
ADJUSTING THE FOOTBOARD<br />
26• The footboard can be adjusted to 2 different<br />
positions. To lower the footboard, pull the two<br />
small levers downward while lowering. To lift<br />
the footboard, pull it up until it clicks into place.<br />
ADJUSTING THE BACKREST<br />
27• The backrest can be reclined in 4 positions.<br />
To lower the backrest, raise the handle as you<br />
lower the backrest, blocking it in the desired<br />
position. To raise it, push the backrest upward.<br />
SWIVELLING WHEELS<br />
28• To make the front wheels swivel, push down as<br />
shown in the figure. To fix the wheels, pull up<br />
the lever.<br />
ADJUSTING THE HANDLES<br />
29• The height of the handles can be adjusted in<br />
two positions. For the upper position, press<br />
the button as you raise the handle. To lower it,<br />
press the button as you lower the handle.<br />
FRONT BAR<br />
There are two drink holders in the front bar.<br />
It is dangerous to put hot drinks on the tray.<br />
30• The front bar can be opened on one side only<br />
to make it easier for the child to get into the<br />
stroller when he is older. To open the bar, press<br />
the button under the armrest while pulling the<br />
bar outwards.<br />
31• To remove the front bar, press the two buttons<br />
under the armrests while pulling the bar outwards.<br />
REAR LEDGE<br />
32• The rear ledge helps overcome small rises and<br />
can also be used to carry a second child.<br />
LOADING SEQUENCE<br />
33• To use the stroller with two children, brake<br />
the stroller, place the smaller child in the seat<br />
and fasten the safety belt (1). Grip the handles<br />
(2) and help the second child climb onto<br />
the footrest (3). Never leave your children<br />
unattended. Do not allow the child to climb<br />
onto the rear footrest when the stroller is<br />
empty.<br />
CLOSING<br />
Before closing the stroller, loosen the<br />
braces if the hood is attached, and raise the<br />
backrest if it is lowered.<br />
34• The stroller can be closed with one hand: pull<br />
first one lever up and then the other until it<br />
releases.<br />
35• Grip the central handle and pull it upward until<br />
it closes, as shown in the figure.<br />
36• Verify the correct closing of the stroller from<br />
the safety hook. The folded stroller can stand<br />
upright.<br />
TRANSPORT<br />
37• The stroller can easily be carried (lock the<br />
swivelling front wheels) by gripping the central<br />
handle, as shown in the figure.<br />
38• You can also use the side handle to carry it, as<br />
shown in the figure.<br />
REMOVABLE LINING<br />
39• To remove the stroller’s lining, loosen the<br />
fasteners on the armrests as shown by the<br />
arrows.<br />
40• Unbutton the sack at the side, as shown in the<br />
figure. Slip the leg divider on the safety belt out<br />
from under the seat.Unscrew the strap (only on<br />
one side) as shown in the figure, holding your<br />
finger under the nut.<br />
41• Unscrew the strap (only on one side) as shown<br />
in the figure, holding your finger under the nut.<br />
42• Unbutton the sack from the seat and slip it off<br />
the footboard hooks. Slip the sack off the top of<br />
the stroller.<br />
ganciomatic system<br />
The Ganciomatic System is the swift, practical<br />
system that allows one to fasten the following<br />
products, which can be bought separately and<br />
are also equipped with Ganciomatic System, to<br />
the stroller, thanks to Ganciomatic fasteners.<br />
• Primo Viaggio Car Seat: a car seat with base,<br />
it can be detached from its base (which stays<br />
in the car) and attached to the Ganciomatic<br />
fasteners of the stroller to transport your child<br />
without disturbing him/her.<br />
STROLLER GANCIOMATIC HOOKS<br />
43• To raise the Ganciomatic hooks on the stroller,<br />
pull the sack up at the corners of the seat and<br />
turn the two hooks upwards until they click<br />
into place.<br />
44• To lower the Ganciomatic hooks on the stroller,<br />
pull the little lever outwards and turn the<br />
hooks upwards at the same time, as shown in<br />
the figure.<br />
PLIKO <strong>P3</strong> + PRIMO VIAGGIO CAR SEAT<br />
45• To fasten the car seat to the stroller:<br />
- set the brake on the stroller;<br />
- remove the hood from the stroller;<br />
- completely lower the backrest on the stroller;<br />
- raise the Ganciomatic hooks on the stroller;<br />
- place the car seat, turned towards the adult, on<br />
the stroller and push downward until it clicks<br />
into place.


