Create successful ePaper yourself
Turn your PDF publications into a flip-book with our unique Google optimized e-Paper software.
English Dart User <strong>Manual</strong><br />
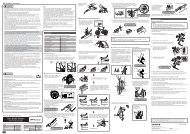
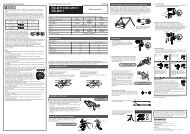
Fork installation<br />
It is extremely <strong>important</strong> that your RockShox fork is installed correctly by a qualified bicycle mechanic.<br />
improperly installed forks are extremely dangerous and can result in severe and/or fatal injuries.<br />
1. Remove the existing fork from the bicycle and the crown race from the fork. Measure the length of<br />
the fork steerer tube against the length of the RockShox steerer tube. The RockShox steerer tube<br />
may need cutting to the proper length. Make sure there is sufficient length to clamp the stem (refer<br />
to the stem manufacturer’s instructions).<br />
.<br />
3.<br />
4.<br />
5.<br />
w a r n i n g<br />
DO NOT ADD THREADS TO ROCKSHOX THREADLESS STEERERS<br />
THE STEERER TUBE CROWN ASSEMBLY IS A ONE-TIME PRESS FIT.<br />
REPLACEMENT OF THE ASSEMBLY MUST BE DONE TO CHANGE THE<br />
LENGTH, DIAMETER OR HEADSET TYPE (THREADED OR THREADLESS).<br />
DO NOT REMOVE OR REPLACE THE STEERER TUBE. THIS COULD RESULT<br />
IN THE LOSS OF CONTROL OF THE BICYCLE WITH POSSIBLE SERIOUS<br />
AND/OR FATAL INJURIES.<br />
Install the headset crown race (29.9mm for 1 1/8” steerers) firmly against the top of the fork crown.<br />
Install the fork assembly on the bike. Adjust the headset until you feel no play or drag.<br />
Install the brakes according to the manufacturer’s instructions and adjust brake pads properly. Use<br />
the fork only with disc style brakes mounted through the provided mounting holes. Do not use any<br />
cantilever brake other than those intended by the brake manufacturer to work with a hangerless<br />
brace.<br />
Forks designed for standard quick releases: adjust the front wheel quick release to clear the<br />
dropout’s counter bore. The quick release nut must be tightened after the wheel is properly seated<br />
into the dropout’s counter bore. Make sure four or more threads are engaged in the quick release<br />
nut when it is closed. Orient the quick release lever in front of and parallel to the lower tube in the<br />
locked position.<br />
Keep in mind tire clearance as you choose tires. Maximum size is .3” wide installed. Be sure to<br />
check this diameter whenever you change tires. To do this, remove the top caps and spring stack<br />
assemblies and <strong>com</strong>press the fork <strong>com</strong>pletely to make sure at least 5 mm of clearance exists<br />
between the top of the inflated tire and the bottom of the crown. Exceeding maximum tire size will<br />
cause the tire to jam against the crown when the fork is fully <strong>com</strong>pressed.<br />
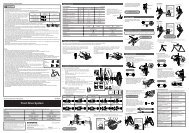
PoPloC reMote installation<br />
The PopLoc Remote Lockout lever allows the rider to control the movement of their suspension fork<br />
without removing their hands from the handlebars. Specific left and right PopLocs are available.<br />
If needed, remove the grip, brake lever, and shifter from the handlebar. If you are unfamiliar with the<br />
removal of these items, please consult the manufacturer’s instructions.<br />
1. Slide the Poploc onto the handlebar.<br />
. Re-install the shifter, brake lever, and grip on the handlebars. If you are unfamiliar with the<br />
installation of these items, please consult the manufacturer’s instructions. Always adhere to the<br />
re<strong>com</strong>mended torque specifications for these items.<br />
3. Position the PopLoc as desired on the handlebar and tighten the clamp bolt to 0 in-lb ( . 5 Nm)<br />
4. Forks with PopLoc Adjust: Turn the blue <strong>com</strong>pression adjustment dial counterclockwise until it stops.<br />
5. Press the release button on the PopLoc.<br />
6. Install the cable in the PopLoc.<br />
7. Install the cable into the housing.<br />
4 95-401 -306-000 Rev D<br />
Dart User <strong>Manual</strong><br />
English<br />
8. Feed the cable and housing into the cable stop on the fork crown.<br />
9. Gently pull on the cable and align it with the groove in the rotating cam of the Motion Control<br />
damper.<br />
10. Tighten the cable fixing bolt on the rotating cam to 8 in-lb (.9 Nm)<br />
note: for pushloc installation or pushloc with matchmaker installation, please refer to the instructions<br />
on our website at www.rockshox.<strong>com</strong>.<br />
PerForManCe tUning<br />
RockShox forks can be tuned for your particular weight, riding style,<br />
and terrain.<br />
setting sag<br />
Dart forks are designed to sag when you are sitting on your bike.<br />
Sag is the <strong>com</strong>pression of the fork caused by the rider’s weight.<br />
Proper sag allows the front wheel to follow the contour of the terrain<br />
as you ride.<br />
Sag is adjusted by turning the top cap preload adjuster (fig 1).<br />
Turning the adjuster clockwise increases spring preload (i.e.<br />
stiffening the spring) decreasing sag. Turning the adjuster counter<br />
Fig. 1<br />
clockwise decreases spring preload which increases sag.<br />
To measure sag, install a zip tie on the upper tube of the fork flush against the dust wiper. Sit on the bike<br />
with normal riding apparel. Step off the bike, and measure the distance between the dust wiper and the<br />
zip tie. This is your sag. Adjust the preload as needed to reach the re<strong>com</strong>mended sag.<br />
Coil sPring tUning<br />
travel re<strong>com</strong>mended sag<br />
80mm 1 - 0mm<br />
100mm 15- 5mm<br />
1 0mm 18-30mm<br />
Changing the sPring rate<br />
Spring rate is the amount of force needed to <strong>com</strong>press a spring one inch. Changing your fork’s coil<br />
spring for a spring of a higher or lower rate will alter the overall feel of your fork. Higher spring rates<br />
make the fork feel more “stiff”, while lower spring rates make the fork more “supple”. Contact your local<br />
RockShox dealer to order replacement springs.<br />
reboUnd daMPing<br />
external reboUnd adjUstMent (dart 2 with tUrnkey oPtion/dart 3)<br />
Rebound damping controls the speed at which a fork returns to its full extension following <strong>com</strong>pression.<br />
Located at the bottom of the right fork leg is the rebound adjuster knob. Turning the adjuster in the<br />
direction indicated by the “rabbit” on the rebound speed decal decreases rebound damping, causing<br />
the fork to return to full extension faster. Turning the adjuster in the direction indicated by the “turtle”<br />
increases rebound damping, slowing the return of the fork to full extension.<br />
Excessive rebound damping will cause the fork to “pack up” over successive bumps, reducing travel<br />
and causing the fork to bottom out. Set your fork to rebound as fast as possible without “topping out” or<br />
kicking back. This allows your fork to follow the contours of the trail, maximizing stability, traction and<br />
control.<br />
©SRAM Corporation • 007 5