
You also want an ePaper? Increase the reach of your titles
YUMPU automatically turns print PDFs into web optimized ePapers that Google loves.
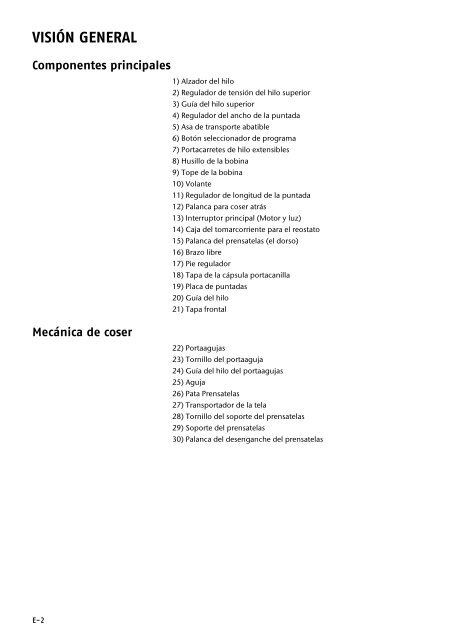
VISIÓN G<strong>EN</strong>ERAL<br />
Componentes principales<br />
Mecánica de coser<br />
E-2<br />
1) Alzador del hilo<br />
2) Regulador de tensión del hilo superior<br />
3) Guía del hilo superior<br />
4) Regulador del ancho de la puntada<br />
5) Asa de transporte abatible<br />
6) Botón seleccionador de programa<br />
7) Portacarretes de hilo extensibles<br />
8) Husillo de la bobina<br />
9) Tope de la bobina<br />
10) Volante<br />
11) Regulador de longitud de la puntada<br />
12) Palanca para coser atrás<br />
13) Interruptor principal (Motor y luz)<br />
14) Caja del tomarcorriente para el reostato<br />
15) Palanca del prensatelas (el dorso)<br />
16) Brazo libre<br />
17) Pie regulador<br />
18) Tapa de la cápsula portacanilla<br />
19) Placa de puntadas<br />
20) Guía del hilo<br />
21) Tapa frontal<br />
22) Portaagujas<br />
23) Tornillo del portaaguja<br />
24) Guía del hilo del portaagujas<br />
25) Aguja<br />
26) Pata Prensatelas<br />
27) Transportador de la tela<br />
28) Tornillo del soporte del prensatelas<br />
29) Soporte del prensatelas<br />
30) Palanca del desenganche del prensatelas
ÍNDICE<br />
Advertencias de seguridad . . . . . . . . . . . . . . . . . . . . . . . . . . 4<br />
Aprenda a conocer su aparato . . . . . . . . . . . . . . . . . . . . . . . 6<br />
Volumen de suministro . . . . . . . . . . . . . . . . . . . . . . . . . . . . . 6<br />
Contenido de la caja de accesorios . . . . . . . . . . . . . . . . . . . . . 7<br />
Conexiones eléctricas . . . . . . . . . . . . . . . . . . . . . . . . . . . . . . . 8<br />
Estabilidad de la máquina de coser . . . . . . . . . . . . . . . . . . . . . 8<br />
Regular la velocidad de costura . . . . . . . . . . . . . . . . . . . . . . . 8<br />
Colocar y retirar la base plana desmontable . . . . . . . . . . . . . . . 8<br />
Caja de accesorios . . . . . . . . . . . . . . . . . . . . . . . . . . . . . . . . . 8<br />
Tareas previas . . . . . . . . . . . . . . . . . . . . . . . . . . . . . . . . . . 9<br />
Devanar la bobina del hilo inferior . . . . . . . . . . . . . . . . . . . . . 9<br />
Retirar la cápsula portacanilla . . . . . . . . . . . . . . . . . . . . . . . 11<br />
Enhebrar la cápsula portacanilla . . . . . . . . . . . . . . . . . . . . . . 11<br />
Colocar la cápsula portacanilla . . . . . . . . . . . . . . . . . . . . . . . 12<br />
Enhebrar el hilo superior . . . . . . . . . . . . . . . . . . . . . . . . . . . 12<br />
Extraer el hilo inferior . . . . . . . . . . . . . . . . . . . . . . . . . . . . . 14<br />
Ajustes . . . . . . . . . . . . . . . . . . . . . . . . . . . . . . . . . . . . . . 15<br />
Ajuste de la tensión del hilo . . . . . . . . . . . . . . . . . . . . . . . . . 15<br />
Comprobar la tensión del hilo . . . . . . . . . . . . . . . . . . . . . . . 16<br />
Coser . . . . . . . . . . . . . . . . . . . . . . . . . . . . . . . . . . . . . . . 17<br />
Aspectos generales . . . . . . . . . . . . . . . . . . . . . . . . . . . . . . . 17<br />
Selección de la aguja adecuada . . . . . . . . . . . . . . . . . . . . . . 17<br />
Elevar y bajar el prensatelas . . . . . . . . . . . . . . . . . . . . . . . . . 17<br />
Protector de los dedos . . . . . . . . . . . . . . . . . . . . . . . . . . . . . 18<br />
Coser hacia atrás . . . . . . . . . . . . . . . . . . . . . . . . . . . . . . . . . 18<br />
Retirar la tela de la máquina de coser . . . . . . . . . . . . . . . . . . 18<br />
Cambiar la dirección de costura . . . . . . . . . . . . . . . . . . . . . . 18<br />
Cortar el hilo . . . . . . . . . . . . . . . . . . . . . . . . . . . . . . . . . . . 18<br />
Botón seleccionador de programa . . . . . . . . . . . . . . . . . . . . . 19<br />
Ajuste de la longitud de la puntada . . . . . . . . . . . . . . . . . . . 19<br />
Ajuste del ancho de la puntada . . . . . . . . . . . . . . . . . . . . . . 19<br />
Tipos de puntada (programas) . . . . . . . . . . . . . . . . . . . . . . . 19<br />
Ojales . . . . . . . . . . . . . . . . . . . . . . . . . . . . . . . . . . . . . . . . 23<br />
Coser botones y ojetes . . . . . . . . . . . . . . . . . . . . . . . . . . . . . 24<br />
Coser cremalleras . . . . . . . . . . . . . . . . . . . . . . . . . . . . . . . . 25<br />
Hacer dobladillos . . . . . . . . . . . . . . . . . . . . . . . . . . . . . . . . 25<br />
Zurcir . . . . . . . . . . . . . . . . . . . . . . . . . . . . . . . . . . . . . . . . . 26<br />
Bordar . . . . . . . . . . . . . . . . . . . . . . . . . . . . . . . . . . . . . . . . 27<br />
Coser con una aguja gemela . . . . . . . . . . . . . . . . . . . . . . . . . 28<br />
Coser con el brazo libre . . . . . . . . . . . . . . . . . . . . . . . . . . . . 29<br />
La guía de bordes . . . . . . . . . . . . . . . . . . . . . . . . . . . . . . . . 29<br />
La guía para enguatar . . . . . . . . . . . . . . . . . . . . . . . . . . . . . 29<br />
Mantenimiento, cuidado y limpieza . . . . . . . . . . . . . . . . . . 30<br />
Cambiar la lámpara de coser . . . . . . . . . . . . . . . . . . . . . . . . 30<br />
Cambiar la aguja . . . . . . . . . . . . . . . . . . . . . . . . . . . . . . . . . 30<br />
Retirar y colocar la pata prensatelas . . . . . . . . . . . . . . . . . . . 31<br />
Retirar y colocar el soporte de la pata prensatelas . . . . . . . . . 32<br />
Cuidado de la máquina de coser . . . . . . . . . . . . . . . . . . . . . . 32<br />
Lubricar la máquina . . . . . . . . . . . . . . . . . . . . . . . . . . . . . . 34<br />
Averías . . . . . . . . . . . . . . . . . . . . . . . . . . . . . . . . . . . . . . 38<br />
Tabla de telas, hilos y agujas . . . . . . . . . . . . . . . . . . . . . . . 40<br />
Eliminación . . . . . . . . . . . . . . . . . . . . . . . . . . . . . . . . . . . 41<br />
Especificaciones técnicas . . . . . . . . . . . . . . . . . . . . . . . . . . 41<br />
Índice de palabras clave . . . . . . . . . . . . . . . . . . . . . . . . . . 42<br />
E-3<br />
E
ADVERT<strong>EN</strong>CIAS DE SEGURIDAD<br />
Acerca de las presentes instrucciones<br />
No permita que los niños toquen aparatos eléctricos<br />
E-4<br />
¡Antes de la primera puesta en funcionamiento lea detenidamente las presentes instrucciones<br />
de funcionamiento y ante todo observe las advertencias de seguridad!<br />
Todas las acciones en este aparato o con el mismo sólo se pueden realizar en la medida<br />
en que estén descritas en las presentes instrucciones de uso.<br />
¡En caso de que alguna vez le entregue el aparato a una tercera persona, debe entregarle<br />
también las presentes instrucciones de funcionamiento!<br />
Los niños desconocen los peligros que pueden surgir del uso de<br />
aparatos eléctricos.<br />
No permita que los niños utilicen la máquina de coser sin vigilancia.<br />
Piense que las agujas pueden causar también heridas si la máquina<br />
no está conectada a la red.<br />
Mantenga también alejados de los niños los embalajes. Existe el peligro<br />
de asfixia.<br />
Este aparato no ha sido concebido para ser utilizado por personas<br />
(incluyendo niños) con discapacidad física, sensorial o psíquica, o<br />
por aquellas que no tengan la suficiente experiencia o conocimientos,<br />
a no ser que, para su propia seguridad, sean supervisadas<br />
por una persona responsable o reciban de ella las<br />
correspondientes instrucciones sobre su utilización.<br />
Cable de la toma de corriente y conexión a la red<br />
Conecte el equipo en una toma de corriente bien accesible<br />
(230 V ~ 50 Hz) y cercana al emplazamiento de la máquina. Para<br />
que el aparato pueda desconectarse rápidamente de la corriente, el<br />
enchufe debe permanecer accesible.<br />
Cuando desconecte la máquina de la red, tire siempre de la clavija<br />
y no del cable.<br />
Durante el funcionamiento desenrolle siempre el cable completamente.<br />
El cable de la red y el alargador deben estar tendidos siempre de tal<br />
forma que nadie pueda tropezar con ellos.<br />
El cable no debe tocar ninguna superficie caliente.<br />
Para efectuar las siguientes tareas, desconecte la máquina de coser<br />
y desenchúfela de la red: Enhebrar, cambiar la aguja, ajustar el<br />
prensatelas, cambiar la lámpara, tareas de limpieza y de mantenimiento,<br />
al terminar de coser y al interrumpir el trabajo.<br />
Nunca efectúe Usted mismo la reparación del aparato<br />
En caso de desperfectos en el aparato o la toma de corriente, desenchúfelo<br />
inmediatamente.<br />
No se debe usar el aparato en caso de daños visibles de la máquina<br />
de coser o del cable de la toma de corriente para evitar peligros.<br />
No intente en ningún caso abrir y/o arreglar Usted mismo el aparato.<br />
¡Existe el peligro de recibir una descarga eléctrica! En caso de mal<br />
funcionamiento del aparato, diríjase a nuestro servicio de reparación<br />
o a otro taller especializado.
Si el cable de conexión está dañado, el fabricante o su servicio de<br />
postventa, o una persona similarmente cualificada, deberá sustituirlo<br />
a fin de evitar accidentes.<br />
Indicaciones básicas<br />
¡No se debe mojar la máquina de coser, existe el peligro de recibir<br />
una descarga eléctrica!<br />
No deje la máquina de coser encendida sin vigilancia.<br />
Nunca utilice el aparato al aire libre.<br />
Solamente se debe hacer funcionar la máquina con el pedal del tipo<br />
KD 2902 suministrado.<br />
Manejo seguro del aparato<br />
Coloque la máquina de coser sobre una superficie firme y lisa.<br />
Durante el funcionamiento, las aberturas de aire deben quedar libres:<br />
No permita que nada (p.ej., polvo, restos de hilo, etc.) entre en<br />
las aberturas.<br />
Utilice exclusivamente los accesorios suministrados.<br />
Para engrasar utilice solamente aceites especiales para máquinas de<br />
coser. No utilice otros líquidos.<br />
Tenga cuidado al mover las piezas movibles de la máquina, especialmente<br />
la aguja. ¡También existe el peligro de lesionarse cuando<br />
la máquina no esté conectada a la red eléctrica!<br />
Al coser preste atención a no meter los dedos debajo del tornillo<br />
que sujeta la aguja.<br />
No utilice agujas deformadas o despuntadas.<br />
Al coser no sujete la tela y no tire de la misma. Las agujas pueden<br />
romperse.<br />
Al terminar las tareas de costura, coloque la aguja siempre en su posición<br />
más elevada.<br />
Limpieza y protección<br />
Antes de limpiar el aparato, desconéctelo de la red. Para limpiarlo,<br />
emplee un paño seco y suave. Evite emplear detergentes y productos<br />
químicos de limpieza, puesto que podrían dañar las superficies<br />
y las inscripciones del aparato.<br />
Para guardar la máquina de coser, cúbrala siempre con la capucha<br />
cobertora que la protege contra el polvo.<br />
E-5<br />
E
APR<strong>EN</strong>DA A CONOCER SU APARATO<br />
Volumen de suministro<br />
E-6<br />
Cuando desembale la caja, asegúrese de que están incluidos los siguientes<br />
artículos:<br />
1)Máquina de coser<br />
2)Base plana desmontable con caja de accesorios<br />
3)Reóstato (pedal)<br />
4) Portabobina para hilos overlock<br />
Las siguientes piezas sin ilustración:<br />
• Capucha cobertora<br />
• Instrucciones de funcionamiento y documentos de garantía
Contenido de la caja de accesorios<br />
1) Prensatelas estándar (puntada recta/puntada zigzag)<br />
(ya montado)<br />
2) Suela dobladilladora<br />
3) Prensatelas, suela ojales<br />
4) Prensatelas, suela cremalleras<br />
5) Prensatelas, suela para coser botones<br />
6) Guía de bordes<br />
7) Guía para enguatar<br />
8) Bastidor para bordar<br />
9) Bobina de recambio (3 unidades)<br />
10) Protector de los dedos (ya montado)<br />
11) Fieltro para el portacarretes de hilo (2 unidades)<br />
12) Surtido de agujas<br />
13) Aceitera<br />
14) Destornillador (grande)<br />
15) Destornillador (pequeño)<br />
16) Cuchilla para descoser<br />
E-7<br />
E
Conexiones eléctricas<br />
Estabilidad de la máquina de coser<br />
Regular la velocidad de costura<br />
Colocar y retirar la base plana desmontable<br />
Caja de accesorios<br />
E-8<br />
El interruptor de corriente conecta la máquina y también la bombilla.<br />
• Enchufe la clavija de acoplamiento del reóstato (pedal) suministrado<br />
en la caja del tomacorriente de la máquina y a continuación<br />
la clavija de la red en la toma de corriente.<br />
Utilice solamente el reóstato (pedal) tipo KD 2902 suministrado.<br />
Después de las tareas de costura o antes de los trabajos de mantenimiento,<br />
desenchufe siempre la máquina de la toma de corriente.<br />
Con el pie regulador (17) se puede ajustar la estabilidad de la máquina<br />
de coser.<br />
• Gire el pie regulador hacia la derecha para bajarlo, o hacia la izquierda<br />
para subirlo.<br />
• Ajuste el pie de tal forma que la máquina de coser esté nivelada<br />
sobre la superficie de trabajo y no se tambalee.<br />
La velocidad de costura se regula mediante el reóstato (pedal). Se<br />
puede cambiar la velocidad de costura, apretando el reóstato (pedal)<br />
con más o menos presión.<br />
La máquina se suministra con una base plana desmontable ya colocada.<br />
• La base plana desmontable se retira empujándola cuidadosamente<br />
hacia la izquierda.<br />
• Para colocar la base plana desmontable, acérquela cuidadosamente<br />
a la máquina y empújela hacia la derecha hasta que oiga<br />
que queda encajada.<br />
La caja de accesorios está integrada en la base plana desmontable.<br />
• Para abrir la caja, abra la tapa de la base plana y así tendrá acceso<br />
a los accesorios.
TAREAS PREVIAS<br />
Devanar la bobina del hilo inferior<br />
Las bobinas del hilo inferior se pueden devanar rápida y fácilmente<br />
con la máquina de coser.<br />
Para ello introduzca el hilo del carrete de hilo a través de la guía de<br />
hilo hasta la bobina.<br />
El procedimiento exacto para el devanado lo encontrará en los siguientes<br />
puntos:<br />
• coloque el interruptor del volante (10) sobre el símbolo de la canilla<br />
para evitar que la aguja se mueva durante el devanado.<br />
• Saque completamente uno de los portacarretes (7) y coloque un<br />
carrete de hilo.<br />
• Ahora introduzca el hilo del carrete, como se indica en la figura,<br />
a través de la guía del hilo.<br />
• Enhebre el extremo del hilo, como se indica en la figura, a través<br />
del agujero de la bobina y bobine el hilo manualmente, dando<br />
algunas vueltas sobre la bobina.<br />
E-9<br />
E
E-10<br />
• Coloque la bobina sobre el husillo de la bobina (8), encontrándose<br />
el extremo del hilo arriba sobre la bobina. Gire el husillo de<br />
bobina (8) hacia la derecha contra el tope de la bobina (9) hasta<br />
que oiga que queda encajado.<br />
• Sujete el extremo del hilo y pise el reóstato (pedal). En cuanto la<br />
bobina esté un poco devanada suelte el extremo del hilo. Rebobine<br />
hasta que el husillo de bobina (8) se detenga automáticamente.<br />
• Gire el husillo de bobina (8) hacia la izquierda y retire la bobina.<br />
• Corte el hilo.<br />
• Vuelva a colocar el interruptor del volante sobre el símbolo de la<br />
aguja. Ahora la aguja vuelve a moverse cuando Usted pisa el reóstato<br />
(pedal).<br />
Si al devanar la distribución del hilo fuese irregular, tiene la posibilidad<br />
de regular la altura de la guía de hilos:<br />
• Abrir la tapa frontal (21)<br />
• Aflojar el tornillo (B) para regular la altura de la guía de hilos (A).
Retirar la cápsula portacanilla<br />
• Retire la base plana desmontable.<br />
• Coloque tanto la aguja, girando el volante (10), como el prensatelas<br />
en la posición más elevada y abra la tapa de la cápsula<br />
portacanilla (18) como se indica en la figura.<br />
• Abra la palanca basculante de la cápsula portacanilla y retírela de<br />
la máquina.<br />
• Cuando se suelta la palanca basculante, la canilla cae por sí sola<br />
de la cápsula portacanilla.<br />
Enhebrar la cápsula portacanilla<br />
• Sujete la canilla entre el pulgar y el índice de su mano derecha y<br />
deje que cuelguen 15 cm del hilo.<br />
• Sujete la cápsula portacanilla con su mano izquierda e introduzca<br />
la canilla en la cápsula portacanilla.<br />
• Introduzca el extremo del hilo en la ranura del borde de la cápsula<br />
portacanilla.<br />
• Ahora lleve el hilo por debajo del muelle tensor e introdúzcalo<br />
en el agujero para el hilo. Asegúrese de que aprox. 15 cm del hilo<br />
cuelgan de la canilla.<br />
E-11<br />
E
Colocar la cápsula portacanilla<br />
Enhebrar el hilo superior<br />
E-12<br />
• Sujete la cápsula portacanilla de tal forma que el dedo de la cápsula<br />
señale hacia arriba. Abra la palanca basculante de la cápsula<br />
portacanilla.<br />
• Coloque la cápsula portacanilla sobre la espiga central y empuje<br />
la cápsula cuidadosamente hacia adentro, hasta que el dedo de<br />
la cápsula portacanilla entre en el anillo de la lanzadera.<br />
• Suelte la tapa y empújela sobre la cápsula portacanilla.<br />
• Cierre la tapa de la cápsula portacanilla (18).<br />
Les rogamos que lean las siguientes instrucciones con atención ya<br />
que un orden incorrecto o una conducción incorrecta del hilo puede<br />
causar rupturas de hilo, saltos de puntada o arregazar la tela.<br />
En la tapa frontal (21) se ve otra vez la representación esquemática<br />
de la conducción del hilo; oriéntese también con ayuda del dibujo.<br />
• Antes de enhebrar, coloque la aguja girando el volante (10) y la<br />
palanca del prensatelas (15) en la posición más elevada.<br />
• Coloque un carrete de hilo sobre uno de los portacarretes (7),<br />
para lo cual el hilo debe llegar desde detrás del carrete de hilo.<br />
• Sujete el carrete de hilo con la mano derecha.
• Ahora lleve el hilo por debajo de la guía del hilo superior (3), tal<br />
y como se indica.<br />
• A continuación deje que el hilo pase entre los discos de tensión<br />
del regulador de tensión del hilo superior (2), como se indica.<br />
CONSEJO<br />
Una tensión del hilo superior de 3 es ideal para la mayoría de aplicaciones.<br />
• Lleve el hilo por debajo de la guía de hilo frontal hacia arriba; con<br />
ello se empuja el resorte guía interior automáticamente hacia arriba.<br />
• Enhebre el hilo desde la derecha hacia la izquierda en el gancho<br />
del alzador de hilo (1).<br />
ADVERT<strong>EN</strong>CIA<br />
Si fuera necesario, gire el volante (10) para elevar el alzador de hilo<br />
hasta arriba.<br />
• Ahora vuelva a llevar el hilo hacia abajo en dirección de la aguja;<br />
con ello el hilo se colocará a través de la guía interior de hilo y de<br />
la guía de hilo del portaagujas.<br />
• Ahora enhebre el hilo desde delante hacia atrás a través del ojo<br />
de la aguja y deje que sobre un extremo de hilo de aprox. 10 cm.<br />
E-13<br />
E
Extraer el hilo inferior<br />
E-14<br />
• Coloque el prensatelas (26) hacia arriba.<br />
Gire el volante (10) con la mano derecha hacia Usted hasta que<br />
la aguja se mueva hacia abajo y luego nuevamente hacia arriba.<br />
Detenga el volante (10) en cuanto la aguja se encuentre en su<br />
posición más elevada.<br />
Sujete el extremo del hilo superior con su mano izquierda.<br />
Tire del hilo superior suavemente hacia arriba para que el hilo inferior<br />
forme un lazo.<br />
• Extraiga aprox. 10 cm de ambos hilos por debajo del<br />
prensatelas (26) hacia atrás.
AJUSTES<br />
Ajuste de la tensión del hilo<br />
Si al coser se rompe el hilo, la tensión del hilo está demasiado alta.<br />
Si al coser se forman pequeños bucles, la tensión del hilo está demasiado<br />
baja.<br />
En ambos casos se debe ajustar la tensión del hilo.<br />
Para ello la tensión del hilo superior e inferior deben estar en una relación<br />
correcta.<br />
Regulación de la tensión del hilo superior<br />
La tensión se produce mediante los discos por los que se conduce<br />
el hilo. La presión sobre estos discos la controla el regulador de tensión<br />
del hilo superior (2).<br />
Cuanto más alto es el número, más fuerte es la tensión.<br />
ADVERT<strong>EN</strong>CIA<br />
Una tensión del hilo superior de nivel 3 es ideal para la mayoría de<br />
las tareas de costura.<br />
La tensión del hilo superior solamente es activada cuando se baja el<br />
prensatelas.<br />
Existen varias razones por las que se debe regular la tensión. Por<br />
ejemplo, la tensión para telas diferentes debe ser también diferente.<br />
La tensión necesaria depende de la solidez y el grosor de la tela, de<br />
cuantas capas de tela se desea coser y de que tipo de puntada se elija.<br />
Por favor, preste atención a que las tensiones del hilo superior e inferior<br />
sean uniformes ya que en caso contrario se puede arregazar<br />
la tela.<br />
Le recomendamos que realice una costura de prueba sobre un resto<br />
de tela antes de cada tarea de costura.<br />
Regulación de la tensión del hilo inferior<br />
La tensión del hilo inferior se tiene que regular raras veces ya que<br />
ésta ha sido ajustada por el fabricante para realizar tareas de costura<br />
generales.<br />
La tensión del hilo inferior es la correcta si se puede extraer el hilo<br />
fácilmente con una pequeña resistencia del carrete.<br />
No obstante, para telas ligeras o gruesas se debe regular el hilo inferior.<br />
La tensión del hilo inferior se ajusta mediante el tornillo de ajuste de<br />
la cápsula portacanilla. Para el ajuste utilice el destornillador pequeño<br />
suministrado.<br />
Retire la cápsula portacanilla:<br />
Tensión baja:<br />
Girar el tornillo contra el sentido de las agujas del reloj<br />
Tensión elevada:<br />
Girar el tornillo en el sentido de las agujas del reloj.<br />
E-15<br />
E
Comprobar la tensión del hilo<br />
E-16<br />
Comprobar la tensión del hilo inferior<br />
La manera más fácil de comprobar la tensión del hilo inferior consiste<br />
en coser una puntada zig-zag mediana sobre la tela que desea<br />
coser.<br />
Para ello utilice la aguja y los hilos adecuados.<br />
Será especialmente visible si se utilizan hilos de diferentes colores<br />
para el hilo superior e inferior.<br />
Cosa solamente algunas puntadas zig-zag.<br />
La tensión del hilo es la correcta si el hilo inferior no es visible en la<br />
cara superior de la tela.<br />
Preste atención a que se cosan siempre puntadas uniformes (véase<br />
la figura a la izquierda).<br />
Costura correcta<br />
El ajuste correcto de la tensión de los hilos superior e inferior debería<br />
ser la justa para que los entrelazados de los hilos se encuentren en<br />
el centro de la tela.<br />
La tela queda lisa y no forma pliegues.<br />
Costuras irregulares<br />
El hilo superior está demasiado tenso y tira del hilo inferior hacia arriba.<br />
El hilo inferior aparece en el lado superior de la tela.<br />
Solución:<br />
Bajar la tensión del hilo superior girando el regulador del hilo<br />
superior (2) a un número inferior.<br />
El hilo superior está demasiado suelto. El hilo inferior tira del hilo superior<br />
hacia abajo. El hilo superior aparece en el lado inferior de la<br />
tela.<br />
Solución:<br />
Aumentar la tensión del hilo superior girando el regulador del hilo<br />
superior (2) a un número superior.<br />
En ambos casos de costura irregular, tal vez debería regular también<br />
la tensión del hilo inferior.
COSER<br />
Aspectos generales<br />
Conecte el interruptor principal (13) .<br />
Al terminar las tareas de costura, coloque la aguja siempre en su posición<br />
más elevada. Introduzca la tela suficientemente por debajo<br />
del prensatelas (26). Deje que los hilos superior e inferior sobresalgan<br />
aprox. 10 cm hacia atrás.<br />
Bajar la palanca del prensatelas (15). Mientras sujeta el hilo con su<br />
mano izquierda, gire el volante (10) hacia Usted y lleve la aguja al<br />
punto de la tela donde desea comenzar a coser.<br />
Accione el reóstato (pedal); cuanto más lo pise , más rápido funciona<br />
la máquina. Al coser guíe la tela suavemente con la mano. Cosa<br />
algunas puntadas hacia atrás accionando la palanca de coser hacia<br />
atrás (12), para fijar las primeras puntadas de la costura.<br />
CONSEJO<br />
Si no está seguro de si, por ejemplo, la tensión del hilo o el tipo de<br />
puntada son correctos, haga una prueba de los ajustes en una muestra<br />
de tela.<br />
La tela se desliza automáticamente por debajo del prensatelas (26):<br />
no se debe sujetar o tirar la tela con las manos sino solamente guiarla<br />
ligeramente para que la costura quede en la dirección que Usted<br />
desea.<br />
Selección de la aguja adecuada<br />
El número que indica el grosor de la aguja se indica en el vástago.<br />
Cuanto más alto es el número, más fuerte es la aguja.<br />
ADVERT<strong>EN</strong>CIA<br />
No emplee bajo ningún concepto una aguja que está deformada o<br />
despuntada.<br />
Elevar y bajar el prensatelas<br />
Al elevar o bajar la palanca del prensatelas (15) la pata<br />
prensatelas (26) se eleva o baja.<br />
Para poder utilizar telas más gruesas se puede elevar un poco la<br />
pata prensatelas (26) para conseguir un juego adicional.<br />
E-17<br />
E
Protector de los dedos<br />
Coser hacia atrás<br />
Retirar la tela de la máquina de coser<br />
Cambiar la dirección de costura<br />
Cortar el hilo<br />
E-18<br />
Este accesorio le protege para que la mano no vaya accidentalmente<br />
debajo de la aguja.<br />
Cosa hacia atrás para reforzar el comienzo y el final de una costura.<br />
• Presione hacia abajo la palanca para coser hacia atrás (12) y<br />
manténgala presionada.<br />
• Accione el reóstato (pedal); cuanto más lo pise , más rápido<br />
funciona la máquina.<br />
• Si desea volver a cambiar a la puntada hacia delante, suelte la palanca<br />
para coser hacia atrás (12).<br />
Finalice siempre las tareas de coser de forma que la aguja se encuentre<br />
en la posición más elevada. Para retirar la tela, eleve la pata<br />
prensatelas (26) y retire la tela hacia atrás.<br />
Si desea cambiar la dirección de costura en las esquinas de la pieza<br />
a coser, siga los siguientes pasos:<br />
• Detenga la máquina y gire el volante (10) hacia Usted hasta que<br />
la aguja se encuentre dentro de la tela.<br />
• Eleve la pata prensatelas (26).<br />
• Gire la tela alrededor de la aguja para modificar la dirección<br />
según desee.<br />
• Vuelva a bajar la pata prensatelas (26) y siga cosiendo.<br />
Corte el hilo con el cortador de hilo que hay detrás de la pata<br />
prensatelas (26) o con unas tijeras. Deje que cuelguen aprox. 15<br />
cm del hilo desde el ojo de la aguja.
Botón seleccionador de programa<br />
Con esta máquina de coser dispone Usted de una selección de diferentes<br />
puntadas de uso o de adorno. Con el botón selector de<br />
programa (6) puede ajustar el tipo de puntada deseada.<br />
• Antes de cambiar el tipo de puntada asegúrese siempre de que<br />
la aguja se encuentre en la posición más elevada.<br />
Las letras del botón selector de programa corresponden a las letras<br />
que se encuentran encima de las figuras del tipo de puntada.<br />
• Gire el botón selector de programa de tal forma que el tipo de<br />
puntada se encuentre en la marca deseada.<br />
CONSEJO<br />
Si la máquina no cosiese según el programa de costura deseado,<br />
gire el botón selector (6) una vez completamente; a continuación<br />
vuelva al tipo de puntada deseado.<br />
Ajuste de la longitud de la puntada<br />
Con el regulador de longitud de puntada (11) se puede seleccionar<br />
la longitud del dibujo de la puntada.<br />
• Gire el regulador de longitud de puntada de tal forma que el número<br />
de la longitud de puntada deseada se encuentre en la marca.<br />
• Los números indican la longitud de puntada aproximada en milímetros.<br />
Cuanto menor es el número, más corta es la puntada.<br />
Ajuste del ancho de la puntada<br />
Con el regulador del ancho de la puntada (4) se puede seleccionar<br />
el ancho de una puntada zigzag o la de un diseño de la puntad.<br />
• Ajuste 0: Puntada recta.<br />
• Ajuste 1-5: Diferentes anchos de las puntadas de diseño.<br />
ADVERT<strong>EN</strong>CIA<br />
Si se utiliza la aguja gemela coloque el ancho de la puntada a máximo<br />
3. En caso de un ajuste superior las agujas podrían romperse.<br />
Tipos de puntada (programas)<br />
Los tipos de puntada se ajustan mediante el botón selector de<br />
programa (6). Preste siempre atención a que la aguja se encuentre<br />
en la posición más elevada antes de realizar un cambio de tipo de<br />
puntada.<br />
Antes de cada aplicación de un programa de puntada realice una<br />
prueba de costura en una muestra de tela.<br />
ADVERT<strong>EN</strong>CIA<br />
Para colocar o retirar la pata prensatelas, rogamos que lea<br />
página 31.<br />
Puntada recta<br />
Apropiada para coser de forma general o para pespuntear.<br />
Prensatelas:. . . . . . . . . . . . . . . . . . . . . . . . . . . . . .suela estándar<br />
Programa:. . . . . . . . . . . . . . . . . . . . . . . . . . . . . . . . . . . . . . . A<br />
Longitud de puntada: . . . . . . . . . . . . . . . . . . . . . . . . . . . . . 1 a 4<br />
Ancho de la puntada:. . . . . . . . . . . . . . . . . . . . . . . . . . . . . . . 0<br />
E-19<br />
E
E-20<br />
Puntada zig-zag<br />
La puntada zig-zag es una de las puntadas más utilizadas. Esta puntada<br />
permite muchas posibilidades de aplicación, como p.ej., ribetear,<br />
coser aplicaciones y monogramas.<br />
Antes de utilizar la puntada zig-zag, cosa unas puntadas rectas para<br />
reforzar la costura.<br />
Prensatelas: . . . . . . . . . . . . . . . . . . . . . . . . . . . . suela estándar<br />
Programa: . . . . . . . . . . . . . . . . . . . . . . . . . . . . . . . . . . . . . . . A<br />
Longitud de puntada:. . . . . . . . . . . . . . . . . . . . . . . . . 0,5 hasta 4<br />
Ancho de la puntada: . . . . . . . . . . . . . . . . . . . . . . . . . 1 hasta 5<br />
Si utiliza una aguja gemela, utilice solamente los programas de punto<br />
B y C.<br />
CONSEJOS PARA PUNTADAS ZIG-ZAG<br />
Para conseguir mejores puntadas zig-zag, la tensión del hilo superior<br />
debe ser más suelta que en el caso de las puntadas rectas.<br />
Se debería poder ver ligeramente el hilo superior en la cara inferior<br />
de la tela.<br />
Puntada de satín<br />
La llamada puntada de satín es una puntada zig-zag muy ajustada;<br />
es especialmente adecuada para aplicaciones, monogramas y diferentes<br />
puntadas de adorno.<br />
Selección de programa como en caso de la puntada zig-zag normal.<br />
Prensatelas: . . . . . . . . . . . . . . . . . . . . . . . . . . . . suela estándar<br />
Programa: . . . . . . . . . . . . . . . . . . . . . . . . . . . . . . . . . . . . . . . A<br />
Longitud de puntada:. . . . . . . . . . . . . . . . . . . . . . . . . 0,5 hasta 2<br />
Ancho de la puntada: . . . . . . . . . . . . . . . . . . . . . . . . . 1 hasta 2<br />
CONSEJO<br />
Siempre que desee utilizar esta puntada, debería tener en cuenta<br />
que la tensión del hilo superior estuviese ligeramente suelta. Cuanto<br />
más ancha deba ser la puntada, más suelta debería estar la tensión<br />
del hilo superior. Al coser telas muy finas o suaves se debería<br />
colocar papel fino debajo de la tela y coserlo juntamente con la tela.<br />
Así se evita la omisión de puntadas y que la tela se arregace.<br />
Zigzag con tres puntadas<br />
Con este tipo de puntada se pude sobrecoser los bordes rudos.<br />
Prensatelas: . . . . . . . . . . . . . . . . . . . . . . . . . . . . suela estándar<br />
Programa: . . . . . . . . . . . . . . . . . . . . . . . . . . . . . . . . . . . . . . . B<br />
Longitud de puntada:. . . . . . . . . . . . . . . . . . . . . . . . . . 1 hasta 3<br />
Ancho de la puntada: . . . . . . . . . . . . . . . . . . . . . . . . . . . . . . 3-5<br />
Dobladillo ciego<br />
Prensatelas: . . . . . . . . . . . . . . . . . . . . . . . . . . . . suela estándar<br />
Programa: . . . . . . . . . . . . . . . . . . . . . . . . . . . . . . . . . . . . . . . C<br />
Longitud de puntada:. . . . . . . . . . . . . . . . . . . . . . . . . . 1 hasta 3<br />
Ancho de la puntada: . . . . . . . . . . . . . . . . . . . . . . . . . . . . . . 3-5
Puntada invisible<br />
Referente al denominado ribeteo invisible<br />
Prensatelas:. . . . . . . . . . . . . . . . . . . . . . . . . . . . . suela estándar<br />
Programa:. . . . . . . . . . . . . . . . . . . . . . . . . . . . . . . . . . . . . . . D<br />
Longitud de puntada: . . . . . . . . . . . . . . . . . . . . . . . . . . 1 hasta 3<br />
Ancho de la puntada: . . . . . . . . . . . . . . . . . . . . . . . . . . . . . . 5<br />
Utilice el mismo color de hilo que el de la tela.<br />
En caso de telas muy ligeras o transparentes utilice un hilo de nylon<br />
transparente.<br />
• Doble la tela como se indica en la figura.<br />
• Cosa el pliegue como se indica. La puntada recta debería encontrarse<br />
sobre el dobladillo, y las puntas de las puntadas zig-zag<br />
solamente deberían penetrar en el pliegue superior de la tela.<br />
• Ahora retire la tela de la máquina y alísela.<br />
La tela desdoblada muestra ahora una puntada invisible en el dobladillo.<br />
Puntada elástica:<br />
Triple puntada recta elástica, puntada zig-zag triple<br />
Utilice estos tipos de puntada para coser telas elásticas o genero tejido,<br />
coser cintas de goma, etc.<br />
La triple puntada elástica da una costura recta especialmente sólida,<br />
p.ej., para costuras de la entrepierna, insertos para mangas, fundas<br />
para edredones, etc.; es treces veces más fuerte que una costura<br />
normal y también mucho más elástica. Gracias a ello se puede extender<br />
esta costura junto con la tela sin que el hilo se rompa.<br />
Prensatelas:. . . . . . . . . . . . . . . . . . . . . . . . . . . . . suela estándar<br />
Programa:. . . . . . . . . . . . . . . . . . . . . . . . . . . . . . . . . . . . . . . E<br />
Longitud de puntada: . . . . . . . . . . . . . . . . . . . . . . . . . . . . . . . . 4<br />
Ancho de la puntada: . . . . . . . . . . . . . . . . . . . . . . . . . 0 hasta 5<br />
Coser todos los tipos de telas elásticas<br />
Utilice un hilo sintético. Con él la costura se hace casi invisible.<br />
Juntar cosiendo dos piezas de tela (roturas)<br />
Con la puntada elástica se pueden unir dos cantos abiertos.<br />
• Coloque los dos bordes de tela debajo de la pata prensatelas.<br />
Preste atención a que los dos bordes queden juntos y que la aguja<br />
penetre a la derecha e izquierda de forma uniforme.<br />
Coser cintas elásticas<br />
• Coloque la cinta elástica sobre el punto deseado.<br />
• Coser la cinta elástica con la puntada elástica, tirando de la cinta<br />
con las manos por delante y por detrás de la pata prensatelas.<br />
Cuanto más fuerte es la tensión, más comprimido será el fruncido.<br />
E-21<br />
E
E-22<br />
Puntada de rombo<br />
Se puede aplicar la puntada de rombo de uso múltiple y de forma<br />
decorativa, p.ej., para coser encajes o cintas elásticas o para coser<br />
sobre material elástico.<br />
Prensatelas: . . . . . . . . . . . . . . . . . . . . . . . . . . . . suela estándar<br />
Programa: . . . . . . . . . . . . . . . . . . . . . . . . . . . . . . . . . . . . . . . F<br />
Longitud de puntada:. . . . . . . . . . . . . . . . . . . . . . . . . . . . . . . . 4<br />
Ancho de la puntada: . . . . . . . . . . . . . . . . . . . . . . . . . . . . . . . 5<br />
Le rogamos que para trabajos de rombo tenga en cuenta lo siguiente:<br />
Frunza el material a coser de forma uniforme.<br />
Debajo de los fruncidos coloque una cinta de tela estrecha y<br />
sobrecósala con una puntada de rombo.<br />
Termine de coser el trabajo de rombo antes de introducir la pieza así<br />
adornada en toda la prenda.<br />
En caso de telas muy ligeras se puede obtener el mismo efecto, devanando<br />
un hilo elástico sobre el carrete.<br />
Puntada de sobrehilado-overlock<br />
Esta puntada es especialmente adecuada para coser y remendar jerséis<br />
y chándales. Esta puntada es decorativa y útil. Consiste en<br />
líneas laterales lisas con uniones transversales y es totalmente elástica.<br />
Prensatelas: . . . . . . . . . . . . . . . . . . . . . . . . . . . . . suela estándar<br />
Programa: . . . . . . . . . . . . . . . . . . . . . . . . . . . . . . . . . . . . . . G<br />
Longitud de puntada:. . . . . . . . . . . . . . . . . . . . . . . . . . . . . . . . 4<br />
Ancho de la puntada: . . . . . . . . . . . . . . . . . . . . . . . . . . . . . . . 5<br />
Coloque el borde de la tela debajo de la pata prensatelas de tal manera<br />
que la aguja cosa puntadas rectas con la desviación derecha y<br />
justo toque el borde de la tela; y de tal manera que se cosa con la<br />
desviación izquierda una puntada zig-zag.<br />
Puntadas de bordado de adorno<br />
Los programas H hasta R ofrecen una gran variedad de puntos de<br />
adorno.<br />
Prensatelas: . . . . . . . . . . . . . . . . . . . . . . . . . . . . suela estándar<br />
Longitud de puntada programas H hasta K: . . . . . . . . . . . . . . . . 4<br />
Longitud de puntada programas L hasta R: . . . . . . . . . 0,25 hasta 1<br />
Ancho de la puntada: . . . . . . . . . . . . . . . . . . . . . . . . . . . . . . . 5<br />
La costura curvada (programa N) por ejemplo, es ideal para coser<br />
diseños decorativos de manteles, servilletas, puños, etc.
Ojales<br />
CONSEJO<br />
Para encontrar la longitud de puntada adecuada se recomienda coser<br />
una muestra de ojal sobre un resto de tela.<br />
Prensatelas: . . . . . . . . . . . . . . . . . . . . . . . . . . . . . . suela ojales<br />
Programa:. . . . . . . . . . . . . . . . . . . . . . . . . . . . . . . . . . S hasta U<br />
Longitud de puntada: . . . . . . . . . . . . . . . . . . . . . . . .0,25 hasta 1<br />
Ancho de la puntada: . . . . . . . . . . . . . . . . . . . . . . . . . . . . . . . 5<br />
• Coloque la suela y la aguja en su posición más elevada. Sustituya<br />
la pata por la suela ojales.<br />
• Marque sobre la tela la longitud de ojal deseada donde desea coser<br />
el ojal; utilice un lápiz o tiza de costura.<br />
Si cose una tela muy fina o materiales sintéticos, disminuya la presión<br />
de la suela y cosa sobre un trozo de papel para evitar que el hilo<br />
se enrede.<br />
Procedimiento<br />
• Seleccione mediante el botón selector de programa (6) el programa<br />
S, para coser el nervio izquierdo.<br />
• Introduzca el hilo superior a través de la abertura dela suela de<br />
ojales y tire de ambos, el hilo superior e inferior hacia el lado izquierdo.<br />
Baje la suela y cosa lentamente hasta que se haya alcanzado<br />
la longitud deseada del nervio lateral.<br />
• Eleve la aguja a su posición más alta y cambie al programa T para<br />
el nervio inferior.<br />
• A continuación cosa algunas puntadas del nervio inferior.<br />
• Vuelva a elevar la aguja a su posición más elevada y cambie al<br />
programa U para el nervio derecho.<br />
• Ahora cosa el nervio lateral derechocon exactamente la misma<br />
longitud que en el lado izquierdo.<br />
• Sitúe la aguja en su posición más elevada y vuelva a seleccionar<br />
el programa T para el nervio superior.<br />
• A continuación cosa, como en el caso del nervio inferior, también<br />
el nervio superior con algunas puntadas.<br />
• Al final se recomienda poner la longitud de puntada a “0” y seguir<br />
cosiendo algunas puntadas para que los hilos se anuden<br />
mejor y el ojal no se deshilache tan rápidamente.<br />
• Al final corte la tela entre las costuras con la cuchilla para descoser<br />
suministrada. Actué cuidadosamente para no dañar ninguno<br />
de los nervios.<br />
CONSEJO<br />
Para evitar cortar el nervio superior se recomienda colocar un alfiler<br />
delante del nervio.<br />
E-23<br />
E
Coser botones y ojetes<br />
E-24<br />
Con la pata prensatelas de color azul transparente se pueden coser<br />
botones, corchetes y ojetes.<br />
Seleccione con el botón selector de programa (6) una anchura de la<br />
puntada zig-zag que corresponda a la distancia de los ojales.<br />
• Para estas tareas coloque la placa de zurcir; así evitará que la tela<br />
se desplace. Véase el montaje de la placa de zurcir página 26<br />
• Baje la pata prensatelas y coloque el botón entre la tela y la suela<br />
de tal forma que la puntada zig-zag pueda penetrar en los agujeros<br />
del botón, como se indica en la figura.<br />
• Compruebe la posición correcta del botón girando el<br />
volante (10) manualmente. La aguja debe penetrar exactamente<br />
en los agujeros del botón para evitar un desperfecto de la aguja.<br />
En caso necesario modifique el ancho de la puntada zig-zag.<br />
• Cosa a baja velocidad de 6 a 7 puntadas por agujero.<br />
En caso de botones con 4 agujeros se desplaza la tela con el botón:<br />
entonces se cose también de 6 a 7 puntadas en los demás agujeros.<br />
Después de retirar la tela, lleve el hilo superior cortado generosamente<br />
a la parte inferior de la tela y átelo ahí con el hilo inferior.<br />
Coser botones con tallo<br />
En caso de materiales gruesos se necesita frecuentemente un tallo<br />
en el botón.<br />
• Coloque un alfiler o en caso de un tallo más fuerte una cerilla<br />
sobre el botón y proceda como si cosiera un botón normal.<br />
• Retire la pieza de la máquina después de aprox. 10 puntadas.<br />
• Retire el alfiler o la cerilla de la pieza.<br />
• Deje el hilo superior un poco más largo, enhébrelo en el botón<br />
y devánelo varias veces alrededor del tallo que se ha creado; a<br />
continuación llévelo a la parte inferior de la tela y átelo con el<br />
hilo inferior.
Coser cremalleras<br />
Utilice la suela cremalleras.<br />
En función del lado de la cinta de la cremallera se vaya a coser, el<br />
prensatelas debe descansar siempre sobre la tela.<br />
Por esta razón el prensatelas se fija bien en la parte izquierda o derecha<br />
y no en el centro como con los demás prensatelas.<br />
• Coloque el prensatelas y la aguja en su posición más elevada<br />
para poder cambiar el prensatelas.<br />
• Hilvane la cremallera sobre la tela y coloque la pieza en la posición<br />
adecuada debajo de la suela.<br />
• Para coser el lado derecho de la cremallera, fije la suela cremallera<br />
de tal forma que la aguja cosa sobre el lado izquierdo (1).<br />
• Cosa sobre el lado derecho de la cremallera, acercando la costura<br />
tanto como sea posible a los dientes. (1)<br />
• Fije la cremallera cosiéndola con un nervio de aprox, 0,5 centímetros<br />
por debajo de los dientes.<br />
• Para coser el lado izquierdo de la cremallera, cambie la posición<br />
de la suela en el soporte del prensatelas.<br />
• Cosa de la misma manera que en el lado derecho de la cremallera<br />
(2).<br />
• Antes de que la suela alcance el pasador de la cinta de la cremallera,<br />
eleve la suela y abra la cremallera, cuando la aguja esté dentro<br />
del material. (3)<br />
Coser cordones<br />
Con la suela para cremalleras se pueden coser fácilmente cordones,<br />
tal como se indica en la figura.<br />
• Doble la tela una vez para que se forme un túnel para tirar del<br />
cordón y a continuación cosa al lado del cordón, debiendo encontrase<br />
la suela para cremalleras detrás del cordón.<br />
Hacer dobladillos<br />
Con la suela para dobladillos/dobladillos enrollados se pueden hacer<br />
sin ningún problema dobladillos en materiales finos y medianos,<br />
p.ej. en blusas, paños de seda y volantes. Al hacer dobladillos con<br />
la suela para hacer dobladillos enrollados se pueden asegurar los<br />
bordes contra deshilachados y se crean bordes limpios y resistentes.<br />
• Coloque la suela y la aguja en su posición más elevada y a continuación<br />
sustituya la suela existente por la suela para dobladillos.<br />
• Doble el principio del dobladillo en un pliegue doble de aprox.<br />
2 mm hacia dentro.<br />
• Este dobladillo se introduce en la rosca de la suela para dobladillos<br />
enrollados.<br />
• Cosa cuidadosa y lentamente algunas puntadas; lo mejor es que<br />
lo haga girando el volante (10).<br />
• En cuanto el principio del dobladillo se haya introducido en la<br />
suela, comience a coser cuidadosamente el dobladillo.<br />
• Mantenga el borde de la tela siempre un poco por encima del<br />
lado de la suela para evitar que la tela salga de la rosca.<br />
E-25<br />
E
Zurcir<br />
E-26<br />
• Preste atención para que la tela no se introduzca por debajo del<br />
lado derecho de la suela.<br />
CONSEJO<br />
Sujetando el extremo de la tela ligeramente oblicua, el dobladillo<br />
podrá entrar con más facilidad en la suela para dobladillos.<br />
Antes de coser fije el dobladillo con unos alfileres o planche el principio<br />
del dobladillo.<br />
Este trabajo requiere materiales adecuados y también algo de experiencia<br />
para obtener resultados óptimos.<br />
Colocar la placa de zurcir<br />
En algunos trabajos de costura, p.ej., coser botones, corchetes y<br />
ojetes, así como para zurcir y bordar, no debe realizarse ningún<br />
transporte automático del material a coser, sino que uno mismo<br />
debe poder controlar el transporte del material.<br />
En estos casos se debe montar la placa de zurcir suministrada como<br />
accesorio.<br />
• Coloque la palanca del prensatelas (15) hacia arriba y lleve la<br />
aguja girando el volante (10) hacia la posición más elevada.<br />
• Ahora presione los dos pasadores de la placa de zurcir para que<br />
entren en las aberturas de la placa de puntada (19) hasta que encajen,<br />
como se indica en fig. 1 y 2.<br />
• Para volver a retirar la placa de zurcir, solamente hace falta levantar<br />
las esquinas.<br />
Zurcir<br />
• Retire el soporte del prensatelas y elija la tensión normal del hilo<br />
inferior.<br />
La tensión del hilo superior debería ser un poco más floja de lo normal.<br />
En caso necesario, debajo del lugar defectuoso se puede poner un<br />
trozo de tela.<br />
• Coloque la pieza debajo de la aguja y baje la palanca del<br />
prensatelas (15) para que la tensión del hilo se haga efectiva.<br />
• Al empujar manualmente la tela hacia atrás y delante se comienza<br />
a coser lentamente.<br />
• Repita este proceso tantas veces como sea necesario hasta que el<br />
punto defectuoso se haya llenado con puntadas paralelas.<br />
• Si fuera necesario, se puede volver a zurcir en dirección transversal,<br />
como se hace zurciendo manualmente.<br />
CONSEJO<br />
La tela debe estar bien tensada al zurcir. Si el punto defectuoso es<br />
grande, se recomienda tensar la pieza en un bastidor para bordados<br />
(adquirible en el comercio especializado).
Bordar<br />
Aspectos generales<br />
Retire el soporte del prensatelas, coloque la placa de zurcir y seleccione<br />
la tensión normal del hilo inferior.<br />
La tensión del hilo superior debe estar ajustada lo suficientemente<br />
suelta para que el hilo inferior no pueda ser llevado al lado derecho<br />
de la tela.<br />
• Fije la tela en el bastidor de bordar (de venta en comercios especializados).<br />
• Baja el prensatelas para que la tensión del hilo se haga efectiva.<br />
• Sujete el bastidor de bordar con su mano mientras está cosiendo<br />
el dibujo deseado. No mueva la tela sino siempre el bastidor de<br />
bordar.<br />
ADVERT<strong>EN</strong>CIA<br />
No acerque demasiado sus dedos a la aguja.<br />
CONSEJO<br />
Le recomendamos dibujar el motivo de bordado deseado con lápiz<br />
o tiza (se vende en comercios especializados) en el lado derecho de<br />
la tela.<br />
E-27<br />
E
Coser con una aguja gemela<br />
E-28<br />
La aguja gemela se vende en comercios especializados bien surtidos.<br />
Al comprarla preste atención a que la distancia entre las dos<br />
agujas no sobrepase los 2,5 mm.<br />
Con la aguja gemela se puede realizar preciosos diseños de dos colores<br />
si al coser se utilizan hilos de diferentes colores.<br />
ADVERT<strong>EN</strong>CIA<br />
Utilice sólo la puntada recta o la puntada zigzag con la aguja gemela.<br />
Coloque el ancho de la puntada a máximo 3.<br />
Con otros programas o un ancho de puntada superior las agujas<br />
pueden doblarse o romperse.<br />
• Coloque la aguja gemela de la misma forma como se coloca una<br />
aguja sencilla (véase página 30).<br />
• Coloque dos carretes de hilo igual de llenos en los portacarretes<br />
extensibles (7).<br />
• Asegúrese de que ha colocado los dos discos de fieltro, suministrados<br />
con el accesorio, en los dos portacarretes (7).<br />
• Enhebre los dos hilos a través del soporte del hilo como en caso<br />
de un hilo solo.<br />
• En los discos tensores del hilo superior conduzca los dos hilos a<br />
través de los discos; tenga en cuenta que uno de los hilos se mueve<br />
a la derecha del disco central y el segundo hilo a la izquierda<br />
del mismo.<br />
• Introduzca los dos hilos en la guía de hilos.<br />
• En los ojos de la aguja, enhebre uno de los hilos a la derecha y el<br />
otro a la izquierda.<br />
ADVERT<strong>EN</strong>CIA<br />
Para coser una esquina con la aguja gemela retire la aguja de la tela<br />
porque en caso contrario la aguja gemela podría romperse o deformarse.
Coser con el brazo libre<br />
El brazo libre (16) le da la posibilidad de coser más fácilmente piezas<br />
con forma de tubo; esta función es muy útil para coser p.ej. mangas<br />
y perneras.<br />
Se puede convertir fácilmente la máquina de coser en una máquina<br />
de brazo libre, retirando la base plana desmontable con la caja de<br />
accesorios de la máquina de coser.<br />
En caso de las siguientes tareas de costura, el brazo libre (16) es especialmente<br />
de gran ayuda:<br />
-- Arreglar codos y rodillas de prendas.<br />
-- Coser mangas, especialmente en caso de prendas pequeñas.<br />
-- Aplicaciones, bordados o hacer dobladillos de bordes, puños y<br />
perneras.<br />
-- Coser pretinas de cinturas en faldas o pantalones.<br />
La guía de bordes<br />
La guía de bordes le ayuda a realizar costuras rectas y paralelas a lo<br />
largo de bordes de tela.<br />
• Introduzca suavemente el tornillo moleteado de la guía en el<br />
agujero de rosca interior a la derecha del lado de la placa de<br />
puntada (19).<br />
• Ajuste el dispositivo de guía a la distancia deseada y apriete el<br />
tornillo.<br />
Para su ayuda en la placa de puntada (19) se encuentran algunas líneas<br />
de guía.<br />
La guía para enguatar<br />
• Introduzca la guía para enguatar debajo del muelle de apriete en<br />
la cavidad prevista.<br />
• Dibuje primero la primera costura con tiza y cósala.<br />
• Con ayuda de la guía para enguatar se cose la segunda costura<br />
de forma paralela a la primera.<br />
• Se puede regular la distancia de las costuras ajustando la guía en<br />
dirección de la flecha.<br />
E-29<br />
E
MANT<strong>EN</strong>IMI<strong>EN</strong>TO, CUIDADO Y LIMPIEZA<br />
Cambiar la lámpara de coser<br />
Cambiar la aguja<br />
E-30<br />
En todos los trabajos de mantenimiento, limpieza y de recambio<br />
desconecte siempre primero la máquina y desenchúfela.<br />
La lámpara de coser se enciende y se apaga mediante el interruptor<br />
principal (13).<br />
• Abrir la tapa frontal (21).<br />
• Ahora se puede girar la tapa frontal (21) hacia la izquierda.<br />
• Ahora cambie la lámpara.<br />
• Cierre la tapa frontal (21) y atorníllela firmemente.<br />
ADVERT<strong>EN</strong>CIA<br />
La potencia máxima permitida de la lámpara es de 15 vatios.<br />
Las bombillas se adquieren en el comercio especializado.<br />
• Gire el volante (10) hacia Usted hasta que la aguja se encuentre<br />
en su posición más elevada.<br />
• Afloje el tornillo que sujeta la aguja girándolo hacia Usted.<br />
• Retire la aguja del portaagujas.<br />
• Introduzca la nueva aguja con el lado plano hacia atrás. Empuje<br />
la aguja hacia arriba hasta el tope.<br />
• Vuelva a apretar el tornillo del portaagujas.<br />
ADVERT<strong>EN</strong>CIA<br />
Las agujas se adquieren en el comercio especializado.<br />
Para la información acerca de la denominación de tipo y grosor, le<br />
rogamos que consulte la tabla de telas, hilos y agujas en página 40.
Retirar y colocar la pata prensatelas<br />
Retirar<br />
• Gire el volante (10) hacia Usted hasta que la aguja se encuentre<br />
en su posición más elevada.<br />
• Eleve el prensatelas subiendo la palanca del prensatelas (15).<br />
• Al subir la palanca del prensatelas, detrás del soporte del prensatelas,<br />
el prensatelas se cae.<br />
Insertar<br />
• Coloque la pata prensatelas de tal forma que el perno de la pata<br />
descanse directamente debajo de la ranura del soporte de la pata.<br />
Baje la palanca del prensatelas (15).<br />
• Ahora empuje la palanca de desenganche del prensatelas hacia<br />
arriba. El prensatelas se engancha ahora automáticamente.<br />
E-31<br />
E
Retirar y colocar el soporte de la pata prensatelas<br />
E-32<br />
No en necesario retirar el soporte para el prensatelas, excepto si<br />
desea Usted zurcir, bordar u obtener más espacio para limpiar el<br />
transportador de la tela (27).<br />
Retirar<br />
• Coloque la aguja en su posición más elevada, girando el<br />
volante (10) hacia Usted y coloque la palanca del<br />
•<br />
prensatelas (15) hacia arriba.<br />
Retire la pata del soporte y afloje el tornillo del soporte del prensatelas<br />
mediante el destornillador suministrado.<br />
Insertar<br />
Cuidado de la máquina de coser<br />
• Coloque la aguja en su posición más elevada, girando el<br />
volante (10) hacia Usted y coloque la palanca del<br />
•<br />
prensatelas (15) hacia arriba.<br />
Si ahora se inserta el soporte para el prensatelas, empújelo tanto<br />
como sea posible hacia arriba y apriete el tornillo del soporte<br />
para el prensatelas mediante el destornillador suministrado.<br />
La máquina de coser es un producto de mecánica de precisión y necesita<br />
un cuidado periódico para poder funcionar siempre a la perfección.<br />
Este cuidado lo puede realizar Usted mismo.<br />
Cuidado significa principalmente: Limpiar y lubricar.<br />
ADVERT<strong>EN</strong>CIA<br />
Para la lubricación emplee solamente aceites especiales para máquinas<br />
de coser de la mejor calidad ya que otros aceites no son adecuados.<br />
Observe que después de la lubricación se pueden encontrar residuos<br />
dentro del aparato. Para eliminar dichos residuos, cosa algunas<br />
puntadas en una pieza de muestra u otro resto de tela. Así<br />
evitará ensuciar el material que desee coser.
Limpiar la carcasa y el reóstato (pedal)<br />
Antes de limpiar el aparato, desconéctelo de la red.<br />
Para limpiar la carcasa y el reóstato (pedal), emplee un paño seco y<br />
suave. Evite emplear detergentes y productos químicos de limpieza,<br />
puesto que podrían dañar las superficies y las inscripciones del<br />
aparato.<br />
Limpiar el transportador<br />
Para garantizar una costura perfecta es necesario mantener siempre<br />
limpios los dientes del transportador de tela.<br />
• Retire la aguja y el prensatelas (véase página 30 y siguiente).<br />
• Desatornille los tornillos de la placa de puntada (19), para retirar<br />
ésta de la máquina.<br />
• Retire con un cepillo el polvo y restos de hilo de los dientes del<br />
transportador.<br />
• Vuelva a colocar la placa de puntada (19).<br />
Limpiar y lubricar la carcasa del carrete<br />
• Coloque la aguja en su posición más elevada; en caso contrario<br />
no se puede retirar la lanzadera.<br />
• Retire la cápsula portacanilla:<br />
• Gire la palanca de resorte hacia fuera, como se indica, y retire el<br />
anillo de la lanzadera.<br />
• Retire la lanzadera sujetando el pestillo en el centro de la lanzadera.<br />
• Retire todas las partículas sucias del anillo de la órbita de la lanzadera<br />
y lubrique las piezas con un paño.<br />
• Introduzca de una a dos gotas de aceite en la órbita de la lanzadera,<br />
como se indica.<br />
• Ahora vuelva a montarlo todo en orden inverso.<br />
E-33<br />
E
Lubricar la máquina<br />
E-34<br />
ADVERT<strong>EN</strong>CIA<br />
Su máquina ya ha sido lubricada en fábrica y está lista para el servicio.<br />
Lubricar la máquina detrás de la tapa frontal<br />
Los puntos a lubricar están marcados con flechas en la figura. Antes<br />
de lubricar se debería limpiar estos puntos. Aplique sobre estos<br />
puntos una o dos gotas de un buen aceite para máquinas de coser.<br />
Si la máquina no funciona perfectamente, tras haber estado en servicio<br />
durante un largo periodo de tiempo, deje que la máquina lubricada<br />
marche con rapidez, con la tapa frontal cerrada (21) durante<br />
algunos minutos.<br />
No olvide primero coser sobre un resto de tela, para que se absorba<br />
el aceite que pueda salir.<br />
CONSEJO<br />
Según la frecuencia de uso se debería lubricar esta parte de la máquina<br />
más frecuentemente.
Desmontaje de la tapa posterior de la carcasa<br />
• Empuje la palanca de la pata prensatelas (15) hacia arriba, abra<br />
la tapa frontal (21) y afloje el tornillo (A).<br />
ADVERT<strong>EN</strong>CIA<br />
Ya que los tornillos A, B y C son diferentes, guárdelos siempre por<br />
separado.<br />
• Retire la base plana desmontable y abra la tapa de la cápsula<br />
portacanilla (18).<br />
• Tumbe la máquina con el lado posterior hacia arriba y desatornille<br />
los cuatro tornillos (B) y los dos tornillos (C) del fondo,<br />
como se indica.<br />
• Vuelva a poner la máquina de pie.<br />
E-35<br />
E
E-36<br />
• Ahora solamente unos pequeños ganchos de plástico internos<br />
sujetan la tapa posterior, como se indica.<br />
• Ahora empuje cuidadosamente hacia abajo el borde superior de<br />
la tapa posterior (ahí donde se encuentran los ganchos) con la<br />
mano.<br />
• Ahora retire la tapa posterior, tirando hacia fuera.
Lubricar la parte superior e inferior de la máquina<br />
Los puntos a lubricar están marcados con flechas en la figura. Antes<br />
de lubricar se debería limpiar estos puntos. Aplique una o dos gotas<br />
de un buen aceite para máquinas de coser sobre estos puntos.<br />
CONSEJO<br />
Los puntos marcados con flechas solamente deben ser lubricados<br />
pocas veces, aprox. cada dos o tres meses según la frecuencia de<br />
uso.<br />
Montaje de la tapa posterior de la carcasa<br />
• Vuelva a colocar la tapa posterior y preste atención a que encaje.<br />
• Ponga la máquina ahora sobre su lado frontal y vuelva a atornillar<br />
los tornillos A; B y C.<br />
• Cierre la tapa de la cápsula portacanilla (18) y la tapa<br />
frontal (21).<br />
• Al final vuelva a insertar la tapa de la carcasa para el reóstato y<br />
empújela hasta que encaje.<br />
ADVERT<strong>EN</strong>CIA<br />
Para hacer el montaje más fácil, preste siempre atención a que la palanca<br />
del prensatelas (15) se encuentre arriba y que la tapa de la<br />
cápsula portacanilla (18) quede abierta.<br />
La tapa de la carcasa del enchufe del reóstato está ahora insertada.<br />
E-37<br />
E
AVERÍAS<br />
E-38<br />
En caso de producirse averías, le rogamos que lea las instrucciones<br />
de funcionamiento, para cerciorarse de haber observado correctamente<br />
todas las indicaciones.<br />
Solamente si ninguna de las soluciones mencionadas tiene éxito,<br />
contacte con nuestro servicio postventa.<br />
Fallos Causa página<br />
La máquina no marcha libremente Se debe lubricar la máquina página 34<br />
En la lanzadera hay polvo e hilos página 34<br />
En los dientes del transportador se encuentran<br />
restos<br />
Se ha utilizado un aceite incorrecto y la<br />
máquina está obstruida<br />
página 34<br />
página 34<br />
El hilo superior se rompe La máquina no está bien enhebrada página 12<br />
La tensión del hilo es demasiado alta página 15<br />
La aguja está deformada o despuntada página 17<br />
El grosor del hilo no es el adecuado para la<br />
aguja<br />
página 17<br />
La aguja está mal fijada página 30<br />
La tela no está tirada hacia atrás en el extremo<br />
de la costura<br />
La placa de puntada, la bobina o el prensatelas<br />
están dañados<br />
El hilo inferior se rompe El hilo inferior se enreda por un carrete mal<br />
devanado<br />
El hilo inferior no se encuentra debajo del<br />
muelle de tensión en la cápsula portacanilla<br />
página 18<br />
página 9<br />
página 9<br />
La aguja se rompe Se ha colocado mal la aguja página 30<br />
La aguja se ha deformado página 17<br />
La aguja es demasiado fina página 17<br />
Durante la costura se tira de la tela página 18<br />
Un nudo en el hilo página 12<br />
Con agujas gemelas: El ancho de la puntada<br />
es superior a 3 o se ha utilizado un programa<br />
especial.<br />
página 28<br />
La máquina omite puntadas Se ha colocado mal la aguja página 30<br />
Se ha enhebrado mal la aguja página 15<br />
La aguja y/o el hilo no se ajustan a la tela página 40<br />
La tela es demasiado gruesa o dura página 40<br />
Durante la costura se tira de la tela página 18
La costura se frunce o arregaza La tensión del hilo superior es demasiado<br />
fuerte<br />
página 15<br />
Se ha enhebrado mal la máquina página 12<br />
La aguja es demasiado grande para la tela página 40<br />
El hilo forma bucles La tensión del hilo no está regulada página 15<br />
El hilo superior no está bien enhebrado y/o el<br />
hilo inferior no está bien devanado<br />
El grosor de los hilos no es el adecuado para la<br />
tela<br />
página 9<br />
página 40<br />
La tela marcha con irregularidades La longitud de puntada se encuentra en “0” página 19<br />
Se encuentran restos de hilo en la lanzadera página 33<br />
La máquina no marcha La máquina de coser no está bien conectada o<br />
el enchufe no tiene corriente<br />
página 8<br />
Se encuentran restos de hilo en la lanzadera página 33<br />
El interruptor del volante se encuentra en el<br />
símbolo de la canilla.<br />
página 9<br />
E-39<br />
E
TABLA DE TELAS, HILOS Y AGUJAS<br />
E-40<br />
Grosor de la<br />
tela<br />
Telas finas Nylon<br />
Batista<br />
Velo<br />
telas de grosor<br />
mediano<br />
Generalmente se utilizan hilos y agujas finos para la costura de telas<br />
finas e hilos y agujas más fuertes para telas gruesas. Compruebe<br />
siempre el grosor del hilo y de la aguja sobre un resto de aquella tela<br />
que desea coser. Utilice el mismo hilo para la aguja y el carrete. Si<br />
cose encima de tela fina o si cose costuras sintéticas elásticas, utilice<br />
agujas con un vástago azul (de venta en comercios especializados).<br />
Estas agujas evitan la omisión de puntadas.<br />
Tipo de tela Hilo Aguja<br />
80<br />
Algodón<br />
Jersey 60<br />
Material<br />
sintético<br />
Seda 50<br />
Seda<br />
Lana<br />
Seda<br />
Percal<br />
Piqué<br />
Lino<br />
50<br />
Seda sintética<br />
60 - 80<br />
Algodón<br />
Jersey 60<br />
Material<br />
sintético<br />
Gabardina 50<br />
Seda<br />
Telas gruesas Tejido jeans<br />
Tela de abrigo<br />
50<br />
Algodón<br />
Jersey 50<br />
Material<br />
sintético<br />
Lana<br />
Tweed<br />
50<br />
Seda<br />
Longitud de<br />
puntada<br />
Puntada<br />
recta<br />
Zig-zag<br />
65 1 - 3 1 - 4<br />
75<br />
75 - 90 0,5 - 3 0,5 - 4<br />
75<br />
75 - 90 0,5 - 3 0,5 - 4<br />
Tensión del<br />
hilo superior
ELIMINACIÓN<br />
Embalaje<br />
Su máquina de coser está embalada para protegerla<br />
contra eventuales daños durante el transporte. Los<br />
embalajes son materias primas y por ello son reutilizables<br />
o aptos para ser devueltos al ciclo de reciclaje<br />
de materias primas.<br />
Aparato<br />
No tire bajo ningún concepto su máquina de coser<br />
al final de su vida útil a la basura doméstica normal.<br />
Consulte en su ayuntamiento o autoridad local la<br />
posibilidad de una eliminación apropiada y respetuosa<br />
con el medio ambiente.<br />
ESPECIFICACIONES TÉCNICAS<br />
Máquina de coser<br />
Tensión nominal: 230 V ~ 50 Hz<br />
Absorción nominal de corriente: total 75 vatios<br />
Motor: 60 vatios<br />
Lámpara: 15 vatios<br />
Tamaño de rosca E14<br />
Reóstato (pedal)<br />
Tipo: KD 2902<br />
Tensión nominal: 220 V -240 V ~ 50 Hz<br />
Clase de protección II<br />
¡Las especificaciones técnicas están sujetas a cambios<br />
sin previo aviso!<br />
E-41<br />
E
ÍNDICE DE PALABRAS CLAVE<br />
A<br />
Aguja 17, 30<br />
Aguja gemela 28<br />
Ajuste de la longitud de la puntada 19<br />
Ajuste del ancho de la puntada 19<br />
Alzador de hilo 13<br />
Anillo de la órbita de la lanzadera 33<br />
Averías 38<br />
B<br />
Base plana desmontable 8, 11, 29, 35<br />
Bastidor para bordar 7<br />
Bobina del hilo inferior 9<br />
Bordar 27<br />
Bordar monogramas 28<br />
Botón seleccionador de programa 19<br />
Brazo libre 29<br />
C<br />
Caja de accesorios 7, 8<br />
Cambio de dirección de costura 18<br />
Cápsula portacanilla 33<br />
Carcasa del carrete 33<br />
Colocar la cápsula portacanilla 12<br />
Con 19<br />
Cortar el hilo 18<br />
Coser botones con tallo 24<br />
Coser botones y ojetes 24<br />
Coser cintas elásticas 21<br />
Coser cordones 25<br />
Coser hacia atrás 18<br />
Coser las piezas de tela 21<br />
Coser telas elásticas 21<br />
Cremalleras 25<br />
D<br />
Devanar la bobina del hilo inferior 9<br />
Dobladillo de concha 21<br />
E<br />
El soporte del prensatelas 32<br />
Eliminación 41<br />
Enhebrar el hilo superior 12<br />
Enhebrar la cápsula portacanilla 11<br />
E-42
Extraer el hilo inferior 14<br />
G<br />
Guía de bordes 7, 29<br />
Guía para enguatar 7, 29<br />
H<br />
Hacer dobladillos 25<br />
I<br />
Insertar el prensatelas 31<br />
Insertar el soporte para el prensatelas 32<br />
L<br />
Lámpara de coser 30<br />
Lanzadera 33<br />
Limpieza 33<br />
Lubricar 33, 34, 35<br />
M<br />
Mantenimiento 30<br />
O<br />
Ojales 23<br />
Órbita de la lanzadera 33<br />
P<br />
Placa de zurcir 24, 26, 27<br />
Portacarretes 9<br />
Prensatelas 17, 31<br />
Prensatelas estándar 7<br />
Prensatelas, suela cremalleras 7, 25<br />
Prensatelas, suela ojales 7, 23<br />
Prensatelas, suela para coser botones 7<br />
Protector de los dedos 7, 18<br />
Puntada de pluma 22<br />
Puntada de rombo 22<br />
Puntada de satín 20<br />
Puntada invisible 21<br />
Puntada recta 19<br />
Puntada sobrehilado-overlock 22<br />
Puntada zig-zag 20<br />
Puntada zig-zag triple 22<br />
Puntadas de bordado de adorno 22<br />
E-43<br />
E
R<br />
Regulador de tensión del hilo superior 13<br />
Regular la velocidad de costura 8<br />
Reóstato (pedal) 6, 8, 10, 17, 18, 37, 41<br />
Retirar el prensatelas 31<br />
Retirar el soporte para el prensatelas 32<br />
Retirar la cápsula portacanilla 11<br />
S<br />
Sobrecoser aplicaciones 28<br />
Suela dobladilladora 7<br />
suela estándar 19, 20, 21, 22<br />
Suela para dobladillos 25, 26<br />
T<br />
Tabla de agujas 40<br />
Tensión del hilo 15, 16<br />
Tensión del hilo inferior 15, 16<br />
Tensión del hilo superior 15<br />
Transportador 33<br />
Triple puntada recta elástica 22<br />
V<br />
Volumen de suministro 6<br />
Z<br />
Zurcir 26<br />
E-44
VISTA GERAL<br />
Componentes principais<br />
Sistema mecânico de costura<br />
P-2<br />
1) Alavanca da linha<br />
2) Regulador da tensão da linha superior<br />
3) Guia da linha superior<br />
4) Regulador de largura do ponto<br />
5) Pega de suporte rebatível<br />
6) Botão selector do programa<br />
7) Suporte do carrinho de linha amovível<br />
8) Fuso da bobina<br />
9) Encosto da bobina<br />
10) Roda manual<br />
11) Regulador do comprimento do ponto<br />
12) Alavanca de marcha-atrás<br />
13) Interruptor principal (Motor e luz)<br />
14) Caixa da ficha para pedal<br />
15) Alavanca do calcador (no avesso)<br />
16) Braço livre<br />
17) Pé de regulação<br />
18) Cobertura de cápsula da bobina<br />
19) Placa de costura<br />
20) Guia da linha<br />
21) Tampa da frente<br />
22) Suporte da agulha<br />
23) Parafuso de fixação da agulha<br />
24) Guia da linha no suporte da agulha<br />
25) Agulha<br />
26) Calcador<br />
27) Transportador do tecido<br />
28) Parafuso do suporte do calcador<br />
29) Suporte do calcador<br />
30) Alavanca de activação do calcador
ÍNDICE<br />
Indicações de segurança . . . . . . . . . . . . . . . . . . . . . . . . . . . 4<br />
Conhecer o aparelho . . . . . . . . . . . . . . . . . . . . . . . . . . . . . . 6<br />
Material fornecido . . . . . . . . . . . . . . . . . . . . . . . . . . . . . . . . . 6<br />
Conteúdo da caixa de acessórios . . . . . . . . . . . . . . . . . . . . . . . 7<br />
Ligações eléctricas . . . . . . . . . . . . . . . . . . . . . . . . . . . . . . . . . 8<br />
Estabilidade da máquina de costura . . . . . . . . . . . . . . . . . . . . 8<br />
Controlo da velocidade de costura . . . . . . . . . . . . . . . . . . . . . . 8<br />
Colocação e remoção da mesa amovível . . . . . . . . . . . . . . . . . . 8<br />
Caixa de acessórios . . . . . . . . . . . . . . . . . . . . . . . . . . . . . . . . 8<br />
Trabalhos a serem efectuados . . . . . . . . . . . . . . . . . . . . . . . 9<br />
Encher a bobina da linha inferior . . . . . . . . . . . . . . . . . . . . . . 9<br />
Remoção da cápsula da bobina . . . . . . . . . . . . . . . . . . . . . . 11<br />
Enfiar a cápsula da bobina . . . . . . . . . . . . . . . . . . . . . . . . . . 11<br />
Colocação da cápsula da bobina . . . . . . . . . . . . . . . . . . . . . . 12<br />
Enfiar a linha superior . . . . . . . . . . . . . . . . . . . . . . . . . . . . . 12<br />
Fazer subir a linha superior . . . . . . . . . . . . . . . . . . . . . . . . . 14<br />
Ajustes . . . . . . . . . . . . . . . . . . . . . . . . . . . . . . . . . . . . . . 15<br />
Ajuste da tensão da linha . . . . . . . . . . . . . . . . . . . . . . . . . . 15<br />
Verificação das tensões da linha . . . . . . . . . . . . . . . . . . . . . . 16<br />
Coser . . . . . . . . . . . . . . . . . . . . . . . . . . . . . . . . . . . . . . . 17<br />
Generalidades . . . . . . . . . . . . . . . . . . . . . . . . . . . . . . . . . . 17<br />
Selecção correcta da agulha . . . . . . . . . . . . . . . . . . . . . . . . . 17<br />
Elevação e descida do calcador . . . . . . . . . . . . . . . . . . . . . . . 17<br />
Protecção para os dedos . . . . . . . . . . . . . . . . . . . . . . . . . . . 18<br />
Coser para trás . . . . . . . . . . . . . . . . . . . . . . . . . . . . . . . . . . 18<br />
Introduzir o tecido na máquina de costura . . . . . . . . . . . . . . 18<br />
Alteração da direcção da costura . . . . . . . . . . . . . . . . . . . . . . 18<br />
Corte da linha . . . . . . . . . . . . . . . . . . . . . . . . . . . . . . . . . . . 18<br />
Botão selector do programa . . . . . . . . . . . . . . . . . . . . . . . . . 19<br />
Ajuste do comprimento do ponto . . . . . . . . . . . . . . . . . . . . . 19<br />
Ajuste de largura do ponto . . . . . . . . . . . . . . . . . . . . . . . . . . 19<br />
Tipos de pontos (programas) . . . . . . . . . . . . . . . . . . . . . . . . . 19<br />
Orifício do botão . . . . . . . . . . . . . . . . . . . . . . . . . . . . . . . . . 23<br />
Pregar botões e colchetes . . . . . . . . . . . . . . . . . . . . . . . . . . . 24<br />
Pregar fechos de correr . . . . . . . . . . . . . . . . . . . . . . . . . . . . 25<br />
Coser bainhas . . . . . . . . . . . . . . . . . . . . . . . . . . . . . . . . . . . 25<br />
Passajar . . . . . . . . . . . . . . . . . . . . . . . . . . . . . . . . . . . . . . . 26<br />
Bordar . . . . . . . . . . . . . . . . . . . . . . . . . . . . . . . . . . . . . . . . 27<br />
Coser com uma agulha dupla . . . . . . . . . . . . . . . . . . . . . . . . 28<br />
Coser com o braço livre . . . . . . . . . . . . . . . . . . . . . . . . . . . . 29<br />
A régua da ourela . . . . . . . . . . . . . . . . . . . . . . . . . . . . . . . . 29<br />
A régua wattier . . . . . . . . . . . . . . . . . . . . . . . . . . . . . . . . . . 29<br />
Manutenção, conservação e limpeza . . . . . . . . . . . . . . . . . . 30<br />
Substituição da lâmpada . . . . . . . . . . . . . . . . . . . . . . . . . . . 30<br />
Substituição da agulha . . . . . . . . . . . . . . . . . . . . . . . . . . . . 30<br />
Remoção e colocação do calcador . . . . . . . . . . . . . . . . . . . . . 31<br />
Remoção e colocação do suporte do calcador . . . . . . . . . . . . . 32<br />
Conservação da máquina de costura . . . . . . . . . . . . . . . . . . . 32<br />
Lubrificação da máquina . . . . . . . . . . . . . . . . . . . . . . . . . . . 34<br />
Avarias . . . . . . . . . . . . . . . . . . . . . . . . . . . . . . . . . . . . . . 38<br />
Tabela de tecidos, linhas e agulhas . . . . . . . . . . . . . . . . . . 40<br />
Eliminação . . . . . . . . . . . . . . . . . . . . . . . . . . . . . . . . . . . 41<br />
Dados técnicos . . . . . . . . . . . . . . . . . . . . . . . . . . . . . . . . . 41<br />
Índice alfabético . . . . . . . . . . . . . . . . . . . . . . . . . . . . . . . 42<br />
P-3<br />
P
INDICAÇÕES DE SEGURANÇA<br />
Relativamente a este manual<br />
Manter os aparelhos eléctricos fora do alcance de crianças<br />
Cabo e ligação de rede<br />
P-4<br />
Antes da primeira colocação em funcionamento leia este manual de instruções com atenção<br />
e siga estritamente as indicações de segurança!<br />
Todos os trabalhos efectuados no e com este aparelho devem seguir as instruções descritas<br />
no manual.<br />
Se entregar o aparelho a terceiros, deve também entregar este manual de instruções!<br />
As crianças não têm noção dos perigos que podem advir dos aparelhos<br />
eléctricos.<br />
Nunca deixe que as crianças utilizem a máquina de costura sem vigilância.<br />
Tenha em mente os eventuais ferimentos que podem ser<br />
provocados pela agulha, mesmo quando a máquina não está ligada<br />
à rede.<br />
Mantenha também a película das embalagens fora do alcance de<br />
crianças. Existe risco de asfixia.<br />
Este aparelho não se destina a ser utilizado por pessoas (incluindo<br />
crianças) com capacidades físicas, sensoriais ou mentais limitadas<br />
ou com pouco experiência e / ou com pouco conhecimento, a<br />
não ser que se encontrem sob vigilância por uma pessoa responsável<br />
pela segurança ou se obterem indicações, da mesma pessoa,<br />
como utilizar o aparelho.<br />
Ligue o aparelho apenas numa tomada eléctrica bem acessível<br />
(230 V ~ 50 Hz), próximo do local de instalação. A tomada eléctrica<br />
deve estar bem acessível para o caso de necessitar de desligar rapidamente<br />
o aparelho da rede.<br />
Quando retirar a ficha, puxe pela ficha e não pelo cabo.<br />
Desenrole todo o cabo durante o funcionamento.<br />
A ficha de rede e o cabo de extensão devem estar colocados de forma<br />
que ninguém possa tropeçar neles.<br />
O cabo não deve tocar em superfícies quentes.<br />
Desligue a máquina e a ficha de rede antes de efectuar os seguintes<br />
trabalhos: enfiar a linha, substituição da agulha, ajustar o calcador,<br />
substituir lâmpada, limpeza e manutenção, bem como no final e em<br />
caso de interrupção do trabalho de costura.<br />
Nunca reparar o aparelho por iniciativa própria<br />
No caso de danos no aparelho ou no cabo de ligação, retire imediatamente<br />
a ficha da tomada.<br />
O aparelho não deve ser utilizado se apresentar danos visíveis na<br />
máquina de costura ou no cabo de rede, de forma a evitar riscos.<br />
Nunca tente abrir e/ou reparar o aparelho por iniciativa própria. Existe<br />
risco de choque eléctrico! Em caso de avaria, dirija-se ao nosso<br />
serviço de assistência técnica ou a uma loja especializada.<br />
Se o cabo de ligação deste aparelho se encontrar danificado, deve<br />
ser substituído pelo fabricante ou seu serviço de assistência ao cliente<br />
ou por uma pessoa com iguais classificações, de modo a evitar<br />
eventuais perigos.
Indicações fundamentais<br />
A máquina de costura não deve ser sujeita a humidade – risco de<br />
choque eléctrico!<br />
Nunca deixe a máquina de costura ligada sem vigilância.<br />
Não utilize a máquina ao ar livre.<br />
O aparelho só pode ser colocado em funcionamento com o pedal<br />
de tipo KD 2902.<br />
Operar o aparelho com segurança<br />
Coloque a máquina de costura sobre uma superfície de trabalho firme<br />
e plana.<br />
Durante o funcionamento, os orifícios de ar devem permanecer<br />
desobstruídos: não deixe entrar quaisquer objectos (p. ex. pó, restos<br />
de tecido etc.) nos orifícios.<br />
Utilize apenas os acessórios fornecidos.<br />
Na lubrificação, utilize apenas óleos especiais para máquinas de costura.<br />
Não utilize outros líquidos.<br />
Seja cuidadoso ao utilizar as peças móveis da máquina, sobretudo a<br />
agulha. Há risco de ferimentos mesmo quando a máquina não está<br />
ligada à corrente!<br />
Ao coser, preste atenção para não colocar os dedos por baixo do<br />
parafuso de fixação da agulha.<br />
Não utilize agulhas tortas nem gastas.<br />
Não prenda nem puxe o tecido ao coser. As agulhas podem partir.<br />
No final do trabalho de costura, coloque a agulha sempre na posição<br />
mais alta.<br />
Limpeza e armazenamento<br />
Antes de iniciar a limpeza retire a ficha de rede da tomada. Para a<br />
limpeza deve ser utilizado um pano seco e suave. Devem ser evitados<br />
produtos de limpeza ou solventes químicos, visto que estes podem<br />
danificar a superfície e/ou as inscrições no aparelho.<br />
Quando guardar a máquina de costura, cubra-a sempre com a cobertura<br />
fornecida, para a proteger do pó.<br />
P-5<br />
P
CONHECER O APARELHO<br />
Material fornecido<br />
P-6<br />
Ao retirar o aparelho da embalagem, certifique-se de que as seguintes<br />
peças foram fornecidas:<br />
1)Máquina de costura<br />
2)Mesa amovível com caixa de acessórios<br />
3)Pedal<br />
4) Suporte da bobina para linha overlock<br />
Las seguintes peças sem imagem:<br />
• Cobertura<br />
• Manual de instruções e documento da garantia
Conteúdo da caixa de acessórios<br />
1) Calcador padrão (ponto a direito/ponto ziguezague)<br />
(já montado)<br />
2) Calcador para bainhas<br />
3) Calcador para casear<br />
4) Calcador para pregar fechos de correr<br />
5) Calcador para pregar botões<br />
6) Régua da ourela<br />
7) Régua wattier<br />
8) Placa de cerzidura<br />
9) Bobina de substituição (3 peças)<br />
10) Protecção para os dedos (já montada)<br />
11) Feltro para suporte do carrinho de linha (2 peças)<br />
12) Conjunto de agulhas<br />
13) Bisnaga de óleo<br />
14) Chave de fendas (grande)<br />
15) Chave de fendas (pequena)<br />
16) Lanceta de abrir casas<br />
P-7<br />
P
Ligações eléctricas<br />
Estabilidade da máquina de costura<br />
Controlo da velocidade de costura<br />
Colocação e remoção da mesa amovível<br />
Caixa de acessórios<br />
P-8<br />
O interruptor de corrente liga não só a máquina como também a<br />
luz para a costura.<br />
• Encaixe a ficha de acoplamento do pedalfornecido na caixa da<br />
ficha na máquina e depois a ficha de rede na tomada.<br />
Utilize apenas o pedal de tipo KD 2902 fornecido.<br />
Depois do trabalho ou antes da manutenção, desligue sempre a<br />
máquina e retire a ficha de rede da tomada.<br />
Com o pé de regulação (17) pode ajustar a estabilidade da máquina<br />
de costura.<br />
• Rode o pé de regulação para a direita, para baixar ou para esquerda,<br />
para subir.<br />
• Ajuste a base, de forma que a máquina de costura fique direita e<br />
não oscile.<br />
A velocidade de costura é controlada pelo pedal. A velocidade da<br />
costura pode ser alterada, exercendo-se mais ou menos pressão no<br />
pedal.<br />
A máquina é fornecida com uma mesa de trabalho.<br />
• A mesa amovível pode ser removida, deslocando-a cuidadosamente<br />
para a esquerda.<br />
• Para a colocação da mesa amovível, coloque a mesa com cuidado<br />
na máquina e desloque-a para a direita até a ouvir encaixar.<br />
•<br />
A caixa de acessórios está integrada na mesa amovível.<br />
• Para a abrir, feche cuidadosamente a tampa da mesa amovível,<br />
ficando com acesso aos acessórios.
TRABALHOS A SEREM EFECTUADOS<br />
Encher a bobina da linha inferior<br />
As bobinas da linha inferior podem ser enchidas de forma rápida e<br />
fácil com a máquina de costura.<br />
Passe a linha do carrinho de linha através da guia da linha em direcção<br />
à bobina.<br />
O procedimento detalhado para a bobinagem está descrito nos seguintes<br />
pontos:<br />
• Scoloque o interruptor na roda manual (10) para o símbolo da<br />
bobina, para evitar um movimento da agulha durante a bobinagem.<br />
• Retire um dos suportes do carrinho de linha (7) totalmente para<br />
fora e encaixe um carrinho de linha.<br />
• Passe, agora, a linha do carrinho de linha, tal como está descrito<br />
na figura, através da guia da linha.<br />
• Enfie o final da linha, tal como representado, através do orifício<br />
da bobina e enrole algumas vezes com a mão à volta da bobina.<br />
P-9<br />
P
P-10<br />
• Encaixe a bobina no fuso da bobina (8), em que a extremidade<br />
da linha esteja no cimo da bobina. Gire o fuso da bobina (8) para<br />
a direita de encontro do encosto da bobina (9) até se ouvir a encaixar.<br />
• Mantenha a extremidade da linha segura e accione o pedal. Solte<br />
a extremidade da linha, logo que a bobina seja bobinada um<br />
pouco. Bobine, até o fuso da bobina (8) parar automaticamente.<br />
• Gire o fuso da bobina (8) para a esquerda e remova a bobina.<br />
• Corte a linha.<br />
• Coloque o interruptor na roda manual novamente para o símbolo<br />
da agulha. A agulha só se volta a mover quando accionar o pedal.<br />
Se na bobinagem, a distribuição da linha não for uniforme, pode regular<br />
a altura da guia da linha:<br />
• Abrir tampa da frente (21)<br />
• Soltar o parafuso (B) para regular a altura da guia da linha (A).
Remoção da cápsula da bobina<br />
• Remova a mesa amovível.<br />
• Coloque a agulha, rodando a roda manual (10) bem como o calcador<br />
para a posição mais alta e abra a cobertura da cápsula da<br />
bobina (18) tal como é indicado na figura.<br />
• Abra a alavanca basculante da cápsula da bobina e retire-a da<br />
máquina.<br />
• Ao soltar a alavanca basculante, a bobina sai automaticamente<br />
da cápsula da bobina.<br />
Enfiar a cápsula da bobina<br />
• Segure a bobina entre o polegar e o indicador da mão direita e<br />
deixe aprox. 15 cm da linha pendurada.<br />
• Segure a cápsula da bobina na mão esquerda e coloque a bobina<br />
na cápsula da mesma.<br />
• Introduza a extremidade da linha na ranhura no bordo da cápsula<br />
da bobina.<br />
• Agora para a linha por baixo da mola tensora em direcção ao<br />
orifício da linha. Certifique-se de que aprox. 15 cm da linha se<br />
encontra suspenso para fora da bobina.<br />
P-11<br />
P
Colocação da cápsula da bobina<br />
Enfiar a linha superior<br />
P-12<br />
• Segure a cápsula da bobina de forma que os dedos da cápsula<br />
estejam virados para cima. Abra a alavanca basculante da cápsula<br />
da bobina.<br />
• Coloque a cápsula da bobina no pino central e pressione a cápsula<br />
cuidadosamente para dentro, até o dedo da cápsula da bobina<br />
entrar no anel do rodete.<br />
• Solte a tampa e pressione-a para a cápsula da bobina.<br />
• Feche a cobertura da cápsula da bobina (18).<br />
Leia as seguintes instruções com atenção, pois uma sequência ou<br />
uma introdução da linha errada pode provocar quebras da linha,<br />
omissões de pontos e o enrugamento do tecido.<br />
Na tampa da frente (21) está representada esquematicamente a introdução<br />
da linha, pela qual se pode orientar.<br />
• Antes de enfiar a linha, colocar a agulha na sua posição mais alta,<br />
girando a roda manual (10) e a alavanca do calcador (15).<br />
• Coloque um carrinho de linha num suporte para o mesmo (7),<br />
em que a linha deve chegar ao carrinho de linha pela parte de<br />
trás.<br />
• Segure no carrinho de linha com a mão direita.
• Passe agora a linha por baixo da guia da linha superior (3), tal<br />
como é indicado.<br />
• Em seguida, deixe a linha passar entre os discos tensores do regulador<br />
da tensão da linha superior (2), tal como é indicado.<br />
DICA<br />
Uma tensão da linha superior de 3 é o ideal para a maioria das utilizações.<br />
• Passe a linha para cima por baixo da guia dianteira da linha, a<br />
mola de guia interior é levantada automaticamente.<br />
• Enfie a linha da direita para a esquerda no gancho da alavanca<br />
da linha (1).<br />
NOTA<br />
Se necessário, gire a roda manual (10), para levantar a alavanca da<br />
linha.<br />
• Volte a introduzir a linha para baixo no sentido da agulha, sendo<br />
colocada através da guia interna da linha e da guia da linha do<br />
suporte da agulha.<br />
• Enfie agora a linha, da frente para trás, através do orifício da<br />
agulha e deixe aprox. 10 cm de linha livre.<br />
P-13<br />
P
Fazer subir a linha superior<br />
P-14<br />
• Colocar o calcador (26) para cima.<br />
Gire a roda manual (10) para si com a mão direita, até a agulha<br />
se mover para baixo e de novo para cima.<br />
Logo que a agulha chegue à sua posição mais alta, imobilize a<br />
roda manual (10).<br />
Segure bem a extremidade da linha superior com a mão esquerda.<br />
Puxe a linha superior ligeiramente para cima, de forma que a linha<br />
inferior forme um nó.<br />
• Puxe para trás aprox. 10 cm de ambas as linhas por baixo do<br />
calcador (26).
AJUSTES<br />
Ajuste da tensão da linha<br />
Se a linha partir ao coser, quer dizer que a tensão da linha está demasiado<br />
elevada.<br />
Se, ao coser, se formarem nós, a tensão da linha é demasiado reduzida.<br />
Em ambos os casos, a tensão da linha tem de ser ajustada.<br />
Nesse caso, a tensão da linha superior e inferior deve estar ajustada<br />
na relação correcta.<br />
Regulação da tensão da linha superior<br />
A tensão é criada pelos discos, por onde passa a linha. A pressão nestes<br />
discos é regulada através do regulador da tensão da linha<br />
superior (2).<br />
Quanto maior o número, maior a tensão.<br />
NOTA<br />
Uma tensão da linha superior de 3 é a ideal para a maioria dos trabalhos<br />
de costura.<br />
A tensão da linha superior só é activada mediante a descida do calcador.<br />
Há mais motivos para ter de regular a tensão. Assim, p. ex. a tensão<br />
é diferente para diferentes materiais.<br />
A tensão necessária depende da estabilidade e grossura do tecido,<br />
das camadas de tecido que devem ser cosidas e do tipo de ponto<br />
seleccionado.<br />
Preste atenção para que a tensão da linha superior e inferior seja<br />
uniforme, caso contrário, o tecido pode ficar enrugado.<br />
Recomendamos que cosa uma amostra de tecido, antes de cada trabalho.<br />
Regulação da tensão da linha inferior<br />
A tensão da linha inferior raramente tem de ser regulada, pois já<br />
vem ajustada pelo fabricante para trabalhos gerais de costura.<br />
A tensão da linha inferior é a correcta, quando a linha pode ser removida<br />
facilmente da bobina com uma pequena resistência.<br />
Porém, para materiais especialmente leves ou difíceis de manusear<br />
a linha inferior requer uma regulação.<br />
A tensão da linha inferior pode ser ajustada no parafuso de ajuste da<br />
cápsula da bobina. Para ajustar, utilize a pequena chave de fendas<br />
fornecida.<br />
Remova a cápsula da bobina:<br />
Tensão reduzida:<br />
Rodar o parafuso no sentido contrário ao dos ponteiros do relógio<br />
Tensão elevada:<br />
Rodar o parafuso no sentido dos ponteiros do relógio.<br />
P-15<br />
P
Verificação das tensões da linha<br />
P-16<br />
Verificar a tensão da linha inferior<br />
A forma mais simples de verificar a tensão da linha inferior, é coser<br />
com um ponto médio de ziguezague no tecido que deseja coser.<br />
Utilize a agulha e as linhas adequadas.<br />
Isto é especialmente importante quando utilizar diferentes cores<br />
para a linha superior e inferior.<br />
Cosa alguns pontos em ziguezague.<br />
A tensão da linha é a correcta se não conseguir ver a linha inferior<br />
no lado direito do tecido.<br />
Preste atenção para dar sempre pontos uniformes (ver figura à esquerda).<br />
Costura correcta<br />
O ajuste correcto da tensão da linha superior e inferior deve estar de<br />
tal forma firme que os entrelaçamentos das linhas se encontrem no<br />
centro do tecido.<br />
O tecido permanece plano e sem dobras.<br />
Costuras imperfeitas<br />
A linha superior está demasiado firme e puxa a linha inferior para cima.<br />
A linha inferior surge no lado direito do tecido.<br />
Solução:<br />
Diminuir a tensão da linha superior, rodando o regulador da tensão<br />
da linha superior (2) para um número inferior.<br />
A linha superior está demasiado solta. A linha inferior puxa a linha<br />
superior para baixo. A linha superior surge no avesso do tecido.<br />
Solução:<br />
Aumentar a tensão da linha superior, rodando o regulador da<br />
tensão da linha superior (2) para um número superior.<br />
Em ambos os casos de costuras imperfeitas, deve também regular<br />
eventualmente a tensão da linha inferior.
COSER<br />
Generalidades<br />
Ligue o interruptor principal (13).<br />
Ao mudar o tipo de ponto, coloque a agulha sempre na posição<br />
mais alta. Desloque o tecido o suficiente por baixo do calcador (26).<br />
Deixe cerca de 10 cm de linha superior e inferior livre na parte de<br />
trás.<br />
Descer a alavanca do calcador (15). Enquanto segura a linha com a<br />
mão esquerda, gire a roda manual (10) para si e coloque a agulha<br />
no local do tecido onde pretende começar a coser.<br />
Accione o pedal – quando mais pressionado for o pedal, mais depressa<br />
a máquina trabalha. Ao coser, acompanhe o tecido gentilmente<br />
com a mão. Efectue alguns pontos para trás, accionando a<br />
alavanca de marcha-atrás (12), para fixar os primeiros pontos.<br />
DICA<br />
Se não tiver a certeza se, por exemplo, a tensão da linha ou o ponto<br />
coincidem, experimente os ajustes num retalho de tecido.<br />
O tecido passa automaticamente por baixo do calcador (26): não<br />
deve ser preso nem puxado com as mãos, mas sim acompanhado<br />
suavemente, para que a costura adquira a direcção desejada.<br />
Selecção correcta da agulha<br />
O número, que indica a grossura da agulha, encontra-se na haste.<br />
Quanto maior for o número, mais grossa será a agulha.<br />
NOTA<br />
Nunca utilize uma agulha que esteja dobrada ou gasta.<br />
Elevação e descida do calcador<br />
Levantando ou baixando a alavanca do calcador (15) o<br />
calcador (26) sobe ou desce, respectivamente.<br />
Para poder coser tecidos grossos, o calcador (26) pode ser levantado<br />
para se obter mais algum espaço.<br />
P-17<br />
P
Protecção para os dedos<br />
Coser para trás<br />
Introduzir o tecido na máquina de costura<br />
Alteração da direcção da costura<br />
Corte da linha<br />
P-18<br />
Este acessório protege as mãos de ficarem inadvertidamente por<br />
baixo da agulha.<br />
Utilize a costura para trás para reforçar o início e o fim da costura.<br />
• Prima a alavanca de marcha-atrás (12) para baixo e mantenha-a<br />
premida.<br />
• Accione o pedal – quando mais pressionado for o pedal, mais<br />
depressa a máquina trabalha.<br />
• Se pretender voltar a coser para a frente, basta soltar a alavanca<br />
de marcha-atrás (12).<br />
Termine o seu trabalho sempre de forma que a agulha fique na sua<br />
posição mais alta. Para remover o tecido, levante o calcador (26) e<br />
puxe o tecido para trás, afastando-o de si.<br />
Se no canto do tecido pretender alterar o sentido da costura, proceda<br />
da seguinte forma:<br />
• Pare a máquina e gire a roda manual (10) para si até a agulha<br />
entrar no tecido.<br />
• Levante o calcador (26).<br />
• Rode o tecido à volta da agulha, para mudar para a direcção que<br />
deseja.<br />
• Baixe o calcador (26) e continue a coser.<br />
Corte a linha na parte traseira no calcador (26) ou com uma tesoura.<br />
Deixe aprox. 15 cm de linha livre fora do orifício da agulha.
Botão selector do programa<br />
Nesta máquina de costura encontram-se disponíveis diferentes<br />
pontos normais e de fantasia. Com o botão selector de<br />
programa (6) pode ajustar facilmente o tipo de ponto desejado.<br />
• Antes da mudança de ponto, certifique-se sempre que a agulha<br />
se encontra na sua posição mais alta.<br />
As letras do botão selector do programa correspondem às letras das<br />
figuras dos tipos de ponto.<br />
• Gire o botão selector do programa de forma que o tipo de ponto<br />
desejado se encontre na marcação.<br />
DICA<br />
Se a máquina não coser conforme o programa de costura seleccionado,<br />
gire o botão selector do programa (6) todo de uma vez; volte<br />
depois para o tipo de ponto desejado.<br />
Ajuste do comprimento do ponto<br />
Com o regulador do comprimento do ponto (11), pode seleccionar<br />
o comprimento do tipo de ponto desejado.<br />
• Gire o regulador do comprimento do ponto de forma que o número<br />
do comprimento desejado do ponto se encontre na marcação.<br />
• Os números indicam o comprimento aproximado do ponto em<br />
milímetros.<br />
Quanto menor for o número, mais curto será o ponto.<br />
Ajuste de largura do ponto<br />
Com o regulador de largura do ponto (4) pode seleccionar a largura<br />
do ponto ziguezague ou de uma amostra de pontos.<br />
• Ajuste 0: ponto a direito.<br />
• Ajuste de 1-5: diferentes larguras dos pontos de amostra.<br />
NOTA<br />
Se utilizar agulha dupla, regule a largura do ponto, no máximo,<br />
para 3. No caso de um ajuste mais elevado, as agulhas podem partir.<br />
Tipos de pontos (programas)<br />
Os tipos de pontos são ajustados no botão selector do<br />
programa (6). Preste atenção para que a agulha se encontre na posição<br />
mais alta, antes de efectuar a mudança do tipo de ponto.<br />
Antes de utilizar um programa de pontos, cosa num retalho de tecido.<br />
NOTA<br />
Para colocar e remover o calcador, leia página 31.<br />
Ponto a direito<br />
Adequado para costuras gerais e pespontos.<br />
Calcador: . . . . . . . . . . . . . . . . . . . . . . . . . . . . . calcador padrão<br />
Programa:. . . . . . . . . . . . . . . . . . . . . . . . . . . . . . . . . . . . . . . A<br />
Comprimento do ponto: . . . . . . . . . . . . . . . . . . . . . . . . . . . . . . 0<br />
Largura do ponto: . . . . . . . . . . . . . . . . . . . . . . . . . . . . . . . . . 0<br />
P-19<br />
P
P-20<br />
Ponto ziguezague<br />
O ponto ziguezague é um dos pontos mais usados. Permite muitas<br />
utilizações, como por exemplo, bainhas, aplicações e monogramas.<br />
Antes de utilizar o ponto ziguezague, cosa alguns pontos a direito<br />
para reforçar a costura.<br />
Calcador:. . . . . . . . . . . . . . . . . . . . . . . . . . . . . calcador padrão<br />
Programa: . . . . . . . . . . . . . . . . . . . . . . . . . . . . . . . . . . . . . . . A<br />
Comprimento do ponto: . . . . . . . . . . . . . . . . . . . . . . . . . . 0,5 a 4<br />
Largura do ponto: . . . . . . . . . . . . . . . . . . . . . . . . . . . . . . . 1 a 5<br />
DICAS PARA PONTOS ZIGUEZAGUE<br />
Para conseguir pontos ziguezague mais perfeitos, a tensão da linha<br />
superior tem de estar mais solta do que na costura com pontos a direito.<br />
A linha superior deve ser facilmente visível no lado do avesso do tecido.<br />
Ponto de cordão<br />
O chamado ponto de cordão, um ponto ziguezague muito estreito,<br />
destina-se sobretudo a aplicações, monogramas e diferentes pontos<br />
de fantasia.<br />
Selecção do programa como no caso do ponto ziguezague normal.<br />
Calcador:. . . . . . . . . . . . . . . . . . . . . . . . . . . . . calcador padrão<br />
Programa: . . . . . . . . . . . . . . . . . . . . . . . . . . . . . . . . . . . . . . . A<br />
Comprimento do ponto: . . . . . . . . . . . . . . . . . . . . . . . . . . 0,5 a 2<br />
Largura do ponto: . . . . . . . . . . . . . . . . . . . . . . . . . . . . . . . 1 a 2<br />
DICA<br />
Sempre que utilizar este ponto, deve prestar atenção para que a<br />
tensão da linha superior seja ligeiramente solta. Quanto mais largo<br />
for o ponto, mais relaxada deve ser a tensão da linha superior. Ao<br />
coser tecidos muitos finos ou macios, deve colocar um papel fino<br />
por baixo do tecido e cosê-lo juntamente. Evita, assim, a omissão de<br />
pontos e o enrugamento do tecido.<br />
Ziguezague com três pontos<br />
Com este tipo de ponto são cosidas as beiras ásperas.<br />
Calcador:. . . . . . . . . . . . . . . . . . . . . . . . . . . . . calcador padrão<br />
Programa: . . . . . . . . . . . . . . . . . . . . . . . . . . . . . . . . . . . . . . . B<br />
Comprimento do ponto: . . . . . . . . . . . . . . . . . . . . . . . . . . . 1 a 3<br />
Largura do ponto: . . . . . . . . . . . . . . . . . . . . . . . . . . . . . . . 3 a 5<br />
Bainhas invisíveis no sentido contrário<br />
Calcador:. . . . . . . . . . . . . . . . . . . . . . . . . . . . . calcador padrão<br />
Programa: . . . . . . . . . . . . . . . . . . . . . . . . . . . . . . . . . . . . . . . C<br />
Comprimento do ponto: . . . . . . . . . . . . . . . . . . . . . . . . . . . 1 a 3<br />
Largura do ponto: . . . . . . . . . . . . . . . . . . . . . . . . . . . . . . . 3 a 5
Ponto invisível<br />
Para os chamados pontos invisíveis.<br />
Calcador: . . . . . . . . . . . . . . . . . . . . . . . . . . . . . calcador padrão<br />
Programa:. . . . . . . . . . . . . . . . . . . . . . . . . . . . . . . . . . . . . . . D<br />
Comprimento do ponto: . . . . . . . . . . . . . . . . . . . . . . . . . . . 1 a 3<br />
Largura do ponto: . . . . . . . . . . . . . . . . . . . . . . . . . . . . . . . . . 5<br />
Utilize uma cor de linha, que coincida com o tecido.<br />
No caso de tecidos muito leves ou transparentes utilize um fio de<br />
nylon transparente.<br />
• Dobre o tecido tal como é indicado na figura.<br />
• Cosa por cima da dobra, tal como é indicado. Os pontos a direito<br />
devem estar na bainha, e as extremidades dos pontos ziguezague<br />
devem entrar apenas na dobra superior do tecido.<br />
• Retire agora o tecido da máquina e alise-o.<br />
O tecido dobrado exibe agora um ponto invisível.<br />
Ponto elástico:<br />
a direito triplo, ziguezague triplo<br />
Utilize os tipos de pontos para coser tecidos elásticos ou malhas<br />
para coser elásticos.<br />
O ponto a direito triplo resulta numa costura a direito firme, p. ex.<br />
para costuras extensíveis em calças, aplicações em mangas, forros,<br />
etc., que é três vezes mais forte do que uma costura normal e é também<br />
mais elástica. Por isso, esta costura acompanha o tecido quando<br />
este é esticado, sem romper a linha.<br />
Calcador: . . . . . . . . . . . . . . . . . . . . . . . . . . . . . calcador padrão<br />
Programa:. . . . . . . . . . . . . . . . . . . . . . . . . . . . . . . . . . . . . . . E<br />
Comprimento do ponto: . . . . . . . . . . . . . . . . . . . . . . . . . . . . . . 4<br />
Largura do ponto: . . . . . . . . . . . . . . . . . . . . . . . . . . . . . . 0 a 5<br />
Costurar todos os tipos de tecidos elásticos<br />
Utilize uma linha sintética. Assim, a costura fica quase imperceptível.<br />
Coser duas partes de tecido (elevação)<br />
Com o ponto elástico podem ser cosidas duas partes de tecido de<br />
forma lisa.<br />
• Coloque as duas ourelas do tecido por baixo do calcador. Preste<br />
atenção para que ambas as ourelas sejam cozidas em conjunto<br />
e a agulha entre uniformemente à esquerda e à direita no tecido.<br />
Coser bandas de borracha<br />
• Coloque a banda de borracha no local desejado.<br />
• Coser a banda de borracha com o ponto elástico, esticando a<br />
banda à frente e atrás do calcador com as mãos. Quanto maior<br />
for a tensão, mais apertada será a dobra.<br />
P-21<br />
P
P-22<br />
Ponto em losango<br />
O ponto em losango é um ponto decorativo com múltiplas aplicações,<br />
p. ex. para coser extremidades de bandas de borracha ou<br />
para coser em stretch e noutro material elástico.<br />
Calcador:. . . . . . . . . . . . . . . . . . . . . . . . . . . . . calcador padrão<br />
Programa: . . . . . . . . . . . . . . . . . . . . . . . . . . . . . . . . . . . . . . . F<br />
Comprimento do ponto: . . . . . . . . . . . . . . . . . . . . . . . . . . . . . . 4<br />
Largura do ponto: . . . . . . . . . . . . . . . . . . . . . . . . . . . . . . . . . 5<br />
Para trabalhos em losango prestar atenção ao seguinte:<br />
Dobre a costura uniformemente.<br />
Forre a dobra com uma tira estreita de tecido e coza por cima com<br />
o ponto de losango.<br />
Termine o trabalho em losango, antes de aplicar a peça guarnecida<br />
na peça de vestuário.<br />
No caso de tecidos muito leves, pode conseguir-se o mesmo efeito,<br />
com uma linha elástica.<br />
Ponto Overlock<br />
Este ponto é sobretudo adequado para coser e reparar fatos em jersey<br />
e para jogging. Este ponto é tão útil como decorativo. Ele consiste<br />
em linhas laterais planas com uniões transversais e é<br />
absolutamente elástico.<br />
Calcador:. . . . . . . . . . . . . . . . . . . . . . . . . . . . . calcador padrão<br />
Programa: . . . . . . . . . . . . . . . . . . . . . . . . . . . . . . . . . . . . . . G<br />
Comprimento do ponto: . . . . . . . . . . . . . . . . . . . . . . . . . . . . . . 4<br />
Largura do ponto: . . . . . . . . . . . . . . . . . . . . . . . . . . . . . . . . . 5<br />
Coloque o bordo do tecido por baixo do calcador de forma que a<br />
agulha cosa a direito com do lado direito, tocando ainda no bordo<br />
do tecido e coza em ziguezague com o lado esquerdo.<br />
Pontos de fantasia<br />
Os programas H até R oferecem inúmeros pontos de fantasia.<br />
Calcador:. . . . . . . . . . . . . . . . . . . . . . . . . . . . . calcador padrão<br />
Comprimento do ponto programa H a K: . . . . . . . . . . . . . . . . . . 4<br />
Comprimento do ponto programa L a R: . . . . . . . . . . . . . 0,25 a 1<br />
Largura do ponto: . . . . . . . . . . . . . . . . . . . . . . . . . . . . . . . . . 5<br />
A costura em arco (programa N), por exemplo, é a ideal para coser<br />
modelos decorativos em toalhas de mesa, guardanapos, colarinhos,<br />
mangas, etc.
Orifício do botão<br />
DICA<br />
Para encontrar o comprimento adequado do ponto, recomenda-se<br />
que caseie num retalho de tecido em separado.<br />
Calcador: . . . . . . . . . . . . . . . . . . . . . . . . . .calcador para casear<br />
Programa:. . . . . . . . . . . . . . . . . . . . . . . . . . . . . . . . . . . . S a U<br />
Comprimento do ponto: . . . . . . . . . . . . . . . . . . . . . . . . 0,25 a 1<br />
Largura do ponto: . . . . . . . . . . . . . . . . . . . . . . . . . . . . . . . . . . 5<br />
• Coloque o calcador e a agulha na posição mais alta. Substitua o<br />
calcador pelo calcador para casear.<br />
• Seleccione no tecido, onde se deverá casear, o comprimento<br />
desejado da casa; utilizando um lápis ou giz de alfaiate.<br />
Ao coser tecido muito fino ou sintético, reduza a pressão do calcador<br />
e cosa por cima de um papel, para impedir o enrugamento do<br />
tecido.<br />
Procedimentos<br />
• Com o botão selector de programa (6) seleccione o programa S<br />
para coser o lado esquerdo.<br />
• Passe a linha superior através do orifício do calcador para casear<br />
e puxe as duas, a linha superior e inferior, no lado esquerdo. Baixe<br />
o calcador e cosa lentamente, até ser atingido o comprimento<br />
desejado do lado lateral.<br />
• Levante a agulha para a posição mais alta e mude para o programa<br />
T para o lado inferior.<br />
• Dê alguns pontos do lado inferior.<br />
• Volte a levantar a agulha para a posição mais alta e mude para o<br />
programa U para o lado direito.<br />
• Cosa agora o lado lateral direito no mesmo comprimento do<br />
lado esquerdo.<br />
• Coloque a agulha na posição mais alta e seleccione novamente<br />
o programa T para o lado superior.<br />
• Dê alguns pontos no lado superior, tal como fez para o lado inferior.<br />
• Para rematar, recomenda-se o comprimento de ponto ”0“ e dar<br />
ainda alguns pontos, para que as linhas fiquem bem entrelaçadas<br />
e a casa do botão não desfie.<br />
• Para rematar, abra o tecido entre as costuras com a lanceta de<br />
abrir casas fornecida. Preste muita atenção para não danificar<br />
nenhum dos lados.<br />
DICA<br />
Para evitar cortar o lado superior, recomenda-se espetar um alfinete<br />
antes dele.<br />
P-23<br />
P
Pregar botões e colchetes<br />
P-24<br />
Com o calcador azul transparente podem ser cozidos botões e colchetes<br />
sem esforço.<br />
Com o botão selector do programa (6) seleccione uma largura do<br />
ponto ziguezague, que corresponda à distância do furo.<br />
• Para este passo de trabalho, monte a placa de cerzidura, para evitar<br />
que a peça de trabalho se desloque. Montagem da placa de<br />
cerzidura, consultar página 26<br />
• Baixar o calcador e colocar o botão entre o tecido e o calcador,<br />
de forma que o ponto ziguezague entre nos furos do botão, tal<br />
como se pode ver na figura.<br />
• Verifique a posição correcta do botão, girando a roda<br />
manual (10) com a mão. A agulha tem de entrar exactamente<br />
nos furos do botão, para não se danificar. Se necessário, altere a<br />
largura do ponto ziguezague.<br />
• Cosa a uma velocidade reduzida 6 a 7 pontos por furo.<br />
No caso de botões com quatro furos, o tecido é deslocado com o<br />
botão: assim também são cosidos nos outros furos 6 a 7 pontos. Depois<br />
de remover o tecido, coloque a linha superior cortada generosamente<br />
no lado do avesso do tecido e entrelace-a com a linha<br />
inferior.<br />
Coser botões com pé<br />
No caso de materiais pesados é necessário um pé para o botão.<br />
• Coloque uma agulha, ou no caso de um pé grosso, um fósforo<br />
por cima do botão e, em seguida, proceda da mesma forma<br />
como ao coser um botão normal.<br />
• Remova o material da máquina depois de aprox. 10 pontos.<br />
• Retire a agulha ou o fósforo da peça a ser cosida.<br />
• Deixe um pouco mais de linha superior, enfie-a no botão e enrole-a<br />
algumas vezes à volta do pé, passe-a para o avesso do tecido<br />
e entrelace-a com a linha inferior.
Pregar fechos de correr<br />
Utilize o calcador para fechos.<br />
De acordo com o lado do fecho de correr que deseja coser, o calcador<br />
deve estar sempre pousado no tecido.<br />
Por este motivo, o calcador deve ser fixo à esquerda ou à direita, e<br />
não no meio como no caso de todos os outros calcadores.<br />
• Coloque o calcador e a agulha na posição mais alta, para mudar<br />
de calcador.<br />
• Fixe o fecho de correr ao tecido e coloque a peça a ser cosida em<br />
posição, por baixo do calcador.<br />
• Para coser o lado direito do fecho de correr, fixe o calcador para<br />
fechos de correr de forma que a agulha cosa do lado esquerdo<br />
(1).<br />
• Cosa no lado direito do fecho de correr, em que a costura deve<br />
ser efectuada tão próximo quanto possível dos dentes do fecho.<br />
(1)<br />
• Cosa o fecho de correr cerca de 0,5 centímetros abaixo dos dentes<br />
com uma nervura firme.<br />
• Para coser o lado esquerdo do fecho de correr, mude a posição<br />
do calcador no suporte do mesmo.<br />
• Cosa tal como fez no lado direito do fecho de correr (2).<br />
• Antes de o calcador chegar ao cursor no bordo do fecho de correr,<br />
levante o calcador e abra o fecho de correr, mantendo a<br />
agulha no tecido. (3)<br />
Coser cordões<br />
Com o calcador do fecho de correr também pode coser cordões facilmente,<br />
como se pode ver na figura.<br />
• Dobre o tecido de forma a fazer um túnel para o cordão e cosa<br />
ao longo do cordão, mantendo o calcador para fechos de correr<br />
atrás do cordão.<br />
Coser bainhas<br />
Com o calcador para bainhas pode fazer bainhas em tecidos finos e<br />
de média espessura, p. ex. blusas, lenços de seda e volantes. Mediante<br />
a bainha efectuada com o calcador de rolo, garantem-se ourelas<br />
perfeitas, duradouras e sem esfiar.<br />
• Coloque o calcador e a agulha na posição mais alta e substitua,<br />
em seguida, o calcador existente pelo calcador para bainhas.<br />
• Coloque o início da bainha num dobra dupla de aprox. 2 mm<br />
para o interior.<br />
• Introduza então a bainha invertida na rosca da base da bainha<br />
em rolo.<br />
• Dê alguns pontos com cuidado e lentamente, girando a roda<br />
manual (10).<br />
• Quando o início da bainha for puxado para o calcador, comece<br />
a coser a bainha com cuidado.<br />
P-25<br />
P
Passajar<br />
P-26<br />
• Mantenha a ourela do tecido um pouco por cima do lado esquerdo<br />
do calcador, para evitar um deslizamento para fora da<br />
rosca.<br />
• Preste atenção para que o tecido passe para baixo do lado direito<br />
do calcador.<br />
DICA<br />
Inclinando um pouco a extremidade do tecido, a bainha pode ser<br />
introduzida facilmente no calcador para bainhas.<br />
Fixe a bainha antes de coser ou passe a ferro o início da bainha.<br />
Este trabalho pressupõe a existência dos materiais adequados e de<br />
alguma experiência, para serem obtidos os melhores resultados.<br />
Montar a placa de cerzidura<br />
Em diferentes trabalhos de costura, p. ex. ao pregar botões, colchetes<br />
e para passajar e bordar, é necessário que não se efectue nenhum<br />
transporte automático da peça a ser cosida, mas que o<br />
transporte seja controlado pelo utilizador.<br />
Nestes casos, tem de montar a placa de cerzidura contida nos acessórios.<br />
• Ajuste a alavanca do calcador (15) para cima e gire a roda<br />
manual (10) para colocar a agulha na posição mais alta.<br />
• Prima agora ambos os pinos da placa de cerzidura nos respectivos<br />
orifícios da placa de costura (19), até encaixarem, tal como<br />
é indicado na fig. 1 e 2.<br />
• Para voltar a remover a placa de cerzidura, necessita apenas de<br />
levantar os cantos.<br />
Passajar<br />
• Remova o suporte do calcador e seleccione a tensão normal da<br />
linha inferior.<br />
A tensão da linha superior deve ser um pouco menor do que o normal.<br />
Se necessário, pode forrar os locais danificados com um pouco de<br />
tecido.<br />
• Coloque o tecido por baixo da agulha e levante a alavanca do<br />
calcador (15), para que a tensão da linha seja eficaz.<br />
• Através do avanço e do retrocesso lento do tecido com a mão,<br />
comece lentamente a coser.<br />
• Repita este processo até a parte danificada ficar apertada com<br />
pontos paralelos.<br />
• Se necessário, pode passajar mais uma vez no sentido transversal.<br />
DICA<br />
Ao passajar, o tecido deve estar bem esticado. Se o ponto danificado<br />
for grande, recomenda-se que a peça seja esticada num bastidor<br />
(disponível no nas lojas especializadas).
Bordar<br />
Generalidades<br />
Remova o suporte do calcador, monte a placa de cerzidura e seleccione<br />
a tensão normal da linha inferior.<br />
A tensão da linha superior tem de ser ajustada de forma solta, de tal<br />
modo que a linha superior não seja puxada para o lado direito do<br />
tecido.<br />
• Estique o tecido no bastidor (disponível em lojas especializadas).<br />
• Baixe o calcador, para que a tensão da linha seja eficaz.<br />
• Segure bem no bastidor com a mão, enquanto cose o ponto<br />
desejado. Não mova o tecido, mas sim o bastidor.<br />
NOTA<br />
Não aproxime demasiado os dedos da agulha.<br />
DICA<br />
Recomendamos a estampagem do padrão desejado no lado direito<br />
do tecido com lápis ou giz de alfaiate (disponível em lojas especializadas).<br />
P-27<br />
P
Coser com uma agulha dupla<br />
P-28<br />
A agulha dupla pode ser obtida em lojas especializadas. Na altura da<br />
compra, preste atenção para que a distância entre as agulhas não<br />
exceda 2,5 mm.<br />
Com a agulha dupla podem ser criados magníficos padrões de duas<br />
cores, se utilizar linhas de diferentes cores.<br />
NOTA<br />
Utilize apenas o ponto direito ou o ziguezague com a agulha dupla.<br />
Coloque a largura do ponto, no máximo, para 3.<br />
Com outros programas ou uma largura do ponto maior, as agulhas<br />
podem dobrar ou partir.<br />
• Coloque a agulha dupla tal como uma agulha simples (consultar<br />
página 30).<br />
• Coloque dois carrinhos de linha cheios nos suportes dos<br />
carrinhos (7) amovíveis.<br />
• Certifique-se de que ambos os discos de feltro, fornecidos nos<br />
acessórios, estão colocados em ambos os suportes de<br />
carrinhos (7).<br />
• Enfiar ambas as linhas através do suporte da linha, como se fosse<br />
uma linha individual.<br />
• No caso de discos de tensão da linha superior, enfie ambas as linhas<br />
através dos discos, prestando atenção para que uma linha<br />
passe à direita do disco central e a segunda linha passe à sua esquerda.<br />
• Passe ambas as linhas na guia de linha.<br />
• No caso de orifícios da agulha, enfie uma linha à direita e à esquerda.<br />
NOTA<br />
Para coser um canto com uma agulha dupla, levante a agulha do tecido,<br />
caso contrário a agulha dupla pode partir ou dobrar.
Coser com o braço livre<br />
O braço livre (16) permite-lhe coser facilmente peças tubulares, p.<br />
ex. esta função é muito útil para coser mangas e pernas de calças.<br />
A sua máquina de costura pode tornar-se numa máquina de braço<br />
livre, removendo a mesa amovível com a caixa de acessórios da máquina<br />
de costura.<br />
O braço livre (16) é especialmente útil nos seguintes trabalhos de<br />
costura:<br />
-- Reparação de cotovelos e joelhos em peças de vestuário.<br />
-- Coser mangas, sobretudo em peças de vestuário pequenas<br />
-- Aplicações, bordados ou bainhas de cantos, mangas ou pernas de<br />
calças.<br />
-- Coser cintas elásticas em saias e calças.<br />
A régua da ourela<br />
A régua da ourela é útil para coser a direito e paralelamente à orla<br />
do tecido.<br />
• Gire ligeiramente o parafuso de cabeça estriada da régua no<br />
orifício roscado à direita, perto da placa de costura (19).<br />
• Ajuste a guia para a distância desejada e aperte bem o parafuso.<br />
Como auxílio, são colocadas algumas réguas de guia na placa de<br />
costura (19).<br />
A régua wattier<br />
• Introduza a régua wattier por baixo da mola de aperto na cavidade<br />
prevista.<br />
• Assinalar a primeira costura com giz e coser.<br />
• Com a ajuda da régua wattier, cosa a segunda costura paralelamente<br />
à primeira.<br />
• A distância das costuras pode ser regulada, ajustando a calha no<br />
sentido das setas.<br />
P-29<br />
P
MANUT<strong>EN</strong>ÇÃO, CONSERVAÇÃO E LIMPEZA<br />
Substituição da lâmpada<br />
Substituição da agulha<br />
P-30<br />
Antes de qualquer trabalho de manutenção, limpeza e substituição,<br />
desligue sempre a máquina e retire a ficha.<br />
A lâmpada é ligada e desligada no interruptor principal (13).<br />
• Abrir a tampa da frente (21).<br />
• Agora, pode girar a tampa da frente (21) para a esquerda.<br />
• Troque agora a lâmpada.<br />
• Feche a tampa da frente (21) e aparafuse-a bem.<br />
NOTA<br />
A potência máxima permitida da lâmpada é de 15W.<br />
As lâmpadas podem ser adquiridas numa loja especializada.<br />
• Gire a roda manual (10) para si, até a agulha ficar na posição<br />
mais alta.<br />
• Solte o parafuso de fixação da agulha, girando-o para si.<br />
• Remova a agulha do suporte da mesma.<br />
• Coloque a nova agulha com o lado plano para trás. Introduza a<br />
agulha para cima até encostar.<br />
• Volte a apertar bem o parafuso de fixação da agulha.<br />
NOTA<br />
As agulhas podem ser adquiridas numa loja especializada.<br />
Informações sobre a designação do tipo e a espessura podem ser<br />
consultadas na tabela de tecidos, linhas e agulhas página 40.
Remoção e colocação do calcador<br />
Remoção<br />
• Gire a roda manual (10) para si, até a agulha chegar à sua posição<br />
mais alta.<br />
• Levante o calcador, premindo para cima a alavanca do<br />
calcador (15).<br />
• Premindo para cima a alavanca de accionamento do calcador,<br />
atrás do suporte do calcador, faz baixar o calcador.<br />
Colocação<br />
• Coloque o calcador de forma que o pino assente no calcador directamente<br />
por baixo da ranhura do suporte do calcador. Baixe<br />
a alavanca do calcador (15).<br />
• Prima agora para cima a alavanca de activação do calcador. O<br />
calcador encaixa automaticamente.<br />
P-31<br />
P
Remoção e colocação do suporte do calcador<br />
P-32<br />
O suporte do calcador não precisa de ser removido, a não ser que<br />
pretenda passajar, bordar ou arranjar espaço para a limpeza do<br />
transportador do tecido (27).<br />
Remoção<br />
• Coloque a agulha na sua posição mais alta, girando a roda<br />
manual (10) para si e coloque a alavanca do calcador (15) para<br />
cima.<br />
• Remova o calcador do suporte do calcador e solte o parafuso do<br />
suporte do calcador com a chave de fendas fornecida.<br />
Colocação<br />
Conservação da máquina de costura<br />
• Coloque a agulha na sua posição mais alta, girando a roda<br />
manual (10) para si e coloque a alavanca do calcador (15) para<br />
cima.<br />
• Se colocar agora o suporte do calcador, pressione-o o mais possível<br />
para cima e remova o parafuso do suporte do calcador com<br />
a chave de fendas fornecida.<br />
A máquina de costura é um produto mecânico de precisão e necessita<br />
de uma conservação permanente, para funcionar sempre da<br />
melhor forma.<br />
Esta conservação pode ser efectuada por si próprio.<br />
Conservar significa sobretudo: limpar e lubrificar.<br />
NOTA<br />
Para lubrificar, utilize apenas óleos especiais para máquinas de costura<br />
da melhor qualidade, uma vez que os outros óleos não são<br />
adequados.<br />
Tenha em atenção que após a lubrificação podem permanecer resíduos<br />
no aparelho. Para eliminar estes resíduos, cosa durante breves<br />
momentos num retalho ou resto de tecido. Evita, assim, que a peça<br />
de costura se suje.
Limpeza da caixa e do calcador<br />
Antes de iniciar a limpeza retire a ficha de rede da tomada.<br />
Para a limpeza da caixa e do calcador deve ser utilizado um pano<br />
seco e macio. Devem ser evitados produtos de limpeza ou solventes<br />
químicos, visto que estes podem danificar a superfície e/ou as inscrições<br />
no aparelho.<br />
Limpeza do transportador<br />
É necessário manter os dentes do transportador do tecido sempre<br />
limpos, a fim de garantir uma costura perfeita.<br />
• Remova a agulha e o calcador (consultar página 30 f.).<br />
• Desaperte os parafusos da placa de costura (19), para a retirar da<br />
máquina.<br />
• Remova com uma escova o pó e os restos de tecido dos dentes<br />
do transportador.<br />
• Volte a colocar a placa de costura (19).<br />
Limpeza e lubrificação da caixa da bobina<br />
• Coloque a agulha na posição mais alta, caso contrário o rodete<br />
não pode ser removido.<br />
• Remova a cápsula da bobina.<br />
• Gire a alavanca de engate para fora, como indicado, e remova o<br />
anel do rodete.<br />
• Retire o rodete, fixando os moentes no centro do rodete.<br />
• Retire todas as peças sujas do anel do rodete do caminho do rodete<br />
e lubrifique as peças com um pano.<br />
• Insira uma ou duas gotas de óleo no caminho do rodete da bobina,<br />
tal como é indicado.<br />
• Volte a montar tudo na sequência inversa.<br />
P-33<br />
P
Lubrificação da máquina<br />
P-34<br />
NOTA<br />
A sua máquina de costura já vem lubrificada de fábrica e pronta<br />
para ser utilizada.<br />
Lubrificação da máquina atrás da tampa da frente<br />
Os locais a serem lubrificados estão marcados com setas na figura.<br />
Antes de lubrificar, limpar estes locais. Introduza aí uma ou duas gotas<br />
de um bom óleo para máquinas de costura.<br />
Se a máquina não funcionar correctamente, depois de ter estado<br />
imobilizada durante algum tempo, deixe que a máquina lubrificada<br />
funcione a grande velocidade durante aprox. 1 minuto com a tampa<br />
da frente fechada (21).<br />
Não se esqueça de coser primeiro numa amostra de tecido, para absorver<br />
o óleo que possa eventualmente sair.<br />
DICA<br />
Esta parte da máquina deve ser lubrificada frequentemente, de<br />
acordo com a frequência de uso.
Desmontagem da tampa traseira da caixa<br />
• Coloque a alavanca do calcador (15) para cima, abra a tampa da<br />
frente (21) e solte o parafuso (A).<br />
NOTA<br />
Como os parafusos A; B e C são diferentes, guarde-os sempre separados.<br />
• Remova a mesa amovível e abra a cobertura da cápsula da<br />
bobina (18).<br />
• Pouse a máquina com a parte traseira para cima e desaparafuse<br />
os quatro parafusos (B) e os dois parafusos (C) na base, tal como<br />
é indicado.<br />
• Volte a posicionar a máquina.<br />
P-35<br />
P
P-36<br />
• A tampa interna é fixada por ganchos internos em plástico, tal<br />
como é indicado.<br />
• Pressione com cuidado o canto superior da tampa traseira (onde<br />
estão os ganchos) com uma mão.<br />
• Puxe agora a tampa traseira para fora.
Lubrificação do lado superior e inferior da máquina<br />
Os locais a serem lubrificados estão marcados com setas na figura.<br />
Antes de lubrificar, limpar estes locais. Introduza uma ou duas gotas<br />
de um bom óleo para máquinas de costura.<br />
DICA<br />
Os locais marcados com setas só raramente necessitam de ser lubrificados,<br />
num intervalo aprox. de dois ou três meses de acordo com<br />
a frequência de uso.<br />
Montagem da tampa traseira da caixa<br />
• Volte a colocar a cobertura traseira e preste atenção para que encaixe.<br />
• Volte a colocar a máquina no lado dianteiro e a aparafusar bem<br />
os parafusos A; B e C.<br />
• Feche a cobertura da cápsula da bobina (18) e a tampa da<br />
frente (21).<br />
• Por fim, volte a colocar a cobertura da caixa para o pedal e pressione-a<br />
firmemente, até encaixar.<br />
NOTA<br />
Para facilitar a montagem, preste atenção para que a alavanca do<br />
calcador (15) esteja em cima e a cobertura da cápsula da<br />
bobina (18) permaneça aberta.<br />
A tampa da caixa da ficha do pedal está agora encaixada.<br />
P-37<br />
P
AVARIAS<br />
P-38<br />
Se ocorrerem avarias, consulte este manual de instruções, para confirmar<br />
se todas as instruções foram cumpridas correctamente.<br />
Só se as soluções mencionadas não surtirem efeito, é que deve consultar<br />
o nosso serviço de apoio ao cliente.<br />
Avaria Causa Página<br />
A máquina não funciona suavemente<br />
A linha superior parte<br />
A linha inferior parte<br />
A agulha parte<br />
A máquina omite pontos<br />
A máquina tem de ser lubrificada página 34<br />
Há pó e fios no caminho do rodete página 34<br />
Há restos de tecidos nos dentes do<br />
transportador do tecido<br />
Foi utilizado um óleo inadequado e entupiu a<br />
máquina<br />
página 34<br />
página 34<br />
A máquina não está enfiada correctamente página 12<br />
Tensão da linha é demasiado elevada página 15<br />
Agulha está dobrada ou gasta página 17<br />
A espessura da linha não é adequada para a<br />
agulha<br />
página 17<br />
A agulha não está colocada correctamente página 30<br />
O tecido não passou para trás no final da<br />
costura<br />
Placa de costura, bobina ou calcador<br />
danificado<br />
A linha inferior enreda-se devido a uma<br />
bobina incorrectamente bobinada<br />
A linha inferior não se encontra por baixo da<br />
mola tensora na cápsula da bobina<br />
página 18<br />
página 9<br />
página 9<br />
A agulha foi mal colocada página 30<br />
A agulha está dobrada página 17<br />
A agulha é demasiado fina página 17<br />
Durante a costura o tecido é puxado página 18<br />
Um nó na linha página 12<br />
Em caso de agulhas duplas: a largura do<br />
ponto é superior a 3 ou foi utilizado um<br />
programa especial.<br />
página 28<br />
A agulha foi mal colocada página 30<br />
A agulha foi mal enfiada página 15<br />
A agulha e/ou a linha são inadequadas para o<br />
tecido<br />
página 40<br />
O tecido é muito pesado ou duro página 40<br />
Durante a costura o tecido é puxado. página 18
A costura enruga ou franze<br />
A linha faz nós<br />
O tecido passa de forma irregular<br />
A máquina não funciona<br />
A tensão da linha superior é demasiado<br />
elevada<br />
página 15<br />
A máquina foi mal enfiada página 12<br />
A agulha é demasiado grande para o tecido página 40<br />
A tensão da linha não está regulada página 15<br />
A linha superior não está bem enfiada e/ou a<br />
linha inferior não está bem bobinada<br />
A espessura da linha não é adequada para o<br />
tecido<br />
página 9<br />
página 40<br />
O comprimento do ponto está em ”0“ página 19<br />
Existem restos de fios no caminho do rodete página 33<br />
A roda manual ainda está puxada para fora página 9<br />
A máquina de costura não está ligada<br />
correctamente ou a tomada não tem corrente<br />
página 8<br />
Existem restos de fios no caminho do rodete página 33<br />
O interruptor na roda manual encontra-se no<br />
símbolo da bobina<br />
página 9<br />
P-39<br />
P
TABELA DE TECIDOS, LINHAS E AGULHAS<br />
Espessura<br />
do tecido<br />
tecidos finos<br />
tecidos de<br />
grossura<br />
média<br />
tecidos<br />
pesados<br />
P-40<br />
Tipo de<br />
tecido<br />
Nylon<br />
Bastist<br />
Voile<br />
Geralmente, são utilizadas linhas e agulhas finas para coser tecidos<br />
finos, fios e agulhas mais grossas são utilizadas para tecidos mais<br />
fortes. Teste sempre a espessura da linha e da agulha numa parte do<br />
tecido, que deseja coser. Utilize a mesma linha na agulha e na bobina.<br />
Se coser em ponto strech num tecido fino ou sintético, utilize<br />
agulhas com haste azul (disponíveis em lojas especializadas). Estas<br />
evitam a omissão de pontos.<br />
Linha Agulha<br />
80<br />
algodão<br />
Jersey 60<br />
sintético<br />
seda 50<br />
seda<br />
lã<br />
seda<br />
Perkal<br />
Pikée<br />
linho<br />
50<br />
seda sintética<br />
60 - 80<br />
algodão<br />
Jersey 60<br />
sintético<br />
gabardina 50<br />
seda<br />
tecido Jeans<br />
tecido para<br />
sobretudos<br />
50<br />
algodão<br />
Jersey 50<br />
sintético<br />
lã<br />
Tweed<br />
50<br />
seda<br />
65<br />
75<br />
75 - 90<br />
75<br />
Comprimento do<br />
ponto<br />
Ponto a<br />
direito<br />
Ziguez<br />
ague<br />
1 - 3 1 - 4<br />
0,5 - 3 0,5 - 4<br />
75 - 90 0,5 - 3 0,5 - 4<br />
Tensão da linha<br />
superior
ELIMINAÇÃO<br />
Embalagem<br />
A sua máquina de costura encontra-se numa embalagem<br />
para ficar protegida de danos de transporte.<br />
As embalagens são matérias-primas reutilizáveis ou<br />
podem ser enviadas para reciclagem.<br />
Aparelho<br />
DADOS TÉCNICOS<br />
Nunca deposite a máquina de costura no lixo doméstico<br />
no fim da sua vida útil. Informe-se junto dos<br />
serviços municipais sobre as possibilidades de uma<br />
eliminação correcta e ecológica.<br />
Máquina de costura<br />
Tensão nominal: 230 V ~ 50 Hz<br />
Potência consumida: total 75 W<br />
Motor: 60 W<br />
Lâmpada: 15 W<br />
Tamanho da rosca E14<br />
Pedal:<br />
Tipo: KD 2902<br />
Tensão nominal: 220 V - 240 V ~ 50 Hz<br />
Classe de protecção II<br />
Reservamos os direitos de alterações técnicas!<br />
P-41<br />
P
ÍNDICE ALFABÉTICO<br />
A<br />
Agulha 17, 30<br />
Agulha dupla 28<br />
Ajuste do comprimento do ponto 19<br />
Alavanca da linha 13<br />
Alteração da direcção da costura 18<br />
Anel do rodete 33<br />
Avarias 38<br />
B<br />
Bobina da linha inferior 9<br />
Bordar 27<br />
Botão selector do programa 19<br />
Braço livre 29<br />
C<br />
Caixa da bobina 33<br />
Caixa de acessórios 7, 8<br />
Calcador 17, 31<br />
Calcador padrão 7, 19, 20, 21, 22<br />
Calcador para bainhas 7, 25, 26<br />
Calcador para casear 7, 23<br />
Calcador para pregar botões 7<br />
Calcador para pregar fechos de correr 7, 25<br />
Caminho do rodete 33<br />
Cápsula da bobina 33<br />
Colocação da cápsula da bobina 12<br />
Colocar o calcador 31<br />
Colocar o suporte do calcador 32<br />
Controlo da velocidade de costura 8<br />
Cortar a linha 18<br />
Coser aplicações 28<br />
Coser bainhas 25<br />
Coser bandas de borracha 21<br />
Coser botões com pé 24<br />
Coser cordões 25<br />
Coser duas partes de tecido 21<br />
Coser para trás 18<br />
Coser tecidos elásticos 21<br />
E<br />
Eliminação 41<br />
Encher a bobina da linha inferior 9<br />
Enfiar a cápsula da bobina 11<br />
Enfiar a linha superior 12<br />
P-42
F<br />
Fazer subir a linha superior 14<br />
Fechos de correr 25<br />
L<br />
Lâmpada 30<br />
Limpeza 33<br />
Lubrificação 33, 34, 35<br />
M<br />
Manutenção 30<br />
Material fornecido 6<br />
Mesa amovível 8, 11, 29, 35<br />
O<br />
Orifício do botão 23<br />
P<br />
Passajar 26<br />
Pedal 6, 8, 10, 17, 18, 37, 41<br />
Placa de cerzidura 7, 24, 26, 27<br />
Ponto a direito 19<br />
Ponto a direito triplo 21<br />
Ponto de cordão 20<br />
Ponto em losango 22<br />
Ponto invisível 21<br />
Ponto Overlock 22<br />
Ponto ziguezague 20<br />
Pontos de fantasia 22<br />
Pregar botões e colchetes 24<br />
Protecção para os dedos 7, 18<br />
R<br />
Régua da ourela 7, 29<br />
Régua wattier 7, 29<br />
Regulador da tensão da linha superior 13<br />
Remoção da cápsula da bobina 11<br />
Remover o calcador 31<br />
Remover o suporte do calcador 32<br />
Rodete 33<br />
P-43<br />
P
S<br />
Suporte do calcador 32<br />
Suporte do carrinho de linha 9<br />
T<br />
Tabela de agulhas 40<br />
Tensão da linha 15, 16<br />
Tensão da linha inferior 15, 16<br />
Tensão da linha superior 15<br />
Transportador 33<br />
P-44
OVERVIEW<br />
Main components<br />
Sewing mechanisms<br />
<strong>EN</strong>-2<br />
1) Thread take-up<br />
2) Upper thread tension regulator<br />
3) Upper thread guide<br />
4) Stitch width regulator<br />
5) Fold-down carrying handle<br />
6) Programme selection dial<br />
7) Removable cotton reel holders (2)<br />
8) Bobbin spindle<br />
9) Winding stop<br />
10) Hand wheel<br />
11) Stitch length regulator<br />
12) Reverse lever<br />
13) Main switch (motor and light)<br />
14) Plug housing for foot pedal<br />
15) Sewing foot lever (on back)<br />
16) Free arm<br />
17) Adjustment foot<br />
18) Bobbin case cover<br />
19) Needle plate<br />
20) Thread guide<br />
21) Front flap<br />
22) Needle holder<br />
23) Needle holding screw<br />
24) Needle holder thread guide<br />
25) Needle<br />
26) Sewing foot<br />
27) Fabric feeder<br />
28) Sewing foot holding screw<br />
29) Sewing foot holder<br />
30) Sewing foot release lever
TABLE OF CONT<strong>EN</strong>TS<br />
Safety instructions . . . . . . . . . . . . . . . . . . . . . . . . . . . . . . . 4<br />
About these instructions . . . . . . . . . . . . . . . . . . . . . . . . . . . . 4<br />
Keep electrical equipment out of reach of children . . . . . . . . . . 4<br />
Mains cable and mains connection . . . . . . . . . . . . . . . . . . . . . 4<br />
Never undertake your own repairs . . . . . . . . . . . . . . . . . . . . . 4<br />
Basic information . . . . . . . . . . . . . . . . . . . . . . . . . . . . . . . . . 5<br />
Handling the appliance safely . . . . . . . . . . . . . . . . . . . . . . . . 5<br />
Cleaning and storage . . . . . . . . . . . . . . . . . . . . . . . . . . . . . . . 5<br />
Getting to know your appliance . . . . . . . . . . . . . . . . . . . . . . 6<br />
<strong>Content</strong>s of package . . . . . . . . . . . . . . . . . . . . . . . . . . . . . . . 6<br />
<strong>Content</strong>s of the accessories box . . . . . . . . . . . . . . . . . . . . . . . . 7<br />
Electrical connections . . . . . . . . . . . . . . . . . . . . . . . . . . . . . . 8<br />
Stability of the sewing machine . . . . . . . . . . . . . . . . . . . . . . . 8<br />
Controlling the sewing speed . . . . . . . . . . . . . . . . . . . . . . . . . 8<br />
Attaching and removing the table extension . . . . . . . . . . . . . . 8<br />
Accessories box . . . . . . . . . . . . . . . . . . . . . . . . . . . . . . . . . . . 8<br />
Preparatory work . . . . . . . . . . . . . . . . . . . . . . . . . . . . . . . . 9<br />
Winding thread on to the bobbin . . . . . . . . . . . . . . . . . . . . . . 9<br />
Removing the bobbin case . . . . . . . . . . . . . . . . . . . . . . . . . . 11<br />
Threading the bobbin case . . . . . . . . . . . . . . . . . . . . . . . . . . 11<br />
Inserting the bobbin case . . . . . . . . . . . . . . . . . . . . . . . . . . 12<br />
Threading the upper thread . . . . . . . . . . . . . . . . . . . . . . . . . 12<br />
Bringing up the lower thread . . . . . . . . . . . . . . . . . . . . . . . . 14<br />
Settings . . . . . . . . . . . . . . . . . . . . . . . . . . . . . . . . . . . . . 15<br />
Setting the thread tension . . . . . . . . . . . . . . . . . . . . . . . . . . 15<br />
Checking the thread tension . . . . . . . . . . . . . . . . . . . . . . . . . 16<br />
Sewing . . . . . . . . . . . . . . . . . . . . . . . . . . . . . . . . . . . . . . 17<br />
General information . . . . . . . . . . . . . . . . . . . . . . . . . . . . . . 17<br />
Selecting the right needle . . . . . . . . . . . . . . . . . . . . . . . . . . 17<br />
Raising and lowering the sewing foot . . . . . . . . . . . . . . . . . . 17<br />
Finger protector . . . . . . . . . . . . . . . . . . . . . . . . . . . . . . . . . 18<br />
Reverse stitching . . . . . . . . . . . . . . . . . . . . . . . . . . . . . . . . . 18<br />
Removing fabric from the sewing machine . . . . . . . . . . . . . . 18<br />
Changing the sewing direction . . . . . . . . . . . . . . . . . . . . . . . 18<br />
Cutting the thread . . . . . . . . . . . . . . . . . . . . . . . . . . . . . . . . 18<br />
Programme selection dial . . . . . . . . . . . . . . . . . . . . . . . . . . . 19<br />
Setting the stitch length . . . . . . . . . . . . . . . . . . . . . . . . . . . 19<br />
Setting the stitch width . . . . . . . . . . . . . . . . . . . . . . . . . . . . 19<br />
Stitch types (programmes) . . . . . . . . . . . . . . . . . . . . . . . . . . 19<br />
Buttonhole . . . . . . . . . . . . . . . . . . . . . . . . . . . . . . . . . . . . . 23<br />
Sewing on buttons and hooks and eyes . . . . . . . . . . . . . . . . . 24<br />
Sewing in zips . . . . . . . . . . . . . . . . . . . . . . . . . . . . . . . . . . 25<br />
Hems . . . . . . . . . . . . . . . . . . . . . . . . . . . . . . . . . . . . . . . . . 25<br />
Darning . . . . . . . . . . . . . . . . . . . . . . . . . . . . . . . . . . . . . . . 26<br />
Embroidering . . . . . . . . . . . . . . . . . . . . . . . . . . . . . . . . . . . 27<br />
Sewing with a twin needle . . . . . . . . . . . . . . . . . . . . . . . . . . 28<br />
Sewing with the free arm . . . . . . . . . . . . . . . . . . . . . . . . . . . 29<br />
Seam guide . . . . . . . . . . . . . . . . . . . . . . . . . . . . . . . . . . . . 29<br />
Quilting guide . . . . . . . . . . . . . . . . . . . . . . . . . . . . . . . . . . . 29<br />
Maintenance and cleaning . . . . . . . . . . . . . . . . . . . . . . . . 30<br />
Replacing the sewing light bulb . . . . . . . . . . . . . . . . . . . . . . 30<br />
Replacing the needle . . . . . . . . . . . . . . . . . . . . . . . . . . . . . . 30<br />
Removing and attaching the sewing foot . . . . . . . . . . . . . . . . 31<br />
Removing and attaching the sewing foot holder . . . . . . . . . . . 32<br />
Maintaining the sewing machine . . . . . . . . . . . . . . . . . . . . . 32<br />
Oiling the machine . . . . . . . . . . . . . . . . . . . . . . . . . . . . . . . 34<br />
Faults . . . . . . . . . . . . . . . . . . . . . . . . . . . . . . . . . . . . . . . 38<br />
Fabric, thread and needle table . . . . . . . . . . . . . . . . . . . . . 40<br />
Disposal . . . . . . . . . . . . . . . . . . . . . . . . . . . . . . . . . . . . . 41<br />
Technical data . . . . . . . . . . . . . . . . . . . . . . . . . . . . . . . . . 41<br />
Index . . . . . . . . . . . . . . . . . . . . . . . . . . . . . . . . . . . . . . . 42<br />
<strong>EN</strong>-3<br />
<strong>EN</strong>
SAFETY INSTRUCTIONS<br />
About these instructions<br />
Keep electrical equipment out of reach of children<br />
Mains cable and mains connection<br />
Never undertake your own repairs<br />
<strong>EN</strong>-4<br />
Please read these operating instructions thoroughly and follow them, paying special attention<br />
to the safety instructions, before using the appliance for the first time.<br />
This device may only be used as described in the operating instructions.<br />
If you pass on the appliance to another party it is essential that you also provide the operating<br />
instructions.<br />
Children are not aware of the dangers posed by electrical equipment.<br />
Never allow children to use the sewing machine unsupervised. Remember<br />
that needles can also cause injury even when the machine<br />
has been turned off.<br />
Keep the packaging out of the reach of children. There is a risk of suffocation.<br />
This device is not intended to be used by individuals with restricted<br />
physical, sensory or intellectual abilities or lacking experience and/<br />
or lacking knowledge (including children), unless they are being<br />
supervised an individual responsible for their safety or receive instructions<br />
about how the device is used from such an individual.<br />
Only connect the appliance to a power socket (230 V ~ 50 Hz) that<br />
is easy to reach and is close to the place where you have set up the<br />
appliance. The power socket must be freely accessible so that you<br />
can unplug the appliance quickly, if necessary.<br />
When you unplug the appliance, always take hold of the plug itself,<br />
not the cable.<br />
Fully unwind the cable during operation of the appliance.<br />
The mains cable and extension cable must be positioned so that noone<br />
can trip over them.<br />
The cable must not come into contact with hot surfaces.<br />
When you perform the following activities, switch off and unplug<br />
the sewing machine: Threading, changing the needle, setting the<br />
sewing foot, replacing the light bulb, cleaning and maintenance<br />
work, when you have finished sewing, and if your work is interrupted.<br />
If the plug, cable or appliance is damaged, pull the mains plug immediately.<br />
If the sewing machine or mains cable has visible damage, the appliance<br />
must not be used, in order to avoid risks.<br />
Never try to open and/or repair the appliance yourself. There is a risk<br />
of electric shock! If there is a fault contact our Service Centre or other<br />
suitable specialist workshop.
Basic information<br />
The sewing machine should never be allowed to get wet – there is<br />
the danger of electric shocks!<br />
When the sewing machine is on, never leave it unattended.<br />
Do not use the machine out of doors.<br />
The appliance can only be operated using the supplied foot pedal<br />
model KD 2902.<br />
Handling the appliance safely<br />
Place the sewing machine on a sturdy, level work surface.<br />
During operation, the air vents must not be blocked: Do not allow<br />
any objects (e.g. dust, threads, etc.) to enter the vents.<br />
Only use the accessories supplied.<br />
Only use special sewing machine oil to oil the appliance. Do not use<br />
any other liquids.<br />
Be careful when using the moving parts of the machine, in particular<br />
the needle. There is the risk of injury even when the machine has<br />
been turned off.<br />
When sewing, make sure that your fingers are never underneath the<br />
needle holding screw.<br />
Do not use bent or blunt needles.<br />
When sewing, do not hold the fabric tight or pull the fabric. The<br />
needles could break.<br />
When you have finished sewing, always move the needle to its highest<br />
position.<br />
Cleaning and storage<br />
Before cleaning, remove the plug from the mains socket. Use a dry,<br />
soft cloth to clean the appliance. Avoid the use of chemical solutions<br />
and cleaning products because these may damage the appliance<br />
surface or markings.<br />
Always store the sewing machine using the cover hood provided to<br />
protect the machine from dust.<br />
<strong>EN</strong>-5<br />
<strong>EN</strong>
GETTING TO KNOW YOUR APPLIANCE<br />
<strong>Content</strong>s of package<br />
<strong>EN</strong>-6<br />
When unpacking, ensure that the following parts are included:<br />
1) Sewing machine<br />
2) Table extension with accessories box<br />
3) Foot pedal<br />
4) Bobbin holder for overlock threads<br />
The following parts not shown in the diagram:<br />
• Cover hood<br />
• Operating instructions and guarantee documents
<strong>Content</strong>s of the accessories box<br />
1) Standard foot (straight stitch/zigzag stitch) (already attached)<br />
2) Hemming foot<br />
3) Buttonhole sewing foot<br />
4) Zip sewing foot<br />
5) Button sewing foot<br />
6) Seam guide<br />
7) Quilting guide<br />
8) Darning plate<br />
9) Spare bobbin (3)<br />
10) Finger protector (already attached)<br />
11) Felt for cotton reel holder (2)<br />
12) Selection of needles<br />
13) Oilcan<br />
14) Screwdriver (large)<br />
15) Screwdriver (small)<br />
16) Knife<br />
<strong>EN</strong>-7<br />
<strong>EN</strong>
Electrical connections<br />
Stability of the sewing machine<br />
Controlling the sewing speed<br />
<strong>EN</strong>-8<br />
The power switch turns both the machine and the sewing light on.<br />
• Put the coupler plug of the supplied foot pedal into the connector<br />
housing on the machine and then put the mains plug into the<br />
socket.<br />
Only used the supplied foot pedal model KD 2902.<br />
Attaching and removing the table extension<br />
Accessories box<br />
Once you have finished working or before you start maintenance,<br />
always turn off and unplug the machine.<br />
You can use the adjustment foot (17) to adjust the stability of the sewing<br />
machine.<br />
• Turn the adjustment foot to the right to move it down or to the<br />
left to move it up.<br />
• Adjust the foot so that the sewing machine is level on the work<br />
surface and does not wobble.<br />
The sewing speed is controlled by the foot pedal. The sewing speed<br />
can be changed by applying more or less pressure to the foot pedal.<br />
The machine is supplied with an attached work table.<br />
• The table extension is removed by pushing it carefully to the left.<br />
• To attach the table extension, carefully place the table extension<br />
on to the machine and push it to the right until it audibly clicks<br />
into place.<br />
The accessories box is integrated in the table extension.<br />
• To open it, simply lift the lid of the table extension towards you,<br />
giving you access to the accessories.
PREPARATORY WORK<br />
Winding thread on to the bobbin<br />
You can use the sewing machine to wind thread on to the bobbins<br />
easily.<br />
To do so, take the thread from the cotton reel through the thread<br />
guide to the bobbin.<br />
The exact procedure for winding thread on to the bobbin is described<br />
in the following points:<br />
• Set the switch in the hand wheel (10) to the bobbin symbol to<br />
prevent the needle from moving while you wind thread on to<br />
the bobbin.<br />
• Pull one of the cotton reel holders (7) completely out and place<br />
a cotton reel on it..<br />
• Now guide the thread from the cotton reel through the thread<br />
guide as illustrated.<br />
• Put the end of the thread through the bobbin hole as illustrated<br />
and wind the thread around the bobbin a few times by hand.<br />
<strong>EN</strong>-9<br />
<strong>EN</strong>
<strong>EN</strong>-10<br />
• Place the bobbin on the bobbin spindle (8), with the side of the<br />
bobbin containing the end of the thread facing upwards. Move<br />
the bobbin spindle (8) to the right towards the winding stop (9)<br />
until it audibly clicks into place.<br />
• Hold on to the end of the thread and press the foot pedal. Once<br />
some thread has been wound on to the bobbin, let go of the end<br />
of the thread. Wind thread on to the bobbin until the bobbin<br />
spindle (8) automatically stops.<br />
• Move the bobbin spindle (8) to the left and remove the bobbin.<br />
• Cut the thread.<br />
• Set the switch in the hand wheel (10) back to the needle symbol.<br />
The needle will now move again when you press the foot pedal.<br />
If the thread is wound unevenly on the bobbin, you can adjust the<br />
height of the thread guide:<br />
• Open the front flap (21).<br />
• Loosen screw (B) to adjust the height of the thread guide (A).
Removing the bobbin case<br />
• Remove the table extension.<br />
• Turn the hand wheel (10) to move the needle to its highest position,<br />
move the sewing foot to its highest position and open the<br />
bobbin case cover (18) as illustrated.<br />
• Open the rocking arm of the bobbin case and remove this from<br />
the machine.<br />
• When you let go of the rocking arm, the bobbin falls out of the<br />
bobbin case.<br />
Threading the bobbin case<br />
• Hold the bobbin between the thumb and index finger of your<br />
right hand and leave about 15 cm of the thread hanging out.<br />
• Hold the bobbin case in your left hand and put the bobbin in the<br />
bobbin case.<br />
• Put the end of the thread into the slit on the edge of the bobbin<br />
case.<br />
• Now pass the thread through the tension spring and into the<br />
thread hole. Make sure that around 15 cm of the thread is hanging<br />
out of the bobbin.<br />
<strong>EN</strong>-11<br />
<strong>EN</strong>
Inserting the bobbin case<br />
Threading the upper thread<br />
<strong>EN</strong>-12<br />
• Hold the bobbin case so that the finger of the case is pointing upwards.<br />
Open the rocking arm of the bobbin case.<br />
• Put the bobbin case on the central pin and press the case in carefully<br />
until the finger of the bobbin case enters the shuttle track<br />
ring.<br />
• Let go of the flap and press on the bobbin case.<br />
• Close the bobbin case cover (18).<br />
Please read the following instructions carefully as an incorrect sequence<br />
or thread guiding can lead to broken threads, missed stitches<br />
and gathered fabric.<br />
A diagram of how to guide the thread is provided on the front<br />
flap (21); you can also use this drawing as a guideline.<br />
• Before threading the needle, raise the needle to its highest position<br />
by turning the hand wheel (10) and raise the sewing foot lever<br />
(15) to its highest position.<br />
• Place a cotton reel on one of the cotton reel holders (7), making<br />
sure the thread comes from behind the cotton reel.<br />
• Hold the cotton reel with your right hand.
• Now pass the thread through the upper thread guide (3) as illustrated.<br />
TIP<br />
An upper thread tension of 3 is ideal for most applications.<br />
• Pass the thread under the front thread guide and upwards,<br />
which automatically pushes up the inner guide spring.<br />
• Then insert the thread from right to left into the hook of the<br />
thread take-up (1).<br />
NOTE<br />
If necessary, turn the hand wheel (10) to raise the thread take-up.<br />
• Now guide the thread down towards the needle. It is thus channelled<br />
through the internal thread guide and thread guide of the<br />
needle holder.<br />
• Now pass the thread through the eye of the needle from the<br />
front to the back and leave a thread end of around 10 cm.<br />
<strong>EN</strong>-13<br />
<strong>EN</strong>
Bringing up the lower thread<br />
<strong>EN</strong>-14<br />
• Move the sewing foot (26) to the upper position.<br />
Turn the hand wheel (10) with your right hand towards you until<br />
the needle moves down and back up again.<br />
Stop turning the hand wheel (10) as soon as the needle has reached<br />
its highest position.<br />
Hold the end of the upper thread with your left hand.<br />
Pull the upper thread upwards slightly so that the lower thread<br />
forms a loop.<br />
• Pull around 10 cm of both threads out from under the sewing<br />
foot (26).
SETTINGS<br />
Setting the thread tension<br />
If the thread tears while you are sewing, the thread tension is too<br />
high.<br />
If small loops are formed when you are sewing, the thread tension<br />
is too low.<br />
In both cases, you need to set the thread tension.<br />
The tensions of the upper and lower threads must be in the correct<br />
proportion to each other.<br />
Adjusting the upper thread tension<br />
The tension is created by the discs through which the thread is guided.<br />
The pressure on these discs is controlled by the upper tension<br />
thread regulator (2).<br />
The higher the number, the higher the tension.<br />
NOTE<br />
Upper thread tension of 3 is ideal for most sewing work.<br />
The upper thread tension is not activated until the sewing foot is lowered.<br />
There are a number of reasons why you might need to adjust the<br />
tension. For example, different tensions are required for different fabrics.<br />
The tension you require depends on the strength and thickness of<br />
the fabric, the number of layers of fabric you want to sew and the<br />
type of stitch you choose.<br />
Please make sure that the tensions of the upper and lower threads<br />
match, as otherwise the fabric may gather.<br />
We recommend that you carry out a test on a scrap of fabric before<br />
starting work.<br />
Adjusting the lower thread tension<br />
The lower thread tension rarely needs to be adjusted as this has<br />
been set by the manufacturer for general sewing work.<br />
The lower thread tension is correct if you can pull the thread out of<br />
the bobbin easily but with a slight resistance.<br />
However, the lower thread does need to be adjusted for particularly<br />
lightweight or heavy fabrics.<br />
You set the lower thread tension by using the regulating screw on<br />
the bobbin case. Adjust the screw using the small screwdriver provided.<br />
Remove the bobbin case:<br />
Low tension:<br />
Turn the screw anticlockwise<br />
Higher tension:<br />
Turn the screw clockwise.<br />
<strong>EN</strong>-15<br />
<strong>EN</strong>
Checking the thread tension<br />
<strong>EN</strong>-16<br />
Checking the lower thread tension<br />
The easiest way of checking the lower thread tension is by sewing a<br />
medium zigzag stitch on the fabric in question.<br />
Use the appropriate needle and threads.<br />
You can get a clearer picture by using different colours for the upper<br />
and lower threads.<br />
Sew a few zigzag stitches.<br />
The thread tension is correct if the lower threads are not visible on<br />
the top surface of the fabric.<br />
Make sure that you always sew even stitches (see diagram on the<br />
left).<br />
Correct stitches<br />
The tension of the upper and lower thread should be sufficient to<br />
ensure that the threads interlace in the middle of the fabric.<br />
The fabric remains smooth and does not pucker.<br />
Incorrect stitches<br />
Upper thread is too tight and pulls the lower thread up. The lower<br />
thread is visible on the upper fabric layer.<br />
Solution:<br />
Reduce the upper thread tension by turning the upper thread tension<br />
regulator (2) to a lower number.<br />
Upper thread is too loose. The lower thread pulls the upper thread<br />
down. The upper thread is visible on the underside of the fabric layer.<br />
Solution:<br />
Increase the upper thread tension by turning the upper thread tension<br />
regulator (2) to a higher number.<br />
In both cases in which the stitching is incorrect, you may also need<br />
to adjust the lower thread tension.
SEWING<br />
General information<br />
Switch the main switch (13) on.<br />
When changing the stitch type, always move the needle to its highest<br />
position. Push the fabric sufficiently far under the sewing<br />
foot (26). Make sure there is a length of around 10 cm of the upper<br />
and lower thread behind the needle.<br />
Lower the sewing foot lever (15). While holding the thread with<br />
your left hand, turn the hand wheel (10) towards you and lower the<br />
needle to the point on the fabric where you want to start sewing.<br />
Press the foot pedal – the more pressure you apply to the foot pedal,<br />
the faster the machine runs. While sewing, guide the fabric gently<br />
by hand. Sew a few reverse stitches by actuating the reverse<br />
lever (12), to fix the first stitches in place.<br />
TIP<br />
If you are not sure whether the thread tension or stitch type, for example,<br />
is correct, test the settings on a swatch.<br />
The fabric automatically runs under the sewing foot (26): It should<br />
not be held fast or pulled by hand, but should only be gently guided<br />
so that the stitches go in the desired direction.<br />
Selecting the right needle<br />
The number indicating the needle thickness is written on the shaft.<br />
The higher the number, the thicker the needle.<br />
NOTE<br />
Never use a needle that is bent or blunt.<br />
Raising and lowering the sewing foot<br />
You raise and lower the sewing foot lever (15) to raise and lower the<br />
sewing foot (26).<br />
The sewing foot (26) can be raised slightly to provide extra room<br />
when sewing thick fabrics.<br />
<strong>EN</strong>-17<br />
<strong>EN</strong>
Finger protector<br />
Reverse stitching<br />
Removing fabric from the sewing machine<br />
Changing the sewing direction<br />
Cutting the thread<br />
<strong>EN</strong>-18<br />
This accessory prevents your hand from accidentally getting under<br />
the needle.<br />
Use reverse stitches to reinforce the first and last stitches.<br />
• Press the reverse lever (12) and hold it down.<br />
• Press the foot pedal – the more pressure you apply to the foot<br />
pedal, the faster the machine runs.<br />
• When you want to change to forward stitching, simple release<br />
the reverse lever (12).<br />
When you finish sewing, make sure that the needle is at its highest<br />
position. To remove the fabric, raise the sewing foot (26) and pull<br />
out the fabric from the back of the machine.<br />
To change the sewing direction at the corner of the material, proceed<br />
as follows:<br />
• Stop the machine and turn the hand wheel (10) towards you until<br />
the needle is in the fabric.<br />
• Raise the sewing foot (26).<br />
• Turn the fabric around the needle to change the direction as<br />
desired.<br />
• Lower the sewing foot (26) and continue sewing.<br />
Cut the thread using the thread cutter behind the sewing foot (26)<br />
or with a pair of scissors. Leave around 15 cm of the thread hanging<br />
from the eye of the needle.
Programme selection dial<br />
On this sewing machine, you can select a number of different<br />
functional and decorative stitches. You can use the programme selection<br />
dial (6) to easily select the stitch setting you want.<br />
• Before changing the stitch, always make sure that the needle is<br />
at its highest position.<br />
The letters on the programme selection dial correspond to the letters<br />
above the stitch setting illustrations.<br />
• Turn the programme selection dial so that the arrow marker<br />
points to the stitch type you want to use.<br />
The width of the zigzag stitch is automatically set by turning the<br />
programme selection dial (6).<br />
TIP<br />
If the machine does not create the selected stitch, turn the programme<br />
selection dial (6) one full rotation and then reset the stitch you<br />
require.<br />
Setting the stitch length<br />
You use the stitch length regulator (11) to select the length of the<br />
stitch type you selected.<br />
• Turn the stitch length regulator so that the marker points to the<br />
stitch length number you want to use.<br />
• The numbers indicate the approximate stitch length in millimetres.<br />
The lower the number, the shorter the stitch.<br />
Setting the stitch width<br />
You use the stitch width regulator (4) to select the width of the zizzag<br />
stitch or the stitch type.<br />
• Setting 0: straight stitch.<br />
• Settings 1-5: Different widths of zigzag and decorative stitches.<br />
NOTE<br />
If you use the twin needle, set the stitch width to setting 3 max.<br />
A higher position could break the needles.<br />
Stitch types (programmes)<br />
You set the stitch types using the programme selection dial (6).<br />
Make sure that the needle is at its highest position before changing<br />
the stitch type.<br />
Test the stitching on a swatch before using a stitch programme for<br />
your actual work.<br />
NOTE<br />
For information on attaching and removing the sewing foot, please<br />
see page 31.<br />
Straight stitch<br />
Suitable for general sewing and for top-stitching .<br />
Sewing foot: . . . . . . . . . . . . . . . . . . . . . . . . . . . . . Standard foot<br />
Programme: . . . . . . . . . . . . . . . . . . . . . . . . . . . . . . . . . . . . . A<br />
Stitch length: . . . . . . . . . . . . . . . . . . . . . . . . . . . . . . . . . . .1 to 4<br />
Stitch width . . . . . . . . . . . . . . . . . . . . . . . . . . . . . . . . . . . . . 0<br />
<strong>EN</strong>-19<br />
<strong>EN</strong>
<strong>EN</strong>-20<br />
Zigzag stitch<br />
The zigzag stitch is one of the most commonly used stitches. It can<br />
be used for many different things, for example hemming, appliqué,<br />
and monograms.<br />
Before you use the zigzag stitch, sew a few straight stitches to reinforce<br />
the stitching.<br />
Sewing foot: . . . . . . . . . . . . . . . . . . . . . . . . . . . . . .Standard foot<br />
Programme: . . . . . . . . . . . . . . . . . . . . . . . . . . . . . . . . . . . . . . A<br />
Stitch length:. . . . . . . . . . . . . . . . . . . . . . . . . . . . . . . . . 0.5 to 4<br />
Stitch width: . . . . . . . . . . . . . . . . . . . . . . . . . . . . . . . . . . . 1 to 5<br />
If you use a twin needle, only use programmes B and C.<br />
TIPS FOR ZIGZAG STITCHES<br />
For a better zigzag stitch, the upper thread tension must be lower<br />
than for straight stitches.<br />
The upper thread should be slightly visible on the underside of the<br />
fabric.<br />
Satin stitch<br />
Satin stitch, a zigzag stitch in which the stitches are very close together,<br />
is particularly suitable for appliqué, monograms, and various<br />
decorative stitches.<br />
Programme selection as for the normal zigzag stitch.<br />
Sewing foot: . . . . . . . . . . . . . . . . . . . . . . . . . . . . . .Standard foot<br />
Programme: . . . . . . . . . . . . . . . . . . . . . . . . . . . . . . . . . . . . . . A<br />
Stitch length:. . . . . . . . . . . . . . . . . . . . . . . . . . . . . . . . . 0.5 to 2<br />
Stitch width: . . . . . . . . . . . . . . . . . . . . . . . . . . . . . . . . . . . 1 to 2<br />
TIP<br />
Whenever you use this stitch, reduce the upper thread tension<br />
slightly. The wider the stitch, the lower the upper thread tension<br />
should be. If you are sewing very thin or soft fabrics, you should place<br />
a thin piece of paper under the fabric and sew this too. This prevents<br />
stitches being missed and the material gathering.<br />
Zigzag with three stitches<br />
Used for sewing over rough edges.<br />
Sewing foot: . . . . . . . . . . . . . . . . . . . . . . . . . . . . . .Standard foot<br />
Programme: . . . . . . . . . . . . . . . . . . . . . . . . . . . . . . . . . . . . . . B<br />
Stitch length:. . . . . . . . . . . . . . . . . . . . . . . . . . . . . . . . . . . 1 to 3<br />
Stitch width: . . . . . . . . . . . . . . . . . . . . . . . . . . . . . . . . . . . 3 to 5<br />
Reversed blind hem<br />
Sewing foot: . . . . . . . . . . . . . . . . . . . . . . . . . . . . . .Standard foot<br />
Programme: . . . . . . . . . . . . . . . . . . . . . . . . . . . . . . . . . . . . . . C<br />
Stitch length:. . . . . . . . . . . . . . . . . . . . . . . . . . . . . . . . . . . 1 to 3<br />
Stitch width: . . . . . . . . . . . . . . . . . . . . . . . . . . . . . . . . . . . 3 to 5
Blind stitch<br />
For blind hemming.<br />
Sewing foot: . . . . . . . . . . . . . . . . . . . . . . . . . . . . . Standard foot<br />
Programme: . . . . . . . . . . . . . . . . . . . . . . . . . . . . . . . . . . . . . D<br />
Stitch length: . . . . . . . . . . . . . . . . . . . . . . . . . . . . . . . . . . . . 1 to<br />
Stitch width: . . . . . . . . . . . . . . . . . . . . . . . . . . . . . . . . . . . . . . 5<br />
Use a thread colour that exactly matches the fabric.<br />
If you are sewing very light or transparent fabrics, use a transparent<br />
nylon thread.<br />
• Fold the fabric as illustrated.<br />
• Sew on the fold, as illustrated. The straight stitches should be on<br />
the hem, and only the points of the zigzag stitches should extend<br />
into the upper fold of the fabric.<br />
• Remove the fabric from the machine and straighten it out.<br />
The folded-out fabric now has a blind hem stitch.<br />
Elastic stitch: Triple straight and triple zigzag stitch<br />
Thiese stitches are particularly suitable for sewing of elastic material<br />
or knitwear, application of elastic bands etc.<br />
It can also be used to reinforce elastic materials and to sew on fabric<br />
pieces. It is also suitable for sewing on elastic. A seam with this stitch<br />
is three times as strong as a normal seam and is also far more elastic.<br />
The seam therefore stretches with the fabric without the thread breaking.<br />
Sewing foot: . . . . . . . . . . . . . . . . . . . . . . . . . . . . . Standard foot<br />
Programme: . . . . . . . . . . . . . . . . . . . . . . . . . . . . . . . . . . . . . E<br />
Stitch length: . . . . . . . . . . . . . . . . . . . . . . . . . . . . . . . . . . . . . . 4<br />
Stitch width: . . . . . . . . . . . . . . . . . . . . . . . . . . . . . . . . . . 0 to 5<br />
Sewing all kinds of elastic fabrics<br />
Use a synthetic thread, as this makes the stitches practically invisible.<br />
Sewing together two pieces of fabric<br />
You can use the elastic stitch to join two pieces of fabric.<br />
• Place the two fabric edges under the sewing foot. Make sure that<br />
the two edges remain together and that the needle enters the fabric<br />
right and left at the same distance from the centre.<br />
Sewing on elastic bands<br />
• Position the elastic band as required.<br />
• Sew on the elastic band using the elastic stitch, using your hands<br />
to stretch out the band in front of and behind the sewing foot.<br />
The more you stretch it, the more it will gather.<br />
<strong>EN</strong>-21<br />
<strong>EN</strong>
<strong>EN</strong>-22<br />
Smocking stitch<br />
The smocking stitch can be used in many different ways and is decorative,<br />
e.g. for attaching lace or elastic bands, or for sewing on<br />
stretch and other elastic materials.<br />
Sewing foot: . . . . . . . . . . . . . . . . . . . . . . . . . . . . . .Standard foot<br />
Programme: . . . . . . . . . . . . . . . . . . . . . . . . . . . . . . . . . . . . . . F<br />
Stitch length:. . . . . . . . . . . . . . . . . . . . . . . . . . . . . . . . . . . . . . 4<br />
Stitch width: . . . . . . . . . . . . . . . . . . . . . . . . . . . . . . . . . . . . . . 5<br />
For smocking work, please note the following:<br />
Gather the material evenly.<br />
Place a narrow strip of fabric under the gathers and sew over them<br />
using the smocking stitch.<br />
Finish the smocking work before you insert this decorative piece in<br />
the garment.<br />
In the case of very lightweight fabrics, the same effect can be achieved<br />
by using an elastic thread on the bobbin.<br />
Overlock-overcast stitch<br />
This stitch is particularly suitable for sewing and patching jersey and<br />
track suits. The stitch is both decorative and functional. It consists of<br />
smooth side lines with cross-connections and is completely elastic.<br />
Sewing foot: . . . . . . . . . . . . . . . . . . . . . . . . . . . . . .Standard foot<br />
Programme: . . . . . . . . . . . . . . . . . . . . . . . . . . . . . . . . . . . . . G<br />
Stitch length:. . . . . . . . . . . . . . . . . . . . . . . . . . . . . . . . . . . . . . 4<br />
Stitch width: . . . . . . . . . . . . . . . . . . . . . . . . . . . . . . . . . . . . . . 5<br />
Position the edge of the fabric under the sewing foot so that the<br />
needle sews straight stitches with the right deflection and just touches<br />
the edge of the fabric, so that a zigzag stitch is sewn with the<br />
left deflection.<br />
Decorative embroidery stitches<br />
The programmes H to R offer a great number of decorative stitches.<br />
Sewing foot: . . . . . . . . . . . . . . . . . . . . . . . . . . . . . .Standard foot<br />
Stitch length programmes H to K : . . . . . . . . . . . . . . . . . . . . . . . 4<br />
Stitch length programmes L to R: . . . . . . . . . . . . . . . . . . 0.25 to 1<br />
Stitch width: . . . . . . . . . . . . . . . . . . . . . . . . . . . . . . . . . . . . . . 5<br />
The scallop stitch (programme N), for example, is ideal for sewing<br />
decorative patterns on tablecloths, napkins, collars, cuffs, and so<br />
on.
Buttonhole<br />
TIP<br />
To determine the correct stitch length, we recommend you sew a<br />
test buttonhole on a scrap of fabric.<br />
Sewing foot: . . . . . . . . . . . . . . . . . . . . . . .Buttonhole sewing foott<br />
Programme: . . . . . . . . . . . . . . . . . . . . . . . . . . . . . . . . . . S to U<br />
Stitch length: . . . . . . . . . . . . . . . . . . . . . . . . . . . . . . . . 0.25 to 1<br />
Stitch width: . . . . . . . . . . . . . . . . . . . . . . . . . . . . . . . . . . . . . . 5<br />
• Set the foot and needle to their highest position. Replace the foot<br />
with the buttonhole sewing foot.<br />
• On the fabric, mark where you want to sew the buttonhole and<br />
its length. Use a pencil or tailor's chalk.<br />
How to proceed<br />
• Use the programme selection dial (6) to select programme S to<br />
sew the left bar.<br />
• Pass the upper thread through the opening on the buttonhole<br />
sewing foot and pull both the upper and lower thread to the lefthand<br />
side. Lower the foot and sew slowly until you have achieved<br />
the desired length for the side bar.<br />
• Raise the needle to its highest position and change to programme<br />
S for the bottom bar.<br />
• Sew a few stitches of the bottom bar.<br />
• Raise the needle to its highest position again and change to programme<br />
U for the right-hand bar.<br />
• Now sew the right-hand bar with exactly the same length as the<br />
left-hand side.<br />
• Raise the needle to its highest position and select programme T<br />
again for the top bar.<br />
• Then sew a few stitches for the top bar, like you did for the bottom<br />
bar.<br />
• At the end, you are advised to set the stitch length to "0" and sew<br />
a few more stitches so that the threads are better connected and<br />
the buttonhole does not fray so quickly.<br />
• Then use the knife provided to cut the fabric between the stitches.<br />
Do this carefully to ensure you do not damage any of the<br />
bars.<br />
TIP<br />
Pin a safety pin in front of the top bar to stop you cutting through it.<br />
<strong>EN</strong>-23<br />
<strong>EN</strong>
Sewing on buttons and hooks and eyes<br />
<strong>EN</strong>-24<br />
You can use the transparent blue sewing foot to sew on buttons,<br />
hooks and eyes easily.<br />
Use the programme selection dial (6) to select a zigzag stitch width<br />
that corresponds to the distance between the holes.<br />
• For this step, attach the darning plate to stop the fabric from slipping.<br />
For information on attaching the darning plate, see<br />
page 26<br />
• Lower the sewing foot and place the button between the fabric<br />
and sewing foot so that the zigzag stitch enters the holes of the<br />
button, as illustrated.<br />
• Check the button is positioned correctly by turning the hand<br />
wheel (10) manually. The needle must exactly enter the holes of<br />
the button, otherwise the needle may be damaged. If necessary,<br />
change the width of the zigzag stitch.<br />
• At a low speed, sew about 6 to 7 stitches per hole.<br />
If the button has four holes, move the fabric and button: then sew<br />
6 to 7 stitches in the other two holes. Once you have removed the<br />
fabric, pass a generous length of the upper thread to the underside<br />
of the fabric and knot it to the lower thread there.<br />
Sewing buttons with a shank<br />
In the case of heavy fabrics, a button shank is often needed.<br />
• Place a needle or, for a thicker shank, a matchstick on the button<br />
and then proceed to sew as for a normal button.<br />
• After about 10 stitches, remove the material from the machine.<br />
• Remove the needle or matchstick.<br />
• Leave a longer length of upper thread, pass it through the button<br />
and wind it around the threads to create a shank, then pass<br />
it through to the underside of the fabric and knot it to the lower<br />
thread.
Sewing in zips<br />
Use the zip sewing foot.<br />
Depending on which side of the zip band you are sewing, the sewing<br />
foot must always be on the fabric.<br />
For this reason, the sewing foot is attached on either the left-hand<br />
or right-hand side, and not in the middle like all other sewing feet.<br />
• Raise the sewing foot and needle to its highest position to switch<br />
the sewing foot.<br />
• Place the zip on the fabric and place the workpiece in position<br />
under the foot.<br />
• To sew the right-hand side of the zip, attach the zip sewing foot<br />
so that the needle sews on the left-hand side (1).<br />
• Sew the right-hand side of the zip, creating the stitches as close<br />
as possible to the teeth. (1)<br />
• Sew the zip in with a bridge around 0.5 centimetres below the<br />
teeth.<br />
• To sew the left-hand side of the zip, change the foot position on<br />
the sewing foot holder.<br />
• Proceed in the same way as for the right-hand side of the zip (2).<br />
• Before the foot reaches the slider on the zip band, lift the foot up<br />
and open the zip, keeping the needle in the material. (3)<br />
Sewing in a drawstring<br />
You can also use the zip sewing foot to sew in drawstrings, as illustrated.<br />
• Fold the fabric over once to create a drawstring tunnel and then<br />
sew along the drawstring, making sure the zip sewing foot is behind<br />
the drawstring.<br />
Hems<br />
You can use the roll hem/hemming sewing foot to easily hem fine<br />
to medium materials, e.g. blouses, silk scarves and flounces. Hemming<br />
using the roll hemmer stops the edges from fraying and creates<br />
a clean, durable edge.<br />
• Raise the sewing foot and needle to its highest position and replace<br />
the existing foot with the hemming foot.<br />
• Fold the start of the hem around 2 mm in with a double fold.<br />
• Insert this folded hem into the coil of the roll hemming foot.<br />
• Carefully and slowly sew a few stitches, preferably by turning<br />
the hand wheel (10).<br />
• If the start of the hem was pulled into the foot, carefully start sewing<br />
the hem.<br />
• Always hold the edge of the fabric somewhat over the left-hand<br />
side of the sewing foot, to stop the fabric slipping out of the coil.<br />
• Make sure that the fabric does not slip under the right-hand side<br />
of the sewing foot.<br />
<strong>EN</strong>-25<br />
<strong>EN</strong>
Darning<br />
<strong>EN</strong>-26<br />
TIP<br />
The hem can be inserted in the hemming foot more easily if you<br />
hold the end of the fabric at a slight angle.<br />
Before you start sewing, fix the hem with safety pins or iron down<br />
the start of the hem.<br />
For this work, you need to use suitable materials and have some experience<br />
in order to obtain the best results.<br />
Attaching the darning plate<br />
For some sewing work, e.g. sewing on buttons, hooks and eyes, as<br />
well as darning and embroidering, the material must not be fed automatically<br />
and you must be able to control the feeding of the material<br />
yourself.<br />
In these cases, you must attach the darning plate included in the accessories.<br />
• Raise the sewing foot lever (15) and turn the hand wheel (10) to<br />
raise the needle to its highest position.<br />
• Now push both pins of the darning plate into the openings on<br />
the needle plate (19) until they click into place, as shown in figures<br />
1 and 2.<br />
• To remove the darning plate again, you simply need to lift up<br />
one of the corners.<br />
Darning<br />
• Remove the sewing foot holder and select the normal lower<br />
thread tension.<br />
The upper thread tension should be somewhat lower than usual.<br />
If necessary, you can place a piece of fabric under the damaged<br />
area.<br />
• Place the material under the needle and lower the sewing foot<br />
lever (15) to apply the thread tension.<br />
• Begin sewing by pushing moving the fabric forwards and backwards<br />
by hand.<br />
• Repeat until the damaged area has been completely filled with<br />
parallel stitches.<br />
• If necessary, you can darn over these stitches with stitches at<br />
right angles to them, as you do when darning by hand.<br />
TIP<br />
During darning, the fabric must be taut. If the damaged area is large,<br />
it is advisable to use an embroidery frame (available from specialist<br />
retailers) to keep the material taut.
Embroidering<br />
General information<br />
Remove the sewing foot holder, attach the darning plate and select<br />
the normal lower thread tension.<br />
The upper thread tension must be low enough that the lower<br />
thread is not pulled to the upper side of the fabric.<br />
• Stretch the fabric taut in an embroidery frame (available from<br />
specialist retailers).<br />
• Lower the sewing foot to apply the thread tension.<br />
• Hold the embroidery frame by hand while you sew the desired<br />
pattern. Do not move the fabric itself, only the embroidery frame.<br />
NOTE<br />
Do not let your fingers get too close to the needle.<br />
TIP<br />
We recommend drawing the desired embroidery pattern on the upper<br />
side of the fabric in pencil or tailor's chalk (available from specialist<br />
retailers).<br />
<strong>EN</strong>-27<br />
<strong>EN</strong>
Sewing with a twin needle<br />
<strong>EN</strong>-28<br />
The twin needle is available from well-stocked specialist retailers.<br />
When buying a twin needle, make sure that the distance between<br />
the two needles is no more than 2.5 mm.<br />
The twin needle can be used to create attractive, two-coloured patterns<br />
if you use different coloured threads when sewing.<br />
TIP<br />
Only use the straight stitch or the zigzag stitch with the twin needle.<br />
Set the stitch width to a maximum position of 3.<br />
Applying other stitch types or using a higher stitch width could<br />
cause the needles to bend or break.<br />
• Attach the twin needle in the same way as you would a single<br />
needle (see page 30).<br />
• Place two equally full cotton reels on the removable cotton reel<br />
holders (7).<br />
• Make sure that the two felt discs included in the accessories are<br />
in place on the two cotton reel holders (7).<br />
• Pass the two threads through the thread holder in the same way<br />
as for a single thread.<br />
• Guide both threads through the upper thread tension discs making<br />
sure that one thread goes to the right of the central disc and<br />
the second thread goes to the left of the disc.<br />
• Insert both threads in the thread guide.<br />
• Insert one thread through the eye of the needle on the righthand<br />
side, and one thread on the left-hand side.<br />
NOTE<br />
To sew a corner using the twin needle, take the needle out of the<br />
fabric, as otherwise the twin needle may bend or break.
Sewing with the free arm<br />
The free arm (16) enables you to sew tube-shaped pieces more easily.<br />
This function is very useful e.g. when sewing sleeves and<br />
trouser legs.<br />
You can easily turn your sewing machine into a free-arm machine<br />
by removing the table extension and accessories box from the sewing<br />
machine<br />
The free arm (16) is particularly useful for the following work:<br />
-- Repairing elbows and knees in garments<br />
-- Sewing sleeves, in particular on smaller garments<br />
-- Appliqué, embroidery or hemming edges, cuffs or trouser legs.<br />
-- Sewing elasticated waistbands on skirts or trousers.<br />
Seam guide<br />
The seam guide helps you to create straight and parallel seams along<br />
the edge of the fabric.<br />
• Slightly turn the knurled screw of the guide into the threaded<br />
hole to the right of the needle plate (19).<br />
• Adjust the guide to the required distance and then tighten the<br />
screw.<br />
The needle plate (19) contains a number of guide lines to help you.<br />
Quilting guide<br />
• Push the quilting guide underneath the clamp spring to the intended<br />
depth.<br />
• Mark the first seam with tailor's chalk and sew it.<br />
• You use the quilting guide to sew the second seam parallel to the<br />
first.<br />
• The distance between the seams can be adjusted by moving the<br />
bar in the direction of the arrow.<br />
<strong>EN</strong>-29<br />
<strong>EN</strong>
MAINT<strong>EN</strong>ANCE AND CLEANING<br />
Replacing the sewing light bulb<br />
Replacing the needle<br />
<strong>EN</strong>-30<br />
Before carrying out any maintenance, cleaning or replacement<br />
work, please always turn off and unplug the machine.<br />
You switch the sewing light on and off using the main switch (13).<br />
• For information on opening the front flap (21) see page 15.<br />
• You can now swing the front flap (21) out to the left.<br />
• Replace the bulb.<br />
• Close the front flap (21) and screw it tight.<br />
NOTE<br />
The maximum permitted light bulb power rating in 15W.<br />
Light bulbs are available from specialist retailers.<br />
• Turn the hand wheel (10) towards you until the needle has reached<br />
its highest position.<br />
• Loosen the needle holding screw by turning it towards you.<br />
• Remove the needle from the needle holder.<br />
• Insert a new needle with the flat side facing backwards. Push the<br />
needle upwards until it can go no further.<br />
• Tighten the needle holding screw again.<br />
NOTE<br />
Needles are available from specialist retailers.<br />
For information on types and thickness, please see the table for fabric,<br />
thread and needle data on page 40.
Removing and attaching the sewing foot<br />
Removing<br />
• Turn the hand wheel (10) towards you until the needle has reached<br />
its highest position.<br />
• Raise the sewing foot by pushing up the sewing foot lever (15).<br />
• If you push up the sewing foot release lever behind the sewing<br />
foot holder, the sewing foot drops out.<br />
Attaching<br />
• Attach the sewing foot so that the pin on the foot is directly under<br />
the groove of the foot holder. Lower the sewing foot<br />
lever (15).<br />
• Now push the sewing foot release lever upwards. The sewing<br />
foot automatically clicks into place.<br />
<strong>EN</strong>-31<br />
<strong>EN</strong>
Removing and attaching the sewing foot holder<br />
<strong>EN</strong>-32<br />
The sewing foot holder does not need to be removed unless you<br />
want to darn or embroider, or make space to clean the fabric<br />
feeder (27).<br />
Removing<br />
• Move the needle to its highest position by turning the hand<br />
wheel (10) towards you and raise the sewing foot lever (15).<br />
• Remove the foot from the sewing foot holder and loosen the sewing<br />
foot holder screw using the screwdriver provided.<br />
Attaching<br />
Maintaining the sewing machine<br />
• Move the needle to its highest position by turning the hand<br />
wheel (10) towards you and raise the sewing foot lever (15).<br />
• When you attach the sewing foot holder, push it upwards as far<br />
as possible and tighten the sewing foot holder screw using the<br />
screwdriver provided.<br />
The sewing machine is a sensitive mechanical product and requires<br />
regular maintenance to ensure it always functions perfectly.<br />
You can carry out this maintenance yourself.<br />
Above all, maintenance means cleaning and oiling.<br />
NOTE<br />
Only use high-quality sewing machine oils. Other oils are not suitable.<br />
Please note that after oiling, there may be oil residue in the machine.<br />
To get rid of this residue, sew a few stitches on a swatch or scrap of<br />
fabric. This will stop your actual fabric from getting soiled.
Cleaning the housing and foot pedal<br />
Before cleaning, remove the plug from the mains socket.<br />
Use a dry, soft cloth to clean the housing and foot pedal. Avoid the<br />
use of chemical solutions and cleaning products because these may<br />
damage the appliance surface or markings.<br />
Cleaning the feeder<br />
It is necessary to keep the fabric feeder teeth clean at all times to ensure<br />
perfect stitching.<br />
• Remove the needle and sewing foot (see page 30 f.).<br />
• Remove the screws on the needle plate (19) to remove the needle<br />
plate from the machine.<br />
• Use a brush to remove dust and loose threads from the feeder<br />
teeth.<br />
• Replace the needle plate (19).<br />
Cleaning and oiling the bobbin housing<br />
• Move the needle to its highest position, otherwise the shuttle<br />
cannot be removed.<br />
• Remove the bobbin case.<br />
• Turn the snap lever outwards as illustrated and remove the<br />
shuttle track ring.<br />
• Remove the shuttle by holding the pin in the centre of the shuttle.<br />
• Remove all dirt from the shuttle track's ring and oil the parts<br />
using a cloth.<br />
• Put one or two drops of oil on the bobbin shuttle track, as illustrated.<br />
• Now reassemble all the components following the instructions<br />
in the reverse order.<br />
<strong>EN</strong>-33<br />
<strong>EN</strong>
Oiling the machine<br />
<strong>EN</strong>-34<br />
NOTE<br />
Your sewing machine is delivered oiled and ready for use.<br />
Oiling the machine behind the front flap<br />
The places that need to be oiled are marked with an arrow on the<br />
illustration. You should clean these areas before oiling them. Put<br />
one or two drops of a good sewing machine oil on these areas.<br />
If the machine does not run perfectly if it was out of use for a long<br />
period of time, run the oiled machine at high speed for about a minute<br />
with the front flap (21) closed.<br />
Do not forget to first sew on a fabric scrap to absorb any leaked oil.<br />
TIP<br />
These parts of the machine may need to be oiled more frequently,<br />
depending on how often you use the machine.
Dismantling the rear housing cover<br />
• Raise the sewing foot lever (15), open the front flap (21) and loosen<br />
the screw (A).<br />
NOTE<br />
As screws A, B and C are different, always keep them separate from<br />
each other.<br />
• Remove the table extension and open the bobbin case<br />
cover (18).<br />
• Turn the machine so that the rear side is facing upwards and remove<br />
the four screws (B) and two screws (C) on the base, as illustrated.<br />
• Put the machine upright again.<br />
<strong>EN</strong>-35<br />
<strong>EN</strong>
<strong>EN</strong>-36<br />
• Only small, internal plastic hooks now hold the rear cover, as illustrated.<br />
• Carefully push the upper edge of the rear cover (where the<br />
hooks are located) down with one hand.<br />
• Now pull out the rear cover.
Oiling the top and bottom of the machine<br />
The places that need to be oiled are marked with an arrow on the<br />
illustration. You should clean these areas before oiling them. Put<br />
one or two drops of a good sewing machine oil on these areas.<br />
TIP<br />
The places marked with arrows do not need to be oiled often, only<br />
every two to three months or so, depending on how often you use<br />
the machine.<br />
Attaching the rear housing cover<br />
• Replace the rear cover and make sure that it locks into place.<br />
• Lay the machine back on its front side and tighten screws A; B<br />
and C.<br />
• Close the bobbin case cover (18) and front flap (21).<br />
• Finally, replace the housing cover for the foot pedal and push<br />
this until it locks into place.<br />
NOTE<br />
To simplify assembly, always make sure that the sewing foot<br />
lever (15) is raised and the bobbin case cover (18) is open.<br />
The housing cover for the foot pedal plug just snaps on.<br />
<strong>EN</strong>-37<br />
<strong>EN</strong>
FAULTS<br />
<strong>EN</strong>-38<br />
If faults occur, please read the operating instructions to determine<br />
whether you have followed all the instructions correctly.<br />
Please only contact our customer services if none of the solutions<br />
provided is successful.<br />
Fault Cause Page<br />
Machine does not run smoothly Machine needs to be oiled page 34<br />
Dust and threads in shuttle track page 34<br />
Foreign objects on the teeth of the fabric<br />
feeder<br />
Wrong oil was used and has blocked the<br />
machine<br />
page 34<br />
page 34<br />
Upper thread breaks Machine not threaded correctly page 12<br />
Thread tension too high page 15<br />
Needle bent or blunt page 17<br />
Thread thickness not right for the needle page 17<br />
Needle not inserted correctly page 30<br />
Fabric not pulled through from back at end of<br />
seam<br />
Needle plate, bobbin or sewing foot damaged<br />
Lower thread breaks Lower thread tangles because thread wound<br />
on to bobbin incorrectly<br />
Lower thread not under tension spring in<br />
bobbin case<br />
page 18<br />
page 9<br />
page 9<br />
Needle breaks Needle inserted incorrectly page 30<br />
Needle is bent page 17<br />
Needle is too fine page 17<br />
Fabric pulled while sewing page 18<br />
Knot in the thread page 12<br />
Needle threaded incorrectly page 15<br />
With twin needles: The stitch width is higher<br />
than 3 or a ornament programme was used.<br />
page 28<br />
Machine misses stitches Needle inserted incorrectly page 30<br />
Needle threaded incorrectly page 15<br />
Needle and/or thread not suitable for fabric page 40<br />
Fabric too heavy or hard page 40<br />
Sewing foot pressure too low page 15<br />
Fabric pulled while sewing page 18
Puckering or gathering of seam Upper thread tension too high page 15<br />
Machine threaded incorrectly page 12<br />
Needle too large for the fabric page 40<br />
Thread makes loops Thread tension not adjusted page 15<br />
Upper thread not threaded correctly and/or<br />
lower thread not wound on to bobbin correctly<br />
page 9<br />
Thread thickness not suitable for the fabric page 40<br />
Fabric feed irregular Stitch length is "0" page 19<br />
Thread ends in shuttle track page 33<br />
Machine does not run Sewing machine not connected correctly or<br />
there is no power from the socket<br />
page 8<br />
Thread ends in shuttle track page 33<br />
The switch in the handwheel is set to the<br />
bobbin symbol<br />
page 9<br />
<strong>EN</strong>-39<br />
<strong>EN</strong>
FABRIC, THREAD AND NEEDLE TABLE<br />
Fabric<br />
thicknees<br />
Fine fabrics Nylon<br />
Batiste<br />
Voile<br />
Medium<br />
fabrics<br />
Heavy<br />
fabrics<br />
<strong>EN</strong>-40<br />
As a general rule, fine threads and needles are used to sew thin fabrics,<br />
thicker threads and needles are used for heavier fabrics. Always<br />
test the thread and needle thickness on a scrap of the fabric<br />
you intend to use. Use the same thread for needle and bobbin. If<br />
you sew stretch stitches on fine fabrics or synthetics, use a needle<br />
with a blue shaft (available from specialist retailers). These prevent<br />
stitches from being missed.<br />
Fabric type Thread Needle Stitch length<br />
80<br />
Cotton<br />
Jersey 60<br />
Synthetics<br />
Silk 50<br />
Silk<br />
Wool<br />
Silk<br />
Percale<br />
Piqué<br />
Linen<br />
50<br />
Synthetic silk<br />
60 - 80<br />
Cotton<br />
Jersey 60<br />
Synthetics<br />
Gabardine 50<br />
Silk<br />
Denim<br />
Coat fabric<br />
50<br />
Cotton<br />
Jersey 50<br />
Synthetics<br />
Wool<br />
Tweed<br />
50<br />
Silk<br />
Straight<br />
stitch<br />
Zigzag<br />
65 1 - 3 1 - 4<br />
75<br />
75 - 90 0.5 - 3 0.5 - 4<br />
75<br />
75 - 90 0.5 - 3 0.5 - 4<br />
Upper thread<br />
tension
DISPOSAL<br />
Packaging<br />
Your sewing machine is wrapped in packaging to protect<br />
it against transportation damage. Packaging is<br />
raw material and can be re-used or added to the recycling<br />
system.<br />
Device<br />
TECHNICAL DATA<br />
At the end of its useful life, the sewing machine should<br />
not be disposed of with the household rubbish. Seek<br />
the advice of your local authority on correct, environmentally<br />
friendly disposal.<br />
Sewing machine<br />
Nominal voltage: 230 V ~ 50 Hz<br />
Nominal consumption: total 75 W<br />
Motor: 60 W<br />
Light: 15 W<br />
Socket: E14<br />
Foot pedal<br />
Model: <strong>MD</strong> 2902<br />
Nominal voltage: 230 V ~ 50 Hz<br />
Safety class II<br />
Subject to technical changes.<br />
<strong>EN</strong>-41<br />
<strong>EN</strong>
INDEX<br />
A<br />
Accessories box 7, 8<br />
B<br />
Blind stitch 20, 21<br />
Bobbin 9<br />
Bobbin case 33<br />
Bobbin housing 33<br />
Bringing up the lower thread 14<br />
Button sewing foot 7<br />
Buttonhole 23<br />
Buttonhole sewing foot 7, 23<br />
Buttons and hooks and eyes, sewing on 24<br />
Buttons, sewing with a shank 24<br />
C<br />
Cleaning 33<br />
<strong>Content</strong>s of package 6<br />
Controlling the sewing speed 8<br />
Cotton reel holder 9<br />
D<br />
Darning 26<br />
Darning plate 7, 24, 26, 27<br />
Decorative embroidery stitches 22<br />
Disposal 41<br />
Drawstring, sewing in 25<br />
E<br />
Elastic bands, sewing on 21<br />
Elastic stitch 21<br />
Embroidery 27<br />
F<br />
Fabric pieces, sew together 21<br />
Faults 38<br />
Feeder 33<br />
Finger protector 7, 18<br />
Foot pedal 6, 8, 10, 17, 18, 37, 41<br />
Free arm 29<br />
<strong>EN</strong>-42
H<br />
Hand wheel 9<br />
Hemming foot 7, 25, 26<br />
Hems 25<br />
I<br />
Inserting the bobbin case 12<br />
L<br />
Lace, sewing on 27<br />
Lower thread tension 15, 16<br />
M<br />
Maintenance 30<br />
N<br />
Needle 17, 30<br />
Needle table 40<br />
O<br />
Oiling 33, 34, 35<br />
Overlock-overcast stitch 22<br />
P<br />
Programme selection dial 19<br />
Q<br />
Quilting guide 7, 29<br />
R<br />
Removing the bobbin case 11<br />
Reverse stitching 18<br />
S<br />
Satin stitch 20<br />
Seam guide 7, 29<br />
Sewing direction change 18<br />
Sewing elastic fabrics 21<br />
Sewing foot 17, 31<br />
<strong>EN</strong>-43<br />
<strong>EN</strong>
Sewing foot holder 32<br />
Sewing foot holder, attach 32<br />
Sewing foot holder, remove 32<br />
Sewing foot, attach 31<br />
Sewing foot, remove 31<br />
Sewing light 30<br />
Shuttle 33<br />
Shuttle track 33<br />
Shuttle track ring 33<br />
Smocking stitch 22<br />
Standard foot 7, 19, 20, 21, 22<br />
Standardfuß 20<br />
Stitch length setting 19<br />
Stitch type table 41<br />
Stitch width 19<br />
Straight stitch 19<br />
T<br />
Table extension 8, 11, 29, 35<br />
Thread take-up 13<br />
Thread tension 15, 16<br />
Thread, cutting 18<br />
Threading the bobbin case 11<br />
Threading the upper thread 12<br />
Twin needle 28<br />
U<br />
Upper thread tension 15<br />
W<br />
Winding thread on to the bobbin 9<br />
Z<br />
Zigzag stitch 20<br />
Zip sewing foot 7, 25<br />
Zips 25<br />
<strong>EN</strong>-44
ÜBERSICHT<br />
Hauptkomponenten<br />
Nächmechanismus<br />
D-2<br />
1 Fadenheber<br />
2 Oberfadenspannungsregler<br />
3 Oberfadenführung<br />
4 Stichbreitenregler<br />
5 Umklappbarer Tragegriff<br />
6 Programmwahlknopf<br />
7 Ausziehbare Garnrollenhalter (2)<br />
8 Spulenspindel<br />
9 Spulenanschlag<br />
10 Handrad<br />
11 Stichlängenregler<br />
12 Rückwärtshebel<br />
13 Hauptschalter (Motor und Licht)<br />
14 Steckergehäuse für Fußanlasser<br />
15 Nähfußhebel (auf der Rückseite)<br />
16 Freiarm<br />
17 Regulierungsfuß<br />
18 Spulenkapselabdeckung<br />
19 Stichplatte<br />
20 Fadenführung<br />
21 Frontklappe<br />
22 Nadelhalterung<br />
23 Nadelhalteschraube<br />
24 Nadelhalterungfadenführung<br />
25 Nadel<br />
26 Nähfuß<br />
27 Stofftransporteur<br />
28 Nähfußhalteschraube<br />
29 Nähfußhalter<br />
30 Nähfußauslösehebel
INHALTSVERZEICHNIS<br />
Sicherheitshinweise . . . . . . . . . . . . . . . . . . . . . . . . . . . . . . 4<br />
Elektrische Geräte nicht in Kinderhände . . . . . . . . . . . . . . . . . 4<br />
Netzkabel und Netzanschluss . . . . . . . . . . . . . . . . . . . . . . . . . 4<br />
Niemals selbst reparieren . . . . . . . . . . . . . . . . . . . . . . . . . . . . 4<br />
Grundsätzliche Hinweise . . . . . . . . . . . . . . . . . . . . . . . . . . . . 5<br />
Sicher mit dem Gerät umgehen . . . . . . . . . . . . . . . . . . . . . . . 5<br />
Reinigung und Aufbewahrung . . . . . . . . . . . . . . . . . . . . . . . . 5<br />
Lernen Sie Ihr Gerät kennen . . . . . . . . . . . . . . . . . . . . . . . . 6<br />
Lieferumfang . . . . . . . . . . . . . . . . . . . . . . . . . . . . . . . . . . . . 6<br />
Inhalt der Zubehörbox . . . . . . . . . . . . . . . . . . . . . . . . . . . . . . 7<br />
Elektrische Anschlüsse . . . . . . . . . . . . . . . . . . . . . . . . . . . . . . 8<br />
Standfestigkeit der <strong>Nähmaschine</strong> . . . . . . . . . . . . . . . . . . . . . . 8<br />
Steuern der Nähgeschwindigkeit . . . . . . . . . . . . . . . . . . . . . . . 8<br />
Ansetzen und Entfernen des Anschiebetisches . . . . . . . . . . . . . 8<br />
Zubehörbox . . . . . . . . . . . . . . . . . . . . . . . . . . . . . . . . . . . . . 8<br />
Vorbereitende Arbeiten . . . . . . . . . . . . . . . . . . . . . . . . . . . . 9<br />
Aufspulen der Unterfadenspule . . . . . . . . . . . . . . . . . . . . . . . . 9<br />
Entfernen der Spulenkapsel . . . . . . . . . . . . . . . . . . . . . . . . . 11<br />
Einfädeln der Spulenkapsel . . . . . . . . . . . . . . . . . . . . . . . . . 11<br />
Einsetzen der Spulenkapsel . . . . . . . . . . . . . . . . . . . . . . . . . 12<br />
Einfädeln des Oberfadens . . . . . . . . . . . . . . . . . . . . . . . . . . 12<br />
Heraufholen des Unterfadens . . . . . . . . . . . . . . . . . . . . . . . . 14<br />
Einstellungen . . . . . . . . . . . . . . . . . . . . . . . . . . . . . . . . . . 15<br />
Einstellung der Fadenspannung . . . . . . . . . . . . . . . . . . . . . . 15<br />
Überprüfen der Fadenspannungen . . . . . . . . . . . . . . . . . . . . 16<br />
Nähen . . . . . . . . . . . . . . . . . . . . . . . . . . . . . . . . . . . . . . . 17<br />
Allgemeines . . . . . . . . . . . . . . . . . . . . . . . . . . . . . . . . . . . . 17<br />
Auswahl der richtigen Nadel . . . . . . . . . . . . . . . . . . . . . . . . . 17<br />
Heben und Absenken des Nähfußes . . . . . . . . . . . . . . . . . . . 17<br />
Fingerschutz . . . . . . . . . . . . . . . . . . . . . . . . . . . . . . . . . . . . 18<br />
Rückwärtsnähen . . . . . . . . . . . . . . . . . . . . . . . . . . . . . . . . . 18<br />
Stoff aus der <strong>Nähmaschine</strong> nehmen . . . . . . . . . . . . . . . . . . . 18<br />
Wechseln der Nährichtung . . . . . . . . . . . . . . . . . . . . . . . . . . 18<br />
Durchtrennen des Fadens . . . . . . . . . . . . . . . . . . . . . . . . . . . 18<br />
Der Programmwahlknopf . . . . . . . . . . . . . . . . . . . . . . . . . . 19<br />
Stichlängeneinstellung . . . . . . . . . . . . . . . . . . . . . . . . . . . . 19<br />
Stichbreiteneinstellung . . . . . . . . . . . . . . . . . . . . . . . . . . . . 19<br />
Sticharten (Programme) . . . . . . . . . . . . . . . . . . . . . . . . . . . . 19<br />
Knopflöcher . . . . . . . . . . . . . . . . . . . . . . . . . . . . . . . . . . . . 23<br />
Knöpfe und Ösen annähen . . . . . . . . . . . . . . . . . . . . . . . . . . 24<br />
Reißverschlüsse einnähen . . . . . . . . . . . . . . . . . . . . . . . . . . 25<br />
Säumen . . . . . . . . . . . . . . . . . . . . . . . . . . . . . . . . . . . . . . . 25<br />
Stopfen . . . . . . . . . . . . . . . . . . . . . . . . . . . . . . . . . . . . . . . 26<br />
Sticken . . . . . . . . . . . . . . . . . . . . . . . . . . . . . . . . . . . . . . . . 27<br />
Nähen mit einer Zwillingsnadel (Doppelnadel) . . . . . . . . . . . . 28<br />
Nähen mit dem Freiarm . . . . . . . . . . . . . . . . . . . . . . . . . . . . 29<br />
Das Kantenlineal . . . . . . . . . . . . . . . . . . . . . . . . . . . . . . . . . 29<br />
Das Wattierlineal . . . . . . . . . . . . . . . . . . . . . . . . . . . . . . . . . 29<br />
Wartung, Pflege und Reinigung . . . . . . . . . . . . . . . . . . . . . 30<br />
Auswechseln der Nählampe . . . . . . . . . . . . . . . . . . . . . . . . . 30<br />
Auswechseln der Nadel . . . . . . . . . . . . . . . . . . . . . . . . . . . . 30<br />
Entfernen und Einsetzen des Nähfußes . . . . . . . . . . . . . . . . . 31<br />
Entfernen und Einsetzen des Nähfußhalters . . . . . . . . . . . . . . 32<br />
Pflege der <strong>Nähmaschine</strong> . . . . . . . . . . . . . . . . . . . . . . . . . . . 32<br />
Ölen der Maschine . . . . . . . . . . . . . . . . . . . . . . . . . . . . . . . . 34<br />
Störungen . . . . . . . . . . . . . . . . . . . . . . . . . . . . . . . . . . . . 38<br />
Stoff-, Garn- und Nadeltabelle . . . . . . . . . . . . . . . . . . . . . 40<br />
Entsorgung . . . . . . . . . . . . . . . . . . . . . . . . . . . . . . . . . . . 41<br />
Technische Daten . . . . . . . . . . . . . . . . . . . . . . . . . . . . . . . 41<br />
Stichwortverzeichnis . . . . . . . . . . . . . . . . . . . . . . . . . . . . . 42<br />
D-3<br />
D
SICHERHEITSHINWEISE<br />
Elektrische Geräte nicht in Kinderhände<br />
Netzkabel und Netzanschluss<br />
Niemals selbst reparieren<br />
D-4<br />
Zu dieser Anleitung<br />
Lesen Sie vor der ersten Inbetriebnahme diese Bedienungsanleitung gründlich durch und befolgen<br />
Sie vor allen Dingen die Sicherheitshinweise!<br />
Alle Tätigkeiten an und mit diesem Gerät dürfen nur soweit ausgeführt werden, wie sie in der<br />
Bedienungsanleitung beschrieben sind.<br />
Bewahren Sie diese Bedienungsanleitung für den zukünftigen Gebrauch auf.<br />
Falls Sie das Gerät einmal weitergeben, muss auch diese Bedienungsanleitung unbedingt mitgegeben<br />
werden!<br />
Kinder erkennen nicht die Gefahren, die von elektrischen Geräten<br />
ausgehen.<br />
Lassen Sie Kinder die <strong>Nähmaschine</strong> niemals unbeaufsichtigt benutzen.<br />
Bedenken Sie, dass man sich an den Nadeln auch verletzen<br />
kann, wenn die Maschine nicht am Netz angeschlossen ist.<br />
Halten Sie auch die Verpackungsfolie von Kindern fern. Es besteht<br />
Erstickungsgefahr.<br />
Dieses Gerät ist nicht dafür bestimmt, durch Personen (einschließlich<br />
Kinder) mit eingeschränkten physischen, sensorischen<br />
oder geistigen Fähigkeiten oder mangels Erfahrung und/oder<br />
mangels Wissen benutzt zu werden, es sein denn, sie werden<br />
durch eine für ihre Sicherheit zuständige Person beaufsichtigt<br />
oder erhielten von ihr Anweisungen, wie das Gerät zu benutzen ist.<br />
Schließen Sie das Gerät nur an eine gut erreichbare Steckdose<br />
(230 V ~ 50 Hz) an, die sich in der Nähe des Aufstellortes befindet.<br />
Für den Fall, dass Sie das Gerät schnell vom Netz nehmen müssen,<br />
muss die Steckdose frei zugänglich sein.<br />
Wenn Sie den Stecker ziehen, fassen Sie immer den Stecker selbst an<br />
und ziehen Sie nicht am Kabel.<br />
Wickeln Sie das Kabel während des Betriebs ganz ab.<br />
Netzkabel und Verlängerungskabel müssen so verlegt werden, dass<br />
niemand darüber stolpern kann.<br />
Das Kabel darf keine heißen Flächen berühren.<br />
Schalten Sie für folgende Tätigkeiten die <strong>Nähmaschine</strong> aus und ziehen<br />
Sie den Netzstecker ab: Einfädeln, Nadelwechsel, Nähfuß einstellen,<br />
Glühlampe ersetzen, Reinigungs- und Wartungsarbeiten,<br />
sowie am Ende der Näharbeiten und bei Arbeitsunterbrechung.<br />
Ziehen Sie bei Beschädigung des Geräts oder der Anschlussleitung<br />
sofort den Netzstecker aus der Steckdose.<br />
Das Gerät darf bei sichtbarer Beschädigung der <strong>Nähmaschine</strong> oder<br />
des Netzkables nicht verwendet werden, um Gefärdungen zu vermeiden.<br />
Versuchen Sie auf keinen Fall, das Gerät selbst zu öffnen und/oder<br />
zu reparieren. Es besteht die Gefahr des elektrischen Schlags! Wenden<br />
Sie sich im Störfall an unser Service Center oder eine andere geeignete<br />
Fachwerkstatt.
Wenn die Anchlussleitung dieses Geräts beschädigt ist, muss sie<br />
durch den Hersteller oder seinen Kundendienst oder eine ähnlich<br />
qualifizierte Person ersetzt werden, um Gefährdungen zu vermeiden.<br />
Grundsätzliche Hinweise<br />
Die <strong>Nähmaschine</strong> darf nicht nass werden – es besteht Stromschlaggefahr!<br />
Lassen Sie die eingeschaltete <strong>Nähmaschine</strong> niemals unbeaufsichtigt.<br />
Benutzen Sie die Maschine nicht im Freien.<br />
Gerät darf nur mit dem mitgelieferten Fußanlasser Typ KD 2902 in<br />
Betrieb genommen werden.<br />
Sicher mit dem Gerät umgehen<br />
Stellen Sie die <strong>Nähmaschine</strong> auf eine ebene, feste Arbeitsfläche.<br />
Während des Betriebs müssen die Luftöffnungen frei bleiben: Lassen<br />
Sie keine Gegenstände (z. B. Staub, Fadenreste usw.) in die Öffnungen<br />
eindringen.<br />
Verwenden Sie nur die mitgelieferten Zubehörteile.<br />
Verwenden Sie zum Ölen nur spezielle <strong>Nähmaschine</strong>nöle. Benutzen<br />
Sie keine anderen Flüssigkeiten.<br />
Seien Sie vorsichtig bei der Bedienung der beweglichen Teile der<br />
Maschine, insbesonders der Nadel. Es besteht Verletzungsgefahr<br />
auch dann, wenn die Maschine nicht am Stromnetz ist!<br />
Achten Sie beim Nähen darauf, dass Sie nicht mit den Fingern unter<br />
die Nadelhalteschraube kommen.<br />
Benutzen Sie keine verbogenen oder stumpfen Nadeln.<br />
Halten Sie den Stoff beim Nähen nicht fest und ziehen Sie nicht am<br />
Stoff. Die Nadeln können brechen.<br />
Stellen Sie die Nadel am Schluss der Näharbeit immer in die höchste<br />
Position.<br />
Reinigung und Aufbewahrung<br />
Vor der Reinigung ziehen Sie bitte den Netzstecker aus der Steckdose.<br />
Für die Reinigung verwenden Sie ein trockenes, weiches Tuch.<br />
Vermeiden Sie Chemische Lösungs- und Reinigungsmittel, weil diese<br />
die Oberfläche und/oder Beschriftungen des Gerätes beschädigen<br />
können.<br />
Zur Aufbewahrung decken Sie die <strong>Nähmaschine</strong> immer mit der beiliegenden<br />
Abdeckhaube ab, um die Maschine vor Staub zu schützen.<br />
D-5<br />
D
LERN<strong>EN</strong> SIE IHR GERÄT K<strong>EN</strong>N<strong>EN</strong><br />
Lieferumfang<br />
D-6<br />
Vergewissern Sie sich beim Auspacken, dass folgende Teile mitgeliefert<br />
wurden:<br />
1) <strong>Nähmaschine</strong><br />
2) Anschiebetisch mit Zubehörbox<br />
3) Fußanlasser<br />
4) Spulenhalter für Overlockgarne<br />
Folgende Teile ohne Abbildung:<br />
• Abdeckhaube<br />
• Bedienungsanleitung und Garantieunterlagen
Inhalt der Zubehörbox<br />
1) Standardfuß (Geradstich/Zickzackstich) (bereits montiert)<br />
2) Säumerfuß<br />
3) Knopfloch-Nähfuß<br />
4) Reißverschluss-Nähfuß<br />
5) Knopf-Annähfuß<br />
6) Kantenlineal<br />
7) Wattierlineal<br />
8) Stopfplatte<br />
9) Ersatzspule (3 Stück)<br />
10) Fingerschutz (bereits montiert)<br />
11) Filz für Garnrollenhalter (2 Stück)<br />
12) Nadelsortiment<br />
13) Ölkännchen<br />
14) Schraubendreher (groß)<br />
15) Schraubendreher (klein)<br />
16) Trennmesser<br />
D-7<br />
D
Elektrische Anschlüsse<br />
Standfestigkeit der <strong>Nähmaschine</strong><br />
Steuern der Nähgeschwindigkeit<br />
D-8<br />
Der Stromschalter schaltet sowohl die Maschine als auch das Nählicht<br />
ein.<br />
• Stecken Sie den Kupplungsstecker des mitgelieferten Fußanlassers<br />
in das Steckergehäuse an der Maschine und dann den Netzstecker<br />
in die Steckdose.<br />
Verwenden Sie nur den mitgelieferten Fußanlasser Typ KD 2902.<br />
Schalten Sie nach der Arbeit oder vor Wartungsarbeiten immer die<br />
Maschine aus und ziehen Sie den Netzstecker aus der Steckdose.<br />
Mit dem Regulierungsfuß (17) können Sie die Standfestigkeit der<br />
<strong>Nähmaschine</strong> justieren.<br />
• Drehen Sie den Regulierungsfuß nach rechts, um ihn hinunter<br />
zu drehen, oder nach links, um ihn herauf zu drehen.<br />
• Justieren Sie den Fuß so, dass die <strong>Nähmaschine</strong> gerade auf der<br />
Arbeitsplatte steht und nicht wackelt.<br />
Ansetzen und Entfernen des Anschiebetisches<br />
Zubehörbox<br />
Die Nähgeschwindigkeit wird über den Fußanlasser gesteuert. Die<br />
Nähgeschwindigkeit kann dadurch verändert werden, dass man<br />
mehr oder weniger Druck auf den Fußanlasser ausübt.<br />
Die Maschine wird mit einem angesetzen Arbeitstisch geliefert.<br />
• Der Anschiebetisch wird entfernt, indem Sie ihn vorsichtig nach<br />
links wegschieben.<br />
• Zum Ansetzen des Anschiebetisches setzen Sie ihn vorsichtig an<br />
die Maschine an und schieben ihn nach rechts, bis er hörbar einrastet.<br />
Die Zubehörbox ist in den Anschiebetisch integriert.<br />
• Zum Öffnen klappen Sie den Deckel des Anschiebetisches einfach<br />
zu sich hin und haben somit Zugriff auf die Zubehörteile.
VORBEREIT<strong>EN</strong>DE ARBEIT<strong>EN</strong><br />
Aufspulen der Unterfadenspule<br />
Die Unterfadenspulen lassen sich schnell und einfach mit der <strong>Nähmaschine</strong><br />
aufspulen.<br />
Dazu führen Sie den Faden von der Garnrolle durch die Fadenführung<br />
hin zur Spule.<br />
Die genaue Vorgehensweise für das Aufspulen entnehmen Sie bitte<br />
den folgenden Punkten:<br />
• Stellen Sie den Schalter im Handrad (10) auf das Spulensymbol,<br />
damit sich die Nadel während des Aufspulens nicht mitbewegt.<br />
• Ziehen Sie einen der Garnrollenhalter (7) vollständig heraus und<br />
stecken Sie eine Garnrolle darauf.<br />
• Führen Sie nun den Faden von der Garnrolle, wie in der Abbildung<br />
ersichtlich, durch die Fadenführung.<br />
• Fädeln Sie das Garnende wie abgebildet durch das Loch der Spule<br />
und wickeln Sie den Faden mit der Hand einige Umdrehungen<br />
auf die Spule.<br />
D-9<br />
D
D-10<br />
• Stecken Sie die Spule auf die Spulenspindel (8), wobei das Fadenende<br />
oben auf der Spule ist. Schwenken Sie die Spulenspindel<br />
(8) nach rechts gegen den Spulenanschlag (9), bis er hörbar<br />
einrastet.<br />
• Halten Sie das Fadenende fest und betätigen Sie den Fußanlasser.<br />
Sobald die Spule ein wenig aufgespult ist, lassen Sie das Fadenende<br />
los. Spulen Sie auf, bis die Spulenspindel (8)<br />
automatisch stoppt.<br />
• Schwenken Sie die Spulenspindel (8) nach links und entfernen<br />
Sie die Spule.<br />
• Schneiden Sie den Faden ab.<br />
• Stellen Sie den Schalter im Handrad wieder auf das Nadelsymbol.<br />
Die Nadel bewegt sich nun wieder, wenn Sie den Fußanlasser<br />
betätigen.<br />
Sollte beim Aufspulen die Garnverteilung unregelmäßig sein, haben<br />
Sie die Möglichkeit die Höhe der Fadenführung zu regulieren:<br />
• Frontklappe (21) öffnen<br />
• Schraube (B) lösen, um die Höhe der Fadenführung (A) zu regulieren.
Entfernen der Spulenkapsel<br />
• Entfernen Sie den Anschiebetisch.<br />
• Stellen Sie die Nadel durch Drehen des Handrades (10) sowie<br />
den Nähfuß in die oberste Position und öffnen Sie die<br />
Spulenkapselabdeckung (18) wie in der Abbildung gezeigt.<br />
• Öffnen Sie den Kipphebel der Spulenkapsel und ziehen Sie diese<br />
aus der Maschine.<br />
• Wenn Sie den Kipphebel loslassen, fällt die Spule von selbst aus<br />
der Spulenkapsel heraus.<br />
Einfädeln der Spulenkapsel<br />
• Halten Sie die Spule zwischen Daumen und Zeigefinger Ihrer<br />
rechten Hand und lassen Sie ca. 15 cm des Fadens heraushängen.<br />
• Halten Sie die Spulenkapsel in Ihrer linken Hand und setzen Sie<br />
die Spule in die Spulenkapsel ein.<br />
• Führen Sie das Fadenende in den Schlitz am Rand der Spulenkapsel<br />
ein.<br />
• Nun geben Sie den Faden unter der Spannungsfeder hindurch<br />
und in das Fadenloch. Versichern Sie sich, dass ca. 15 cm des Fadens<br />
aus der Spule heraushängen.<br />
D-11<br />
D
Einsetzen der Spulenkapsel<br />
Einfädeln des Oberfadens<br />
D-12<br />
• Halten Sie die Spulenkapsel so, dass der Finger der Kapsel nach<br />
oben zeigt. Öffnen Sie den Kipphebel der Spulenkapsel.<br />
• Setzen Sie die Spulenkapsel auf den mittleren Stift und drücken<br />
Sie die Kapsel vorsichtig hinein, bis der Finger der Spulenkapsel<br />
in den Greiferbahnring eintritt.<br />
• Lassen Sie die Klappe los und drücken Sie sie auf die Spulenkapsel.<br />
• Schließen Sie die Spulenkapselabdeckung (18).<br />
Bitte lesen Sie die folgenden Anweisungen genau durch, da ein falsche<br />
Reihenfolge oder Fadenführung zu Fadenrissen, Stichauslassungen<br />
und Zusammenziehen des Stoffes führen kann.<br />
Auf der Frontklappe (21) ist noch einmal die schematische Darstellung<br />
der Fadenführung abgebildet, orientieren Sie sich auch an dieser<br />
Zeichnung.<br />
• Bringen Sie vor dem Einfädeln die Nadel durch Drehen des<br />
Handrades (10) und den Nähfußhebel (15) in die oberste Stellung.<br />
• Setzen Sie eine Garnrolle auf einen der Garnrollenhalter (7), wobei<br />
der Faden von hinter der Garnrolle kommen soll.<br />
• Halten Sie die Garnrolle mit der rechten Hand fest.
• Führen Sie nun den Faden durch die Oberfadenführung (3).<br />
• Lassen Sie danach den Faden zwischen den Spannungsscheiben<br />
des Oberfadenspannungsreglers (2) durchlaufen.<br />
TIPP<br />
Eine Oberfadenspannung von 3 ist für die meisten Anwendungen<br />
ideal.<br />
• Führen Sie den Faden unter der vorderen Fadenführung hindurch<br />
nach oben, dabei wird die innere Führungsfeder automatisch<br />
hinaufgeschoben.<br />
• Fädel Sie dann den Faden von rechts nach links in den Haken des<br />
Fadenhebers (1) ein.<br />
HINWEIS<br />
Drehen Sie ggf. am Handrad (10), um den Fadenheber bis oben anzuheben.<br />
• Führen Sie den Faden nun wieder nach unten in Richtung Nadel,<br />
dabei wird er durch die interne Fadenführung und die Fadenführung<br />
der Nadelhalterung gelegt.<br />
• Fädeln Sie nun den Faden von vorne nach hinten durch das Nadelöhr<br />
und lassen Sie ein Fadenende von ca. 10 cm übrig.<br />
D-13<br />
D
Heraufholen des Unterfadens<br />
D-14<br />
• Stellen Sie den Nähfuß (26) nach oben.<br />
Drehen Sie das Handrad (10) mit der rechten Hand zu sich, bis<br />
die Nadel sich nach unten und wieder nach oben bewegt.<br />
Dann stoppen Sie das Handrad (10), sobald die Nadel auf ihrer<br />
höchsten Position ist.<br />
Halten Sie das Ende des Oberfadens mit Ihrer linken Hand fest.<br />
Ziehen Sie den Oberfaden leicht nach oben, so dass der Unterfaden<br />
eine Schlinge bildet.<br />
• Ziehen Sie ca. 10 cm der beiden Fäden unter dem Nähfuß (26)<br />
nach hinten heraus.
EINSTELLUNG<strong>EN</strong><br />
Einstellung der Fadenspannung<br />
Wenn der Faden beim Nähen reißt, ist die Fadenspannung zu hoch.<br />
Wenn sich beim Nähen kleine Schlaufen bilden, ist die Fadenspannung<br />
zu niedrig.<br />
In beiden Fällen muss die Fadenspannung eingestellt werden.<br />
Dabei müssen Oberfaden- und Unterfadenspannung im richtigen<br />
Verhältnis zueinander stehen.<br />
Regulierung der Oberfadenspannung<br />
Die Spannung wird von den Scheiben, durch die der Faden geführt<br />
wird, erzeugt. Der Druck auf diese Scheiben wird durch den<br />
Oberfadenspannungsregler (2) reguliert.<br />
Je höher die Zahl, desto fester die Spannung.<br />
HINWEIS<br />
Eine Oberfadenspannung von 3 ist für die meisten Näharbeiten geeignet.<br />
Die Oberfadenspannung wird erst durch das Herablassen des Nähfußes<br />
aktiviert.<br />
Es gibt mehrere Gründe, die Spannung zu regulieren. So muss z. B.<br />
die Spannung für verschiedene Stoffe auch verschieden stark sein.<br />
Die benötigte Spannung hängt von der Festigkeit und Dicke des<br />
Stoffes ab, wie viele Lagen Stoff genäht werden sollen und welche<br />
Stichart Sie wählen.<br />
Bitte achten Sie darauf, dass die Spannung von Ober- und Unterfaden<br />
gleichmäßig ist, da es sonst zu einem Zusammenziehen des<br />
Stoffes kommen kann.<br />
Wir empfehlen, vor jeder Näharbeit auf einem Stoffrest eine Probenaht<br />
zu machen.<br />
Regulierung der Unterfadenspannung<br />
Die Unterfadenspannung muss selten reguliert werden, da diese<br />
bereits vom Hersteller für das Nähen allgemeiner Näharbeiten eingestellt<br />
ist.<br />
Die Unterfadenspannung ist gerade richtig, wenn Sie den Faden<br />
leicht mit einem kleinen Widerstand aus der Spule herausziehen<br />
können.<br />
Für besonders leichte oder schwere Stoffe muss der Unterfaden jedoch<br />
reguliert werden.<br />
Die Unterfadenspannung verstellen Sie an der Einstellschraube der<br />
Spulenkapsel. Benutzen Sie zum Einstellen den kleinen beiliegenden<br />
Schraubendreher.<br />
Nehmen Sie die Spulenkapsel heraus:<br />
Niedrige Spannung:<br />
Schraube gegen den Uhrzeigersinn drehen<br />
Höhere Spannung:<br />
Schraube im Uhrzeigersinn drehen.<br />
D-15<br />
D
Überprüfen der Fadenspannungen<br />
D-16<br />
Unterfadenspannung überprüfen<br />
Die einfachste Art die Unterfadenspannung zu überprüfen ist das<br />
Nähen eines mittleren Zickzackstichs auf dem Stoff, den Sie nähen<br />
wollen.<br />
Benutzen Sie dazu die vorgesehene Nadel und Fäden.<br />
Besonders deutlich wird es, wenn Sie für Ober- und Unterfaden verschieden<br />
farbige Fäden benutzen.<br />
Nähen Sie nun einige Zickzackstiche.<br />
Die Fadenspannung ist richtig, wenn Sie den Unterfaden nicht auf<br />
der Oberseite des Stoffes zu sehen bekommen.<br />
Achten Sie darauf, dass Sie immer gleichmäßige Stiche nähen (siehe<br />
nebenstehende Abbildung).<br />
Richtige Naht<br />
Die richtige Einstellung von Ober- und Unterfadenspannung sollte<br />
gerade so fest sein, dass sich die Verschlingungen der Fäden in der<br />
Mitte des Stoffes befinden.<br />
Der Stoff bleibt glatt und bildet keine Falten.<br />
Unsaubere Nähte<br />
Der Oberfaden ist zu fest und zieht den Unterfaden nach oben. Der<br />
Unterfaden erscheint auf der oberen Stofflage.<br />
Lösung:<br />
Oberfadenspannung durch Drehen des Oberfadenspannungsreglers<br />
(2) niedriger einstellen.<br />
Der Oberfaden ist zu locker. Der Unterfaden zieht den Oberfaden<br />
nach unten. Der Oberfaden erscheint auf der Unterseite der Stofflage.<br />
Lösung:<br />
Oberfadenspannung durch Drehen des Oberfadenspannungsreglers<br />
(2) auf höher einstellen.<br />
In beiden Fällen von unsauberen Nähten müssen Sie eventuell auch<br />
die Unterfadenspannung regulieren.
NÄH<strong>EN</strong><br />
Allgemeines<br />
Schalten Sie den Hauptschalter (13) ein.<br />
Stellen Sie die Nadel beim Wechsel der Sticharten immer in die<br />
höchste Position. Schieben Sie den Stoff weit genug unter den<br />
Nähfuß (26). Lassen Sie Ober- und Unterfaden etwa 10 cm nach<br />
hinten überstehen.<br />
Den Nähfußhebel (15) herablassen. Während Sie den Faden mit Ihrer<br />
linken Hand festhalten, drehen Sie das Handrad (10) zu sich und<br />
bringen die Nadel auf jene Stelle des Stoffes, wo Sie zu nähen beginnen<br />
wollen.<br />
Betätigen Sie den Fußanlasser – je mehr der Fußanlasser durchgetreten<br />
wird, umso schneller läuft die Maschine. Führen Sie den Stoff<br />
beim Nähen sanft mit der Hand. Nähen Sie einige Rückwärtsstiche<br />
durch Bedienen des Rückwärts- hebels (12), um die ersten Nahtstiche<br />
zu fixieren.<br />
TIPP<br />
Wenn Sie sich unsicher sind, ob zum Beispiel die Fadenspannung<br />
oder Stichart stimmen, probieren Sie die Einstellungen an einem<br />
Stof<strong>fm</strong>uster aus.<br />
Der Stoff läuft automatisch unter dem Nähfuß (26) durch: Er darf<br />
nicht mit den Händen aufgehalten oder gezogen, sondern nur<br />
leicht geführt werden, damit die Naht die von Ihnen gewünschte<br />
Richtung erhält.<br />
Auswahl der richtigen Nadel<br />
Die Nummer, die die Stärke des Nadel anzeigt, ist auf dem Schaft<br />
angebracht.<br />
Je höher die Nummer, desto stärker die Nadel.<br />
HINWEIS<br />
Benutzen Sie auf keinen Fall eine Nadel, die gebogen oder stumpf<br />
ist.<br />
Heben und Absenken des Nähfußes<br />
Durch Heben oder Ansenken des Nähfußhebels (15) geht der<br />
Nähfuß (26) hinauf oder hinunter.<br />
Um dicke Stoffe nähen zu können, kann der Nähfuß (26) für zusätzlichen<br />
Spielraum etwas angehoben werden.<br />
D-17<br />
D
Fingerschutz<br />
Rückwärtsnähen<br />
Stoff aus der <strong>Nähmaschine</strong> nehmen<br />
Wechseln der Nährichtung<br />
Durchtrennen des Fadens<br />
D-18<br />
Dieses Zubehörteil schützt Sie davor, mit der Hand unter die Nadel<br />
zu gelangen.<br />
Benutzen Sie das Rückwärtsnähen zum Verstärken am Anfang und<br />
Ende einer Naht.<br />
• Drücken Sie den Rückwärtshebel (12) nach unten und halten Sie<br />
ihn gedrückt.<br />
• Betätigen Sie den Fußanlasser – je mehr der Fußanlasser durchgetreten<br />
wird, desto schneller läuft die Maschine.<br />
• Wenn Sie wieder auf Vorwärtsstich umschalten wollen, lassen<br />
Sie den Rückwärtshebel (12) einfach los.<br />
Beenden Sie Ihre Näharbeiten immer so, dass die Nadel in der höchsten<br />
Position ist. Um den Stoff zu entfernen, heben Sie den<br />
Nähfuß (26) und ziehen Sie den Stoff von sich weg nach hinten.<br />
Wenn Sie an den Ecken des Nähguts die Nährichtung ändern wollen,<br />
gehen Sie wie folgt vor:<br />
• Stoppen Sie die Maschine und drehen Sie das Handrad (10) so<br />
weit zu sich, bis die Nadel im Stoff steckt.<br />
• Heben Sie den Nähfuß (26).<br />
• Drehen Sie den Stoff um die Nadel, um die Richtung wie gewünscht<br />
zu ändern.<br />
• Senken Sie den Nähfuß (26) wieder und fahren Sie mit dem Nähen<br />
fort.<br />
Durchtrennen Sie den Faden mit dem Fadenschneider hinten am<br />
Nähfuß (26) oder mit einer Schere. Lassen Sie ca. 15 cm des Fadens<br />
von Nadelöhr heraushängen.
Der Programmwahlknopf<br />
Bei dieser <strong>Nähmaschine</strong> stehen Ihnen verschiedene Nutz- und Zierstiche<br />
zur Auswahl. Mit dem Programmwahlknopf (6) können Sie<br />
einfach das gewünschte Stichmuster einstellen.<br />
• Versichern Sie sich immer vor einem Stichwechsel, dass die Nadel<br />
sich in der obersten Position befindet.<br />
Die Buchstaben des Programmwahlknopfes entsprechen den Buchstaben,<br />
die sich über den Stichmusterabbildungen befinden.<br />
• Drehen Sie den Programmwahlknopf so, dass die gewünschte<br />
Stichart an dem Markierungszeichen steht.<br />
TIPP<br />
Sollte die Maschine nicht gemäß des ausgewählten Nähprogramms<br />
nähen, drehen Sie den Programmwahlknopf (6) einmal komplett<br />
durch; kehren Sie dann wieder zu der gewünschten Stichart zurück.<br />
Stichlängeneinstellung<br />
Mit dem Stichlängenregler (11) können Sie die Länge des Stichmusters<br />
wählen.<br />
• Drehen Sie das Stichlängenregler so, dass die Nummer der gewünschten<br />
Stichlänge an der Markierung steht.<br />
• Die Nummern zeigen die ungefähre Stichlänge in Millimetern.<br />
Stichbreiteneinstellung<br />
Mit dem Stichbreitenregler (4) können Sie die Breite eines Zickzackstichs<br />
oder eines Stichmusters wählen.<br />
• Einstellung 0: Geradstich.<br />
• Einstellung 1-5: Verschiedene Breiten der Musterstiche.<br />
HINWEIS<br />
Wenn Sie die Zwillingsnadel verwenden, stellen Sie die Stichbreite<br />
maximal auf 3. Bei einer höhere Einstellung können die Nadeln brechen.<br />
Sticharten (Programme)<br />
Die Sticharten werden am Programmwahlknopf (6) eingestellt.<br />
Achten Sie immer darauf, dass sich die Nadel in der höchsten Position<br />
befindet, bevor Sie einen Stichartwechsel vornehmen.<br />
Machen Sie vor jeder Anwendung eines Stichprogrammes einen<br />
Nähprobe auf einem Stof<strong>fm</strong>uster.<br />
HINWEIS<br />
Zum Einsetzen und Entfernen des Nähfußes lesen Sie bitte Seite 31.<br />
Geradstich<br />
Zum allgemeinen Nähgebrauch und zum Absteppen geeignet.<br />
Nähfuß: . . . . . . . . . . . . . . . . . . . . . . . . . . . . . . . . . Standardfuß<br />
Programm: . . . . . . . . . . . . . . . . . . . . . . . . . . . . . . . . . . . . . . A<br />
Stichlänge: . . . . . . . . . . . . . . . . . . . . . . . . . . . . . . . . . . . 1 bis 4<br />
Stichbreite: . . . . . . . . . . . . . . . . . . . . . . . . . . . . . . . . . . . . . . 0<br />
D-19<br />
D
D-20<br />
Zickzackstich<br />
Der Zickzackstich ist einer der meistgebrauchten Stiche. Er erlaubt<br />
viele Anwendungsmöglichkeiten wie z. B. Einsäumen, Applika-tionen<br />
und Monogramme aufnähen.<br />
Bevor Sie den Zickzackstich nutzen, nähen Sie zur Nahtverstärkung<br />
einige Geradstiche.<br />
Nähfuß: . . . . . . . . . . . . . . . . . . . . . . . . . . . . . . . . . .Standardfuß<br />
Programm: . . . . . . . . . . . . . . . . . . . . . . . . . . . . . . . . . . . . . . . A<br />
Stichlänge: . . . . . . . . . . . . . . . . . . . . . . . . . . . . . . . . . .0,5 bis 4<br />
Stichbreite: . . . . . . . . . . . . . . . . . . . . . . . . . . . . . . . . . . . 1 bis 5<br />
TIPPS FÜR ZICKZACKSTICHE<br />
Um bessere Zickzackstiche zu erhalten, muss die Oberfadenspannung<br />
lockerer sein als beim Nähen von Geradstichen.<br />
Der Oberfaden sollte auf der Unterseite des Stoffes leicht sichtbar<br />
sein.<br />
Satinstich<br />
Der sogenannte Satinstich, ein sehr enger Zickzackstich, eignet sich<br />
besonders für Applikationen, Monogramme und verschiedene Zierstiche.<br />
Programmwahl wie beim normalen Zickzackstich.<br />
Nähfuß: . . . . . . . . . . . . . . . . . . . . . . . . . . . . . . . . . .Standardfuß<br />
Programm: . . . . . . . . . . . . . . . . . . . . . . . . . . . . . . . . . . . . . . . A<br />
Stichlänge: . . . . . . . . . . . . . . . . . . . . . . . . . . . . . . . . . .0,5 bis 2<br />
Stichbreite: . . . . . . . . . . . . . . . . . . . . . . . . . . . . . . . . . . . 1 bis 2<br />
TIPP<br />
Wenn Sie diesen Stich benutzen, sollten Sie die Oberfadenspannung<br />
etwas lockern. Je breiter der Stich sein soll, desto lockerer sollte<br />
die Oberfadenspannung sein. Beim Nähen von sehr dünnen oder<br />
weichen Stoffen sollten Sie ein dünnes Papier unter den Stoff legen<br />
und mit nähen. So verhindern Sie das Auslassen von Stichen und<br />
Zusammenziehen des Stoffes.<br />
Zickzack mit drei Stichen<br />
Mit dieser Stichart werden raue Kanten übernäht.<br />
Nähfuß: . . . . . . . . . . . . . . . . . . . . . . . . . . . . . . . . . .Standardfuß<br />
Programm: . . . . . . . . . . . . . . . . . . . . . . . . . . . . . . . . . . . . . . . B<br />
Stichlänge: . . . . . . . . . . . . . . . . . . . . . . . . . . . . . . . . . . . 1 bis 3<br />
Stichbreite: . . . . . . . . . . . . . . . . . . . . . . . . . . . . . . . . . . 3 bis 5<br />
Umgekehrter Blindsaum<br />
Nähfuß: . . . . . . . . . . . . . . . . . . . . . . . . . . . . . . . . . .Standardfuß<br />
Programm: . . . . . . . . . . . . . . . . . . . . . . . . . . . . . . . . . . . . . . . C<br />
Stichlänge: . . . . . . . . . . . . . . . . . . . . . . . . . . . . . . . . . . . 1 bis 3<br />
Stichbreite: . . . . . . . . . . . . . . . . . . . . . . . . . . . . . . . . . . 3 bis 5
Blindstich<br />
Zum so genannten Blindsäumen.<br />
Nähfuß: . . . . . . . . . . . . . . . . . . . . . . . . . . . . . . . . . Standardfuß<br />
Programm: . . . . . . . . . . . . . . . . . . . . . . . . . . . . . . . . . . . . . . D<br />
Stichlänge: . . . . . . . . . . . . . . . . . . . . . . . . . . . . . . . . . . . 1 bis 3<br />
Stichbreite: . . . . . . . . . . . . . . . . . . . . . . . . . . . . . . . . . . . . . . 5<br />
Verwenden Sie eine Nähgarnfarbe, die genau zum Stoff passt.<br />
Bei sehr leichten oder transparenten Stoffen verwenden Sie einen<br />
transparenten Nylonfaden.<br />
• Falten Sie den Stoff wie in der Abbildung gezeigt zusammen.<br />
• Nähen Sie auf der Falte, wie gezeigt. Die geraden Stiche sollen<br />
auf dem Saum sein, und die Spitzen der Zickzackstiche sollen jeweils<br />
nur in die obere Falte des Stoffes stechen.<br />
• Nehmen Sie nun den Stoff aus der Maschine und streichen Sie<br />
ihn glatt.<br />
Der ausgefaltete Stoff zeigt nun einen Blindsaumstich.<br />
Elastikstich: Dreifachgerad- und -zickzackstich<br />
Verwenden Sie die Sticharten zum Nähen von elastischen Stoffen<br />
oder Strick, dem Aufnähen von Gummibändern etc.<br />
Der Dreifach-Stretchgerad- oder -zickzackstich ergibt eine besonders<br />
feste Stichnaht, z. B. für Schrittnähte an Hosen, Ärmeleinsätzen,<br />
Inlets usw., die dreimal so stark ist wie eine normale Naht und<br />
die auch wesentlich dehnbarer ist. Man kann die Naht zusammen<br />
mit dem Stoff spannen, ohne dass der Faden reißt.<br />
Nähfuß: . . . . . . . . . . . . . . . . . . . . . . . . . . . . . . . . . Standardfuß<br />
Programm: . . . . . . . . . . . . . . . . . . . . . . . . . . . . . . . . . . . . . . E<br />
Stichlänge: . . . . . . . . . . . . . . . . . . . . . . . . . . . . . . . . . . . . . . . 4<br />
Stichbreite: . . . . . . . . . . . . . . . . . . . . . . . . . . . . . . . . . . . 0 bis 5<br />
Nähen von allen Arten elastischer Stoffe<br />
Verwenden Sie einen synthetischen Faden. Dadurch wird die Naht<br />
fast unsichtbar.<br />
Zusammennähen zweier Stoffteile (Risen)<br />
Mit dem Elastikstich können zwei Stoffteile stumpf zusammengenäht<br />
werden.<br />
• Legen Sie die zwei Stoffkanten unter den Nähfuß. Achten Sie darauf,<br />
dass beide Kanten beisammen bleiben und die Nadel links<br />
und rechts gleichmäßig in den Stoff sticht.<br />
Aufnähen von Gummibändern<br />
• Legen Sie das Gummiband an der gewünschten Stelle auf.<br />
• Das Gummiband mit dem Elastikstich aufnähen, wobei das Band<br />
vor und hinter dem Nähfuß mit den Händen gespannt wird. Je<br />
stärker die Spannung desto dichter wird die Kräuselung.<br />
D-21<br />
D
D-22<br />
Rautenstich<br />
Der Rautenstich ist vielseitig verwendbar und dekorativ, z. B. zum<br />
Aufnähen von Spitzen oder Gummibändern oder zum Nähen auf<br />
Stretch und anderem Elastikmaterial.<br />
Nähfuß: . . . . . . . . . . . . . . . . . . . . . . . . . . . . . . . . . .Standardfuß<br />
Programm: . . . . . . . . . . . . . . . . . . . . . . . . . . . . . . . . . . . . . . . F<br />
Stichlänge: . . . . . . . . . . . . . . . . . . . . . . . . . . . . . . . . . . . . . . . 4<br />
Stichbreite: . . . . . . . . . . . . . . . . . . . . . . . . . . . . . . . . . . . . . . 5<br />
Für die Rautenarbeiten bitte beachten:<br />
Kräuseln Sie das Nähgut gleichmäßig an.<br />
Unterlegen Sie die Kräusel mit einem schmalen Stoffstreifen und<br />
übernähen Sie sie mit dem Rautenstich.<br />
Nähen Sie die Rautenarbeit fertig, bevor Sie das so verzierte Teil in<br />
das ganze Kleidungsstück einsetzen.<br />
Bei sehr leichten Stoffen kann dieselbe Wirkung mit einem elastischen<br />
Faden erreicht werden.<br />
Einfacher Überwendlingsstich<br />
Dieser Stich ist besonders geeignet, Jersey und Jogging-Anzüge zu<br />
nähen und zu flicken. Dieser Stich ist genauso dekorativ wie nützlich.<br />
Er besteht aus glatten Seitenlinien mit Querverbindungen und<br />
ist absolut elastisch.<br />
Nähfuß: . . . . . . . . . . . . . . . . . . . . . . . . . . . . . . . . . .Standardfuß<br />
Programm: . . . . . . . . . . . . . . . . . . . . . . . . . . . . . . . . . . . . . . G<br />
Stichlänge: . . . . . . . . . . . . . . . . . . . . . . . . . . . . . . . . . . . . . . . 4<br />
Stichbreite: . . . . . . . . . . . . . . . . . . . . . . . . . . . . . . . . . . . . . . 5<br />
Legen Sie den Rand des Stoffes so unter den Nähfuß, dass die Nadel<br />
mit dem rechten Ausschlag Geradstiche näht und gerade noch den<br />
Rand des Stoffes berührt, und so mit dem linken Ausschlag ein Zickzackstich<br />
genäht wird.<br />
Zierstickstiche<br />
Die Programme H bis R bieten eine Vielzahl von Zierstichen.<br />
Nähfuß: . . . . . . . . . . . . . . . . . . . . . . . . . . . . . . . . . .Standardfuß<br />
Stichlänge Programme H bis K:. . . . . . . . . . . . . . . . . . . . . . . . . 4<br />
Stichlänge Programme L bis R: . . . . . . . . . . . . . . . . . . .0,25 bis 1<br />
Stichbreite: . . . . . . . . . . . . . . . . . . . . . . . . . . . . . . . . . . . . . . 5<br />
Die Bogennaht (Programm N) ist zum Beispiel ideal zum Nähen dekorativer<br />
Muster von Tischtüchern, Servietten, Krägen, Manschetten<br />
usw.
Knopflöcher<br />
TIPP<br />
Um die passende Stichlänge zu finden, ist es empfehlenswert, ein<br />
Muster-Knopfloch auf einem Stoffrest zu nähen.<br />
Nähfuß: . . . . . . . . . . . . . . . . . . . . . . . . . . . . . Knopfloch-Nähfuß<br />
Programm: . . . . . . . . . . . . . . . . . . . . . . . . . . . . . . . . . . S bis U<br />
Stichlänge: . . . . . . . . . . . . . . . . . . . . . . . . . . . . . . . . 0,25 bis 1<br />
Stichbreite: . . . . . . . . . . . . . . . . . . . . . . . . . . . . . . . . . . . . . . . 5<br />
• Stellen Sie den Fuß und die Nadel auf ihre höchste Stellung. Ersetzen<br />
Sie den Fuß mit dem Knopfloch-Nähfuß.<br />
• Markieren Sie auf dem Stoff, wo das Knopfloch genäht werden<br />
soll, die gewünschte Knopflochlänge; benutzen Sie einen Bleistift<br />
oder Schneiderkreide.<br />
Vorgehensweise<br />
• Wählen Sie mit dem Programmwahlknopf (6) das Programm S,<br />
um den linken Riegel zunähen.<br />
• Führen Sie den Oberfaden durch die Öffnung des Knopfloch-<br />
Nähfußes und ziehen Sie beide, den Ober- und den Unterfaden,<br />
auf die linke Seite. Senken Sie den Fuß und nähen Sie langsam,<br />
bis die gewünschte Länge des Seitenriegels erreicht ist.<br />
• Heben Sie die Nadel auf die höchste Position und setzen Sie<br />
wechseln Sie zum Programm T für den unteren Riegel.<br />
• Nähen Sie dann einige Stiche des unteren Riegels.<br />
• Heben Sie die Nadel wieder in die höchste Position und wechseln<br />
Sie zum Programm U für den rechten Riegel.<br />
• Nähen Sie nun den rechten Seitenriegel in genau der gleichen<br />
Länge wie auf der linken Seite.<br />
• Bringen Sie die Nadel in die höchste Position und wählen Sie erneut<br />
das Programm T für den oberen Riegel.<br />
• Nähen Sie dann, wie bereits beim unteren Riegel, auch den oberen<br />
Riegel mit einigen Stichen.<br />
• Zum Abschluss empfiehlt es sich die Stichlänge auf „0“ zu setzen<br />
und noch einige Stiche zu nähen, damit die Fäden besser verknüpft<br />
werden und das Knopfloch nicht so schnell ausfranst.<br />
• Zum Abschluss trennen Sie mit dem beigefügten Trennmesser<br />
noch den Stoff zwischen den Nähten auf. Gehen Sie dabei sehr<br />
vorsichtig zu Werke, damit Sie keinen der Riegel beschädigen.<br />
TIPP<br />
Um ein Durchtrennen des oberen Riegels zu vermeiden, empfiehlt<br />
es sich, eine Stecknadel vor den Riegel zu stecken.<br />
D-23<br />
D
Knöpfe und Ösen annähen<br />
D-24<br />
Mit dem transparent-blauen Knopf-Nähfuß lassen sich Knöpfe, Haken<br />
und Ösen mühelos annähen.<br />
Wählen Sie mit dem Programmwahlknopf (6) eine Zickzackstichbreite,<br />
die dem Abstand der Löcher entspricht.<br />
• Montieren Sie für diese Arbeitsschritte die Stopfplatte, um ein<br />
verrutschen des Stoffstückes zu vermeiden. Stopfplattenmontage<br />
siehe Seite 26.<br />
• Lassen Sie den Nähfuß herab und legen Sie dabei den Knopf so<br />
zwischen Stoff und Nähfuß, dass der Zickzackstich in die Löcher<br />
des Knopfes trifft.<br />
• Kontrollieren Sie die richtige Lage des Knopfes durch Drehen des<br />
Handrades (10) von Hand. Die Nadel muss exakt in die Löcher<br />
des Knopfes stechen, um eine Beschädigung der Nadel zu vermeiden.<br />
Falls nötig, ändern Sie die Breite des Zickzackstiches.<br />
• Nähen Sie 6 bis 7 Stiche pro Loch, indem Sie das Handrad mit der<br />
Hand drehen.<br />
Bei Knöpfen mit vier Löchern wird der Stoff mit dem Knopf verschoben:<br />
dann werden auch in die anderen Löcher 6 bis 7 Stiche genäht.<br />
Nach dem Entfernen des Stoffes bringen Sie den großzügig abgeschnittenen<br />
Oberfaden auf die Unterseite des Stoffes und verknüpfen<br />
ihn dort mit dem Unterfaden.<br />
Knöpfe mit Stiel annähen<br />
Bei schweren Materialen wird oft ein Knopfstiel benötigt.<br />
• Legen Sie eine Nadel oder bei einem stärkeren Stiel ein Zündholz<br />
auf den Knopf und verfahren Sie dann genau wie beim normalen<br />
Knopf annähen.<br />
• Nehmen Sie das Nähgut nach ca. 10 Stichen aus der Maschine.<br />
• Ziehen Sie die Nadel oder das Zündholz aus dem Nähgut.<br />
• Lassen Sie den Oberfaden etwas länger, fädeln Sie ihn dann<br />
durch den Knopf und wickeln ihn einige Male um den entstandenen<br />
Stiel, danach führen Sie ihn auf die Stoffunterseite und<br />
verknüpfen ihn mit dem Unterfaden.
Reißverschlüsse einnähen<br />
Verwenden Sie den Reißverschlussnähfuß.<br />
Je nachdem, welche Seite des Reißverschlussbandes Sie nähen,<br />
muss der Nähfuß immer auf dem Stoff aufliegen.<br />
Aus diesem Grund wird der Nähfuß entweder auf der linken oder<br />
rechten Seite befestigt, nicht in der Mitte wie alle anderen Nähfüße.<br />
• Stellen Sie den Nähfuß und die Nadel in die höchste Position ,<br />
um den Nähfuß auszuwechseln.<br />
• Heften Sie den Reißverschluss auf den Stoff und legen Sie das<br />
Werkstück unter den Fuß in Position.<br />
• Um die rechte Seite des Reißverschlusses anzunähen, fixieren Sie<br />
den Reißverschluss-Nähfuß so, dass die Nadel auf der linken Seite<br />
näht (1).<br />
• Nähen Sie auf der rechten Seite des Reißverschlusses, wobei die<br />
Naht so nahe wie möglich an die Zähne herangeführt werden<br />
soll. (1)<br />
• Nähen Sie den Reißverschluss etwas 0,5 Zentimeter unterhalb<br />
der Zähne mit einem Steg fest.<br />
• Um die linke Seite des Reißverschlusses anzunähen, wechseln<br />
Sie die Fußposition am Nähfußhalter.<br />
• Nähen Sie in der gleichen Weise wie auf der rechten Seite des<br />
Reißverschlusses (2).<br />
• Bevor der Fuß den Schieber auf dem Reißverschlussband erreicht,<br />
heben Sie den Fuß nach oben und öffnen Sie den Reißverschluss,<br />
wobei die Nadel im Material bleibt (3).<br />
Kordeln einnähen<br />
Mit dem Reißverschluss-Nähfuß könne Sie auch leicht Kordeln einnähen,<br />
wie in der Abbildung zusehen.<br />
• Schlagen Sie den Stoff einmal um, so dass ein Kordelzugtunnel<br />
entsteht und nähen Sie dann an der Kordel entlang wobei der<br />
Reißverschluss-Nähfuß hinter der Kordel liegen muss.<br />
Säumen<br />
Mit dem Rollsaum/Säumer-Nähfuß können Sie feine bis mittlere<br />
Materialien, z. B. Blusen, Seidentücher und Volants, problemlos<br />
säumen. Durch das Säumen mit dem Rollsäumer werden die Kanten<br />
gegen Ausfransen gesichert und es entsteht eine saubere, haltbare<br />
Kante.<br />
• Stellen Sie den Nähfuß und die Nadel auf die höchste Position<br />
und ersetzen Sie dann den vorhandenen Fuß durch den Säumerfuß.<br />
• Legen Sie den Saumanfang in einer Doppelfalte um ca. 2 mm<br />
nach innen um.<br />
• Führen Sie den so umgelegten Saum in die Schnecke des Rollsaumfußes<br />
ein.<br />
• Nähen Sie vorsichtig und langsam ein paar Stiche, am besten<br />
durch Drehen des Handrades (10).<br />
• Wenn der Saumanfang in den Fuß gezogen wurden, beginnen<br />
Sie vorsichtig den Saum zu nähen.<br />
D-25<br />
D
Stopfen<br />
D-26<br />
• Halten Sie die Stoffkante immer etwas über die linke Seite des<br />
Nähfußes hinaus, um ein Herausgleiten des Stoffes aus der<br />
Schnecke zu vermeiden.<br />
• Achten Sie darauf, das der Stoff nicht unter der rechten Seite des<br />
Nähfußes gerät.<br />
TIPP<br />
Durch ein leichtes Abschrägen des Stoffendes kann der Saum leichter<br />
in den Säumerfuß eingeführt werden.<br />
Fixieren Sie den Saum vor dem Nähen mit Stecknadeln oder bügeln<br />
Sie den Anfang des Saumes kurz um.<br />
Diese Arbeit setzt geeignete Materialien und auch einige Erfahrung<br />
voraus, um optimale Resultate zu erzielen.<br />
Stopfplatte montieren<br />
Bei verschiedenen Näharbeiten, z. B. Annähen von Knöpfen, Haken,<br />
Ösen sowie zum Stopfen und Sticken, ist es erforderlich, dass kein<br />
automatischer Transport des Nähguts erfolgt, sondern Sie den<br />
Transport des Nähguts selbst kontrollieren können.<br />
In diesen Fällen müssen Sie die im Zubehör enthaltene Stopfplatte<br />
montieren.<br />
• Stellen Sie den Nähfußhebel (15) nach oben und bringen Sie die<br />
Nadel durch das Drehen des Handrades (10) in die höchste Position.<br />
• Drücken Sie nun die beiden Stifte der Stopfplatte in die entsprechenden<br />
Öffnungen der Stichplatte (19), bis sie einrasten, wie in<br />
Abb. 1 und 2 gezeigt.<br />
• Um die Stopfplatte wieder zu entfernen, brauchen Sie nur die Ekken<br />
anheben.<br />
Stopfen<br />
• Entfernen Sie den Nähfußhalter und wählen Sie die normale Unterfadenspannung.<br />
Die Oberfadenspannung sollte etwas lockerer sein als normal.<br />
Wenn nötig, können Sie die schadhafte Stelle noch mit einem Stück<br />
Stoff unterlegen.<br />
• Legen Sie die Arbeit unter die Nadel und lassen Sie den Nähfußhebel<br />
(15) herab, damit die Fadenspannung wirksam wird.<br />
• Durch langsames Vor- und Rückschieben des Stoffes mit der<br />
Hand beginnen Sie langsam zu nähen.<br />
• Wiederholen Sie diesen Vorgang solange, bis die schadhafte Stelle<br />
dicht mit parallel liegenden Stichen ausgefüllt ist.<br />
• Falls notwendig, kann noch einmal, wie beim Stopfen mit der<br />
Hand, in Querrichtung überstopft werden.<br />
TIPP<br />
Während des Stopfen muss der Stoff gut gespannt sein. Wenn die<br />
beschädigte Stelle groß ist, empfiehlt es sich, das Nähgut in einen<br />
Stickrahmen (im Fachhandel erhältlich) einzuspannen.
Sticken<br />
Allgemeines<br />
Entfernen Sie den Nähfuß und montieren Sie die Stopfplatte. Wählen<br />
Sie die normale Unterfadenspannung.<br />
Die Oberfadenspannung muss so locker eingestellt werden, dass<br />
der Unterfaden nicht auf die rechte Seite des Stoffen gezogen wird.<br />
• Spannen Sie den Stoff in den Stickrahmen (im Fachhandel erhältlich).<br />
• Senken Sie den Nähfußhalter, damit die Fadenspannung wirksam<br />
wird.<br />
• Halten Sie den Stickrahmen mit Ihrer Hand fest, während Sie das<br />
gewünschte Muster nähen. Bewegen Sie nicht den Stoff, sondern<br />
immer den Stickrahmen.<br />
HINWEIS<br />
Kommen Sie mit Ihren Fingern nicht zu nahe an die Nadel.<br />
TIPP<br />
Wir empfehlen Ihnen, das gewünschte Stickmuster auf der rechten<br />
Stoffseite mit Bleistift oder Schneiderkreide (im Fachhandel erhältlich)<br />
aufzuzeichen.<br />
D-27<br />
D
Nähen mit einer Zwillingsnadel (Doppelnadel)<br />
D-28<br />
Die Zwillingsnadel ist im gutsortierten Fachhandel erhältlich. Achten<br />
Sie beim Kauf darauf, dass der Abstand zwischen den beiden<br />
Nadeln nicht 2,5 mm überschreiten soll.<br />
Mit der Zwillingsnadel lassen sich wunderschöne zweifarbige Muster<br />
erzeugen, wenn Sie zum Nähen verschiedenfarbige Garne benutzen.<br />
HINWEIS<br />
Verwenden Sie nur den Geradstich oder Zickzackstich bei der Zwillingsnadel.<br />
Stellen Sie die Stichbreite auf maximal 3.<br />
Bei anderen Programmen oder einer höheren Stichbreite können<br />
sich die Nadeln verbiegen oder brechen.<br />
• Setzen Sie die Zwillingsnadel auf die gleiche Weise ein wie eine<br />
Einfachnadel (siehe Seite 30).<br />
• Geben Sie zwei gleichvolle Garnrollen auf die ausziehbaren<br />
Garnrollenhalter (7).<br />
• Versichern Sie sich, dass Sie die beiden Filzscheiben, die im Zubehör<br />
mitgeliefert werden, auf die beiden Garnrollenhalter (7)<br />
platziert haben.<br />
• Fädeln Sie beide Fäden durch die Fadenhalterung ein, wie bei einem<br />
Einzelfaden.<br />
• Bei den Oberfadenspannungsscheiben führen Sie die beiden Fäden<br />
durch die Scheiben, achten Sie darauf, dass ein Faden rechts<br />
von der mittleren Scheibe verläuft und der zweite Faden links<br />
von der Scheibe.<br />
• Führen Sie beide Fäden in die Fadenführung.<br />
• Bei den Nadelöhren fädeln Sie einen Faden rechts und einen<br />
links ein.<br />
HINWEIS<br />
Um eine Ecke mit der Zwillingsnadel zu nähen, heben Sie die Nadel<br />
aus dem Stoff heraus, da sonst die Zwillingsnadel brechen oder verbogen<br />
werden kann.
Nähen mit dem Freiarm<br />
Der Freiarm (16) ermöglicht es Ihnen, röhrenförmige Stücke leichter<br />
zu nähen, z. B. für das Nähen von Ärmeln und Hosenbeinen ist diese<br />
Funktion sehr hilfreich.<br />
Ihre <strong>Nähmaschine</strong> kann leicht zu einer Freiarm-Maschine gemacht<br />
werden, indem Sie den Anschiebetisch mit der Zubehörbox von der<br />
<strong>Nähmaschine</strong> entfernen.<br />
Bei folgenden Näharbeiten ist der Freiarm (16) besonders hilfreich:<br />
-- Ausbessern von Ellbogen und Knien in Kleidungsstücken.<br />
-- Ärmeln nähen, besonders bei kleineren Kleidungsstücken<br />
-- Applikationen, Stickereien oder Säumen von Kanten, Manschetten<br />
oder Hosenbeinen.<br />
-- Nähen von elastischen Taillenbündchen an Röcken oder Hosen.<br />
Das Kantenlineal<br />
Das Kantenlineal hilft Ihnen, gerade und parallele Nähte entlang der<br />
Stoffkante zu machen.<br />
• Drehen Sie die Rändelschraube des Lineals in das Gewindeloch<br />
rechts neben der Stichplatte (19) leicht ein.<br />
• Justieren Sie die Führung auf die gewünschte Entfernung und<br />
ziehen Sie dann die Schraube fest.<br />
Zur Hilfe sind auf der Stichplatte (19) einige Führungslinien angebracht.<br />
Das Wattierlineal<br />
• Schieben Sie das Wattierlineal unter die Klemmfeder in die vorgesehene<br />
Vertiefung.<br />
• Die erste Naht mit Schneiderkreide vorzeichnen und nähen.<br />
• Mit Hilfe des Wattierlineals nähen Sie dann die zweite Naht entsprechend<br />
der ersten parallel.<br />
• Der Abstand der Nähte kann durch Vorstellen der Schiene in<br />
Pfeilrichtung reguliert werden.<br />
D-29<br />
D
WARTUNG, PFLEGE UND REINIGUNG<br />
Auswechseln der Nählampe<br />
Auswechseln der Nadel<br />
D-30<br />
Schalten Sie bitte vor allen Wartungs-, Reinigungs- und Austauscharbeiten<br />
immer die Maschine aus und ziehen Sie den Netzstecker.<br />
Die Nählampe wird mittels des Hauptschalters (13) ein- bzw. ausgeschaltet.<br />
• Zum Öffnen der Frontklappe (21) siehe Seite 10.<br />
• Nun können Sie die Frontklappe (21) nach links schwenken.<br />
• Wechsel Sie nun die Lampe.<br />
• Schließen Sie die Frontklappe (21) und schrauben Sie sie fest zu.<br />
HINWEIS<br />
Die maximal zulässige Leistung der Lampe ist 15W.<br />
Glühlampen sind im Fachhandel erhältlich.<br />
• Drehen Sie das Handrad (10) zu sich, bis die Nadel auf der höchsten<br />
Position steht.<br />
• Lösen Sie die Nadelhalteschraube durch Drehen zu Ihnen hin.<br />
• Entfernen Sie die Nadel von der Nadelhalterung.<br />
• Setzen Sie die neue Nadel mit der flachen Seite nach hinten ein.<br />
Schieben Sie die Nadel bis zum Anschlag nach oben.<br />
• Ziehen Sie die Nadelhalteschraube wieder fest.<br />
HINWEIS<br />
Nadeln sind im Fachhandel erhältlich.<br />
Informationen zu Typenbezeichnung und Stärke entnehmen Sie<br />
bitte der Stoff-, Garn- und Nadeltabelle auf Seite 40.
Entfernen und Einsetzen des Nähfußes<br />
Entfernen<br />
• Drehen Sie das Handrad (10) zu sich, bis die Nadel ihre höchste<br />
Position erreicht hat.<br />
• Heben Sie den Nähfuß durch Hinaufdrücken des Nähfußhebels<br />
(15).<br />
• Durch Hinaufdrücken des Nähfußauslösehebels, hinter dem<br />
Nähfußhalter, fällt der Nähfuß herunter.<br />
Einsetzen<br />
• Legen Sie den Nähfuß so auf, dass der Stift am Fuß direkt unter<br />
der Nut des Fußhalters zum Liegen kommt. Senken Sie den Nähfuß-hebel<br />
(15).<br />
• Drücken Sie nun noch den Nähfußauslösehebel nach oben. Der<br />
Nähfuß rastet nun automatisch ein.<br />
D-31<br />
D
Entfernen und Einsetzen des Nähfußhalters<br />
Pflege der <strong>Nähmaschine</strong><br />
D-32<br />
Der Nähfußhalter braucht nicht entfernt zu werden, es sei denn, Sie<br />
wollen entweder Stopfen, Sticken oder sich Raum zur Reinigung<br />
des Stofftransporteurs (27) verschaffen.<br />
Entfernen<br />
• Bringen Sie die Nadel in ihre höchste Position durch Drehen des<br />
Handrades (10) zu sich hin und stellen Sie den Nähfußhebel (15)<br />
nach oben.<br />
• Entfernen Sie den Fuß vom Nähfußhalter und lösen Sie die Nähfußhalterschraube<br />
mit dem beigefügten Schraubendreher.<br />
Einsetzen<br />
• Bringen Sie die Nadel in ihre höchste Position durch Drehen des<br />
Handrades (10) zu sich hin und stellen Sie den Nähfußhebel (15)<br />
nach oben.<br />
• Wenn Sie nun den Nähfußhalter einsetzen, drücken Sie ihn so<br />
weit wie möglich nach oben und ziehen Sie die Nähfußhalterschraube<br />
mit dem beigefügten Schraubendreher fest.<br />
Die <strong>Nähmaschine</strong> ist ein feinmechanisches Erzeugnis und braucht<br />
regelmäßig Pflege, um stets einwandfrei zu funktionieren.<br />
Für diese Pflege können Sie selbst sorgen.<br />
Pflege heißt vor allem: Reinigen und Ölen.<br />
HINWEIS<br />
Verwenden Sie zum Ölen nur spezielle <strong>Nähmaschine</strong>nöle bester<br />
Qualität, da andere Öle nicht geeignet sind.<br />
Beachten Sie, dass sich nach dem Ölen Rückstände im Gerät befinden<br />
können. Nähen Sie zur Beseitigung dieser Rückstände einige<br />
Stiche auf einem Musterstoffstück oder einem Stoffrest. So vermeiden<br />
Sie eine Verschmutzung Ihres Nähguts.
Reinigen des Gehäuses und des Fußanlassers<br />
Vor der Reinigung ziehen Sie bitte den Netzstecker aus der Steckdose.<br />
Für die Reinigung des Gehäuses und des Fußanlassers verwenden<br />
Sie ein trockenes, weiches Tuch. Vermeiden Sie Chemische Lösungs-<br />
und Reinigungsmittel, weil diese die Oberfläche und/oder<br />
Beschriftungen des Gerätes beschädigen können.<br />
Reinigen des Transporteurs<br />
Es ist notwendig, die Stofftransporteurzähne immer sauber zu halten,<br />
um ein einwandfreies Nähen zu gewährleisten.<br />
• Entfernen Sie die Nadel und den Nähfuß (siehe Seite 30 f.).<br />
• Öffnen Sie die Schrauben der Stichplatte (19), um diese von der<br />
Maschine zu entfernen.<br />
• Entfernen Sie mit einer Bürste Staub und Fadenreste von den<br />
Transporteurzähnen.<br />
• Setzen Sie die Stichplatte (19) wieder ein.<br />
Reinigen und Ölen des Spulengehäuses<br />
• Bringen Sie die Nadel in die höchste Stellung, ansonsten kann<br />
der Greifer nicht herausgenommen werden.<br />
• Nehmen Sie die Spulenkapsel heraus.<br />
• Drehen Sie die Schnapphebel nach außen, wie gezeigt, und entfernen<br />
Sie den Greiferbahnring.<br />
• Entfernen Sie den Greifer, indem Sie den Zapfen in der Mitte des<br />
Greifers festhalten.<br />
• Entfernen Sie alle Schmutzteile aus dem Greiferbahnring der<br />
Greiferbahn und ölen Sie die Teile mit einem Lappen.<br />
• Geben Sie ein bis zwei Tropfen Öl auf die Spulengreiferbahn, wie<br />
gezeigt.<br />
• Bauen Sie nun alles in umgekehrter Reihenfolge wieder zusammen.<br />
D-33<br />
D
Ölen der Maschine<br />
D-34<br />
HINWEIS<br />
Ihre <strong>Nähmaschine</strong> ist ab Werk bereits geölt und zum Gebrauch fertig.<br />
Ölen des Maschine hinter der Frontklappe<br />
Die zu ölenden Stellen sind auf der Abbildung mit Pfeilen markiert.<br />
Vor dem Ölen sollten diese Stellen gereinigt werden. Geben Sie ein<br />
oder zwei Tropfen eines guten <strong>Nähmaschine</strong>nöls auf diese Stellen.<br />
Läuft die Maschine nicht einwandfrei, nachdem sie längere Zeit<br />
nicht mehr in Betrieb war, lassen Sie die geölte Maschine bei geschlossener<br />
Frontklappe (21) ungefähr eine Minute schnell laufen.<br />
Vergessen Sie nicht, zuerst auf einem Stoffrest zu nähen, um eventuell<br />
austretendes Öl aufzusaugen.<br />
TIPP<br />
Je nach Gebrauchshäufigkeit soll dieser Teil der Maschine öfter geölt<br />
werden.
Demontage des hinteren Gehäusedeckels<br />
• Bringen Sie den Nähfußhebel (15) nach oben, öffnen Sie die<br />
Frontklappe (21) und lösen Sie die Schraube (A).<br />
HINWEIS<br />
Da sich die Schrauben A, B und C unterscheiden, bewahren Sie diese<br />
immer getrennt auf.<br />
• Entfernen Sie den Anschiebetisch und öffnen Sie die Spulenkapselabdeckung<br />
(18).<br />
• Legen Sie die Maschine mit der hinteren Seite nach oben und<br />
schrauben Sie die vier Schrauben (B) und die zwei Schrauben (C)<br />
am Boden ab, wie gezeigt.<br />
• Stellen Sie die Maschine wieder hin.<br />
D-35<br />
D
D-36<br />
• Nur kleine interne Kunststoffhaken halten jetzt den hinteren<br />
Deckel, wie abgebildet.<br />
• Drücken Sie nun vorsichtig die obere Kante des hinteren Deckels<br />
(dort wo die Haken sind) mit einer Hand herunter.<br />
• Ziehen Sie nun den hinteren Deckel nach außen ab.
Ölen der Ober- und Unterseite der Maschine<br />
Die zu ölenden Stellen sind auf der Abbildung mit Pfeilen markiert.<br />
Vor dem Ölen sollten diese Stellen gereinigt werden. Geben Sie ein<br />
oder zwei Tropfen eines guten <strong>Nähmaschine</strong>nöls auf diese Stellen.<br />
TIPP<br />
Die mit Pfeilen gekennzeichneten Stellen brauchen nur selten geölt<br />
werden, ca. alle zwei bis drei Monate je nach Gebrauchshäufigkeit.<br />
Montage des hinteren Gehäusedeckels<br />
• Setzen Sie die hintere Abdeckung wieder ein und achten Sie darauf<br />
das sie einrastet.<br />
• Legen Sie nun die Maschine wieder auf die vordere Seite und<br />
schrauben Sie die Schrauben A, B und C wieder fest.<br />
• Schließen Sie die Spulenkapselabdeckung (18) und die Frontklappe<br />
(21).<br />
• Zum Schluss setzen Sie die Gehäuseabdeckung für den Fußanlasser<br />
wieder ein und drücken diese fest, bist sie einrastet.<br />
HINWEIS<br />
Um die Montage zu erleichtern, achten Sie immer darauf, dass der<br />
Nähfußhebel (15) oben ist sowie die Spulenkapselabdeckung (18)<br />
geöffnet bleibt.<br />
Der Gehäusedeckel des Fußanlassersteckers ist nur eingesteckt.<br />
D-37<br />
D
STÖRUNG<strong>EN</strong><br />
D-38<br />
Wenn Störungen auftreten, lesen Sie bitte in dieser Bedienungsanleitung<br />
nach, ob Sie alle Anweisungen richtig beachtet haben.<br />
Erst wenn keine der genannten Lösungen zum Erfolg führt wenden<br />
Sie sich bitte an unseren Kundendienst.<br />
Störung Ursache Seite<br />
Die Maschine läuft nicht frei Die Maschine muss geölt werden Seite 34<br />
Staub und Fäden befinden sich in der<br />
Greiferbahn<br />
Reste befinden sich an den Zähnen des<br />
Stofftransporteurs<br />
Ein falsches Öl wurde verwendet und hat die<br />
Maschine verstopft<br />
Seite 34<br />
Seite 34<br />
Seite 34<br />
Der Oberfaden reißt Die Maschine ist nicht richtig eingefädelt Seite 12<br />
Fadenspannung ist zu stark Seite 15<br />
Nadel ist verbogen oder stumpf Seite 17<br />
Die Garnstärke ist für die Nadel nicht passend Seite 17<br />
Die Nadel ist nicht richtig eingesetzt Seite 30<br />
Der Stoff wurde am Nahtende nach hinten<br />
nicht durchgezogen<br />
Stichplatte, Spule oder Nähfuß ist beschädigt<br />
Der Unterfaden reißt Der Unterfaden verwickelt sich aufgrund<br />
unsachgemäß aufgespulter Spule<br />
Der Unterfaden ist nicht unter der<br />
Spannungsfeder in der Spulenkapsel<br />
Seite 18<br />
Seite 9<br />
Seite 9<br />
Die Nadel bricht Die Nadel ist falsch eingesetzt worden Seite 30<br />
Die Nadel ist verbogen Seite 17<br />
Die Nadel ist zu fein Seite 17<br />
Während des Nähens wird am Stoff gezogen Seite 18<br />
Ein Knoten im Faden Seite 12<br />
Bei Zwillingsnadeln: Die Stichbreite ist größer<br />
als 3 oder es wurde ein Sonderprogramm<br />
verwendet.<br />
Seite 28<br />
Die Maschine lässt Stiche aus Die Nadel ist falsch eingesetzt worden Seite 30<br />
Die Nadel ist falsch eingefädelt worden Seite 15<br />
Die Nadel und/oder der Faden passt sich dem<br />
Stoff nicht an<br />
Seite 40<br />
Der Stoff ist zu schwer oder zu hart Seite 40<br />
Während des Nähens wird am Stoff gezogen. Seite 18
Zusammenziehen oder Kräuseln der<br />
Naht<br />
Die Oberfadenspannung ist zu stark Seite 15<br />
Die Maschine ist falsch eingefädelt worden Seite 12<br />
Die Nadel ist für den Stoff zu groß Seite 40<br />
Der Faden macht Schlingen Die Fadenspannung ist nicht reguliert Seite 15<br />
Der Oberfaden ist nicht richtig eingefädelt und/<br />
oder der Unterfaden ist nicht richtig aufgespult<br />
Seite 9<br />
Die Garnstärke ist für den Stoff nicht geeignet Seite 40<br />
Der Stoff läuft unregelmäßig durch Die Stichlänge steht auf „0“ Seite 19<br />
Fadenreste sind in der Greiferbahn Seite 33<br />
Die Maschine läuft nicht Die <strong>Nähmaschine</strong> ist nicht richtig<br />
angeschlossen oder die Steckdose ist ohne<br />
Strom<br />
Seite 8<br />
Fadenreste in der Greiferbahn Seite 33<br />
Der Schalter im Handrad steht auf dem<br />
Spulensymbol<br />
Seite 9<br />
D-39<br />
D
STOFF-, GARN- UND NADELTABELLE<br />
D-40<br />
Generell werden feine Garne und Nadel für das Nähen von dünnen<br />
Stoffen verwendet, stärkere Garne und Nadeln werden für schwere<br />
Stoffe verwendet. Testen Sie immer Garn- und Nadelstärke auf einem<br />
Stoffrest jenes Stoffes, den Sie nähen wollen. Benutzen Sie dasselbe<br />
Garn für Nadel und Spule. Wenn Sie auf feinem Stoff oder<br />
Synthetiks Stretch-Nähte nähen, verwenden Sie Nadeln mit blauem<br />
Schaft (im Fachhandel erhältlich). Diese verhindern das Auslassen<br />
von Stichen.<br />
Stoffdicke Stoffart Garn Nadel Stichlänge<br />
feine Stoffe Nylon<br />
Bastist<br />
Voile<br />
mittlere<br />
Stoffe<br />
schwere<br />
Stoffe<br />
80<br />
Baumwolle<br />
Jersey 60<br />
Synthetik<br />
Seide 50<br />
Seide<br />
Wolle<br />
Seide<br />
Perkal<br />
Pikée<br />
Leinen<br />
50<br />
Synthetik<br />
Seide<br />
60 - 80<br />
Baumwolle<br />
Jersey 60<br />
Synthetik<br />
Gabardine 50<br />
Seide<br />
Jeansstoff<br />
Mantelstoff<br />
50<br />
Baumwolle<br />
Jersey 50<br />
Synthetik<br />
Wolle<br />
Tweed<br />
50<br />
Seide<br />
Geradstich Zickzack<br />
70 1 - 3 1 - 4<br />
80<br />
80-90 0,5 - 3 0,5 - 4<br />
80<br />
90-100 0,5 - 3 0,5 - 4<br />
80-90<br />
80-90<br />
Oberfadenspannung
<strong>EN</strong>TSORGUNG<br />
Verpackung<br />
Ihre <strong>Nähmaschine</strong> befindet sich zum Schutz vor<br />
Transportschäden in einer Verpackung. Verpackungen<br />
sind Rohmaterialien und somit wiederverwendungsfähig<br />
oder können dem Rohstoff-Kreislauf<br />
zurückgeführt werden.<br />
Gerät<br />
TECHNISCHE DAT<strong>EN</strong><br />
Werfen Sie Ihre <strong>Nähmaschine</strong> am Ende ihrer Lebenszeit<br />
keinesfalls in den normalen Hausmüll. Erkundigen<br />
Sie sich bei Ihrer Stadt- oder Gemeindeverwaltung<br />
nach einer umwelt- und sachgerechten<br />
Entsorgung.<br />
<strong>Nähmaschine</strong><br />
Nennspannung: 230 V ~ 50 Hz<br />
Nennaufnahme: gesamt: 75 W<br />
Motor: 60 W<br />
Lampe: 15 W<br />
Gewindegröße: E14<br />
Fußanlasser:<br />
Typ: KD 2902<br />
Nennspannung: 220 V-240 V ~ 50 Hz<br />
Schutzklasse: II<br />
Technische Änderungen vorbehalten!<br />
D-41<br />
D
INDEX<br />
A<br />
Anschiebetisch 8, 11, 29, 35<br />
Aufspulen der Unterfadenspule 9<br />
B<br />
Blindstich 21<br />
E<br />
Einfädeln der Spulenkapsel 11<br />
Einfädeln des Oberfadens 12<br />
Einsetzen der Spulenkapsel 12<br />
Elastikstich 21<br />
Entfernen der Spulenkapsel 11<br />
Entsorgung 41<br />
F<br />
Faden abschneiden 18<br />
Fadenheber 13<br />
Fadenspannung 15, 16<br />
Fingerschutz 7, 18<br />
Freiarm 29<br />
Fußanlasser 6, 8, 10, 17, 18, 37, 41<br />
G<br />
Garnrollenhalter 9<br />
Geradstich 19<br />
Greifer 33<br />
Greiferbahn 33<br />
Greiferbahnring 33<br />
Gummibänder aufnähen 21<br />
H<br />
Handrad 9<br />
Heraufholen des Unterfadens 14<br />
K<br />
Kantenlineal 7, 29<br />
Knopf-Annähfuß 7<br />
Knöpfe mit Stiel annähen 24<br />
Knöpfe und Ösen annähen 24<br />
Knopflöcher 23<br />
D-42
Knopfloch-Nähfuß 7, 23<br />
Kordeln einnähen 25<br />
L<br />
Lieferumfang 6<br />
N<br />
Nadel 17, 30<br />
Nadeltabelle 40<br />
Näfuß einsetzen 31<br />
Näfuß entfernen 31<br />
Nähen von elastischer Stoffe 21<br />
Nähfuß 17, 31<br />
Nähfußhalter 32<br />
Nähfußhalter einsetzen 32<br />
Nähfußhalter entfernen 32<br />
Nählampe 30<br />
Nährichtungswechsel 18<br />
O<br />
Oberfadenspannung 15<br />
Oberfadenspannungsregler 13<br />
Ölen 33, 34, 35<br />
P<br />
Programmwahlknopf 19<br />
R<br />
Rautenstich 22<br />
Reinigen 33<br />
Reißverschlüsse 25<br />
Reißverschluss-Nähfuß 7, 25<br />
Rückwärtsnähen 18<br />
S<br />
Satinstich 20<br />
Säumen 25<br />
Säumerfuß 7, 25, 26<br />
Spulengehäuse 33<br />
Spulenkapsel 33<br />
Standardfuß 7, 19, 20, 21, 22<br />
Steuern der Nähgeschwindigkeit 8<br />
Stichbreiteneinstellung 19<br />
Stichlängeneinstellung 19<br />
Sticken 27<br />
D-43<br />
D
Stoffteile zusammennähen 21<br />
Stopfen 26<br />
Stopfplatte 7, 24, 26, 27<br />
Störungen 38<br />
T<br />
Transporteur 33<br />
U<br />
Unterfadenspannung 15, 16<br />
Unterfadenspule 9<br />
W<br />
Wartung 30<br />
Wattierlineal 7, 29<br />
Z<br />
Zickzackstich 20<br />
Zierstickstiche 22<br />
Zubehörbox 7, 8<br />
Zwillingsnadel 28<br />
D-44