KING plus 9 - 18 kg - Britax Römer
KING plus 9 - 18 kg - Britax Römer
KING plus 9 - 18 kg - Britax Römer

You also want an ePaper? Increase the reach of your titles
YUMPU automatically turns print PDFs into web optimized ePapers that Google loves.
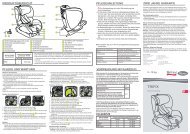
6.1 Pflege des<br />
Gurtschlosses<br />
Das Funktionieren des Gurtschlosses<br />
trägt wesentlich zur Sicherheit bei.<br />
Funktionsstörungen am Gurtschloss<br />
sind meist auf Verunreinigungen<br />
zurückzuführen:<br />
Funktionsstörung<br />
• Die Schlosszungen werden beim<br />
Drücken der roten Taste<br />
verlangsamt ausgeworfen.<br />
• Die Schlosszungen rasten nicht<br />
mehr ein (werden wieder<br />
ausgestoßen).<br />
• Die Schlosszungen rasten ohne<br />
deutliches "Klick" ein.<br />
• Die Schlosszungen werden beim<br />
Einführen gebremst (teigig).<br />
• Das Gurtschloß läßt sich nur noch<br />
mit hohem Kraftaufwand öffnen.<br />
Abhilfemaßnahme<br />
So können Sie das Gurtschloss<br />
auswaschen, damit es wieder<br />
einwandfrei funktioniert:<br />
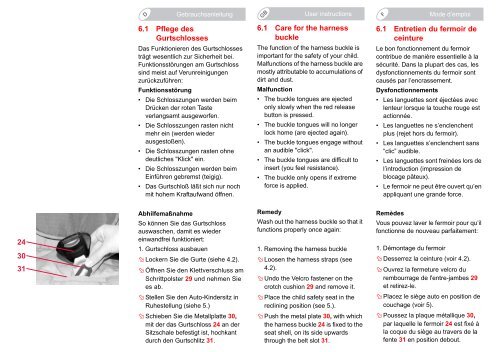
1. Gurtschloss ausbauen<br />
� Lockern Sie die Gurte (siehe 4.2).<br />
� Öffnen Sie den Klettverschluss am<br />
Schrittpolster 29 und nehmen Sie<br />
es ab.<br />
� Stellen Sie den Auto-Kindersitz in<br />
Ruhestellung (siehe 5.)<br />
� Schieben Sie die Metallplatte 30,<br />
mit der das Gurtschloss 24 an der<br />
Sitzschale befestigt ist, hochkant<br />
durch den Gurtschlitz 31.<br />
6.1 Care for the harness<br />
buckle<br />
The function of the harness buckle is<br />
important for the safety of your child.<br />
Malfunctions of the harness buckle are<br />
mostly attributable to accumulations of<br />
dirt and dust.<br />
Malfunction<br />
• The buckle tongues are ejected<br />
only slowly when the red release<br />
button is pressed.<br />
• The buckle tongues will no longer<br />
lock home (are ejected again).<br />
• The buckle tongues engage without<br />
an audible "click".<br />
• The buckle tongues are difficult to<br />
insert (you feel resistance).<br />
• The buckle only opens if extreme<br />
force is applied.<br />
Remedy<br />
Wash out the harness buckle so that it<br />
functions properly once again:<br />
1. Removing the harness buckle<br />
� Loosen the harness straps (see<br />
4.2).<br />
� Undo the Velcro fastener on the<br />
crotch cushion 29 and remove it.<br />
� Place the child safety seat in the<br />
reclining position (see 5.).<br />
� Push the metal plate 30, with which<br />
the harness buckle 24 is fixed to the<br />
seat shell, on its side upwards<br />
through the belt slot 31.<br />
6.1 Entretien du fermoir de<br />
ceinture<br />
Le bon fonctionnement du fermoir<br />
contribue de manière essentielle à la<br />
sécurité. Dans la plupart des cas, les<br />
dysfonctionnements du fermoir sont<br />
causés par l’encrassement.<br />
Dysfonctionnements<br />
• Les languettes sont éjectées avec<br />
lenteur lorsque la touche rouge est<br />
actionnée.<br />
• Les languettes ne s’enclenchent<br />
<strong>plus</strong> (rejet hors du fermoir).<br />
• Les languettes s’enclenchent sans<br />
“clic” audible.<br />
• Les languettes sont freinées lors de<br />
l’introduction (impression de<br />
blocage pâteux).<br />
• Le fermoir ne peut être ouvert qu’en<br />
appliquant une grande force.<br />
Remèdes<br />
Vous pouvez laver le fermoir pour qu’il<br />
fonctionne de nouveau parfaitement:<br />
1. Démontage du fermoir<br />
� Desserrez la ceinture (voir 4.2).<br />
� Ouvrez la fermeture velcro du<br />
rembourrage de l'entre-jambes 29<br />
et retirez-le.<br />
� Placez le siège auto en position de<br />
couchage (voir 5).<br />
� Poussez la plaque métallique 30,<br />
par laquelle le fermoir 24 est fixé à<br />
la coque du siège au travers de la<br />
fente 31 en position debout.