

Plancha Iron Modelo Model Modelo I-335 - Applica Use and Care ...
Plancha Iron Modelo Model Modelo I-335 - Applica Use and Care ...
Plancha Iron Modelo Model Modelo I-335 - Applica Use and Care ...

Create successful ePaper yourself
Turn your PDF publications into a flip-book with our unique Google optimized e-Paper software.
J<br />
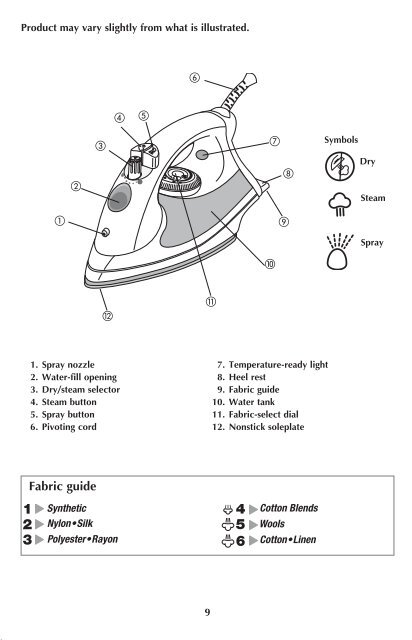
Product may vary slightly from what is illustrated.<br />
<br />
<br />
<br />
<br />
<br />
K<br />
J<br />
L<br />
<br />
<br />
K<br />
M<br />
L<br />
O<br />
M<br />
<br />
<br />
Symbols<br />
Dry<br />
Steam<br />
Spray<br />
g<br />
How to <strong>Use</strong><br />
This appliance is for household use only.<br />
Getting Started<br />
Remove any labels, stickers or tags attached to the body or soleplate of the iron.<br />
Note: <strong>Use</strong> ordinary tap water for ironing. Do not use water processed through a<br />
water softening system.<br />
Important: For optimum performance, let the iron st<strong>and</strong> for 90 seconds before<br />
beginning to iron.<br />
TO FILL THE WATER TANK<br />
1. Tilt the iron <strong>and</strong> using a clean measuring cup, pour water into<br />
opening until the water reaches the MAX level mark on the<br />
water tank (A). Do not overfill. Refill as needed.<br />
2. Plug in the iron. Temperature-ready light glows when iron has<br />
reached set temperature setting.<br />
Tip: If unsure of a garment’s fabric, test a small area (on an inside<br />
seam or hem) before ironing.<br />
A<br />
FOR STEAM IRONING<br />
1. Move the dry/steam selector to the desired steam level (B).<br />
1. Spray nozzle<br />
2. Water-fill opening<br />
3. Dry/steam selector<br />
4. Steam button<br />
5. Spray button<br />
6. Pivoting cord<br />
Fabric guide<br />
<br />
<br />
7. Temperature-ready light<br />
8. Heel rest<br />
9. Fabric guide<br />
10. Water tank<br />
11. Fabric-select dial<br />
12. Nonstick soleplate<br />
O<br />
B<br />
2. Turn the fabric-select dial to appropriate setting (between<br />
4 <strong>and</strong> 6) for your fabric (C). See fabric guide on the heel<br />
J<br />
rest <strong>and</strong> read garment’s label to help you determine fabric<br />
type. The temperature-ready light glows until it reaches the<br />
K<br />
appropriate temperature. It then cycles on <strong>and</strong> off during<br />
ironing.<br />
L<br />
C<br />
3. When finished ironing, turn the fabric-select dial to lowest heat<br />
M<br />
setting, move the selector to <strong>and</strong> unplug the iron. St<strong>and</strong> the<br />
a<br />
b<br />
iron on its heel rest <strong>and</strong> allow it to cool off.<br />
O<br />
Important: Always st<strong>and</strong> the iron on its heel rest when powered on but not in<br />
use.<br />
Surge of Steam<br />
<strong>Use</strong> to remove stubborn creases.<br />
1. With water tank filled to the MAX mark, turn the fabric-select dial to at least<br />
setting 4 <strong>and</strong> wait for the temperature-ready light to go off.<br />
9<br />
10


