8595 - Braun Consumer Service spare parts use instructions manuals
8595 - Braun Consumer Service spare parts use instructions manuals
8595 - Braun Consumer Service spare parts use instructions manuals

You also want an ePaper? Increase the reach of your titles
YUMPU automatically turns print PDFs into web optimized ePapers that Google loves.
12<br />
eco<br />
normal<br />
intensive<br />
auto sel<br />
full<br />
empty<br />
cartridge<br />
2<br />
cartridge<br />
full<br />
empty<br />
clean<br />
eco<br />
normal<br />
intensive<br />
auto select<br />
cartridge<br />
full<br />
clean<br />
eco<br />
normal<br />
intensive<br />
auto select<br />
empty<br />
1<br />
cartridge<br />
full<br />
empty<br />
clean<br />
eco<br />
normal<br />
intensive<br />
auto select<br />
Description<br />
1. Low-voltage adapter<br />
2. «start cleaning» button<br />
3. Station-to-shaver connecting contacts<br />
4. Station lift button for cartridge exchange<br />
5. Display for cleaning programs<br />
6. Display for cleaning fluid status<br />
7. Station mains socket<br />
8. Cleaning cartridge<br />
9. Shaver foil protection cap<br />
10. Shaver foil<br />
11. Cutter block<br />
12. Foil release buttons<br />
13. Long hair trimmer<br />
14. Shaver-to-station connecting contacts<br />
(shaver backside)<br />
15. Switch<br />
16. Shaver display<br />
17. Info key<br />
18. Pilot light<br />
19. Shaver mains socket<br />
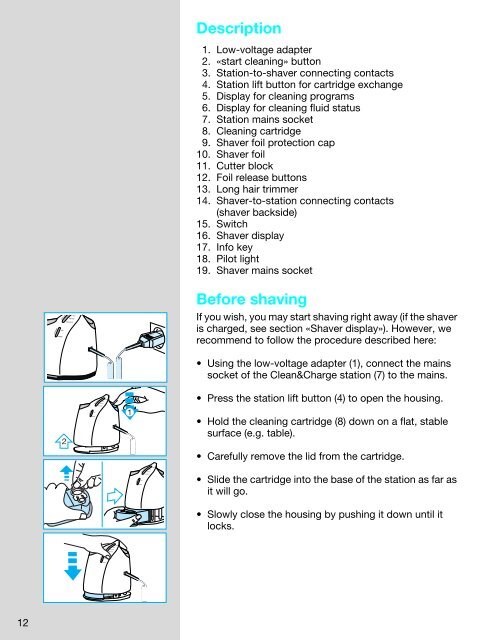
Before shaving<br />
If you wish, you may start shaving right away (if the shaver<br />
is charged, see section «Shaver display»). However, we<br />
recommend to follow the procedure described here:<br />
• Using the low-voltage adapter (1), connect the mains<br />
socket of the Clean&Charge station (7) to the mains.<br />
• Press the station lift button (4) to open the housing.<br />
• Hold the cleaning cartridge (8) down on a flat, stable<br />
surface (e.g. table).<br />
• Carefully remove the lid from the cartridge.<br />
• Slide the cartridge into the base of the station as far as<br />
it will go.<br />
• Slowly close the housing by pushing it down until it<br />
locks.