8595 - Braun Consumer Service spare parts use instructions manuals
8595 - Braun Consumer Service spare parts use instructions manuals
8595 - Braun Consumer Service spare parts use instructions manuals

Create successful ePaper yourself
Turn your PDF publications into a flip-book with our unique Google optimized e-Paper software.
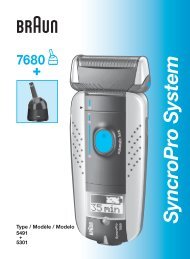
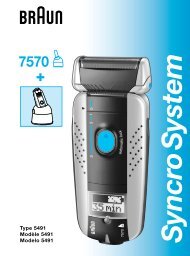
The display for cleaning fluid (6) will show how much<br />
cleaning fluid is in the cartridge:<br />
a) Cleaning solution sufficiently available<br />
b) Up to 7 cleanings left<br />
c) New cartridge required<br />
Make sure the foil protection cap (9) is removed from the<br />
shaver. Insert the shaver head down into the station (the<br />
contacts on the back of the shaver (14) will correspond to<br />
the contacts in the station (3)). If necessary, the system<br />
will now charge the shaver.<br />
Also, the cleaning status will be automatically analyzed<br />
and one of the four diodes of the cleaning program display<br />
(5) will light up:<br />
a) The shaver is clean<br />
b) Eco(nomic), i.e. short cleaning required<br />
c) Normal cleaning required<br />
d) Intensive cleaning required<br />
If the system has selected one of the three cleaning<br />
programs, it will not start until you push down the «start<br />
cleaning» button (2). This locks the shaver into the station<br />
and starts the cleaning process.<br />
We recommend cleaning after each shave.<br />
While the cleaning is in progress, the respective cleaning<br />
program light will flash. Each cleaning consists of several<br />
cycles (where the cleaning fluid is flushed through the<br />
shaver head) and a heat drying period. The total cleaning<br />
time is 33 to 50 minutes.<br />
Cleaning processes in the Clean&Charge should not<br />
be interrupted. While the shaver is drying, the metal<br />
<strong>parts</strong> of the shaver may be hot. Also, if the shaver is<br />
taken out prematurely and is not dry, its electronics<br />
could be harmed.<br />
When the program is finished, the blue «clean» light will<br />
shine. You can release the shaver by pushing the «start<br />
cleaning» button.<br />
Your shaver is now clean and ready for <strong>use</strong>.<br />
cartridge<br />
a b c<br />
auto select<br />
full<br />
empty<br />
off<br />
3 2 1<br />
start cleaning<br />
cartridge<br />
off<br />
3 2 1<br />
start cleaning<br />
cartridgeauto select<br />
full<br />
empty<br />
cartridgeauto select<br />
full<br />
empty<br />
clean<br />
eco<br />
normal<br />
intensive<br />
full<br />
empty<br />
clean<br />
eco<br />
normal<br />
intensive<br />
eco<br />
clean<br />
normal<br />
intensive<br />
cartridge<br />
auto select<br />
auto select<br />
full<br />
empty<br />
clean a<br />
eco<br />
normal<br />
intensive<br />
eco<br />
clean<br />
normal<br />
intensive<br />
b<br />
c<br />
d<br />
13