Télécharger le fichier PDF - ST Dupont
Télécharger le fichier PDF - ST Dupont
Télécharger le fichier PDF - ST Dupont

You also want an ePaper? Increase the reach of your titles
YUMPU automatically turns print PDFs into web optimized ePapers that Google loves.
14<br />
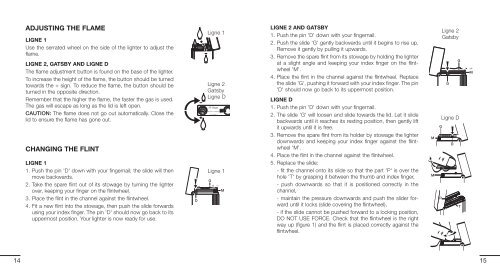
ADJU<strong>ST</strong>ING THE FLAME<br />
LIGNE 1<br />
Use the serrated wheel on the side of the lighter to adjust the<br />
flame.<br />
LIGNE 2, GATSBY AND LIGNE D<br />
The flame adjustment button is found on the base of the lighter.<br />
To increase the height of the flame, the button should be turned<br />
towards the + sign. To reduce the flame, the button should be<br />
turned in the opposite direction.<br />
Remember that the higher the flame, the faster the gas is used.<br />
The gas will escape as long as the lid is <strong>le</strong>ft open.<br />
CAUTION: The flame does not go out automatically. Close the<br />
lid to ensure the flame has gone out.<br />
CHANGING THE FLINT<br />
LIGNE 1<br />
1. Push the pin 'D' down with your fingernail; the slide will then<br />
move backwards.<br />
2. Take the spare flint out of its stowage by turning the lighter<br />
over, keeping your finger on the flintwheel.<br />
3. Place the flint in the channel against the flintwheel.<br />
4. Fit a new flint into the stowage, then push the slide forwards<br />
using your index finger. The pin 'D' should now go back to its<br />
uppermost position. Your lighter is now ready for use.<br />
D<br />
D<br />
Ligne 1<br />
Ligne 2<br />
Gatsby<br />
Ligne D<br />
Ligne 1<br />
G<br />
G<br />
M<br />
M<br />
LIGNE 2 AND GATSBY<br />
1. Push the pin 'D' down with your fingernail.<br />
2. Push the slide 'G' gently backwards until it begins to rise up.<br />
Remove it gently by pulling it upwards.<br />
3. Remove the spare flint from its stowage by holding the lighter<br />
at a slight ang<strong>le</strong> and keeping your index finger on the flintwheel<br />
'M'.<br />
4. Place the flint in the channel against the flintwheel. Replace<br />
the slide 'G', pushing it forward with your index finger. The pin<br />
'D' should now go back to its uppermost position.<br />
LIGNE D<br />
1. Push the pin 'D' down with your fingernail.<br />
2. The slide 'G' will loosen and slide towards the lid. Let it slide<br />
backwards until it reaches its resting position, then gently lift<br />
it upwards until it is free.<br />
3. Remove the spare flint from its holder by stowage the lighter<br />
downwards and keeping your index finger against the flintwheel<br />
'M'.<br />
4. Place the flint in the channel against the flintwheel.<br />
5. Replace the slide:<br />
- fit the channel onto its slide so that the part 'P' is over the<br />
ho<strong>le</strong> 'T' by grasping it between the thumb and index finger,<br />
- push downwards so that it is positioned correctly in the<br />
channel,<br />
- maintain the pressure downwards and push the slider forward<br />
until it locks (slide covering the flintwheel),<br />
- if the slide cannot be pushed forward to a locking position,<br />
DO NOT USE FORCE. Check that the flintwheel is the right<br />
way up (figure 1) and the flint is placed correctly against the<br />
flintwheel.<br />
M<br />
M<br />
M<br />
M<br />
D<br />
D<br />
G<br />
G<br />
P<br />
P<br />
D<br />
D<br />
G<br />
G<br />
Ligne 2<br />
Gatsby<br />
D<br />
D<br />
G<br />
G<br />
Ligne D<br />
T<br />
T<br />
M<br />
M<br />
M<br />
M<br />
15