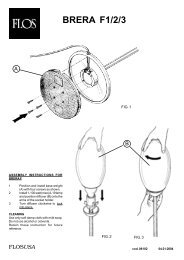
istruzioni di installazione ed impiego instruction for correct ... - Flos
istruzioni di installazione ed impiego instruction for correct ... - Flos
istruzioni di installazione ed impiego instruction for correct ... - Flos

Create successful ePaper yourself
Turn your PDF publications into a flip-book with our unique Google optimized e-Paper software.
P<br />
RUS<br />
JAP<br />
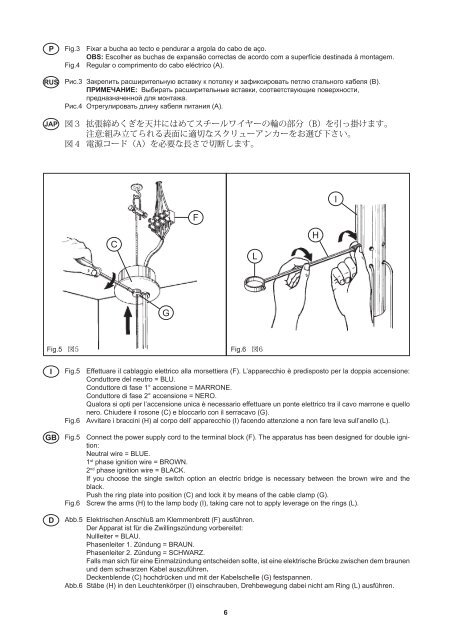
Fig.3 Fixar a bucha ao tecto e pendurar a argola do cabo de aço.<br />
OBS: Escolher as buchas de expansão <strong>correct</strong>as de acordo com a superfície destinada à montagem.<br />
Fig.4 Regular o comprimento do cabo eléctrico (A).<br />
Рис.3 Закрепить расширительную вставку к потолку и зафиксировать петлю стального кабеля (B).<br />
ПРИМЕЧАНИЕ: Выбирать расширительные вставки, соответствующие поверхности,<br />
предназначенной для монтажа.<br />
Рис.4 Отрегулировать длину кабеля питания (A).<br />
図 3 拡 張 締 めくぎを 天 井 にはめてスチールワイヤーの 輪 の 部 分 (B)を 引 っ 掛 けます。<br />
注 意 : 組 み 立 てられる 表 面 に 適 切 なスクリューアンカーをお 選 び 下 さい。<br />
図 4 電 源 コード(A)を 必 要 な 長 さで 切 断 します。<br />
I<br />
F<br />
C<br />
L<br />
H<br />
G<br />
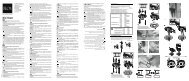
Fig.5 図 5 Fig.6 図 6<br />
I<br />
GB<br />
D<br />
Fig.5 Effettuare il cablaggio elettrico alla morsettiera (F). L’apparecchio è pre<strong>di</strong>sposto per la doppia accensione:<br />
Conduttore del neutro = BLU.<br />
Conduttore <strong>di</strong> fase 1° accensione = MARRONE.<br />
Conduttore <strong>di</strong> fase 2° accensione = NERO.<br />
Qualora si opti per l’accensione unica è necessario effettuare un ponte elettrico tra il cavo marrone e quello<br />
nero. Chiudere il rosone (C) e bloccarlo con il serracavo (G).<br />
Fig.6 Avvitare i braccini (H) al corpo dell’ apparecchio (I) facendo attenzione a non fare leva sull’anello (L).<br />
Fig.5 Connect the power supply cord to the terminal block (F). The apparatus has been design<strong>ed</strong> <strong>for</strong> double ignition:<br />
Neutral wire = BLUE.<br />
1 st phase ignition wire = BROWN.<br />
2 nd phase ignition wire = BLACK.<br />
If you choose the single switch option an electric bridge is necessary between the brown wire and the<br />
black.<br />
Push the ring plate into position (C) and lock it by means of the cable clamp (G).<br />
Fig.6 Screw the arms (H) to the lamp body (I), taking care not to apply leverage on the rings (L).<br />
Abb.5 Elektrischen Anschluß am Klemmenbrett (F) ausführen.<br />
Der Apparat ist für <strong>di</strong>e Zwillingszündung vorbereitet:<br />
Nullleiter = BLAU.<br />
Phasenleiter 1. Zündung = BRAUN.<br />
Phasenleiter 2. Zündung = SCHWARZ.<br />
Falls man sich für eine Einmalzündung entscheiden sollte, ist eine elektrische Brücke zwischen dem braunen<br />
und dem schwarzen Kabel auszuführen.<br />
Deckenblende (C) hochdrücken und mit der Kabelschelle (G) festspannen.<br />
Abb.6 Stäbe (H) in den Leuchtenkörper (I) einschrauben, Drehbewegung dabei nicht am Ring (L) ausführen.