Observed Problem Possible Cause What to Do<strong>Digital</strong> timer does not switch on/off butdisplay looks normal.<strong>Digital</strong> timer won’t enter AUTO orRANDom mode when you press MODE.<strong>Digital</strong> timer switches at incorrect times orskips some of the programmed times.The lights or controlled devices don’tmatch the programmed on/off statusimmediately after setting the time orprogramming a schedule.The load turns off immediately after beingturned on.The digital timer operation is sluggish ornot switching on/off at all.<strong>Timer</strong> shows ON but the light or othercontrolled device is off.Troubleshooting Guide<strong>Digital</strong> timer is not set in AUTO, RANDom, orMANual mode.The time of day or timer settings have notbeen set.Programmed schedule(s) are incorrect.<strong>Digital</strong> timer is in RANDom mode, which variesswitching times up to ±30 minutes (to giveyour home a “lived-in” look).The Astronomic and exact switching times arein conflict. For example, you’ve set on to DUSKand off at 8 pm, and due to seasonal changes,DUSK has advanced to 8:30 pm.NOTE: Your timer automatically skips anyconflicting ON event as summer approachesto prevent unwanted operation of lights orother controlled devices. See “What to Do” ifyou want to identify and remove conflictingsettings.<strong>Digital</strong> timer does not “catch up”automatically to the programmed load state.The status of the timer will remain as is until itcomes to the next programmed on/off time.The timer is not functioning properly.Though the low battery indicator is not beingdisplayed, the batteries are getting weak.The light or controlled device itself may beswitched off or the light bulb may be burnedout.Press MODE to select the operational mode youwant to use.Make sure the time of day and at least onescheduled activity have been set.Press PROG to review the settings and revise themas necessary. See instructions.If you don’t want to keep the timer in RANDommode, press MODE to change to AUTO mode.1.2.3.4.Complete the steps for setting the Time andDate, then temporarily change the date toJune 21st.Review the DAWN and DUSK settings bypushing the PROG button.Make sure the specific ON or OFF time settingswon’t interfere with these DAWN and DUSKtimes. Make changes as necessary.When finished, change the Date setting backto today’s date.After programming your events or the time, thenreturning to the AUTO mode, push the ON/OFFbutton to change the load state if necessary.If the problem persists, contact IntermaticCustomer Service.Replace the batteries.Make sure the light or controlled device isswitched on and plugged in or replace the lightbulb.LIMITED LIFETIME WARRANTYIf within the warranty period specified, this product fails due to a defect in material or workmanship, Intermatic Incorporated will repair or replace it, at its sole option, free of charge. This warranty is extended tothe original household purchaser only and is not transferable. This warranty does not apply to: (a) damage to units caused by accident, dropping or abuse in handling, acts of God or any negligent use; (b) unitswhich have been subject to unauthorized repair, opened, taken apart or otherwise modified; (c) units not used in accordance with instructions; (d) damages exceeding the cost of the product; (e) sealed lampsand/or lamp bulbs, LED’s and batteries; (f) the finish on any portion of the product, such as surface and/or weathering, as this is considered normal wear and tear; (g) transit damage, initial installation costs,removal costs, or reinstallation costs.INTERMATIC INCORPORATED WILL NOT BE LIABLE FOR INCIDENTAL OR CONSEQUENTIAL DAMAGES. SOME STATES DO NOT ALLOW THE EXCLUSION OR LIMITATION OF INCIDENTAL OR CONSEQUENTIALDAMAGES, SO THE ABOVE LIMITATION OR EXCLUSION MAY NOT APPLY TO YOU. THIS WARRANTY IS IN LIEU OF ALL OTHER EXPRESS OR IMPLIED WARRANTIES. ALL IMPLIED WARRANTIES, INCLUDINGTHE WARRANTY OF MERCHANTABILITY AND THE WARRANTY OF FITNESS FOR A PARTICULAR PURPOSE, ARE HEREBY MODIFIED TO EXIST ONLY AS CONTAINED IN THIS LIMITED WARRANTY, AND SHALLBE OF THE SAME DURATION AS THE WARRANTY PERIOD STATED ABOVE. SOME STATES DO NOT ALLOW LIMITATIONS ON THE DURATION OF AN IMPLIED WARRANTY, SO THE ABOVE LIMITATION MAY NOTAPPLY TO YOU.This warranty service is available by either (a) returning the product to the dealer from whom the unit was purchased, or (b) mailing the product, along with proof of purchase, postage prepaid to the authorizedservice center listed below. This warranty is made by: Intermatic Incorporated/After Sales Service/7777 Winn Rd., Spring Grove, Illinois 60081-9698/815-675-7000 http://www.intermatic.com Please be sure to wrapthe product securely to avoid shipping damage.INTERMATIC INCORPORATEDSPRING GROVE, ILLINOIS 60081-9698158-00565
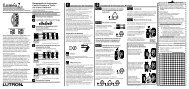
+Serie de MODELO HB800Instrucciones para el usuario y la instalaciónCapacidades• Entrada: 102 a 132 V CA 60 Hz, 2.5 W máx.• Salida: 15 amperios/1800 W resistivos, 12 amperios inductivos,1000 W de tungsteno, 1/3 HP••••Enchufe el cable de alimentación del temporizador en un interruptor delcircuito de fallos de conexión a tierra solamente.No exceda la capacidad de 15 amperios.Inserte los enchufes completamente.No está diseñado para su uso con herramientas eléctricas como cortadoresde setos, hierba y césped.Debido a que el cable de alimentación se mezcla entre el pasto y el follaje,tenga cuidado al operar el equipo para césped cerca del cable.Mantenga alejados a los niños.••ADVERTENCIA: Riesgo de incendio o descarga eléctricaAVISO• Siga los códigos eléctricos locales durante su uso.• Guárdelo en interiores cuando no esté en uso.• Elimine inmediatamente las baterías usadas según los reglamentos locales.Temporizador digital para exteriores7.8.9.10.11.Botón ResetDía de la semana (DOW): Se pueden programar eventos parasólo un día de la semana, todos los días de la semana, sólo díasde semana o sólo fines de semana.Evento: En el temporizador se pueden programar hasta un totalde 28 eventos de encendido/apagado por semana.Modo: El temporizador puede mostrar varios modos durantela configuración y la programación, y tres modos duranteel funcionamiento: MANual, AUTO y RANDom. MANual permitela operación manual de los dispositivos enchufados, AUTO(Automático) usa los ajustes exactos del temporizador yRANDom (Aleatorio) usa los ajustes del temporizador variandoaleatoriamente en incrementos de 5 minutos cada ±30 minutos.Indicador de estado de salida: Éste es el indicador de encendido/apagado. Cuando está encendida la luz verde, significa que elfoco o el artefacto debe estar encendido. Si no es así, la bombilladebe estar quemada o el dispositivo puede estar apagado en elfoco o el artefacto.NOTA: Puede configurar y programar el temporizador antes deenchufarlo. Tenga en cuenta que mientras está desenchufado, seapagará la pantalla para conservar energía si no hay actividad enlos botones durante algunos minutos. Si esto sucede, simplementepresione cualquier botón para volver a encender la pantalla.1 – Active las bateríasEl temporizador viene con dosON OFF LOC DUSK DAWNbaterías LR44 instaladas.MONTHDATEYEARSKIP1. Retire la lengüeta para conectarlas baterías instaladas.EVENT2. La pantalla se inicializará, luegoMO TU WE TH FR SA SUparpadeará “12:00 AM” en elmodo CLOCK (Reloj) (Fig. 1).NOTA: Si no se ilumina la pantalla, las baterías están agotadas.Reemplace las baterías antes de usar el temporizador digital.1.2.3.4.5.6.Compartimiento de baterías(parte posterior de launidad): (parte posteriorde la unidad): Dos bateríasLR44 mantienen la horadurante un máximo de tresmeses sin alimentación.Indicador de batería baja:Los datos programados sealmacenan en la memoriano volátil, de forma que nose pierden cuando se retiranlas baterías.NOTA: Reemplace lasbaterías tan pronto seaposible después de queaparezca el indicador debatería baja.Hora del día (TOD, porsus siglas en inglés): Eltemporizador ajustaráDAYSAV MAN AUTO RAND CLOCK2 – Familiarícese con las funciones del temporizadorON OFF LOC DUSK DAWNDAYSAV MAN AUTO RAND CLOCKMONTH DATE YEARSKIPEVENTMO TU WE TH FR SA SUAM PMautomáticamente la hora de verano (DST, por sus siglas eninglés) y cambiará las horas de amanecer y atardecer para suubicación (función astronómica).BotonesDos tomacorrientes temporizados conectados a tierraPerilla selectora10981 2AM PMOK MODE PROG ON/OFF65Fig.131147Fig.23 – Borre cualquier programación existenteEs poco probable que su nuevo temporizador digital tengaalguna programación existente, pero para asegurarse, use esteprocedimiento antes de ajustar la hora.1. Ubique el botón Reset (Reinicio). Es el orificio pequeño yredondo adyacente al teclado. Necesitará un lápiz o un sujetadorde papel para presionar este botón.2. Presione y mantenga presionado el botón ON/OFF (Encendido/Apagado).3. Presione el botón Reset durante 3 segundos y suéltelo. Seiluminará la pantalla y quedará en blanco.4. Suelte el botón ON/OFF.NOTA: Al presionar el botón Reset sin mantener presionado elbotón ON/OFF borrará la hora, pero no borrará la memoria no volátil(programación).4 – Ajuste la hora, fecha y ubicaciónNOTA: El siguiente procedimiento se debe realizar completamente,lo que incluye los ajustes, para que las funciones Astronomic(Astronómica) y Daylight (Hora de verano) automáticas funcionencorrectamente.Ajuste de hora1. Asegúrese de que el temporizador esté en el modo CLOCK (Fig. 1).Si no es así, presione el botón MODE (Modo) un par de veces(pasando por MANual, AUTO y RANDom) hasta que se muestreCLOCK en el área de visualización de modo, y luego presioneOK (Aceptar).2. Gire la perilla selectora hasta que se muestre la hora correctaen los dos primeros dígitos de la hora del día (TOD), junto conla opción de AM y PM correcta. Tenga en cuenta que AM y PM sealternarán a medida que la hora pase las 12.3. Presione el botón OK para ajustar la hora. Comenzarán aparpadear los últimos dos dígitos de TOD (minutos).4. Gire la perilla selectora hasta que seONOFF LOC DUSK DAWNDAYSAV MAN AUTO RAND CLOCKMONTHDATEYEARmuestre la hora correcta en minutos.SKIP5. Presione el botón OK para ajustarEVENTlos minutos. Se mostrarán MONTHMO TU WE TH FR SA SUAM PM(Mes), DATE (Fecha) y YEAR (Año)en el área de visualización deFig.OK MODE PROG ON/OFFmodo, con los dígitos de YEAR3parpadeando (Fig. 3).