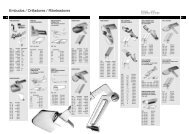
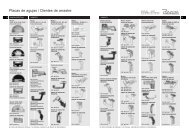
2200AS - Universal Sewing Supply
2200AS - Universal Sewing Supply
2200AS - Universal Sewing Supply
- No tags were found...

You also want an ePaper? Increase the reach of your titles
YUMPU automatically turns print PDFs into web optimized ePapers that Google loves.
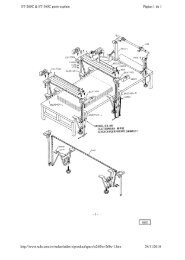
INSTRUCTIONS FOR MECHANICSObserve the SAFETY RULES!SETTING THE LOOPER1. Looper for two thread double locked stitch:Set the looper (A, Fig. 6) so that the distance from the center of theneedle (B) to the point of the looper is not less than 4 mm (5/32")when the looper is at its farthest end position from the needle. Loopergauge No. 21225-4/4.4 can be used advantageously in making thissetting.2. Looper for single thread chainstitch:Set the looper (A, Fig. 6A) so that the distance from the center ofthe needle (B) to the point of the looper is not less than 3.6 mm (9/64") when the looper is at its farthest end position from the needle.Looper gauge No. 21225-9/64 can be used advantageously inmaking this setting.If adjustment is required remove plug (C, Fig. 7). Set screw forlooper shaft is accessible through thsi hole. Loosen the screw andmove the looper shaft to the right or to the left to obtain the 4 mm (5/32") respectively the 3.6 mm (9/64") distance. The looper pointshould pass as close as possible to the back of the needle withoutcontacting it. Clearance 0.08 to 0.13 mm (0.003 to 0.005 in.).Retighten screw and remount the plug.SETTING HEIGHT OF NEEDLEThe height of the needle is correct, when the top of its eye is flushwith the lower edge of the lloper, when the looper moves to the leftand its point is flush with the left side of the needle (see Fig. 8).If adjustment is necessary, loosen set screw (D, Fig. 7) and removeneedle, then loosen lock nut (E) and regulate the height adjustmentscrew (A). Now reset stop screw (B) in feed dog to maintain theadjusted feed dog height.INSTRUCCIONES PARA MECANICOSObserve las INDICACIONES DE SEGURIDAD!AJUSTE DEL LOOPER1. Looper para costura de cadeneta doble, dos hilos:Ajustar el looper (A, Fig. 6) de manera tal que la distancia entre el centrode la aguja (B) y la punta del looper no sea menos de 4 mm en el momentocuando el looper esta en su distancia máxima a la aguja. El calibrador delooper parte No. 21225-4/4.4 se recomienda para realizar este ajuste.2. Looper para costura de cadeneta sencilla:Ajustar el looper (A, Fig. 6) de manera tal que la distancia entre el centrode la aguja (B) y la punta del looper no sea menos de 3,6 mm en el momentocuando el looper esta en su distancia máxima a la aguja. El calibrador delooper parte No. 21225-4/4.4 se recomienda para realizar este ajuste.Para lograr esto se remueve la tapa (C, Fig. 7) para llegar al tornillo que fijael eje del looper. Soltar el tornillo, mover el eje del looper hacia la izquierdao hacia la derecha hasta que se logra la distancia de 4 mm . La punta dellooper deberia pasar lo mas cerca posible de la parte trasera de la gujapero sin tocarla. La altura recomendada es de 0.08 a 0.13 mm.Fijar el tornillo y montar la tapa otra vez.AJUSTE DE LA ALTURA DE LA AGUJAEl ajuste correcto de la aguja se logra cuando el tope del ojo de la agujaesté al ras con el borde inferior del looper en el momento cuando el looperse mueve hacia la izquierda y esta con su punta al ras con el borde izquierdode la aguja. (Ver Fig. 8).Para lograr esto se remueve la aguja soltando el tornillo (D, Fig. 7). Despuésse suelta la tuerca (E) y regula con el tornillo (F) la altura correcta. Fijarposición apretando otra vez la tuerca (E).SETTING THE LOWER FEED DOGThe lower feed dog is set correctly when its teeth rise slightly morethan the depth of a full tooth (approx. 1.6 mm (1/16") above thethroat plate (see Fig. 9). To raise or lower the feed dog loosen screw(A, Fig. 10) and set the feed dog to the specified height. Retightenscrew (A). Now reset stop screw (B) in feed dog to maintain theadjusted feed dog height.AJUSTE DEL DIENTE INFERIOR DE ARRASTREEl ajuste correcto del diente inferior de arrastre se logra cuando los dientessobrepasan aprox. 1,6 mm la plancha de la aguja (Ver Fig. 9). Para bajar osubir el transportador hay que soltar el tornillo (A, Fig. 10) ajustar la alturadel diente de arrastre y apretar el tornillo (A) otra vez. Ahora hay que ajustarel contra-tornillo (B) para mantener esta posición.NEEDLE GUARDSet the needle guard (C, Fig. 10) so that it just touches the needlewhen it is at its most forward point of travel. To move guard forwardor backward loosen screw (A) and move needle guard as required.Retighten screw.NOTE: Screw (A) serves also to fasten the lower feed dog. Thereforemake sure not to disturb the feed dog height when setting the needleguard.AJUSTE DEL GUARDA AGUJASFijar el guarda aguja (C, Fig. 10) de tal manera que en el punto mas avanzadode su movimiento toque levemente la aguja. Para este ajuste hay que soltarel tornillo A y mover el guarda aguja como sea necesario.NOTA: Hay que tener cuidado para no variar la altura del diente alimentador,ya que esta fijado con el mismo tornillo (A).14