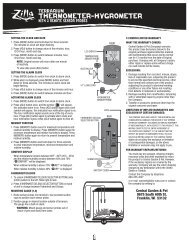
POWER CENTER - Zilla-Rules.com!
POWER CENTER - Zilla-Rules.com!
POWER CENTER - Zilla-Rules.com!

You also want an ePaper? Increase the reach of your titles
YUMPU automatically turns print PDFs into web optimized ePapers that Google loves.
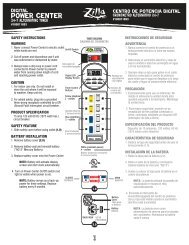
WARNING<br />
1. Never connect Power Center to electric outlet<br />
while hands are wet.<br />
2. Cut off power and discontinue use if unit was<br />
submersed or dampened by water.<br />
3. Always leave a drip-loop in power cord connected<br />
to Power Center to prevent water from running<br />
down length of cord and reaching power outlet.<br />
PRODUCT SPECIFICATION<br />
15 amp 120 volt 60 Hz (1875 watt max.)<br />
circuit breaker.<br />
SAFETY FEATURE (1.0)<br />
NOTE: Slide out safety cover<br />
before using outlet.<br />
CAUTION<br />
1. For indoor use only. Do not install or store<br />
the unit where it will be exposed to weather.<br />
Keep unit dry.<br />
2. For added safety, plug into a grounded<br />
three-prong receptacle controlled by a GFI<br />
(Ground Fault Interrupter) circuit breaker.<br />
MANUAL CONTROL SWITCH<br />
To manually switch between outlets, turn switch<br />
to desired symbol to activate.<br />
ALTERNATING TIMER - Manual Control Switch<br />
(2.0)<br />
NOTE: Blue and Black outlets alternate<br />
power, both outlets cannot be on at the<br />
same time (i.e. when Nighttime black outlets<br />
are on, the Daytime blue outlets are off).<br />
DAY-SHIFT TIMER- Manual Control Switch (3.0)<br />
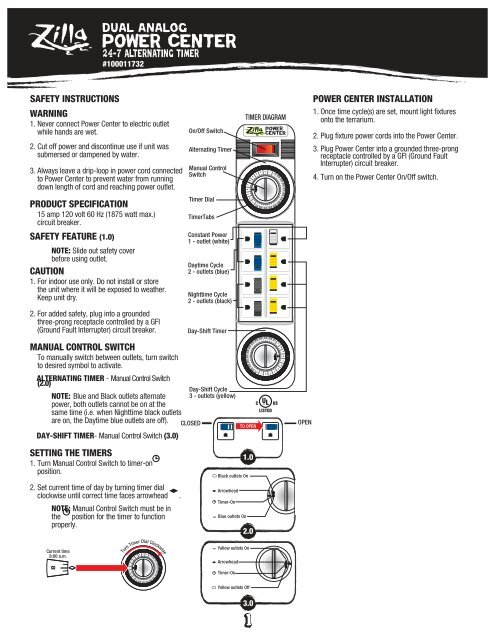
SETTING THE TIMERS<br />
1. Turn Manual Control Switch to timer-on<br />
position.<br />
Current time<br />
8:00 a.m.<br />
Dual analog<br />
<strong>POWER</strong> <strong>CENTER</strong><br />
24-7 ALTERNATING TIMER<br />
#100011732<br />
SAFETY INSTRUCTIONS <strong>POWER</strong> <strong>CENTER</strong> INSTALLATION<br />
2. Set current time of day by turning timer dial<br />
clockwise until correct time faces arrowhead .<br />
NOTE: Manual Control Switch must be in<br />
the position for the timer to function<br />
properly.<br />
Turn Timer Dial Clockwise<br />
On/Off Switch<br />
Alternating Timer<br />
Manual Control<br />
Switch<br />
Timer Dial<br />
TimerTabs<br />
Constant Power<br />
1 - outlet (white)<br />
Daytime Cycle<br />
2 - outlets (blue)<br />
Nighttime Cycle<br />
2 - outlets (black)<br />
Day-Shift Timer<br />
Day-Shift Cycle<br />
3 - outlets (yellow)<br />
CLOSED<br />
TO OPEN<br />
Black outlets On<br />
Arrowhead<br />
Timer-On<br />
Blue outlets On<br />
Yellow outlets On<br />
Arrowhead<br />
Timer-On<br />
Yellow outlets Off<br />
TIMER DIAGRAM<br />
1.0<br />
2.0<br />
3.0<br />
<strong>POWER</strong><br />
<strong>CENTER</strong><br />
OPEN<br />
1. Once time cycle(s) are set, mount light fixtures<br />
onto the terrarium.<br />
2. Plug fixture power cords into the Power Center.<br />
3. Plug Power Center into a grounded three-prong<br />
receptacle controlled by a GFI (Ground Fault<br />
Interrupter) circuit breaker.<br />
4. Turn on the Power Center On/Off switch.
TIMER SETTING INSTRUCTIONS<br />
ALTERNATING TIMER INSTRUCTIONS<br />
1. Turn Manual Control Switch to timer-on<br />
position. Set timer to current time of day.<br />
2. To set time when Daytime Cycle (blue outlets)<br />
will turn on, timer tabs must be in down<br />
position at desired starting time.<br />
3. Continue around timer dial in sequential order<br />
(verify all tabs in Daytime Cycle are in down<br />
position) until reaching end of cycle when<br />
Daytime outlets will be turned off.<br />
4. Push up timer tabs at end of desired Daytime<br />
Cycle to turn on Nighttime cycle (black outlets).<br />
5. Continue pushing tabs up until reaching<br />
starting time of Daytime Cycle.<br />
NOTE: Each timer tab represents a<br />
15 minute interval.<br />
TIMER TABS UP = Nighttime 2-outlets<br />
(black) - On (1.0)<br />
TIMER TABS DOWn = Daylight 2-outlets<br />
(blue) - On (2.0)<br />
DAY-SHIFT TIMER INSTRUCTIONS<br />
1. Turn Manual Control Switch to timer-on<br />
position. Set timer to current time of day.<br />
2. To set time for when the Day-Shift Cycle<br />
(yellow outlets) will turn on, timer tabs must<br />
be in down position at desired starting time.<br />
3. Continue around timer dial in sequential order<br />
(verify that all tabs in Day-Shift Cycle are in<br />
down position) until reaching end of cycle<br />
when the Day-Shift outlets will be turned off.<br />
4. Push up timer tabs at end of desired Day-Shift<br />
Cycle to end the cycle.<br />
5. Continue pushing tabs up until reaching<br />
starting time of Day-Shift Cycle.<br />
NOTE: Each timer tab represents a 15<br />
minute interval.<br />
TIMER TABS DOWN = Day-Shift 3-outlets<br />
(yellow) - On (3.0)<br />
TIMER-TABS UP = Day-Shift 3-outlets<br />
(yellow) - Off (4.0)<br />
Dual analog<br />
<strong>POWER</strong> <strong>CENTER</strong><br />
24-7 ALTERNATING TIMER<br />
#100011732<br />
1.0<br />
2.0<br />
3.0<br />
4.0<br />
Up Position<br />
AM<br />
Down Position<br />
Down Position<br />
PM<br />
Up Position<br />
Typical Nighttime<br />
Cycle<br />
7pm - 9am<br />
PM<br />
Typical Daytime<br />
Cycle<br />
9am - 7pm<br />
Typical Day-Shift<br />
Cycle<br />
10am - 6pm<br />
AM<br />
12 MONTH LIMITED WARRANTY<br />
WHAT THE WARRANTY COVERS:<br />
Central Garden & Pet (Company) warrants this <strong>Zilla</strong><br />
product (see Exclusions below) to the original<br />
purchaser against defective material and<br />
workmanship that occurs during normal use for<br />
12 months from the date of original purchase.<br />
Company will, at Company's option, either repair or<br />
replace same without charge (no cash refunds will<br />
be made).<br />
EXCLUSIONS:<br />
1. Damage resulting from accident, misuse, abuse,<br />
lack of reasonable care, subjecting the product to<br />
any but the specified electrical service, other than<br />
normal and ordinary use of the product, subjecting<br />
the product to abnormal working conditions or any<br />
other failure not resulting from defects in materials<br />
or workmanship.<br />
2. Damage resulting from modification, tampering<br />
with or attempted repair by anyone other than the<br />
Company.<br />
3. Transfer of product to someone other than the<br />
original consumer purchaser.<br />
LIMITATION OF IMPLIED WARRANTIES<br />
AND EXCLUSION OF CERTAIN DAMAGES:<br />
THE COMPANY DISCLAIMS LIABILITY FOR INCIDENTAL AND<br />
CONSEQUENTIAL DAMAGES FOR BREACH OF ANY EXPRESS OR<br />
IMPLIED WARRANTY, INCLUDING ANY IMPLIED WARRANTY OF<br />
MERCHANTABILITY, WITH RESPECT TO THIS PRODUCT. THIS<br />
WRITING CONSTITUTES THE ENTIRE AGREEMENT OF THE<br />
PARTIES WITH RESPECT TO THE SUBJECT MATTER HEREOF; NO<br />
WAIVER OR AMENDMENT SHALL BE VALID UNLESS IN WRITING<br />
SIGNED BY THE COMPANY. Some states do not allow the<br />
exclusion or limitation of consequential damages,<br />
so the above limitation or exclusion may not apply<br />
to you.<br />
FOR WARRANTY/REPAIRS/RETURNS:<br />
You must pay any postage, shipping charges,<br />
insurance costs and other expenses to return the<br />
product to Central Garden & Pet. However, if the<br />
necessary repairs are covered by the warranty,<br />
Company will pay the return shipping charges to<br />
any destination within the United States or Canada.<br />
Contact the Company by telephone: 800-255-4527,<br />
or e-mail: warranty@zilla-rules.<strong>com</strong>, or in writing to<br />
the address below:<br />
Central Garden & Pet<br />
9675 South 60th St.<br />
Franklin, WI 53132
ADVERTENCIA<br />
1. Nunca conecte el centro de potencia a un<br />
tomacorriente eléctrico si tiene las manos mojadas.<br />
2. Interrumpa el suministro eléctrico y deje de usar<br />
la unidad si ésta fue sumergida en agua o si<br />
fue humedecida.<br />
3. Siempre deje un lazo para goteo en el cable eléctrico<br />
conectado al centro de potencia para evitar que el<br />
agua se desplace a lo largo del cable y llegue al<br />
tomacorriente eléctrico.<br />
ESPECIFICACIÓN DEL PRODUCTO<br />
Disyuntor de 15 amperios, 120 voltios, 60 Hz<br />
(1875 vatios <strong>com</strong>o máximo)<br />
CARACTERÍSTICA DE SEGURIDAD (1.0)<br />
NOTA: Deslice la tapa de seguridad para quitarla,<br />
antes de usar el tomacorriente<br />
PRECAUCIÓN<br />
1. Exclusivamente para uso en interiores. No instale ni<br />
almacene la unidad donde ésta quedará expuesta a<br />
la intemperie. Mantenga la unidad seca.<br />
2. Para mayor seguridad, enchufe en un receptáculo de<br />
tres patillas conectado a tierra, controlado mediante<br />
un disyuntor GFI (interruptor de falla a tierra).<br />
INTERRUPTOR DE CONTROL MANUAL<br />
Para conmutar manualmente entre tomacorrientes,<br />
gire el interruptor al símbolo deseado para activarlo.<br />
CRONÓMETRO ALTERNATIVO - Interruptor de<br />
control manual (2.0)<br />
NOTA: Los tomacorrientes azules y negros<br />
alternan la potencia, y ambos tomacorrientes<br />
no pueden estar encendidos al mismo tiempo<br />
(es decir, cuando están encendidos los<br />
tomacorrientes nocturnos negros, estarán<br />
apagados los tomacorrientes diurnos azules).<br />
CRONÓMETRO DE CAMBIO DIURNO - Interruptor<br />
de control manual (3.0)<br />
CONFIGURACIÓN DE LOS CRONÓMETROS<br />
1. Gire el interruptor de control manual a la posición de<br />
encendido del cronómetro .<br />
2. Fije la hora actual del día girando el disco del<br />
cronómetro hacia la derecha hasta que la hora<br />
correcta quede orientada hacia la flecha .<br />
Hora actual<br />
8:00 a.m.<br />
CENTRO DE POTENCIA CON CRONÓMETRO<br />
ANALÓGICO DOBLE<br />
CRONÓMETRO ALTERNATIVO 24-7<br />
#100011732<br />
INSTRUCCIONES DE SEGURIDAD INSTALACIÓN DEL CENTRO DE POTENCIA<br />
NOTA: El interruptor de control manual debe<br />
estar en la posición correcta para que el<br />
cronómetro funcione correctamente .<br />
Gire el disco del cronómetro hacia la derecha<br />
Interruptor de<br />
encendido/apagado<br />
Cronómetro<br />
alternativo<br />
Interruptor de<br />
control manual<br />
Disco del<br />
cronómetro<br />
Lengüetas del<br />
cronómetro<br />
Potencia constante<br />
1 tomacorriente<br />
(blanco)<br />
Ciclo diurno<br />
2 tomacorrientes<br />
(azules)<br />
Ciclo nocturno<br />
2 tomacorrientes<br />
(negros)<br />
Cronómetro de<br />
cambio diurno<br />
Ciclo de cambio<br />
diurno 3 tomacorrientes<br />
(amarillos)<br />
CERRADO ABIERTO<br />
PARA ABRIR<br />
Tomacorrientes<br />
negros encendidos<br />
Flecha<br />
Cronómetro<br />
encendido<br />
Tomacorrientes azules<br />
encendidos<br />
Tomacorrientes<br />
amarillos encendidos<br />
Flecha<br />
Cronómetro<br />
encendido<br />
DIAGRAMA DEL CRONÓMETRO<br />
1.0<br />
2.0<br />
Tomacorrientes amarillos<br />
apagados<br />
3.0<br />
<strong>POWER</strong><br />
<strong>CENTER</strong><br />
1. Una vez configurados los ciclos de tiempo, monte<br />
los artefactos de iluminación en el terrario.<br />
2. Enchufe los cables eléctricos del artefacto en el<br />
centro de potencia.<br />
3. Enchufe el centro de potencia en un receptáculo de<br />
tres patillas conectado a tierra, controlado mediante<br />
un disyuntor GFI (interruptor de falla a tierra).<br />
4. Encienda el interruptor de encendido/apagado del<br />
centro de potencia.
INSTRUCCIONES DE<br />
CONFIGURACIÓN DEL CRONÓMETRO<br />
INSTRUCCIONES DEL CRONÓMETRO ALTERNATIVO<br />
1. Gire el interruptor de control manual a la posición de<br />
encendido del cronómetro. Fije el cronómetro a la hora<br />
actual del día .<br />
2. Para fijar la hora en que se encenderá el ciclo diurno<br />
(tomacorrientes azules), las lengüetas del cronómetro<br />
deben estar en la posición hacia abajo a la hora de<br />
inicio deseada.<br />
3. Continúe alrededor del disco del cronómetro en orden<br />
secuencial (verifique que todas las lengüetas del ciclo<br />
diurno queden en la posición hacia abajo) hasta llegar<br />
al final del ciclo, momento en el cual se apagarán los<br />
tomacorrientes diurnos.<br />
4. Empuje las lengüetas del cronómetro al final del ciclo<br />
diurno deseado para activar el ciclo nocturno<br />
(tomacorrientes negros).<br />
5. Continúe empujando las lengüetas hacia arriba hasta<br />
llegar a la hora de inicio del ciclo diurno.<br />
NOTA: Cada lengüeta del cronómetro<br />
representa un intervalo de 15 minutos.<br />
LENGÜETAS DEL CRONÓMETRO HACIA<br />
ARRIBA = 2 tomacorrientes nocturnos (negros) -<br />
Encendido (1.0)<br />
LENGÜETAS DEL CRONÓMETRO HACIA<br />
ABAJO = 2 tomacorrientes diurnos (azules) -<br />
Encendido (2.0)<br />
INSTRUCCIONES PARA EL CRONÓMETRO DE<br />
CAMBIO DIURNO<br />
1. Gire el interruptor de control manual a la posición de<br />
encendido del cronómetro. Fije el cronómetro a la<br />
hora actual del día .<br />
2. Para fijar la hora en que se encenderá el ciclo de<br />
cambio diurno (tomacorrientes amarillos), las<br />
lengüetas del cronómetro deben estar en la posición<br />
hacia abajo a la hora inicial deseada.<br />
3. Continúe alrededor del disco del cronómetro en orden<br />
secuencial (verifique que todas las lengüetas del ciclo<br />
de cambio diurno estén en la posición hacia abajo)<br />
hasta llegar al final del ciclo, momento en el cual se<br />
apagarán los tomacorrientes de cambio diurno.<br />
4. Empuje las lengüetas del cronómetro hacia arriba al<br />
final del ciclo de cambio diurno para finalizar el ciclo.<br />
5. Continúe empujando las lengüetas hacia arriba hasta<br />
llegar a la hora de inicio del ciclo de cambio diurno.<br />
NOTA: Cada lengüeta del cronómetro<br />
representa un intervalo de 15 minutos.<br />
LENGÜETAS DEL CRONÓMETRO HACIA<br />
ABAJO = 3 tomacorrientes de cambio diurno<br />
(amarillos) - Encendido (3.0)<br />
LENGÜETAS DEL CRONÓMETRO HACIA<br />
ARRIBA = 3 tomacorrientes de cambio diurno<br />
(amarillos) - Apagado (4.0)<br />
CENTRO DE POTENCIA CON CRONÓMETRO<br />
ANALÓGICO DOBLE<br />
CRONÓMETRO ALTERNATIVO 24-7<br />
#100011732<br />
1.0<br />
Up Posición Position hacia<br />
arriba<br />
AM AM<br />
Posición Down hacia Position abajo<br />
2.0<br />
Posición Down hacia Position abajo<br />
3.0<br />
4.0<br />
PM PM<br />
Up Posición Position hacia<br />
arriba<br />
Ciclo nocturno típico<br />
7pm-9am<br />
PM PM<br />
Ciclo diurno típico<br />
9am -7pm<br />
Ciclo de cambio diurno<br />
típico 10am – 6 pm<br />
AM AM<br />
GARANTÍA LIMITADA DE 12 MESES<br />
LO QUE CUBRE LA GARANTÍA:<br />
Central Garden & Pet (la Compañía) garantiza este<br />
producto <strong>Zilla</strong> (consulte las exclusiones indicadas más<br />
abajo) al <strong>com</strong>prador original contra materiales y mano<br />
de obra defectuosos que ocurran durante el uso normal<br />
durante 12 meses a partir de la fecha de <strong>com</strong>pra<br />
original. La Compañía, a su opción, reparará o<br />
reemplazará el producto sin cargo alguno (no se harán<br />
reembolsos en efectivo).<br />
EXCLUSIONES:<br />
1. Daños que surjan <strong>com</strong>o consecuencia de accidente,<br />
uso indebido, abuso, falta de cuidado razonable,<br />
someter al producto a un servicio eléctrico que difiera<br />
del que se ha especificado, diferente del uso normal y<br />
habitual del producto, someter al producto a<br />
condiciones anormales de trabajo o cualquier otro fallo<br />
que no surja <strong>com</strong>o consecuencia de defectos en los<br />
materiales o en la mano de obra.<br />
2. Daños que resulten de la modificación, alteración o<br />
intento de reparación por cualquier persona que no<br />
perteneciera a la Compañía.<br />
3. Transferencia del producto a alguna persona diferente<br />
del <strong>com</strong>prador consumidor original.<br />
LIMITACIÓN DE LAS GARANTÍAS<br />
IMPLÍCITAS Y EXCLUSIÓN DE CIERTOS<br />
DAÑOS:<br />
LA COMPAÑÍA RENUNCIA A RESPONSABILIDAD POR DAÑOS<br />
INCIDENTALES Y EMERGENTES POR INCUMPLIMIENTO DE<br />
CUALQUIER GARANTÍA EXPRESA O IMPLÍCITA, INCLUIDA<br />
CUALQUIER GARANTÍA IMPLÍCITA DE COMERCIABILIDAD, CON<br />
RESPECTO A ESTE PRODUCTO. ESTA DOCUMENTO<br />
CONSTITUYE EL ACUERDO TOTAL ENTRE LAS PARTES CON<br />
RESPECTO AL ASUNTO DEL CUAL TRATA; NO SERÁ<br />
VÁLIDA NINGUNA RENUNCIA O ENMIENDA A MENOS QUE<br />
FUERA POR ESCRITO Y FIRMADA POR LA COMPAÑÍA.<br />
Algunos estados no permiten la exclusión o limitación<br />
de los daños emergentes, de modo que la limitación o<br />
exclusión anterior podría no aplicarse a su caso en<br />
particular.<br />
PARA REPARACIONES O DEVOLUCIONES<br />
BAJO LA GARANTÍA:<br />
Usted deberá pagar por cualquier costo de franqueo,<br />
cargos de envío, costos de seguro y otros gastos para<br />
devolver el producto a Central Garden & Pet. Sin<br />
embargo, si las reparaciones necesarias son cubiertas<br />
por la garantía, la Compañía pagará los cargos de envío<br />
para devolver el producto a cualquier destino dentro de<br />
los Estados Unidos y Canadá.<br />
Comuníquese con la Compañía por teléfono:<br />
800-255-4527, o por correo electrónico:<br />
warranty@zilla-rules.<strong>com</strong>, o por escrito<br />
a la dirección indicada a continuación:<br />
Central Garden & Pet<br />
9675 South 60th St.<br />
Franklin, WI 53132