Create successful ePaper yourself
Turn your PDF publications into a flip-book with our unique Google optimized e-Paper software.
Operation<br />
AC Power Switch<br />
Before applying power, check all connections and turn the attenuation controls fully counter clockwise to maximum attenuation.<br />
One second of muting is normal when the amplifier is turned on or off (Figure 32).<br />
Attenuation Controls<br />
Turn the Attenuation controls clockwise to decrease Attenuation and counterclockwise to increase Attenuation.<br />
The Attenuation controls are marked in numeric increments from ∞ to 0 (clockwise) indicating the amount of attenuation. Settings should normally<br />
be made within the lower attenuation range. The range above 14 on the attenuation scale should not be used for normal program levels, as the<br />
input headroom could be exceeded, but can be used for testing at reduced gain levels. At the maximum attenuation setting (∞), the signal is completely<br />
cut off (Figure 33).<br />
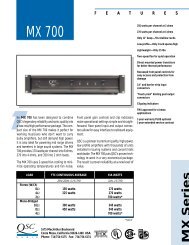
The maximum Voltage Gain for the <strong>CMX</strong> 2000V is 31.6 x (30 dB).<br />
LED Indicators<br />
The green SIGNAL LED indicators light at approximately 0.1% of full power.<br />
The red CLIP LED indicator flashes during overload (clipping).<br />
Operating Voltage<br />
CWUTNORG: Continuous operation at high power may trigger the thermal protection circuitry, shutting down the amplifier and fully<br />
illuminating the Protect indicator. Operation will resume after the amplifier has cooled down sufficiently. Nf both rear panel circuit<br />
breakers are tripped, the Protect indicator will not be illuminated. See the Troubleshooting on page .<br />
On<br />
— Figure 32 —<br />
(AC Mains)<br />
Make sure you connect the amplifier to the correct AC line voltage, as shown on the serial number label. Connecting to the wrong line voltage is<br />
dangerous and may damage the amplifier.<br />
The power requirements are 100, 120, 230 VAC, 50-60 Hz<br />
— Figure 34 —<br />
15<br />
— Figure 33 —