Campana de salida Fume extractor hood Hotte aspirante Exaustor ...
Campana de salida Fume extractor hood Hotte aspirante Exaustor ...
Campana de salida Fume extractor hood Hotte aspirante Exaustor ...

You also want an ePaper? Increase the reach of your titles
YUMPU automatically turns print PDFs into web optimized ePapers that Google loves.
Installation<br />
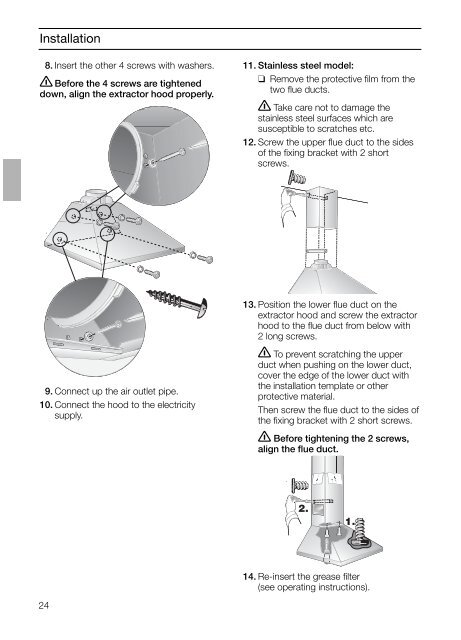
08. Insert the other 4 screws with washers.<br />
� Before the 4 screws are tightened<br />
down, align the <strong>extractor</strong> <strong>hood</strong> properly.<br />
09. Connect up the air outlet pipe.<br />
10. Connect the <strong>hood</strong> to the electricity<br />
supply.<br />
24<br />
11. Stainless steel mo<strong>de</strong>l:<br />
❑ Remove the protective film from the<br />
two flue ducts.<br />
� Take care not to damage the<br />
stainless steel surfaces which are<br />
susceptible to scratches etc.<br />
12. Screw the upper flue duct to the si<strong>de</strong>s<br />
of the fixing bracket with 2 short<br />
screws.<br />
13. Position the lower flue duct on the<br />
<strong>extractor</strong> <strong>hood</strong> and screw the <strong>extractor</strong><br />
<strong>hood</strong> to the flue duct from below with<br />
2 long screws.<br />
� To prevent scratching the upper<br />
duct when pushing on the lower duct,<br />
cover the edge of the lower duct with<br />
the installation template or other<br />
protective material.<br />
Then screw the flue duct to the si<strong>de</strong>s of<br />
the fixing bracket with 2 short screws.<br />
� Before tightening the 2 screws,<br />
align the flue duct.<br />
2.<br />
1.<br />
14. Re-insert the grease filter<br />
(see operating instructions).