CO -Markierungsgewehr Umarex Mod. RAM-12S cal. .43
CO -Markierungsgewehr Umarex Mod. RAM-12S cal. .43
CO -Markierungsgewehr Umarex Mod. RAM-12S cal. .43

Create successful ePaper yourself
Turn your PDF publications into a flip-book with our unique Google optimized e-Paper software.
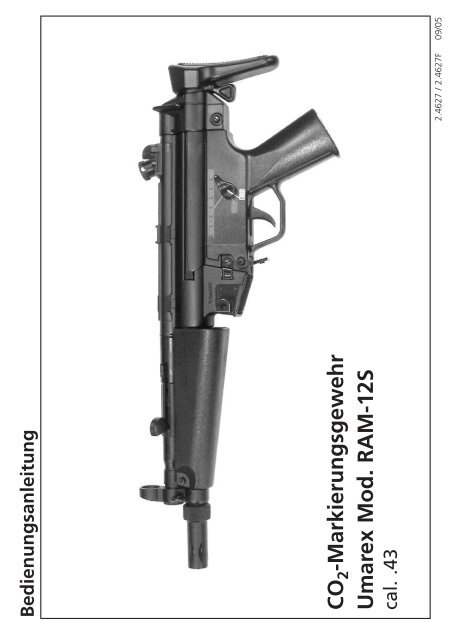
Bedienungsanleitung<br />
<strong>CO</strong>2-<strong>Markierungsgewehr</strong> <strong>Umarex</strong> <strong>Mod</strong>. <strong>RAM</strong>-<strong>12S</strong><br />
<strong>cal</strong>. <strong>.43</strong><br />
2.4627 / 2.4627F 09/05
Käufer und Anwender sind verpflichtet sich an alle gesetzlichen Auflagen in Bezug auf<br />
Besitz und Anwendung dieser Markierungspistole zu halten.<br />
Bitte lesen Sie dieses Handbuch vollständig, ehe Sie diese Markierungspistole verwenden! Denken<br />
Sie außerdem immer daran, daß diese Markierungspistole kein Spielzeug ist. Folgen Sie immer<br />
genau den Anweisungen in diesem Handbuch und halten Sie das Handbuch immer griffbereit.<br />
WARNUNG: Dies ist kein Spielzeug. Mißbräuchliche Anwendung kann zu ernsthaften<br />
Verletzungen führen. Der Anwender und alle anderen Personen innerhalb des Gefahrenbereiches<br />
müssen unbedingt den bei dieser Sportart üblichen Körper und Gesichtsschutz tragen.<br />
Mindestalter beim Kauf ist 18 Jahre. Anwender unter 18 Jahren müssen unter der Aufsicht eines<br />
Erwachsenen stehen. Lesen Sie alle Anweisungen vor der Verwendung des Gerätes.<br />
SCHRITTE ZUM SICHEREN SCHIESSEN<br />
Schritt 1: Machen Sie sich mit den Teilen Ihrer neuen Markierungspistole vertraut<br />
Schritt 2: Bedienung der Sicherung<br />
Schritt 3: Schaftverstellung<br />
Schritt 4: Einsetzen und Herausnehmen der <strong>CO</strong>2-Kapsel<br />
Schritt 5: Laden und Entladen der Munition<br />
Schritt 6: Visierung<br />
Schritt 7: Schießen<br />
Schritt 8: Pflege und Aufbewahrung<br />
Schritt 9: Sicherer Umgang mit Waffen<br />
Schritt 10: Technische Daten<br />
Schritt 1: Machen Sie sich mit den Teilen Ihrer Markierungspistole vertraut<br />
Wenn Sie die Teile Ihrer neuen Markierungspistole genau kennen, dann werden Sie die<br />
Anweisungen in Ihrem Handbuch besser verstehen. Mit Hilfe des Handbuches werden Sie an dieser<br />
Markierungspistole mehr Freude haben.<br />
Schaft<br />
Korn<br />
Kimme<br />
Mündung<br />
2. Bedienung der Sicherung<br />
Hinweis: Entsichern Sie die Waffe nur, wenn Sie auch beabsichtigen zu schießen.<br />
Zum Sichern der Waffe die Sicherung auf stellen.<br />
Zum Schießen die Sicherung auf oder auf<br />
Hinweis: In beiden Einstellungen wird jeweils nur<br />
1 Schuss abgegeben.<br />
Hinweis: Lagern Sie die Waffe nur im gesicherten Zustand.<br />
D<br />
Lauf<br />
Magazinhalter<br />
-2-<br />
Abzug<br />
Griff<br />
Sicherung<br />
Schafthebel<br />
<strong>CO</strong> 2-Anschluss<br />
Sicherung
3. Schaftverstellung<br />
Um den Schaft auszufahren, den Schafthebel nach links drücken<br />
und den Schaft bis zum Einrasten nach hinten oder vorn schieben.<br />
4. Einsetzen und Herausnehmen der <strong>CO</strong> 2 -Kapsel<br />
Warnung: Achten Sie darauf, daß Ihre Hände nicht mit<br />
austretendem <strong>CO</strong> 2 -Gas in Berührung kommen. Bei Kontakt mit der Haut kann es zu Erfrierungen<br />
kommen. Wenn die von Ihnen verwendete <strong>CO</strong> 2 -Kapsel ein Abstellventil besitzt, dann achten Sie<br />
darauf, dass es aus der Stellung "ZU" steht, ehe Sie den Behälter aus der Waffe herausnehmen.<br />
Setzen Sie die <strong>CO</strong> 2 -Kapsel keiner großen Hitze aus und lagern Sie diese Behälter nicht bei<br />
Temperaturen über 54°C. Halten Sie sich immer an die auf der Flasche aufgedruckten Warn- und<br />
Sicherheitshinweise des Herstellers bezüglich Umgang und Lagerung der <strong>CO</strong> 2 -Kapsel.<br />
A. Einsetzen der <strong>CO</strong> 2 -Kapsel<br />
Halten sie das <strong>Markierungsgewehr</strong> in eine SICHERE RICHTUNG.<br />
Sichern Sie das <strong>Markierungsgewehr</strong> (siehe Schritt 2).<br />
Geben Sie ca. 2 Tropfen Öl in den <strong>CO</strong> 2 -Anschluss (Abb.)<br />
Schrauben Sie den Ventiladapter fest an den <strong>CO</strong> 2 -Anschluss.<br />
Achtung: Stellen Sie sicher, dass das Ventil am Ventiladapter fest<br />
geschlossen ist.<br />
Schrauben Sie den <strong>CO</strong> 2 -Adapter an den Ventil-Adapter und<br />
schieben Sie die Schutzkappe über den <strong>CO</strong> 2 -Adapter.<br />
Hinweis: Es passen nur die mitgelieferte Adapter, mit anderen<br />
Adaptern oder <strong>CO</strong> 2 Tanks kann es zu austretendem <strong>CO</strong> 2 kommen.<br />
Schrauben Sie jetzt die <strong>CO</strong> 2 -Kapsel an den <strong>CO</strong> 2 -Adapter.<br />
Das <strong>Markierungsgewehr</strong> ist jetzt fertiggeladen.<br />
Hinweis: Lagern Sie ihr <strong>Markierungsgewehr</strong> nicht mit<br />
eingesetzter <strong>CO</strong> 2 -Kapsel.<br />
B. Abnehmen der <strong>CO</strong> 2 -Kapsel<br />
Hinweis: Nehmen Sie die <strong>CO</strong> 2 -Kapsel immer von der Waffe ab, ehe Sie<br />
ihre Waffe lagern. Schrauben Sie immer die <strong>CO</strong> 2 -Kapsel<br />
zusammen mit dem Adapter ab und erst dann den Adapter<br />
von der <strong>CO</strong> 2 -Kapsel.<br />
Ventil-<br />
Adapter<br />
<strong>CO</strong> 2-<br />
Adapter<br />
<strong>CO</strong> 2-<br />
Kapsel<br />
<strong>CO</strong> 2-Anschluss<br />
Sichern und entladen Sie Ihr Gewehr.<br />
Ziehen Sie die Schutzkappe vom <strong>CO</strong>2-Adapter. Halten Sie das <strong>Markierungsgewehr</strong> in eine Sichere Richtung und drehen Sie den <strong>CO</strong>2-Adapter mit der <strong>CO</strong>2-Kapsel langsam ab.<br />
Tip Sie können bei noch montierten Adaptern und Kapsel mit Hilfe des Ventiladapters Gas aus<br />
der Kapsel ablassen.<br />
Schießen Sie mehrmals in eine sichere Richtung, um das Restgas der Waffe zu leeren.<br />
Hinweis: Beim Herausnehmen der <strong>CO</strong>2-Kapsel kann es zu einem leichten Austritt von<br />
<strong>CO</strong>2 kommen.<br />
5. Laden der Munition<br />
Warnung: Verwenden Sie nur Gummikugeln und Farbmarkierungskugeln im Kaliber <strong>.43</strong>.<br />
Verwenden Sie niemals gebrauchte Munition oder gebrauchte Ladehülsen. Die Verwendung<br />
anderer Munition kann Sie oder andere verletzten oder das Gerät beschädigen.<br />
-3- D
Achtung: Verwenden Sie entweder nur Gummi- oder Farbkugeln. Laden Sie niemals<br />
gleichzeitig verschiedene Kugeln ins Magazin.Hinweis: Wenn Sie Farbkugeln verwenden,<br />
müssen Sie den Lauf reinigen und von Öl befreien.<br />
Wenn Sie Gummigeschosse verwenden, müssen Sie den Lauf ölen. (siehe Pflege und Wartung)<br />
Sichern Sie die Waffe und halten Sie das Gewehr in eine<br />
SICHERE RICHTUNG.<br />
Drücken Sie auf den Magazinhalter und entnehmen Sie das<br />
Magazin aus der Waffe.<br />
Klappen Sie den Flügel am Laderad aus und drehen Sie das Laderad<br />
im Uhrzeigersinn, bis Sie einen Widerstand spüren.<br />
Laden Sie die Geschosse mit den Hülsen wie abgebildet in das<br />
Magazin.<br />
Wichtig: Die offene Seite der Hülse muss immer nach vorne<br />
(in Schussrichtung) zeigen.<br />
Schieben Sie jetzt das Magazin bis zum Einrasten in die Waffe.<br />
Tip Benetzen Sie die Gummikugeln vor dem Laden mit<br />
Silikonöl z.B. <strong>Umarex</strong> 2.5138<br />
Hinweis: Lagern Sie die Waffe nur im gesicherten und ungeladenen Zustand.<br />
6. Visierung<br />
A. Zielen<br />
Visieren Sie ein sicheres Ziel<br />
an: Halten Sie die Waffe so,<br />
dass die Kimme (hinterer<br />
Visierteil) und Korn (Vorderer<br />
Visierteil) gleichzeitig im<br />
Ziel Korn<br />
Blick haben. Das Korn muß genau in der Mitte der Öffnung in<br />
der Kimme sitzen. Jetzt heben Sie die Waffe soweit, bis Sie durch<br />
die Kimmenöffnung das Korn mittig im Ziel sehen (4).<br />
B. Visierung einstellen<br />
Stellen Sie die Visierung wie<br />
folgt ein:<br />
7. Schießen<br />
Die Waffe entsichern, ein sicheres Ziel anvisieren und den Abzug betätigen.<br />
Hinweis: Die Ladehülsen werden seitlich aus der Waffe ausgeworfen.<br />
Laderad<br />
Kimme<br />
offene<br />
Seite<br />
Die Schraube drehen um die Kimme<br />
hoch (bei Tiefschuss) und nach unten<br />
(bei Hochschuss) zu stellen.<br />
Die Schraube im Uhrzeigersinn<br />
(bei Linksschuss) und<br />
gegen den Uhrzeigersinn<br />
(bei Rechtsschuss) drehen.<br />
8. Pflege und Aufbewahrung<br />
Bei entsprechender Pflege und sorgfältiger Behandlung werden Sie viele Jahre Freude an Ihrer<br />
Waffe haben.<br />
D<br />
-4-
Achtung: Versuchen Sie nicht, die Waffe zu reinigen, ohne sie vorher zu sichern, und zu prüfen,<br />
dass sich kein Geschoss mehr im Lauf befindet. Achten Sie darauf, auch das <strong>CO</strong> 2 -Restgas aus der<br />
Waffe zu entleeren. Warten Sie ca. 20 Sekunden, bevor Sie den Laufreiniger in den Lauf einführen.<br />
Die äußeren Teile müssen gelegentlich mit einem weichen, leicht mit Waffenöl benetztem Tuch<br />
gereinigt werden.<br />
Laufreinigung<br />
Sichern Sie die Waffe und Halten Sie das Gewehr in eine SICHERE RICHTUNG.<br />
Drücken Sie auf den Magazinhalter und entfernen Sie das Magazin.<br />
Reinigungstuch<br />
Befestigen Sie das Reinigungstuch am Ende des Laufreinigers.<br />
Schieben Sie durch die Hülsenöffnung das andere Ende des Lauf-<br />
Laufreiniger<br />
reinigers in Richtung Laufmündung.<br />
Ziehen Sie den Laufreiniger mit dem Tuch durch den Lauf.<br />
Wiederholen Sie diesen Vorgang, bis der Lauf sauber und ölfrei ist.<br />
Hülsenöffnung<br />
Jetzt können Sie Farbkugeln mit der Waffe<br />
verschießen.<br />
Hinweis: Wenn Sie Gummikugeln verschießen möchten, benetzen Sie die Kugeln vor dem<br />
Laden ins Magazin mit Silikonöl z.B. <strong>Umarex</strong> 2.5138.<br />
Allgemeine Hinweise<br />
Vermeiden Sie das Leerabschlagen Ihres Gewehrs, denn dadurch können Sie die Waffe<br />
beschädigen.<br />
Falls es an irgendeinem Teil der Waffe zu einer Undichtigkeit kommt, versuchen Sie<br />
NICHT, dieses Leck abzudichten.<br />
Unerlaubte Änderungen am <strong>Markierungsgewehr</strong> oder andere unerlaubte Handlungen<br />
können die Waffe in einen nicht sicheren Zustand versetzen, außerdem erlischt<br />
in diesem Fall die Garantie.<br />
Falls Ihnen das Gewehr hinfällt, überprüfen Sie die Funktion der Waffe, ehe Sie sie weiter<br />
benutzen. Falls Ihnen irgend etwas anders vorkommt wie zum Beispiel ein kürzerer Abzugsweg<br />
oder ein geringerer Abzugswiderstand, dann weist das auf verschlissene oder defekte Teile hin.<br />
Wenden Sie sich an den Kundendienst, ehe Sie Ihr Gewehr weiter verwenden.<br />
9. Sicherer Umgang mit Waffen<br />
Sie sollten mit der richtigen, sicheren Handhabung Ihrer Waffe vertraut sein. Der Aspekt, daß Ihre<br />
neue Waffe eine sehr hohe Geschossgeschwindigkeit hat, erfordert besondere Vorsicht. Im Hinblick<br />
auf die Grundregeln zum sicheren Schießen bedenken Sie, daß jede Berührung mit der Waffe als<br />
Handhabung verstanden wird.<br />
Behandeln Sie jede Waffe so, als wäre sie geladen.<br />
Die Waffe beim Laden stets sichern, so daß sich kein Schuß ungewollt lösen kann. Finger immer<br />
außerhalb des Abzugbügels halten und nur zum Schuß an den Abzug legen.<br />
Verwenden Sie nur für diese Waffe vorgesehene Geschosse.<br />
-5- D
Halten Sie die Mündung stets in eine sichere Richtung.<br />
Das Schießen ist nur in der eigenen Wohnung, auf polizeilich zugelassenen Schießständen und<br />
im befriedeten Besitztum erlaubt, wenn das Geschoss dieses beim Schuß nicht verlassen kann.<br />
Hierbei die maximale Reichweite des Geschosses beachten (ca. 100 m).<br />
Transportieren Sie niemals eine geladene Waffe. Laden Sie nur, wenn Sie schießen möchten.<br />
Waffe niemals auf Menschen oder Tiere richten.<br />
Vergewissern Sie sich vor dem Schuß, daß Ziel und Umgebungsbereich sicher sind.<br />
Kontrollieren Sie immer, ob die Waffe ungeladen ist, wenn Sie sie transportieren oder von einer<br />
anderen Person übernehmen.<br />
Vergewissern Sie sich, daß Sie. auch beim Stolpern oder Stürzen die Richtung der Mündung<br />
kontrollieren können.<br />
Aus Sicherheitsgründen sollte beim Schießen eine Schutzbrille getragen werden. Beim<br />
sogenannten “Gotcha”-Spiel empfehlen wir den Schutz des Körpers, speziell für alle empfindlichen<br />
Körperstellen.<br />
Aufbewahren der Waffe stets sicher und ungeladen vor unerlaubtem Zugriff Unbefugter<br />
(ungeschulte Personen, Kinder, Personen unter 18 Jahren) und getrennt von der Munition.<br />
Weitergabe dieser Waffe mit der Bedienungsanleitung nur an Personen, wenn diese über<br />
18 Jahre alt und mit der Handhabung dieser Waffe genauestens vertraut sind.<br />
Jegliche Veränderungen oder Reparaturen von Waffen sollten nur von fachkundigen Firmen<br />
oder vom Büchsenmacher durchgeführt werden.<br />
Legen Sie niemals eine geladene Waffe aus der Hand.<br />
Geben Sie nur entladene Waffen an andere Personen weiter.<br />
10. Technische Daten<br />
System: Selbstlade <strong>CO</strong> 2 - Gewehr<br />
Kaliber/Munition: Farbmarkierungskugeln Kaliber <strong>.43</strong> und Gummigeschosse Kaliber <strong>.43</strong><br />
Antrieb: <strong>CO</strong> 2 - 81g (3,1 oz) <strong>CO</strong> 2 Kapsel über mitgelieferte Adapter<br />
Abzug: mechanisch<br />
Sicherung: Abzugsicherung<br />
Magazinkapazität 20 Schuss<br />
Energie bis zu 2 Joule (2.4627F)<br />
Energie bis zu 5 Joule (2.4627)<br />
Gewicht: 2820 Gramm<br />
Länge: 537 - 695 mm<br />
Lauflänge: 269 mm<br />
D<br />
-6-
Operating instructions<br />
<strong>CO</strong>2-paintball gun<br />
<strong>Umarex</strong> <strong>Mod</strong>. <strong>RAM</strong>-<strong>12S</strong><br />
<strong>cal</strong>. <strong>.43</strong><br />
2.4627 / 2.4627F 09/05
Buyer and user are obliged to adhere to all legal impositions in respect to ownership and<br />
use of this paintball pistol.<br />
Carefully read and understand this manual before you use this paintball gun! Always remember<br />
that this paintball gun is no toy. Always follow the instructions of this manual and keep the manual<br />
available all the time.<br />
WARNING: This is no toy. Its abuse may result in serious injuries. The user and all other persons<br />
within the danger zone must wear protective shooting glasses commonly worn during this sport.<br />
The minimum age for the purchased is 18 years. Users less than 18 years old are to be supervised<br />
by an adult. Read all instructions before you use the device.<br />
STEPS TO SAFE WEAPON HANDLING<br />
Step 1: make yourself familiar with all parts of your new paintball gun<br />
Step 2: operation of the safety<br />
Step 3: adjustment of the butt<br />
Step 4: insertion and removal of the <strong>CO</strong>2 gas cylinder<br />
Step 5: loading and unloading of the paintballs<br />
Step 6: sights<br />
Step 7: firing<br />
Step 8: maintenance and storage<br />
Step 9: safe weapon handling<br />
Step 10: techni<strong>cal</strong> data<br />
Step 1: Make yourself familiar with all parts of your paintball pistol<br />
Once you know the parts of your new paintball gun you will be able to understand the instructions<br />
of this manual much better. With the aid of this manual, you will enjoy your paintball gun<br />
much better.<br />
butt<br />
foresight<br />
rear sight<br />
muzzle<br />
barrel<br />
magazine holder<br />
trigger<br />
pistol grip<br />
safety<br />
butt locking lever<br />
<strong>CO</strong> 2-connection<br />
2. Operation of the safety<br />
Warning: Always leave the safety of your paintball gun on "safe" until you really intend to fire.<br />
Only then is the safety turned to the position "fire".<br />
To put the safety on "safe", push it to the symbol<br />
To fire the weapon, push the safety to the symbol<br />
or the symbol<br />
Note: In both settings, one shot only is fired.<br />
Note: Always store the weapon with the safety on "safe". safety<br />
GB<br />
-8-
3. Butt adjustment<br />
To extend the butt, press the butt locking lever to the left and<br />
move the butt forward or rearward until it locks.<br />
4. Insertion and removal of the gas cylinder<br />
Warning: Carefully make sure that your hands do not get in<br />
touch with discharged <strong>CO</strong> 2 gas. This may cause freezing of the skin. If the gas source you use is<br />
fitted with a shut-off valve then make sure it is on "off" before you remove the container from the<br />
weapon. Do not expose the <strong>CO</strong> 2 cylinder to excessive heat and do not store it at temperatures<br />
exceeding 54°C. Always adhere to the warnings and safety instructions of the manufacturer on<br />
the gas cylinder in respect to handling and storage of a <strong>CO</strong> 2 gas container.<br />
A. Insertion of the gas cylinder<br />
Keep the muzzle of the gun into a SAFE DIRECTION.<br />
Put the safety on "safe" (refer to step 2).<br />
Insert approx. 2 drops of oil into the gas connection<br />
Screw the valve adapter tightly onto the gas connection.<br />
Caution: Make sure that the valve at the valve adapter is closed.<br />
Now screw the <strong>CO</strong>2 adapter onto the valve adapter and slide the<br />
protective cap over the <strong>CO</strong>2 adapter.<br />
Note: Only the adapters which come with the gun will fit, when other<br />
adapters or <strong>CO</strong>2 tanks are used, gas may be discharged.<br />
Now screw the <strong>CO</strong>2 gas cylinder onto the <strong>CO</strong>2adapter The paintball gun is now charged with gas.<br />
Note: Never store your paintball gun with the gas cylinder attached.<br />
B. Removal of the gas cylinder<br />
Note: Always remove the gas cylinder from the weapon before you strip<br />
it down. Always remove the gas container together with the adapter and<br />
then remove the adapter from the cylinder.<br />
valve<br />
adapter<br />
<strong>CO</strong> 2adapter<br />
<strong>CO</strong> 2gas<br />
cylinder<br />
<strong>CO</strong> 2-connection<br />
Unload your paintball gun and put its safety on "safe".<br />
Remove the protective cap from the <strong>CO</strong>2adapter. Keep the muzzle of your gun into a safe direction and slowly unscrew the gas adapter with the<br />
gas cylinder.<br />
Note: Gas from the gas cylinder may be discharged by means of the valve adapter when the<br />
adapter and the cylinder are still in place.<br />
Dry-fire several times into a safe direction in order to remove residual gas from the weapon.<br />
Note: There may be a minor discharge of gas when you remove the gas cylinder.<br />
5. Loading of the ammunition<br />
Warning: Only use paintballs and rubber projectiles <strong>cal</strong>ibre <strong>.43</strong>. Never reuse used ammunition or<br />
used loading shells. The use of other ammunition my cause injuries to yourself or others and may<br />
damage the device.<br />
Caution: Always use rubber projectiles or paintballs. Never load both types of ammunition<br />
simultaneously.<br />
-9- GB
Note: When paintballs are fired, the barrel has to be cleaned and all oil has to be<br />
removed. The barrel has to be oiled when rubber projectiles are fired.<br />
(refer to section care and maintenance)<br />
Put the safety on "safe" and keep the muzzle into a<br />
SAFE DIRECTION.<br />
Press the magazine holder and remove the magazine from the<br />
weapon.<br />
Unfold the flap at the loading wheel and turn the loading wheel<br />
clockwise until you feel a resistance.<br />
Load the projectiles with its shells as illustrated.<br />
Important: The open side of the shell always has to point forward<br />
(firing direction)<br />
Now insert the magazine into the magazine well until it locks.<br />
Note: Slightly dampen the rubber projectiles with silicone gun<br />
oil such as <strong>Umarex</strong> 2.5138 before you load them<br />
Note: Always store the gun unloaded and with the safety on "safe".<br />
6. Sights<br />
A. Aiming<br />
Aim at a safe target. Keep<br />
the weapon in a way that<br />
rear sight and foresight are<br />
visible together. The foresight<br />
must be right in the<br />
target fore sight<br />
centre of the rear sight notch. Now lift the weapon until the<br />
foresight is aligned with the target centre (4).<br />
B. Sight adjustment<br />
Adjust the sights as follows:<br />
GB<br />
-10-<br />
loading<br />
wheel<br />
open<br />
side<br />
rear sight<br />
Turn the elevation adjustment screw<br />
up in order to elevate the rear sight<br />
(point of impact too low) and turn<br />
it down to lower it (point of impact<br />
too high).<br />
7. Firing<br />
Turn the windage adjustment<br />
screw clockwise (point<br />
of impact too far left) and<br />
anti-clockwise (point of<br />
impact too far right).<br />
Put the safety on "fire", aim at a safe target and pull the trigger.<br />
Note: During firing the shells are ejected through the ejection port.<br />
8. Maintenance and storage<br />
You will get many years of pleasant service from your weapon provided you carefully maintain and<br />
handle it.
Caution: Never attempt to clean your weapon without having put the safety to "safe", and make<br />
sure that no projectile is left in the barrel. Make sure that residual gas is discharged from the weapon.<br />
Wait approx. 20 seconds before you insert the barrel cleaner into the barrel. The outside parts<br />
have to be cleaned from time to time with a soft cloth moistened with weapon oil.<br />
Barrel cleaning<br />
Put the safety of the weapon on "safe" and hold the muzzle into a SAFE DIRECTION.<br />
Press the magazine holder and remove the magazine.<br />
cleaning cloth<br />
Attach the cleaning cloth to the end of the barrel cleaner.<br />
Insert the other end of the barrel cleaner into the shell port in<br />
direction of the muzzle.<br />
Pull the barrel cleaner with the cloth through the barrel.<br />
Repeat this action until the barrel is clean and free of oil.<br />
Now you may fire paintballs from your<br />
weapon.<br />
Note: If rubber projectiles are to be fired, slightly dampen them with silicone oil<br />
(e.g. <strong>Umarex</strong> 2.518) before you load them into the magazine.<br />
shell port<br />
barrel<br />
cleaner<br />
General instructions<br />
Avoid dry-firing of your paintball gun as this may cause damages.<br />
Do not attempt to seal any leakages in case they occur anywhere on the weapon.<br />
Unauthorized modifications and other illegal action may cause the weapon to become<br />
unsafe and will make the warranty null and void.<br />
In case you drop your paintball gun test its functioning before you keep on using it.<br />
If something appears to be different, such as a shorter trigger travel or a lower trigger weight<br />
then this is an indicator for worn or defective parts. Contact the customer service before you<br />
keep on using your paintball gun.<br />
9. Safe weapon handling<br />
You should be familiar with the rules of safe and proper weapon handling. The fact that your new<br />
weapon features a very high muzzle velocity requires extra care. Bear in mind that every contact<br />
with the weapon is weapon handling.<br />
Always treat every weapon is if it were loaded.<br />
Always keep the safety on "safe" when you load your weapon so that an unintentional<br />
discharge is prevented. Always keep your finger outside the trigger guard, only touch the trigger<br />
if you really intend to fire.<br />
Only fire projectiles the use of which has been cleared for this weapon.<br />
Always keep the muzzle into a safe direction.<br />
-11- GB
Only shoot inside your house or flat, on officially cleared shooting ranges or on your own<br />
private property, make sure the projectiles cannot leave the property. The maximal range<br />
(approx. 100 m) of the projectiles is to be borne in mind.<br />
Never transport a loaded weapon. Only load the weapon if you really intend to fire.<br />
Never aim at humans or animals.<br />
Make sure that target and the surrounding area are safe before you fire.<br />
Always make sure your weapon is unloaded before you transport it or hand it over to<br />
another person.<br />
Make sure that you cannot lose control over the direction your muzzle points to in case<br />
you stumble or fall.<br />
For safety reasons, protective shooting glasses should always be worn when firing.<br />
When playing "Gotcha", you should also protect sensitive parts of your body.<br />
Always store your weapon in unloaded condition and in a safe place, unauthorized persons<br />
(unskilled people, children, persons less than 18 years old) must not have access to it. Weapon<br />
and ammunition are to be stored separately.<br />
Only hand this weapon and its manual over to persons who are familiar with its handling and<br />
who are 18 years old or older.<br />
<strong>Mod</strong>ifications or repairs to weapons should only be effected by authorized companies or by<br />
skilled gunsmiths.<br />
Never leave a loaded weapon unattended.<br />
Only unloaded weapons may be passed on to other persons.<br />
10. Techni<strong>cal</strong> data<br />
Action: self-loading <strong>CO</strong> 2 paintball gun<br />
<strong>cal</strong>ibre/ammunition: paintballs <strong>cal</strong>ibre <strong>.43</strong> and rubber projectiles <strong>cal</strong>. <strong>.43</strong><br />
propellant: <strong>CO</strong> 2 81 g cylinders with standard connection,<br />
adapter comes with the weapon<br />
trigger: mechani<strong>cal</strong><br />
safety: trigger safety<br />
magazine capacity: 20 rounds<br />
energy: up to 5 joule (2.4627)<br />
energy: up to 2 joule (2.4627F)<br />
weight: 2820 grams<br />
length: 537 - 695 mm<br />
barrel length: 269 mm<br />
GB<br />
-12-
Notice d'emploi<br />
Fusil marqueur au <strong>CO</strong>2 <strong>Umarex</strong> <strong>Mod</strong>. <strong>RAM</strong>-<strong>12S</strong><br />
<strong>cal</strong>. <strong>.43</strong><br />
2.4627F 09/05
Cette boîte contient: une réplique d'arme factice avec chargeur. Les AIR SOFT GUNS sont des<br />
modèles d'armes factices tirant des billes en plastique de 6 mm inoffensives. Ce modele a une<br />
énergie comprise entre 0.08 joule et inférieure ou égale a 2 joules.<br />
En France, la vente de ces produits est réglementée par le décret n°99-240 du 24 mars<br />
1999, qui interdit la distribution des modèles noirs ou chromés dont l’énergie est comprise<br />
entre 0,08 et 2 joules aux moins de 18 ans non accompagnés. Ce décret ne concerne<br />
pas les modèles transparents, les game guns (oranges) et les mini guns, dont la distribution<br />
reste donc autorisée aux mineurs.<br />
Distribution et vente interdite aux mineurs.<br />
Attention: Ne jamais diriger le tir vers une personne.<br />
Les propriétaires et les utilisateurs de ce type de fusils marqueurs à peinture sont tenus<br />
de respecter la réglementation légale relative à l'utilisation et à la possession de celles-ci.<br />
Lisez entièrement le manuel avant d'utiliser le fusil. Souvenez-vous également que ce fusil marqueur<br />
n'est pas un jouet. Suivez toujours scrupuleusement les instructions de ce manuel et gardezle<br />
à portée de main afin de pouvoir le consulter ultérieurement.<br />
MISE EN GARDE: Ce fusil n'est pas un jouet. Si vous ne l'utilisez pas correctement, il peut<br />
provoquer des dommages ou des blessures graves. L'utilisateur et les personnes se trouvant dans la<br />
zone à risque devront porter les protections du visage et du corps d'usage courant pour ce type de<br />
sport. L'âge minimum requis pour se procurer ce fusil est 18 ans. Les utilisateurs de moins de 18 ans<br />
devront être surveillés par un adulte. Lisez intégralement les instructions avant d'utiliser l'arme.<br />
ETAPES À SUIVRE POUR TIRER EN TOUTE SÉCURITÉ<br />
Etape 1 : Familiarisez-vous avec les différentes pièces de votre nouveau fusil marqueur<br />
Etape 2 : Utilisation de la sûreté<br />
Etape 3 : Réglage de la crosse<br />
Etape 4 : Insertion et retrait de la bonbonne de <strong>CO</strong>2<br />
Etape 5 : Chargement et déchargement des munitions<br />
Etape 6 : Lunette de visée<br />
Etape 7 : Tir<br />
Etape 8 : Entretien<br />
Etape 9 : Maniement des armes en toute sécurité<br />
Etape 10 : Fiche technique<br />
Etape 1 : Familiarisez-vous avec les différentes pièces du fusil marqueur<br />
Lorsque vous connaîtrez parfaitement les pièces de votre nouveau fusil marqueur, vous comprendrez<br />
mieux les instructions de ce manuel. La lecture de ce manuel vous permettra de mieux profiter<br />
de votre fusil marqueur.<br />
Crosse<br />
Guidon<br />
Œilleton<br />
Bouche<br />
F<br />
Canon<br />
Arrêtoir de<br />
chargeur<br />
-14-<br />
Détente<br />
Poignée du<br />
pistolet<br />
Sûreté<br />
Verrou de crosse<br />
Connecteur de<br />
la bonbonne de<br />
<strong>CO</strong> 2
2. Utilisation de la sûreté<br />
Remarque: N'ôtez la sûreté de l'arme que lorsque vous vous apprêtez à tirer.<br />
Pour mettre l'arme à la sûreté, choisissez la position .<br />
Pour tirer, mettez la sûreté en position ou<br />
Remarque: Ces deux positions ne permettront qu'un seul tir.<br />
Remarque: Veillez à ce que la sûreté soit toujours mise avant de<br />
ranger l'arme.<br />
3. Réglage de la crosse<br />
Pour sortir la crosse, appuyez sur le verrou de crosse tout en faisant<br />
glisser vers la gauche et sortez la crosse vers l'avant ou vers l'arrière<br />
jusqu'à enclenchement.<br />
Sûreté<br />
4. Insertion et retrait de la bonbonne de <strong>CO</strong> 2<br />
Mise en garde: Faites en sorte que vos mains n'entrent pas en contact avec les éventuelles fuites<br />
de <strong>CO</strong> 2 . Si la peau entre en contact avec ce gaz, des engelures peuvent apparaître. Si la bonbonne de<br />
<strong>CO</strong> 2 que vous utilisez comporte une valve de fermeture, vérifiez que celle-ci est en position fermée<br />
avant de retirer la bonbonne du fusil. N'exposez pas la bonbonne de <strong>CO</strong> 2 à une chaleur excessive et<br />
ne la conservez pas à des températures supérieures à 54ºC. De plus, respectez toujours les indications<br />
de mise en garde et de sécurité du fabricant, figurant sur la bonbonne, et relatives à son maniement et<br />
à son rangement.<br />
A. Insertion de la bonbonne de <strong>CO</strong> 2<br />
Pointez le canon du fusil dans une DIRECTION NON DANGEREUSE.<br />
Mettez la sûreté du fusil marqueur (référez-vous à l'étape 2).<br />
Déposez environ 2 gouttes d'huile au niveau de la connexion de la<br />
bonbonne de <strong>CO</strong> 2 (voir illustration).<br />
Vissez bien l'adaptateur de la valve au niveau de la connexion de la<br />
bonbonne de <strong>CO</strong> 2 .<br />
Attention: Assurez-vous que la valve est bien fermée au niveau de<br />
l'adaptateur.<br />
Vissez l'adaptateur de la bonbonne de <strong>CO</strong> 2 dans l'adaptateur de la<br />
valve et appuyez sur le couvercle de protection situé sur l'adaptateur<br />
de la bonbonne.<br />
Remarque: Utilisez toujours les adaptateurs fournis car si vous utilisez<br />
d'autres adaptateurs ou d'autres bonbonnes, des fuites de <strong>CO</strong> 2<br />
pourraient se produire.<br />
Puis, vissez la bonbonne de <strong>CO</strong> 2 dans son adaptateur.<br />
Le fusil marqueur est alors chargé.<br />
Remarque: Ne rangez pas le fusil marqueur avec la bonbonne de <strong>CO</strong> 2 insérée.<br />
Connecteur de<br />
la bonbonne<br />
de <strong>CO</strong> 2<br />
Adaptateur<br />
de la valve<br />
Adaptateur de<br />
la bonbonne<br />
de <strong>CO</strong> 2<br />
bonbonne de <strong>CO</strong> 2<br />
-15- F
B. Retrait der de la bonbonne de <strong>CO</strong>2 Remarque: Retirez toujours la bonbonne de <strong>CO</strong>2 du fusil avant de le ranger. Dévissez toujours la bonbonne<br />
de <strong>CO</strong>2 ainsi que l'adaptateur, et dévissez ensuite l'adaptateur de la bonbonne, jamais avant.<br />
Mettez la sûreté et déchargez le fusil.<br />
Tirez le couvercle de protection de l'adaptateur de la bonbonne de <strong>CO</strong>2 .<br />
Pointez le canon du fusil marqueur dans une direction non dangereuse et dévissez lentement la<br />
bonbonne de <strong>CO</strong>2 en même temps que son adaptateur.<br />
Suggestion Lorsque l'adaptateur et la bonbonne sont encore en place, vous pouvez évacuer le<br />
gaz de la bonbonne grâce à l'adaptateur de la valve.<br />
Tirez plusieurs fois dans une direction ne présentant pas de danger pour évacuer le gaz qui<br />
pourrait être resté dans le fusil.<br />
Remarque: En retirant la bonbonne de <strong>CO</strong>2 , il est possible qu'une petite quantité de gaz s'échappe.<br />
5. Chargement des munitions<br />
Mise en garde : Utilisez uniquement des billes en caoutchouc et de peinture de <strong>cal</strong>ibre 0,43. N'utilisez<br />
jamais de munitions ou de douilles usagées. L'utilisation d'un autre type de munitions pourrait endommager<br />
le fusil ou entraîner des blessures chez vous-même ou chez d'autres personnes.<br />
Attention: Utilisez uniquement des billes en caoutchouc ou de peinture. Ne chargez jamais en<br />
même temps différents types de billes dans le chargeur.<br />
Remarque: Si vous utilisez des billes de peinture, nettoyez le canon et enlevez l'huile qui pourrait<br />
s'y trouver. Si vous utilisez des projectiles en caoutchouc, appliquez de l'huile au niveau du canon<br />
(référez-vous à la partie Soins et entretien).<br />
Bouton de chargement<br />
Mettez la sûreté du fusil et pointez le canon dans une DIRECTION<br />
NON DANGEREUSE.<br />
Appuyez sur l'arrêtoir du chargeur et retirez le chargeur du fusil.<br />
Pliez l'extrémité du bouton de chargement et tournez-la vers la<br />
droite jusqu'à sentir une petite résistance.<br />
Introduisez les projectiles dans le chargeur avec les douilles, tel<br />
qu'indiqué sur l'illustration.<br />
Important Le côté ouvert de la douille doit toujours être orienté vers<br />
l'avant (dans la direction du tir).<br />
Introduisez ensuite le chargeur dans le fusil, jusqu'à ce qu'il<br />
s'emboîte.<br />
Suggestion Avant de charger les billes en caoutchouc, trempez-les<br />
dans de l'huile de silicone comme, par exemple, l'huile <strong>Umarex</strong> 2.5138.<br />
Remarque Veillez à ce que la sûreté soit toujours mise et à ce que l'arme soit désapprovisionnée<br />
avant de la ranger.<br />
6. Hausse<br />
A. Viser<br />
Visez une cible ne présentant<br />
aucun danger pour<br />
autrui : tenez l'arme de<br />
sorte que le guidon (partie<br />
Cible Guidon<br />
avant du viseur) soit dans l'alignement de l'œilleton (partie<br />
arrière du viseur). Le guidon doit se trouver exactement au<br />
centre de l'œilleton. Puis levez l'arme jusqu'à voir, à travers<br />
l'œilleton, le guidon au centre de la cible.<br />
F<br />
-16-<br />
Œilleton<br />
Côté<br />
ouvert
B. Réglage du système de visée<br />
Pour régler le système de visée, procédez<br />
de la façon suivante:<br />
7. Tir<br />
Enlevez la sûreté de l'arme, visez une<br />
cible sans danger et appuyez sur la<br />
détente.<br />
Remarque Les douilles sont expulsées<br />
par un côté du fusil.<br />
Utilisez le bouton pour faire monter<br />
l'œilleton (pour les tirs bas) ou le faire<br />
descendre (pour les tirs hauts).<br />
Pour des tirs déviés à droite:<br />
tournez la vis d'ajustage<br />
latérale vers la gauche. Pour<br />
des tirs déviés à gauche:<br />
tournez la vis d'ajustage<br />
latérale vers la droite.<br />
8. Entretien<br />
Si vous entretenez et traitez soigneusement l'arme, vous pourrez en profiter de nombreuses<br />
années.<br />
Attention: Ne nettoyez pas votre arme sans avoir préalablement mis la sûreté et vous être assuré<br />
qu'il ne reste aucun projectile dans le canon. Enlevez les restes de <strong>CO</strong>2 qui pourraient rester dans<br />
le fusil. Attendez une vingtaine de secondes avant d'introduire le câble de nettoyage dans le<br />
canon. Nettoyez occasionnellement les pièces externes avec un tissu doux légèrement imbibé<br />
d'une huile spéciale pour armes.<br />
Nettoyage du canon<br />
Mettez la sûreté du fusil et pointez le canon dans une DIRECTION NON DANGEREUSE.<br />
Appuyez sur l'arrêtoir du chargeur pour extraire celui-ci.<br />
Attachez le chiffon de nettoyage à l'extrémité du câble de<br />
nettoyage du canon.<br />
Introduisez l'autre extrémité du câble de nettoyage du canon dans<br />
l'orifice des douilles et enfoncez-la vers la bouche du canon.<br />
Tirez le câble de nettoyage pour qu'il passe, avec le chiffon, dans le<br />
canon.<br />
Répétez cette opération jusqu'à ce que le canon soit propre et<br />
exempt d'huile.<br />
Chiffon de<br />
nettoyage<br />
Câble de<br />
nettoyage du<br />
canon<br />
Orifice pour douilles<br />
Vous pouvez alors utiliser le fusil avec les billes de<br />
peinture.<br />
Remarque : Si vous souhaitez utiliser des billes en<br />
caoutchouc, trempez-les dans de l'huile de silicone<br />
comme, par exemple, l'huile <strong>Umarex</strong> 2.5138<br />
avant de les introduire dans le chargeur.<br />
Remarques générales<br />
Evitez de démonter le fusil car cela pourrait l'endommager.<br />
Dans le cas où une pièce du fusil présenterait un défaut, N'ESSAYEZ PAS de le corriger.<br />
Toute modification du fusil marqueur ou toute autre manipulation non autorisée pourrait<br />
exposer le fusil à d'éventuels risques. De même, une telle manipulation annulerait la garantie.<br />
Si vous faites tomber le fusil, vérifiez qu'il fonctionne sans problème avant de l'utiliser à<br />
nouveau. Si vous avez affaire à des situations anormales, par exemple, si la course de la détente<br />
devient plus courte ou si sa résistance diminue, cela signifie qu'une pièce est usée ou<br />
défectueuse. Adressez-vous au service d'assistance technique avant d'utiliser à nouveau le fusil.<br />
-17- F
9. Maniement des armes en toute sécurité<br />
Vous devrez vous familiariser avec votre arme afin de la manier correctement et sans danger. Votre<br />
nouvelle arme étant dotée d'une très grande capacité de tir, il vous faudra redoubler de précautions.<br />
Dans le cadre des règles de sécurité fondamentales de tir, considérez que chaque contact avec<br />
l'arme fait partie de son maniement.<br />
Considérez toujours que l'arme est chargée.<br />
Chargez toujours l'arme en veillant à ce que la sûreté soit bien mise pour éviter tout risque de<br />
tir accidentel. Gardez votre index toujours éloigné de la détente et ne l'y placez que lorsque<br />
vous vous apprêtez à tirer.<br />
Utilisez uniquement les projectiles conçus pour cette arme.<br />
Pointez toujours le canon de l'arme dans une direction non dangereuse.<br />
L'utilisation de l'arme est seulement autorisée sur le lieu de résidence du propriétaire ou dans les<br />
zones de tir autorisées par la police, tant que le projectile ne sort pas de la zone de tir. C'est la raison<br />
pour laquelle vous devez toujours garder à l'esprit la portée maximale des projectiles (environ 100 m).<br />
Ne transportez jamais l'arme chargée. Ne la chargez que lorsque vous avez l'intention de tirer.<br />
Ne pointez jamais l'arme vers des personnes ou des animaux.<br />
Avant de tirer, assurez-vous qu'il n'y a personne près de la cible ni dans les environs.<br />
Assurez-vous toujours que l'arme est bien désapprovisionnée avant de la transporter ou de la<br />
prêter à quelqu'un d'autre.<br />
Assurez-vous de toujours contrôler la direction dans laquelle vous pointez le canon du fusil,<br />
même si vous tombez ou laissez tomber l'arme.<br />
Pour des raisons de sécurité, portez des lunettes de protection lorsque vous tirez. Lorsque vous<br />
utilisez l'arme pour jouer au "Paintball", nous vous recommandons de porter des protections du<br />
corps, en particulier au niveau des zones les plus sensibles.<br />
Lors de son rangement, veillez à ce que l'arme soit toujours déchargée, séparée des munitions<br />
et hors de portée des personnes n'ayant pas le droit d'y accéder (personnes non formées,<br />
enfants ou personnes de moins de 18 ans).<br />
Ne remettez cette arme, avec la notice d'emploi, qu'à des personnes de plus de 18 ans, bien<br />
formées à son maniement.<br />
Toute modification ou réparation de l'arme devra être effectuée par une entreprise spécialisée<br />
ou un armurier.<br />
Ne laissez jamais l'arme approvisionnée si elle se trouve hors de votre portée.<br />
Veillez à ce que l'arme soit toujours déchargée avant de la remettre à autrui.<br />
10. Fiche technique<br />
Système: Fusil au <strong>CO</strong> 2 à chargement automatique<br />
Calibre/munition: Billes de peinture et projectiles en caoutchouc de <strong>cal</strong>ibre 0,43<br />
Commande: Bonbonne de <strong>CO</strong> 2 de 81g et adaptateur fourni<br />
Détente: Mécanique<br />
Sécurité: Sûreté de détente<br />
Capacité du chargeur: 20 billes<br />
Énergie: Jusqu'à 2 joules (seulement 2.4627F)<br />
Poids: 2820 grammes<br />
Longueur: 537 - 695 mm<br />
Longueur du canon: 269 mm<br />
F<br />
-18-
Instrucciones de uso<br />
Fusil marcador de <strong>CO</strong>2 <strong>Umarex</strong> <strong>Mod</strong>. <strong>RAM</strong>-<strong>12S</strong><br />
<strong>cal</strong>. <strong>.43</strong><br />
2.4627 / 2.4627F 09/05
Tanto los propietarios como los usuarios de este tipo de armas de pintura tienen la obligación<br />
de respetar las normativas legales relativas al uso y posesión de las mismas.<br />
Lea todo el manual antes de utilizar el fusil. Asimismo, recuerde siempre que este fusil marcador<br />
no es ningún juguete. Siga siempre las instrucciones de este manual estrictamente y téngalo a<br />
mano para futura referencia.<br />
ADVERTENCIA: Este fusil no es ningún juguete. Si no se utiliza adecuadamente, puede provocar<br />
daños o heridas graves. El usuario y las demás personas que se encuentren dentro de la zona de riesgo<br />
deberán llevar puestas las protecciones de cara y cuerpo de uso habitual para este tipo de deporte. La<br />
edad mínima para adquirir este fusil es de 18 años. Los usuarios menores de 18 años deberán contar<br />
con la supervisión de un adulto. Lea todas las instrucciones antes de utilizar el arma.<br />
PASOS A SEGUIR PARA DISPARAR <strong>CO</strong>N SEGURIDAD<br />
Paso 1: Familiarícese con las distintas piezas de su nuevo fusil marcador<br />
Paso 2: Utilización del seguro<br />
Paso 3: Ajuste de la culata<br />
Paso 4: Inserción y extracción de la bombona de <strong>CO</strong>2<br />
Paso 5: Carga y descarga de la munición<br />
Paso 6: Miras<br />
Paso 7: Disparo<br />
Paso 8: Mantenimiento y conservación<br />
Paso 9: Manejo seguro de armas<br />
Paso 10: Especificaciones<br />
Paso 1: Familiarícese con las distintas piezas del fusil marcador<br />
Cuando conozca perfectamente las piezas de su nuevo fusil marcador, comprenderá mejor las instrucciones<br />
del manual. La lectura de este manual le permitirá disfrutar aún más de su fusil marcador.<br />
Boca<br />
2. Utilización del seguro<br />
Nota Desactive el seguro del arma solamente cuando tenga intención de disparar.<br />
Para activar el seguro del fusil, colóquelo en la posición .<br />
Para disparar, colóquelo en la posición o<br />
Nota: En ambas posiciones, sólo se efectuará un disparo.<br />
Nota: Guarde el arma siempre con el seguro activado.<br />
E<br />
Cañón<br />
Punto de mira<br />
Retén del cargador<br />
-20-<br />
Gatillo<br />
Mira trasera<br />
Empuñadura<br />
Seguro<br />
Culata<br />
Palanca de la culata<br />
Conector de la<br />
bombona de<br />
<strong>CO</strong> 2<br />
Seguro
3. Ajuste de la culata<br />
Para extender la culata, presione la palanca de la misma hacia la<br />
izquierda y tire hacia atrás o hacia adelante de la culata hasta que<br />
quede encajada.<br />
4. Inserción y extracción de la bombona de <strong>CO</strong> 2<br />
Advertencia: Procure que sus manos no entren en contacto con las posibles fugas de gas <strong>CO</strong> 2 . Si<br />
la piel entra en contacto con dicho gas, puede congelarse. Si la bombona de <strong>CO</strong> 2 que utiliza cuenta<br />
con una válvula de cierre, procure que ésta esté ajustada en la posición de cierre antes de extraer<br />
la bombona del fusil. No exponga la bombona de <strong>CO</strong> 2 a un <strong>cal</strong>or excesivo ni la guarde a temperaturas<br />
superiores a los 54 °C. Asimismo, respete siempre las indicaciones de advertencia y seguridad<br />
del fabricante impresas en la bombona en relación con el manejo y el almacenamiento de la<br />
misma.<br />
A. Inserción de la bombona de <strong>CO</strong> 2<br />
Mantenga el fusil en una DIRECCIÓN SEGURA.<br />
Active el seguro del fusil marcador (consulte el paso 2).<br />
Aplique aproximadamente 2 gotas de aceite a la conexión de la<br />
bombona de <strong>CO</strong> 2 (consulte la ilustración).<br />
Enrosque con firmeza el adaptador de la válvula en la conexión de la<br />
bombona de <strong>CO</strong> 2 .<br />
Atención: Asegúrese de que la válvula esté bien cerrada en el adaptador<br />
de la misma.<br />
Enrosque el adaptador de la bombona de <strong>CO</strong> 2 en el adaptador de la<br />
válvula y presione la cubierta protectora sobre el adaptador de la<br />
bombona.<br />
Nota: Utilice únicamente los adaptadores suministrados, ya que si utiliza<br />
otros adaptadores o bombonas pueden producirse fugas de gas <strong>CO</strong> 2 .<br />
A continuación, enrosque la bombona de <strong>CO</strong> 2 en el adaptador de la<br />
misma.<br />
El fusil marcador ya está cargado.<br />
Nota: No guarde el fusil marcador con la bombona de <strong>CO</strong> 2 insertada.<br />
Conector de la<br />
bombona de <strong>CO</strong> 2<br />
Adaptador<br />
de la válvula<br />
Adaptador de<br />
la bombona<br />
de <strong>CO</strong> 2<br />
Bombona de <strong>CO</strong> 2<br />
B. Extracción de la bombona de <strong>CO</strong> 2<br />
Nota: Extraiga siempre la bombona de <strong>CO</strong> 2 del fusil antes de guardarlo. Desenrosque siempre la<br />
bombona de <strong>CO</strong> 2 junto con el adaptador y, a continuación, desenrosque el adaptador de la bombona,<br />
nunca antes.<br />
Active el seguro y descargue el fusil.<br />
Tire de la cubierta protectora del adaptador de la bombona de <strong>CO</strong> 2 .<br />
Mantenga el fusil marcador apuntando hacia una dirección segura y desenrosque lentamente<br />
el adaptador de la bombona de <strong>CO</strong> 2 junto con la misma.<br />
Sugerencia Cuando el adaptador y la bombona todavía estén instalados, puede evacuar el gas de<br />
la bombona mediante el adaptador de la válvula.<br />
Dispare varias veces en una dirección segura para vaciar el gas que pueda haber quedado en<br />
el fusil.<br />
Nota: Al extraer la bombona de <strong>CO</strong> 2 , es posible que se escape una pequeña cantidad de gas.<br />
5. Carga de la munición<br />
Advertencia: Utilice únicamente bolas de goma y de pintura de <strong>cal</strong>ibre 0<strong>.43</strong>. No utilice nunca<br />
munición o casquillos usados. Si utiliza otro tipo de munición, usted u otras personas podrían<br />
resultar heridos o el fusil podría resultar dañado.<br />
-21- E
Atención: Utilice únicamente bolas de goma o de pintura. No cargue nunca a la vez tipos de<br />
bolas distintos en el cargador.<br />
Nota: Si utiliza bolas de pintura, limpie el cañón y elimine el aceite que pueda contener. Si utiliza<br />
proyectiles de goma, aplique aceite al cañón (consulte el apartado Cuidados y mantenimiento).<br />
Active el seguro del fusil y manténgalo apuntando en una<br />
DIRECCIÓN SEGURA.<br />
Presione el retén del cargador y extraiga el cargador del fusil.<br />
Doble el extremo de la rueda de carga y gírela hacia la derecha<br />
hasta que note una pequeña resistencia.<br />
Cargue los proyectiles en el cargador con los casquillos tal como se<br />
indica en la ilustración.<br />
Importante: El lado abierto del casquillo debe mirar siempre hacia<br />
adelante (en la dirección de disparo).<br />
A continuación, empuje el cargador en el fusil hasta que quede<br />
encajado.<br />
Sugerencia Antes de cargar las bolas de goma, rocíelas con aceite de<br />
silicona como, por ejemplo, el aceite 2.5138 de <strong>Umarex</strong>.<br />
Nota: Guarde el arma siempre con el seguro activado y descargada.<br />
6. Mira<br />
A. Apuntar<br />
Apunte a un blanco seguro:<br />
Sujete el arma de tal manera<br />
que tenga alineados la mira<br />
trasera (parte trasera del<br />
alza) y el punto de mira<br />
Blanco Punto de mira<br />
(parte delantera) a la vez. El punto de mira debe encontrarse<br />
exactamente en el centro del hueco de la mira. A continuación,<br />
levante el arma hasta que vea el punto de mira en medio del<br />
blanco a través de la muesca de la mira trasera.<br />
B. Ajuste del sistema de mira<br />
Para ajustar el sistema de mira,<br />
proceda del modo siguiente:<br />
7. Disparo<br />
Desactive el seguro del arma, apunte a un blanco seguro y accione el gatillo.<br />
Nota: Los casquillos se expulsan por un un lado del fusil.<br />
E<br />
-22-<br />
Rueda de carga<br />
Lado<br />
abierto<br />
Mira trasera<br />
Gire el tornillo para subir (para disparos<br />
bajos) o bajar (para disparos altos) la<br />
mira.<br />
Gire el tornillo hacia la<br />
derecha cuando los disparos<br />
tiendan hacia la izquierda y<br />
hacia la izquierda cuando<br />
tiendan hacia la derecha.<br />
8. Mantenimiento y conservación<br />
Si lleva a cabo el mantenimiento correspondiente y trata el arma con cuidado, podrá disfrutar de<br />
ella durante muchos años.
Atención: No intente limpiar el arma sin activar el seguro primero y comprobar que no queda ningún<br />
proyectil en el cañón. Procure eliminar los restos de gas <strong>CO</strong> 2 que pudieran quedar en el fusil.<br />
Espere unos 20 segundos antes de introducir el cable de limpieza del cañón en el mismo. Limpie<br />
las piezas externas ocasionalmente con un paño suave ligeramente humedecido con aceite especial<br />
para armas.<br />
Limpieza del cañón<br />
Active el seguro del fusil y manténgalo apuntando en una DIRECCIÓN SEGURA.<br />
Presione el retén del cargador para extraer este último.<br />
Ate el paño de limpieza al extremo del cable de limpieza del cañón.<br />
Introduzca el otro extremo del cable de limpieza del cañón en el<br />
orificio de los casquillos y empújelo en dirección a la boca del cañón.<br />
Tire del cable de limpieza del cañón para que éste pase por el<br />
cañón con el paño atado.<br />
Repita este proceso hasta que el cañón quede limpio y no presente<br />
restos de aceite.<br />
Paño de limpieza<br />
Cable de limpieza<br />
del cañón<br />
Orificio para los casquillos<br />
A continuación ya puede emplear las bolas de<br />
pintura con el fusil.<br />
Nota: Si desea utilizar bolas de goma, rocíelas con aceite de silicona como, por ejemplo, el aceite<br />
2.5138 de <strong>Umarex</strong> antes de introducirlas en el cargador.<br />
Notas generales<br />
Evite desmontar el fusil, ya que podría dañarlo.<br />
En el caso de que alguna de las piezas del fusil presentara defectos, NO intente corregir dicho<br />
defecto.<br />
Cualquier modificación del fusil marcador o cualquier otro tipo de manejo no autorizado<br />
podrían dejar el fusil expuesto a posibles riesgos. Asimismo, en tal caso quedaría anulada la<br />
garantía.<br />
Si se le cayera el fusil, compruebe que funciona sin problemas antes de utilizarlo de nuevo. Si se<br />
encontrara con situaciones anormales como, por ejemplo, que se acortara el recorrido del<br />
gatillo o la resistencia del mismo disminuyera, significa que alguna pieza está gastada o es<br />
defectuosa. Diríjase al servicio de atención al cliente antes de volver a utilizar el fusil.<br />
9. Manejo seguro de armas<br />
Deberá estar familiarizado con el manejo correcto y seguro de su arma. El hecho de que su nueva<br />
arma cuente con una muy alta capacidad de disparos exige extremar las precauciones. Con respecto<br />
a las reglas básicas para disparar con seguridad, considere cada contacto con el arma como<br />
parte de su manejo.<br />
Trate el arma siempre como si estuviera cargada.<br />
Cargue siempre el arma con el seguro activado para evitar que se produzcan disparos<br />
involuntarios. Mantenga el dedo siempre fuera del gatillo y colóquelo solamente cuando vaya a<br />
disparar.<br />
Utilice únicamente los proyectiles diseñados para esta arma.<br />
Mantenga la boca del arma siempre en una dirección segura.<br />
Sólo se permite disparar el arma en la vivienda del propietario o en las zonas de tiro permitidas<br />
por la policía, siempre y cuando el proyectil no pueda llegar más allá del área de tiro. Para ello,<br />
tenga presente siempre el alcance máximo de los proyectiles (aprox. 100 m).<br />
-23- E
No transporte nunca el arma cargada. Cárguela solamente cuando tenga intención de disparar.<br />
No dirija el arma nunca hacia personas o animales.<br />
Antes de disparar, asegúrese de que el objetivo y el entorno sean seguros.<br />
Compruebe siempre que el arma esté descargada cuando la transporte o la entregue a otra<br />
persona.<br />
Asegúrese de tener controlada la dirección hacia la que apunta la boca del fusil, incluso si<br />
tropezara o se le cayera el arma.<br />
Por motivos de seguridad, lleve puestas gafas protectoras cuando dispare. Cuando utilice el<br />
arma para jugar a "Paintball", le recomendamos que lleve puesta protección para el cuerpo, en<br />
especial para las partes más sensibles.<br />
Guarde el arma siempre descargada, separada de la munición y de forma segura para evitar que<br />
personas no autorizadas (personas no instruidas, niños o menores de 18 años) puedan acceder<br />
a ella.<br />
Entregue esta arma junto con las instrucciones de uso sólo a personas mayores de 18 años y<br />
que estén lo más familiarizadas posible con el manejo de la misma.<br />
Cualquier modificación o reparación del arma deberá llevarla a cabo una empresa especializada<br />
o un armero.<br />
No deje nunca el arma cargada si está fuera de su alcance.<br />
Entregue siempre el arma descargada a otras personas.<br />
10. Especificaciones<br />
Sistema: Fusil de <strong>CO</strong> 2 de carga automática<br />
Calibre/munición: Bolas de pintura y proyectiles de goma de <strong>cal</strong>ibre 0<strong>.43</strong><br />
Accionamiento: Bombona de <strong>CO</strong> 2 de 81 g mediante adaptador suministrado<br />
Gatillo: Mecánico<br />
Seguro: Seguro del gatillo<br />
Capacidad del cargador: 20 disparos<br />
Energía: Hasta 2 julios (2.4627F)<br />
Energía: Hasta 5 julios (2.4627)<br />
Peso: 2820 gramos<br />
Longitud: 537 - 695 mm<br />
Longitud del cañón: 269 mm<br />
D<br />
Service:<br />
Sportwaffen GmbH & Co KG<br />
Donnerfeld 2 / D - 59757 Arnsberg / Germany<br />
Telefon 02932 / 638-01<br />
Telefax 02932 / 638-222<br />
Internet: www.umarex.de<br />
e-mail: verkauf@umarex.de<br />
F<br />
Service:<br />
Sportwaffen GmbH & Co KG<br />
Donnerfeld 2 / D - 59757 Arnsberg / Germany<br />
Telefon +49 2932 / 638-241<br />
Telefax +49 2932 / 638-249<br />
Internet: www.umarex.fr<br />
e-mail: sales@umarex.de<br />
GB<br />
Service:<br />
Sportwaffen GmbH & Co KG<br />
Donnerfeld 2 / D - 59757 Arnsberg / Germany<br />
Telefon +49 2932 / 638-241<br />
Telefax +49 2932 / 638-249<br />
Internet: www.umarex.com<br />
e-mail: sales@umarex.de<br />
E<br />
Service:<br />
Sportwaffen GmbH & Co KG<br />
Donnerfeld 2 / D - 59757 Arnsberg / Germany<br />
Telefon +49 2932 / 638-241<br />
Telefax +49 2932 / 638-249<br />
Internet: www.umarex.com<br />
e-mail: sales@umarex.de