Laserliner StarFinder - UMAREX GmbH & Co.KG
Laserliner StarFinder - UMAREX GmbH & Co.KG
Laserliner StarFinder - UMAREX GmbH & Co.KG

You also want an ePaper? Increase the reach of your titles
YUMPU automatically turns print PDFs into web optimized ePapers that Google loves.
<strong>StarFinder</strong><br />
Tip 6: Ensure that you have really detected a stud. To do so,<br />
check on both sides whether other studs are present at<br />
equal distances, usually at 30, 40 or 60 cm. Also check<br />
that it is a stud by scanning at several places directly<br />
above and below the position of the first find.<br />
Tip 7: Textured ceilings: The ceiling must be covered with<br />
cardboard to protect it. In this case, use the DeepScan<br />
function.<br />
CAUTION: If electric wires or metal or plastic pipes are<br />
located near or in contact with a plaster fibreboard panel,<br />
they may be identified by the <strong>StarFinder</strong> as studs. Always<br />
switch off the power supply when working near electric wires.<br />
SPECIAL THINGS TO NOTE WITH VARIOUS MATERIALS<br />
It may not be possible to detect wooden studs or joists<br />
through the following materials:<br />
Ceramic floor tiles<br />
Fitted carpeting with padded backing<br />
Wallpaper with metal fibres or metal foil<br />
Freshly painted, damp walls. These must have dried for at<br />
least one week.<br />
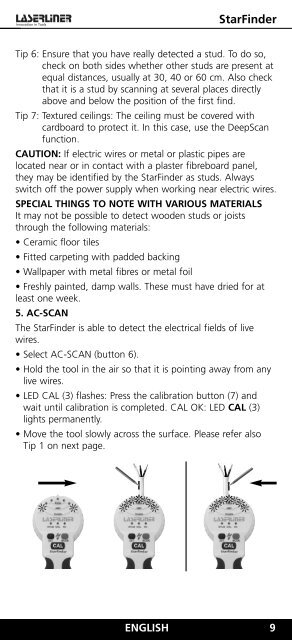
5. AC-SCAN<br />
The <strong>StarFinder</strong> is able to detect the electrical fields of live<br />
wires.<br />
Select AC-SCAN (button 6).<br />
Hold the tool in the air so that it is pointing away from any<br />
live wires.<br />
LED CAL (3) flashes: Press the calibration button (7) and<br />
wait until calibration is completed. CAL OK: LED CAL (3)<br />
lights permanently.<br />
Move the tool slowly across the surface. Please refer also<br />
Tip 1 on next page.<br />
ENGLISH 9