4. Was sind - visomat
4. Was sind - visomat
4. Was sind - visomat

You also want an ePaper? Increase the reach of your titles
YUMPU automatically turns print PDFs into web optimized ePapers that Google loves.
<strong>visomat</strong> ® handy IV<br />
Gebrauchsanleitung (2-29)<br />
Instruction manual (30-55)<br />
Mode d‘emploi (56-66)<br />
Manuale di istruzioni (67-77)<br />
Manual de instrucciones (78-87)<br />
0123
deutsch<br />
Inhaltsangabe<br />
A Gerätebeschreibung/Kontrollanzeigen 4<br />
B Kurzanleitung zur Messung 6<br />
C Bedienung des Gerätes<br />
1. Inbetriebnahme des Gerätes 9<br />
2. Anlegen des Gerätes 9<br />
3. Die richtige Lage des Gerätes 10<br />
<strong>4.</strong> Manschette aufpumpen 12<br />
5. Blutdruck messen 14<br />
6. Messwertspeicher abrufen 15<br />
7. Messwertspeicher löschen 15<br />
D Wichtige Hinweise<br />
1. Grundregeln zur Ermittlung des Blutdrucks 16<br />
2. <strong>Was</strong> noch zu beachten ist 17<br />
Armumfang 17<br />
Herzrhythmusstörungen 17<br />
Frequenz von Herzschrittmachern 17<br />
Schwangerschaft 17<br />
Medikamente 17
Inhaltsangabe<br />
E <strong>Was</strong> Sie über Blutdruck wissen sollten<br />
1. Der systolische und diastolische Blutdruckwert 18<br />
2. Warum Sie unterschiedliche Werte messen 18<br />
3. Warum regelmäßig Blutdruck messen? 19<br />
<strong>4.</strong> <strong>Was</strong> <strong>sind</strong> normale Blutdruckwerte? 19<br />
F Pflege des Gerätes<br />
1. Batterien wechseln 20<br />
2. Reinigen und desinfizieren 20<br />
3. Kundendienst 21<br />
G Anhang<br />
<strong>Was</strong> tun bei Mess- und Bedienungsfehlern? 21<br />
Technische Daten/Zubehör/Ersatzteile 23<br />
CE-Zeichen 25<br />
Messtechnische Kontrolle 26<br />
Herstellergarantie 27<br />
deutsch
deutsch<br />
A<br />
D-4<br />
<br />
<br />
Gerätebeschreibung
Anzeigen für Systole, Diastole, Puls,<br />
Kontrollanzeigen<br />
Start/Stop-Taste<br />
Memory-Taste<br />
(Speicher-Abruf-Taste)<br />
Batterieabdeckung<br />
Handgelenkmanschette<br />
<strong>visomat</strong> ® handy IV:<br />
Digitales Automatikgerät mit<br />
Elektropumpe zur Blutdruckmessung<br />
am Handgelenk.<br />
Kontrollanzeigen/Symbole<br />
No. 30 Speicher Nr. (Nr. der Messung)<br />
A 13 Mittelwert und Anzahl<br />
gespeicherter Messwerte<br />
Pulsfrequenzanzeige<br />
SYS Systole<br />
DIA Diastole<br />
Batterien wechseln<br />
PUL Pulsfrequenz<br />
Aufpumpen / Entlüften<br />
A<br />
D-5<br />
deutsch
deutsch<br />
B<br />
Bitte vor der ersten Messung die ausführliche<br />
Gebrauchsanweisung lesen! (ab Seite 9)<br />
1. Batterien einlegen<br />
D-6<br />
(2 x 1,5V Alkali Mangan)<br />
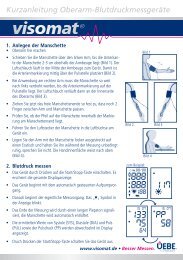
2. Anlegen der Manschette<br />
Linkes Handgelenk freimachen.<br />
Gerät am Handgelenk anlegen.<br />
Abstand vom oberen Manschettenrand<br />
zur Handfläche ca. 1 cm (Abb. 1).<br />
Manschette schließen.<br />
Gerät auf Herzhöhe halten (Abb. 2).<br />
Arm ruhig halten, nicht sprechen.<br />
Kurzanleitung zur Messung<br />
Abb. 1<br />
Abb. 2
Kurzanleitung zur Messung<br />
3. Aufpumpen der Manschette<br />
Start-Taste drücken. Das Gerät führt einen<br />
Funktionstest durch, alle Anzeigenelemente<br />
werden sichtbar. Das Aufpumpen der<br />
Manschette erfolgt automatisch bis ca.<br />
190 mmHg. Bei zu niedrigem Manschettendruck<br />
erhöht das Gerät selbständig den<br />
Druck in Schritten von ca. 30 mmHg.<br />
<strong>4.</strong> Blutdruck messen<br />
Nach dem Aufpumpen entweicht die<br />
Luft automatisch, der fallende Manschettendruck<br />
wird angezeigt und das „“<br />
Symbol blinkt und piepst.<br />
Das automatische Entlüften der Manschette<br />
signalisiert das Ende der Messung.<br />
No.<br />
B<br />
D-7<br />
deutsch
deutsch<br />
B<br />
D-8<br />
Auf der Anzeige erscheinen die Blutdruckwerte<br />
Systole und Diastole sowie die<br />
Pulsfrequenz.<br />
5. Gerät abschalten<br />
Start/Stop-Taste drücken.<br />
Die gemessenen Werte werden automatisch<br />
abgespeichert.<br />
Kurzanleitung zur Messung
Bedienung des Gerätes C<br />
1. Inbetriebnahme des Gerätes<br />
Legen Sie die beigefügten Batterien in das<br />
Gerät ein, falls sie nicht bereits eingelegt<br />
wurden (siehe Seite 20, Batterien wechseln).<br />
2. Anlegen des Gerätes<br />
Linkes Handgelenk freimachen, die Handinnenfläche<br />
zeigt nach oben. Gerät mit<br />
Manschette über das Handgelenk schieben.<br />
Der Abstand zwischen Handfläche<br />
und Oberkante der Manschette soll ca.<br />
1 cm betragen.<br />
Der Manschettensensor auf der Unterseite<br />
des Gerätes liegt dann direkt auf<br />
der Pulsstelle. Linkshänder können die<br />
Manschette am rechten Arm anlegen,<br />
die Gebrauchsanweisung gilt sinngemäß.<br />
Ziehen Sie jetzt das freie Manschettenende<br />
straff und schließen die Manschette mit<br />
dem Klettverschluss. Durch die optimierte<br />
Form sitzt die Manschette sehr straff, um<br />
evtl. Messfehler zu vermeiden.<br />
D-9<br />
deutsch
deutsch<br />
C<br />
3. Die richtige Lage des Gerätes<br />
3 Messhaltungen <strong>sind</strong> möglich:<br />
1. Legen Sie den linken Arm auf einen Esstisch<br />
und winkeln ihn so an, dass sich das<br />
Handgelenk genau auf Herzhöhe befindet.<br />
2. Erfolgt die Messung einmal nicht an<br />
einem Tisch, kann auch in folgender<br />
Haltung gemessen werden: Legen Sie den<br />
linken Arm nach Betätigen der Starttaste<br />
locker so an den Körper, dass sich die<br />
Manschette des Gerätes auf Herzhöhe befindet.<br />
Zur Unterstützung und Entlastung<br />
des linken Armes können Sie den rechten<br />
Arm als Auflage nehmen. Beide Arme<br />
ruhig halten, bis die Messung abgeschlossen<br />
ist.<br />
D-10<br />
Bedienung des Gerätes
Bedienung des Gerätes C<br />
3. Messung im Liegen<br />
Legen Sie sich auf den Rücken. Das Gerät<br />
am Handgelenk anlegen und z. B. durch<br />
ein Kissen gestützt in Herzhöhe halten.<br />
Um sich vor der Messung zu entspannen,<br />
atmen Sie 5- oder 6-mal tief durch. Arm<br />
während der Messung unbedingt ruhig<br />
halten und nicht sprechen.<br />
Falls sich die Manschette in einer zu niedrigen<br />
bzw. zu hohen Stellung als Herzhöhe<br />
befindet, neigt der gemessene Wert dazu,<br />
höher bzw. niedriger auszufallen.<br />
Korrekte Messwerte können nur<br />
dann erzielt werden, wenn sich das<br />
Handgelenk in Herzhöhe befindet.<br />
Eine zu hohe oder zu tiefe Haltung<br />
des Handgelenks führt zu falschen<br />
Messergebnissen.<br />
D-11<br />
deutsch
deutsch<br />
C<br />
<strong>4.</strong> Manschette aufpumpen<br />
Das Gerät durch Drücken auf die Start/<br />
Stop-Taste einschalten. Es leuchtet das<br />
gesamte Display auf (Segmentkontrolle).<br />
Sie können damit überprüfen, dass alle<br />
Anzeigenelemente in Ordnung <strong>sind</strong>. Kurz<br />
danach erscheint ein Pfeil nach unten,<br />
dann die Anzeige „0“, anschließend<br />
wird die Manschette automatisch bis<br />
ca. 190 mmHg aufgepumpt. Falls dieser<br />
Manschettendruck für die Messung der<br />
Blutdruckwerte nicht ausreicht, erhöht das<br />
Gerät selbständig den Manschettendruck<br />
in Schritten von 30 mmHg bis ein ausreichender<br />
Druck erreicht ist. Der Aufpumpund<br />
Messvorgang kann jederzeit durch<br />
Drücken der Start/Stop-Taste abgebro-<br />
D-12<br />
No.<br />
Bedienung des Gerätes
Bedienung des Gerätes C<br />
chen werden. Um den Aufpumpvorgang<br />
manuell zu steuern, halten Sie sofort nach<br />
Beginn des Aufpumpens die Start/Stop-<br />
Taste gedrückt und lassen sie wieder los,<br />
sobald der Manschettendruck eine Höhe<br />
von 30 mmHg über dem zu erwartenden<br />
systolischen Maximaldruck erreicht. Wenn<br />
der Manschettendruck ca. 190 mmHg<br />
überschritten hat, wird das Aufpumpen<br />
gestoppt, sobald man die Taste loslässt.<br />
Der Druck kann bis ca. 300 mmHg erhöht<br />
werden.<br />
Bitte beachten Sie:<br />
Die Manschette darf nur aufgepumpt<br />
werden, wenn sie am Handgelenk<br />
angelegt ist.<br />
D-13<br />
deutsch
deutsch<br />
C<br />
5. Blutdruck messen<br />
Sobald der notwendige Manschettendruck<br />
erreicht ist, schaltet die Pumpe ab und<br />
die Luft entweicht automatisch. In der<br />
Anzeige erscheint der fallende Manschettendruck.<br />
Nach kurzer Zeit blinkt das „“<br />
Symbol im Rhythmus des Pulsschlages.<br />
Am Ende der Messung wird die Manschette<br />
automatisch entlüftet. Auf der Anzeige<br />
erscheinen die gemessenen Blutdruckwerte<br />
sowie die Pulsanzeige. Die Werte von<br />
Systole und Diastole werden automatisch<br />
beim Start einer neuen Messung oder<br />
beim Ausschalten des Gerätes gespeichert.<br />
D-14<br />
Bedienung des Gerätes<br />
Übertragen Sie die Speicherwerte in<br />
Ihren Blutdruckpass. Dadurch erhalten<br />
Sie über einen längeren Zeitraum einen<br />
Überblick über Ihre Blutdrucksituation,<br />
die Sie ggf. mit Ihrem Arzt besprechen<br />
können.
Bedienung des Gerätes<br />
Vor Beginn einer Wiederholungsmessung<br />
sollten Sie drei Minuten warten,<br />
bis sich die Blutzirkulation in Ihrem<br />
Arm wieder normalisiert hat.<br />
6. Messwertspeicher abrufen<br />
Das Gerät hat einen Messwertspeicher,<br />
der es ermöglicht, die 30 zuletzt gemessenen<br />
Blutdruck- und Pulswerte und den<br />
Mittelwert (Durchschnittswert) anzuzeigen.<br />
Durch Drücken der Memory-Taste<br />
erscheint der Mittelwert, sofern bereits 2<br />
Messwerte gespeichert wurden. Nochmaliges<br />
Drücken ruft den zuletzt gemessenen<br />
Wert auf. Durch weiteres Drücken<br />
erscheint jeweils der vorhergehende<br />
Messwert. Auf diese Weise lassen sich<br />
zurückgehend alle 30 Messwerte aufrufen.<br />
Wird die Taste erneut gedrückt, erscheint<br />
der Mittelwert aller Messungen.<br />
7. Messwertspeicher löschen<br />
C<br />
Um einzelne Messwerte zu löschen, rufen<br />
Sie mit der Memory-Taste durch mehrmaliges<br />
Drücken den gewünschten Messwert<br />
auf und halten Sie die Taste 4 Sekunden<br />
lang gedrückt. Um den gesamten Speicher<br />
zu löschen, drücken Sie die Memory-Taste<br />
und halten sie gedrückt, bis der Messwert<br />
erloschen ist (7-8 sec).<br />
Blinkt die Displayanzeige, wurde der<br />
Löschvorgang nicht abgeschlossen und<br />
muss wiederholt werden.<br />
D-15<br />
deutsch
deutsch<br />
D<br />
1. Grundregeln zur Ermittlung<br />
des Blutdrucks<br />
• Die Messung muss in Ruhe vorgenommen<br />
werden. Gehen oder Treppensteigen<br />
erhöht den Blutdruck. Warten Sie mindestens<br />
5 Minuten, bis Ihr Kreislauf sich<br />
beruhigt hat.<br />
• Kontrollieren Sie den Blutdruck zweimal<br />
täglich – morgens nach dem Aufstehen<br />
und abends, wenn Sie sich nach der Arbeit<br />
entspannt haben.<br />
• Der Blutdruck muss im Sitzen gemessen<br />
werden. Setzen Sie sich für die Messung<br />
an Ihren Esstisch (keinesfalls niedriger<br />
Couchtisch) und halten Sie das Handgelenk<br />
auf Herzhöhe.<br />
D-16<br />
Wichtige Hinweise<br />
• Exakte Werte ermitteln Sie am sichersten,<br />
wenn Sie Armbanduhr oder Schmuck ablegen<br />
und am bloßen Handgelenk messen.<br />
• Bei der Messung darf der Arm mit dem<br />
Gerät nicht bewegt werden, um Störimpulse<br />
auf jeden Fall zu vermeiden. Sprechen<br />
Sie während der Messung nicht.<br />
• Zwischen aufeinanderfolgenden Messungen<br />
muss immer eine Pause von etwa 3<br />
Minuten zur Vermeidung von Fehlmessungen<br />
eingelegt werden.
Wichtige Hinweise<br />
2. <strong>Was</strong> noch zu beachten ist<br />
• Armumfang<br />
Die Manschette ist auf einen Handgelenkumfang<br />
von 12,5 – 21,5 cm ausgelegt.<br />
• Herzrhythmusstörungen<br />
Wenn Sie an Herzrhythmusstörungen oder<br />
Arhythmien leiden, kann dies zu falschen<br />
Messergebnissen führen (Achten Sie<br />
auf gleichmäßige Pieptöne während der<br />
Messung). Sprechen Sie deshalb mit Ihrem<br />
Arzt, bevor Sie Ihren Blutdruck messen.<br />
• Frequenz von Herzschrittmachern<br />
Die Anzeige der Pulsfrequenz ist nicht<br />
geeignet zur Kontrolle der Frequenz von<br />
Herzschrittmachern.<br />
• Schwangerschaft<br />
Die Blutdruckwerte können durch die<br />
Schwangerschaft verändert werden. Führen<br />
Sie eine Blutdruck-Selbstkontrolle nur<br />
in Absprache mit Ihrem Arzt durch.<br />
• Medikamente<br />
Bei Einnahme von Blut verdünnenden/gerinnungshemmenden<br />
Mitteln nur nach<br />
Rücksprache mit Ihrem Arzt messen.<br />
Selbstmessung bedeutet noch keine Therapie.<br />
Verändern Sie auf keinen Fall von sich<br />
aus die vom Arzt verschriebene Dosierung<br />
der Arzneimittel.<br />
E<br />
D-17<br />
deutsch
deutsch<br />
E<br />
1. Der systolische und diastolische<br />
Blutdruckwert<br />
Herz- und Blutkreislauf haben die wichtige<br />
Aufgabe, alle Organe und Gewebe des<br />
Körpers ausreichend mit Blut zu versorgen<br />
und Stoffwechselprodukte abzutransportieren.<br />
Das Herz zieht sich dazu in<br />
regelmäßigem Rhythmus etwa 60–80 mal<br />
pro Minute zusammen und dehnt sich<br />
wieder aus.<br />
Der Druck des strömenden Blutes, der<br />
beim Zusammenziehen (Kontraktion) des<br />
Herzens auf die Arterienwände entsteht<br />
wird als Systole bezeichnet. Der Druck in<br />
der darauf folgenden Erschlaffungsphase,<br />
wenn sich das Herz wieder mit Blut füllt,<br />
wird als Diastole bezeichnet.<br />
D-18<br />
<strong>Was</strong> Sie über Blutdruck wissen sollten<br />
Bei Ihrer täglichen Messung ermitteln Sie<br />
beide Werte.<br />
2. Warum Sie unterschiedliche Werte<br />
messen.<br />
Unser Blutdruck reagiert wie ein empfindliches<br />
Messinstrument auf äußere<br />
und innere Einflüsse. Schon geringfügige<br />
Änderungen können auf ihn einwirken.<br />
Das macht verständlich, dass häufig beim<br />
Arzt oder Apotheker gemessene Werte<br />
höher <strong>sind</strong> als jene, die Sie zu Hause in<br />
gewohnter Umgebung erhalten. Aber<br />
auch Wetterumschwung, Klimawechsel,<br />
körperliche und seelische Belastungen<br />
können sich auswirken.
<strong>Was</strong> Sie über Blutdruck wissen sollten E<br />
3. Warum regelmäßig Blutdruck<br />
messen?<br />
Auch die Tageszeit hat einen Einfluss auf<br />
die Höhe des Blutdruckes. Tagsüber <strong>sind</strong><br />
die Werte meist höher als während der<br />
Ruhephasen in der Nacht. Einmalige und<br />
unregelmäßige Messungen sagen daher<br />
kaum etwas über den tatsächlichen Blutdruck<br />
aus. Eine zuverlässige Beurteilung ist<br />
nur möglich, wenn regelmäßig Einzelmessungen<br />
durchgeführt werden. Besprechen<br />
Sie die Messwerte mit Ihrem Arzt.<br />
<strong>4.</strong> <strong>Was</strong> <strong>sind</strong> normale Blutdruckwerte?<br />
Die Weltgesundheitsbehörde (WHO) hat<br />
folgende Übersicht für die Einordnung der<br />
Blutdruckwerte zusammengestellt:<br />
Hochdruck Grenzwert Normalwert<br />
systolischer<br />
Druck ≥140*<br />
und / oder**<br />
diastolischer<br />
Druck ≥90<br />
systolischer<br />
Druck<br />
120–139<br />
diastolischer<br />
Druck 80–89<br />
systolischer<br />
Druck ≤119<br />
diastolischer<br />
Druck ≤79<br />
* mmHg = Millimeter Hydragyrum (Quecksilber)<br />
** Es genügt, wenn bereits einer der Werte erhöht ist.<br />
2003<br />
D-19<br />
deutsch
deutsch<br />
F<br />
1. Batterien wechseln<br />
• Batteriefach öffnen<br />
Deckel des Batteriefaches an der Seite des<br />
Gerätes öffnen.<br />
• Batterie einlegen<br />
Nehmen Sie die alten Batterien aus dem<br />
Gerät und legen die neuen Batterien ein.<br />
Achten Sie beim Einlegen auf die richtige<br />
Polung (Markierung im Batteriefach). Die<br />
Batterien können einfach eingelegt werden,<br />
in dem man Sie in das Batteriefach<br />
drückt, während man ihre (–) Seite gegen<br />
die Feder presst.<br />
• Batteriefach schließen<br />
Schließen Sie das Batteriefach, indem Sie<br />
D-20<br />
Pflege des Gerätes<br />
den Batteriedeckel wieder in das Gerät<br />
einschieben.<br />
• Bitte beachten Sie:<br />
Wechseln Sie die Batterien,<br />
– wenn nach der Segmentkontrolle das<br />
Batteriesymbol im Display erscheint,<br />
– trotz Drücken der Starttaste keine<br />
Displayanzeige erscheint.<br />
Wechseln Sie stets alle 2 Batterien aus.<br />
Verwenden Sie nur Markenbatterien der<br />
angegebenen Qualitätsstufen (siehe techn.<br />
Daten). Wird das Gerät längere Zeit nicht<br />
benutzt, entfernen Sie bitte die Batterien.<br />
Sie beugen so einem Auslaufen vor.<br />
Grundsätzlich kann jede Batterie auslaufen.
Pflege das Gerätes<br />
Batterien und technische Geräte gehören<br />
nicht in den Hausmüll, bitte bei Sammelstellen<br />
in Geschäften oder bei der<br />
Stadtreinigung (Schadstoffsammlung)<br />
abgeben.<br />
2. Reinigen und desinfizieren<br />
Reinigen Sie das Gerät nur mit einem<br />
weichen, leicht angefeuchteten Tuch<br />
und etwas Spülmittel. Flecken auf der<br />
Manschette können vorsichtig mit einem<br />
feuchten Tuch und Seifenwasser entfernt<br />
werden.<br />
Für eine eventuelle Desinfektion empfehlen<br />
wir das Mittel Descosept AF, Dr.<br />
Schumacher GmbH, Melsungen. Schnelldesinfektion<br />
zum Wischen und Sprühen.<br />
Die Manschette darf nicht gewaschen<br />
oder chemisch gereinigt werden.<br />
3. Kundendienst<br />
Eine Reparatur des Gerätes darf nur durch<br />
den Hersteller oder eine von UEBE ausdrücklich<br />
dazu ermächtigte Stelle erfolgen.<br />
Bitte wenden Sie sich an:<br />
UEBE Medical GmbH<br />
Zum Ottersberg 9<br />
97877 Wertheim/Germany<br />
Tel.-Nr.: 09342/924040<br />
Fax-Nr.: 09342/924080<br />
E-mail: info@uebe.com<br />
Internet: www.uebe.de<br />
F<br />
D-21<br />
deutsch
deutsch<br />
<strong>Was</strong> tun bei Mess- oder Bedienungsfehlern?<br />
Menschen mit Herzrhythmusstörungen, Gefäßverengungen, Arteriosklerose in den Extremitäten sowie<br />
Diabetiker sollten sich vor Blutdruck-Selbstmessungen mit dem Arzt abstimmen, da in solchen Fällen<br />
abweichende Blutdruckwerte auftreten können.<br />
Aufgetretener Fehler Ursache Beseitigung<br />
ERR 1: Messfehler Bewegen des Arms oder des Körpers während<br />
der Messung. Manschette sitzt nicht.<br />
Sprechen während der Messung.<br />
Wiederholen Sie die Messung. Bewegen Sie den<br />
Arm nicht und sprechen Sie nicht. Bei wiederholtem<br />
Auftreten Kundendienst kontaktieren.<br />
ERR 2: Aufpumpfehler Im System wird kein Druck aufgebaut Messung wiederholen, bei mehrmaligem Auftreten<br />
Service-Telefon anrufen<br />
ERR 3: Ablassfehler Ablassrate zu hoch oder zu niedrig Bei mehrmaligem Auftreten Service-Telefon anrufen<br />
ERR 330 Aufpumpdruck über 330 mmHg<br />
Batteriefehler<br />
Keine Mess- und Kontrollanzeigen<br />
in den Anzeigenfeldern.<br />
Keine Batterien eingesetzt.<br />
Batterien falsch eingesetzt. Batterien leer.<br />
Fehlerhafte Messwerte. Bewegen des Arms oder des Körpers während<br />
der Messung.<br />
Zu hohe oder zu tiefe Haltung des Handgelenkes.<br />
Messung wiederholen<br />
Batterien überprüfen<br />
Batterien überprüfen und ggf. austauschen.<br />
Batterieanzeige Batterien leer. Batterien überprüfen und ggf. austauschen.<br />
Wiederholen Sie die Messung. Bewegen Sie den<br />
Arm nicht und sprechen Sie nicht.<br />
Manschette wird nicht aufgepumpt.<br />
Manschette sitzt nicht<br />
Manschette falsch angelegt<br />
Wiederholen Sie die Messung mit dem Handgelenk<br />
in Herzhöhe.<br />
Handgelenkumfang prüfen<br />
Messung wiederholen<br />
Herzrhythmusstörungen während der Messung Messung wiederholen<br />
Batterien leer. Batterien überprüfen und ggf. austauschen.
Anhang G<br />
Technische Daten/Zubehör/Ersatzteile<br />
• Gerätetyp:<br />
Digitales Automatikgerät mit Elektropumpe<br />
zur Blutdruckmessung am Handgelenk<br />
• Messverfahren:<br />
Oszillometrische Bestimmung von Systole,<br />
Diastole und Puls<br />
• Referenzverfahren der klinischen Prüfung:<br />
Auskultatorische Messung<br />
• Anzeige:<br />
LCD-Anzeige für Messwerte (7-stellig) und<br />
Kontrollanzeigen<br />
• Speicher:<br />
30 Messwerte (automatische Speicherung)<br />
und Mittelwert<br />
• Messbereich:<br />
Blutdruckmessung: 0–300 mmHg<br />
Pulsmessung: 40–160 Puls/min.<br />
• Fehlergrenzen:<br />
Blutdruckmessung:<br />
entspricht EN 1060 Teil 3<br />
Druckmessung: ± 3 mmHg<br />
Pulsmessung: ± 5%<br />
• Manschette:<br />
Schalenmanschette<br />
• Ablassventil:<br />
elektronisch geregeltes Linearventil<br />
• Aufpumpdruck:<br />
ca. 190 mmHg<br />
D-23<br />
deutsch
deutsch<br />
G<br />
• Ablassrate<br />
Ø 5,5 mmHg<br />
• Batterie:<br />
– Batterietyp:<br />
2 x 1,5 V Micro/AAA LR 03-Zellen<br />
Alkali-Mangan oder Lithium (FR 03)<br />
– Lebensdauer:<br />
Mehr als 600 Messungen in 2 Jahren<br />
– Batteriekontrolle:<br />
Kontrollanzeige „ “ für Batteriewechsel<br />
– Automatische Abschaltung:<br />
ca. 3 Minuten nach Messende<br />
• Betriebsbedingungen:<br />
Umgebungstemperatur 10 – 40°C<br />
Rel. Luftfeuchtigkeit bis 85%<br />
D-24<br />
Anhang<br />
• Lager/ und Transportbedingungen:<br />
Umgebungstemperatur -5 bis +50°C<br />
Rel. Luftfeuchtigkeit bis 85%<br />
Technische Änderungen vorbehalten.<br />
Zubehör/Ersatzteile<br />
Folgende Ersatzteile bzw. Zubehör können<br />
Sie über den Fachhandel erhalten:<br />
• Schalenmanschette „Typ H4“<br />
(12,5 – 21,5 cm)<br />
Art.-Nr. 2104001<br />
Wichtig:<br />
Das Gerät darf nur mit Originalmanschetten<br />
vom „Typ H4“ verwendet werden.
Anhang G<br />
CE-Zeichen<br />
Dieses Blutdruckmessgerät entspricht den europäischen<br />
Vorschriften, die dem Medizinproduktegesetz<br />
(MPG) zugrundeliegen und trägt<br />
das CE-Zeichen „CE 0123“. Das Gerät wurde<br />
qualitätskontrolliert nach der EG-Richtlinie<br />
93/42/EWG, es unterliegt deshalb nicht der<br />
Eichpflicht und trägt keine Eichmarke.<br />
Schutzgrad gegen elektrischen<br />
Schlag: TYP BF<br />
Gebrauchsanweisung beachten.<br />
Die Forderung folgender Normen werden<br />
eingehalten:<br />
• EN 1060 Teil 1: 1995<br />
Nichtinvasive Blutdruckmessgeräte<br />
Teil 1: Allgemeine Anforderungen<br />
• EN 1060 Teil 3: 1997<br />
Nichtinvasive Blutdruckmessgeräte<br />
Teil 3: Ergänzende Anforderungen für<br />
elektromechanische Blutdruckmesssysteme<br />
• prEN 1060-4: 2002<br />
Nicht-invasive Blutdruckmessgeräte<br />
(Klinische Validierung)<br />
D-25<br />
deutsch
deutsch<br />
G<br />
• EN 60601-1:1990<br />
+A1:1993<br />
+A2:1995<br />
1. Mediz. elektr. Geräte<br />
2. Allg. Festlegungen für die Sicherheit<br />
• EN 60601-1-2:2001<br />
Mediz. elekt. Geräte<br />
Elektromagn. Verträglichkeit<br />
Hersteller<br />
UEBE Medical GmbH<br />
Zum Ottersberg 9<br />
97877 Wertheim/Germany<br />
D-26<br />
Anhang<br />
Messtechnische Kontrolle<br />
Gemäß „Medizinprodukte-Betreiberverordnung“<br />
<strong>sind</strong> fachliche Benutzer dazu<br />
angehalten, alle 2 Jahre eine messtechnische<br />
Kontrolle durchzuführen. Diese kann entweder<br />
durch UEBE Medical GmbH, eine für das<br />
Messwesen zuständige Behörde oder durch<br />
autorisierte Wartungsdienste erfolgen.<br />
Zuständige Behörden oder autorisierte<br />
Wartungsdienste erhalten auf Anforderung<br />
eine „Prüfanweisung zur messtechnischen<br />
Kontrolle“ vom Hersteller.
Anhang G<br />
Herstellergarantie<br />
Das Gerät wurde mit aller Sorgfalt hergestellt<br />
und geprüft. Für den Fall, dass es trotzdem<br />
bei Auslieferung Mängel aufweisen sollte,<br />
geben wir eine Garantie zu den nachfolgenden<br />
Konditionen:<br />
1. Während der Garantiezeit von 3 Jahren ab<br />
Kaufdatum beheben wir solche Mängel<br />
nach unserer Wahl und auf unsere Kosten<br />
durch Reparatur (nach Rücksendung in<br />
unserem Werk) oder Ersatzlieferung eines<br />
mangelfreien Gerätes.<br />
2. Nicht unter die Garantie fallen die normale<br />
Abnutzung von Verschleißteilen oder<br />
Schäden, die durch Nichtbeachtung der<br />
Gebrauchsanleitung, unsachgemäße<br />
Handhabung (z.B. ungeeignete Stromquellen,<br />
Bruch, ausgelaufene Batterien)<br />
und/oder Demontage des Gerätes durch<br />
den Käufer entstehen. Ferner werden<br />
durch die Garantie keine Schadenersatzansprüche<br />
gegen uns begründet.<br />
3. Garantieansprüche können nur in der<br />
Garantiezeit und durch Vorlage des<br />
Kaufbeleges geltend gemacht werden.<br />
Im Garantiefall ist das Gerät zusammen<br />
mit dem Kaufbeleg und Beschreibung der<br />
Reklamation zu senden an UEBE Medical<br />
GmbH, Service-Center, Zum Schlag 18,<br />
97877 Wertheim, Germany.<br />
D-27<br />
deutsch
deutsch<br />
G<br />
<strong>4.</strong> Die vertraglichen Mängelansprüche des<br />
Käufers gegen den Verkäufer gemäß<br />
§ 437 BGB werden durch die Garantie<br />
nicht eingeschränkt.<br />
D-28<br />
Anhang<br />
Bitte beachten Sie:<br />
Im Garantiefall unbedingt den Kaufbeleg<br />
beilegen.
Anhang G<br />
D-29<br />
deutsch
english<br />
Contents<br />
A Description of device 32<br />
B Brief instructions for use 34<br />
C Display unit operation<br />
1. Setting up the display unit 37<br />
2. Fitting the cuff 37<br />
3. Correct posture of device 38<br />
<strong>4.</strong> Inflating the cuff 40<br />
5. Blood pressure measurement 42<br />
6. Memory recall 43<br />
7. Memory deletion 43<br />
D Important information<br />
1. Basic rules for blood pressure measurement 44<br />
2. Other points to note 44<br />
Circumference of arm 44<br />
Heart rhythm malfunctions 44<br />
Frequency of cardiac pacemaker 45<br />
Pregnancy 45<br />
Medicines 45
Contents<br />
E What you should know about blood pressure<br />
1. Systolic and diastolic blood pressure values 46<br />
2. Reasons for measuring different values 46<br />
3. Why you should measure regularly 47<br />
<strong>4.</strong> What are standard values? 47<br />
F Maintenance<br />
1. Battery exchange 48<br />
2. Cleaning and disinfecting 49<br />
3. After-sales service 49<br />
G Appendix<br />
Malfunctions 49<br />
Technical specifications/accessories/replacement parts 51<br />
CE-mark 53<br />
Metrological inspection 54<br />
Manufacturer‘s guarantee 54<br />
english
english<br />
A<br />
GB-32<br />
<br />
<br />
Description of device
Display for systole, diastole, pulse<br />
and control readings<br />
Start/Stop button<br />
Memory button<br />
(memory recall button)<br />
Battery compartment<br />
Cuff<br />
<strong>visomat</strong> ® handy IV:<br />
Digital display unit with electronic<br />
pump for measurement of blood<br />
pressure on the wrist.<br />
A<br />
Check display symbols<br />
No.30 Memory data (No. of measurement)<br />
A 13 Average No. of stored data<br />
Pulse rate mark<br />
SYS Systole<br />
DIA Diastole<br />
PUL Pulse<br />
Battery exchange<br />
Inflation / Deflation<br />
GB-33<br />
english
english<br />
B<br />
Please read detailed instructions prior to first<br />
measurement! (Page 37)<br />
1. Insert batteries<br />
(2 x 1.5 V alcaline-mangane batteries)<br />
2. Fitting the cuff<br />
Bare your left wrist. With the palm of your<br />
left hand up, put the cuff on your wrist so<br />
that the main body is on the same side as<br />
your palm. Adjust the cuff, with your palm<br />
up, until its edge is positioned 5 to 10 mm<br />
(1/2 to 1/1 in.) from the lowest part of<br />
your palm (Fig.1).<br />
Fasten the cuff around your wrist so that<br />
there is no space between the cuff and<br />
GB-34<br />
Brief instructions for use<br />
your wrist. The cuff should fit snugly.<br />
Stretch your left arm out and rest it on the<br />
table with your palm facing upwards (Fig.<br />
2). Keep your arm still, and do not talk.<br />
Press the surface of the cuff to make sure<br />
that it is attached securely.<br />
Fig.1<br />
Fig.2
Brief instructions for use B<br />
3. Pumping up the cuff<br />
Press the “Start/Stop” button.<br />
The machine will carry out a function test,<br />
and all display elements will be visible.<br />
The cuff will be pumped up automatically<br />
to about 190 mmHg. If the pressure in<br />
the cuff is still too low, the machine will<br />
continue to pump it up in steps of about<br />
30 mmHg at a time.<br />
<strong>4.</strong> Blood pressure measurement<br />
After inflation, the air escapes automatically,<br />
the falling pressure in the cuff will be<br />
shown automatically, and the “-symbol”<br />
will flash and beep.<br />
No.<br />
GB-35<br />
english
english<br />
B<br />
The automatic release of the air from the<br />
cuff will show the end of the measuring<br />
cycle. The systolic and diastolic blood<br />
pressure readings will appear in the display<br />
alternating in time with your pulse.<br />
5. Switching the machine off<br />
Press the Start/Stop button. The readings<br />
will be stored in the memory automatically.<br />
GB-36<br />
Brief instructions for use
Display unit operation C<br />
1. Setting up the display unit<br />
Load enclosed batteries, if this has not<br />
already been done (see “Battery exchange”).<br />
2. Fitting the cuff<br />
Bare your left wrist.<br />
Left-handed users can fit the cuff to their<br />
right arm (observing the general sense of<br />
instructions). With the palm of your left<br />
hand up, put the cuff on your wrist so that<br />
the main body is on the same side as your<br />
palm. Adjust the cuff, with your palm up,<br />
until its edge is positioned 5 to 10 mm<br />
(1/4 to 1/2 in.) from the lowest part of<br />
your palm. Fasten the cuff around your<br />
wrist so that there is no space between<br />
the cuff and your wrist. The cuff should fit<br />
snugly. The cuff sensor underside should<br />
now lie directly on your pulse. Press the<br />
surface of the cuff to make sure that it is<br />
attached securely. With its improved shape<br />
the cuff fits tightly to prevent measurement<br />
failures.<br />
GB-37<br />
english
english<br />
C<br />
3. Correct posture of device<br />
3 postures for measurement are possible:<br />
1. Stretch your left arm out and rest it on<br />
the table with your palm facing upwards.<br />
Bend the arm to the same height as your<br />
heart.<br />
2. If you once do not measure at a table,<br />
you can measure in a posture as follows:<br />
After pressing the Start/Stop button lay<br />
our arm on your body so that the cuff is at<br />
the same height as your heart. In order to<br />
relieve the left arm you can rest it on your<br />
right arm. Do not move until measurement<br />
has finished.<br />
GB-38<br />
Display unit operation
Display unit operation C<br />
3. Making a Measurement in Lying<br />
Lie on your back. Adjust the cuff to the<br />
same height as your heart (e.g. with a<br />
pillow).<br />
Breathe deeply 5 or 6 times to relax before<br />
measurement.<br />
Measured data may differ very slightly<br />
depending on the posture during measurement.<br />
Keep your arm still, and do not talk.<br />
Correct measurements can only be<br />
achieved when the cuff is adjusted at<br />
the same height as your heart. If the<br />
cuff is lower (higher) in position than<br />
the heart, the measured reading tends<br />
to become larger (smaller).<br />
GB-39<br />
english
english<br />
C<br />
<strong>4.</strong> Inflating the cuff<br />
Press the Start/Stop button. The machine<br />
will carry out a function test, and all<br />
display elements will be visible. First the<br />
display shows an arrow down, then “0”<br />
and the cuff will be pumped up automatically<br />
to about 190 mmHg. If the pressure<br />
in the cuff is too low, the machine will<br />
continue to pump it up in steps of 30<br />
mmHg at a time.<br />
Inflating the cuff and measuring can be<br />
stopped at any time by pressing the Start/<br />
Stop button again.<br />
To manually control pressurization, hold<br />
down the Start/Stop button immediately<br />
after the start of inflation and release it<br />
GB-40<br />
No.<br />
Display unit operation
Display unit operation C<br />
when the pressure reaches the level<br />
30 mmHg higher than the expected<br />
maximum systolic pressure. If the pressure<br />
value has exceeded 190 mmHg, the inflation<br />
will stop when the key is released.<br />
Pressure can be increased to approximately<br />
300 mmHg.<br />
Attention:<br />
Do not inflate the cuff if it is not fitted<br />
to your arm.<br />
GB-41<br />
english
english<br />
C<br />
5. Blood pressure measurement<br />
Once the necessary pressure in the cuff<br />
is reached, the pump stops and the air<br />
escapes automatically. The falling cuff<br />
pressure appears in the display.<br />
After a short time, the symbol “” flashes<br />
in time with your pulse. At the end of the<br />
measurement the remaining air escapes<br />
automatically from the cuff. The display<br />
unit than shows the measured value of the<br />
blood pressure alternating in time with the<br />
pulse speed. When a new measurement is<br />
started, or the device is switched off, the<br />
values of systolic and diastolic blood pressure<br />
are automatically memorized.<br />
GB-42<br />
Display unit operation<br />
Enter the memorised value in your<br />
blood pressure chart. This will provide<br />
you with an overview of your blood<br />
pressure situation for a longer period,<br />
which you can discuss with your doctor<br />
if necessary.
Display unit operation C<br />
Please wait 3 minutes before taking a<br />
new measurement.<br />
6. Memory recall<br />
The device is equipped with a memory<br />
which is able to show the last 30 values<br />
of the blood pressure and pulse measurements<br />
as well as an average value.<br />
When the memory button is pressed, the<br />
average value appears first (as far as 2 values<br />
are stored). When the memory button<br />
is pressed again the last measured value<br />
(no. 1) appears. After pressing the button<br />
a third time the second latest memory (no.<br />
2) appears, and so on.<br />
With this procedure all 30 memories can<br />
be recalled. Finally, another pressing of the<br />
memory button recalls the average of all<br />
measured values.<br />
After the 30th measurement, the oldest<br />
measurement will be deleted and the<br />
latest measured value will be memorised.<br />
7. Memory deletion<br />
Single memorized values can be deleted<br />
when the memory button is pressed several<br />
times until the wanted value appears .<br />
When the button is pressed 4 seconds the<br />
value will be deleted. To delete the complete<br />
storage the memory button must be<br />
pressed until the display is blank (7-8 sec).<br />
GB-43<br />
english
english<br />
D<br />
When the data on the display flashes the<br />
deletion was not completed and has to be<br />
repeated.<br />
1. Basic rules for blood pressure<br />
measurement<br />
• The measurement must be carried out<br />
whilst you are relaxed. Walking or going<br />
upstairs increases the blood pressure.<br />
Please wait at least 5 minutes until your<br />
pulse rate has returned to normal.<br />
• Check the blood pressure twice a day – in<br />
the morning after getting up and in the<br />
evening after work when you are relaxed.<br />
• To carry out the measurement, sit down<br />
GB-44<br />
Important information<br />
at your dining table. This ensures that the<br />
cuff is kept at heart level.<br />
• Perform the measurement on your bare<br />
arm to reach exact values.<br />
• Do not move the arm while wearing the<br />
cuff.<br />
• Please wait at least 3 minutes between<br />
successive measurements in order to avoid<br />
measurement errors.<br />
2. Other points to note<br />
• Circumference of arm<br />
The cuff is made to fit an arm<br />
circumference of 12.5–21.5 cm.
Important information<br />
• Heart rhythm malfunctions<br />
False results can be obtained if you are<br />
suffering from heart rhythm malfunctions<br />
or arrhythmia. Pay attention to regular<br />
beeps during measurement.<br />
• Frequency of cardiac pacemaker<br />
The pulse frequency display is not suitable<br />
for checking the frequency of cardiac<br />
pacemakers.<br />
• Pregnancy<br />
During pregnancy blood pressure measurement<br />
should not be performed without<br />
prior consultation of your doctor since the<br />
pregnancy might affect the blood pressure<br />
levels.<br />
D<br />
• Medicines<br />
If you are taking blood-thinning/anti-coagulating<br />
drugs (clot prevention) you should<br />
only make a measurement after consulting<br />
your doctor.<br />
Measuring your own blood<br />
pressure is not the same as treatment!<br />
Do not change any drug dosage determined<br />
by your doctor.<br />
GB-45<br />
english
english<br />
E<br />
1. Systolic and diastolic blood<br />
pressure values<br />
The cardio vascular system has the important<br />
function of supplying all organs and<br />
tissue in the body with sufficient blood<br />
and of eliminating the products of metabolism.<br />
The heart contracts and relaxes in<br />
a regular rhythm around 60–80 times per<br />
minute. The pressure of the blood applied<br />
to the artery walls during contraction of<br />
the heart is described as systole. The<br />
pressure in the subsequent relaxed phase,<br />
when the heart fills up with blood again,<br />
is described as diastole. You determine<br />
both values in your daily measurements.<br />
GB-46<br />
What you should know about blood pressure<br />
2. Reasons for measuring different<br />
values<br />
Our blood pressure reacts like a sensitive<br />
measurement instrument to external and<br />
internal influences. Even slights alterations<br />
can have an effect. This explains why<br />
measurements taken at your doctor’s or<br />
chemist’s are often higher than those<br />
taken at home. But also such factors as<br />
weather changes, change of climate,<br />
physical and mental stress can affect the<br />
measurements.
What you should know about blood pressure E<br />
3. Why you should measure regularly?<br />
Even the time of day has an influence on<br />
your blood pressure. During the day the<br />
values are generally higher than during the<br />
period of relaxation at night. One-off and<br />
irregular measurements therefore say little<br />
about your daily blood pressure. A reliable<br />
assessment is possible only when measurements<br />
are taken regularly. Speak to your<br />
doctor about the results.<br />
<strong>4.</strong> What are standard values?<br />
The World Health Organization (WHO)<br />
has drawn up the following overview for<br />
assessing blood pressure values:<br />
High blood<br />
pressure<br />
systolic pressure<br />
≥140*<br />
and/or**<br />
diastolic pressure<br />
≥90<br />
Borderline Normal<br />
pressure<br />
systolic pressure<br />
120–139<br />
diastolic pressure<br />
80–89<br />
systolic pressure<br />
≤119<br />
diastolic pressure<br />
≤79<br />
* mmHg = Millimetres of hydragyrum (mercury)<br />
** It suffices for one of the values to be raised<br />
2003<br />
GB-47<br />
english
english<br />
F<br />
1. Battery exchange<br />
• Open battery compartment<br />
Open the cover on the side of the device<br />
by applying light pressure and pushing in<br />
the direction of the arrow.<br />
• Insert batteries<br />
Remove the old batteries from the display<br />
unit and insert the new ones. Make sure<br />
that the polarity is correct (marks inside of<br />
the battery compartment).<br />
• Close battery compartment<br />
Close the battery compartment by replacing<br />
the cover.<br />
GB-48<br />
Maintenance<br />
• Please note:<br />
Replace the batteries when:<br />
– The battery replacement indication<br />
appears on the display.<br />
– Nothing is displayed even if the power<br />
button is depressed.<br />
Always exchange both batteries. Use only<br />
high quality batteries as indicated in the<br />
technical specifications.<br />
If the display unit is not going to be used<br />
for a longer period, remove the batteries<br />
to prevent leakage.<br />
• Dispose of batteries and technical devices<br />
at a recycling point in your<br />
area.
Appendix<br />
2. Cleaning and disinfecting<br />
Clean the display unit only by using a soft,<br />
slightly damp cloth and some detergent.<br />
Stains on the cuff can be removed careful-<br />
ly in the same way.<br />
Please note:<br />
Do not wash or dry-clean the cuff.<br />
3. After-sales service<br />
Any repairs to the display unit may only be<br />
carried out by the manufacturer/ supplier<br />
or by a service centre authorized by UEBE.<br />
Please contact<br />
Uebe Medical GmbH<br />
Zum Ottersberg 9<br />
97877 Wertheim/Germany<br />
Phone: +49 / 93 42 / 92 40 40<br />
Fax: +49 / 93 42 / 92 40 80<br />
E-Mail: info@uebe.com<br />
Internet: www.uebe.de<br />
Malfunctions<br />
G<br />
In rare cases, you may receive no results or<br />
false results of measurements. Your display<br />
unit shows you a code which will help you<br />
to rectify malfunctions (see list on page<br />
50)<br />
GB-49<br />
english
english<br />
G<br />
Malfunctions shown Reasons Corrective Action<br />
Symbol ERR 1 is displayed –<br />
Measurement error<br />
Movement of the arm or body during<br />
the measurement. Do not talk during the<br />
measurement<br />
Appendix<br />
Repeat the measurement. Don’t move the arm and<br />
don’t talk. In case of recurrence please contact our<br />
after-sales service<br />
ERR 2 – inflation error Pump problem Repeat measurement. In case of recurrence please<br />
contact our after-sales service<br />
ERR 3 – deflation error Deflation rate too high or too low, valve<br />
problem<br />
ERR 330 Air pressure exceeds 330 mmHg<br />
Battery problem<br />
No measuring or check displays<br />
on the screen<br />
No battery inserted – Battery incorrectly<br />
inserted – Flat battery<br />
In case of recurrence please contact our after-sales<br />
service<br />
Repeat measurement<br />
Check batteries<br />
Please check battery and replace if necessary<br />
Battery symbol Battery is flat Please check battery and replace if necessary<br />
Faulty measurement values Moving your arm or body<br />
during the measurement.<br />
Repeat the measurement. Don’t move the arm and<br />
don’t talk.<br />
Too low or high position of wrist Repeat measurement with correct posture<br />
Cuff does not fit<br />
Cuff is not put on correctly<br />
Heart rhythm malfunctions during measurement<br />
Check wrist circumference<br />
Repeat measurement<br />
Repeat measurement<br />
Cuff is not pumped Battery is flat Please check battery and replace if necessary.
Appendix<br />
Technical specifications/<br />
accessories/replacement parts<br />
• Display unit type:<br />
Digital display unit with electric pump for<br />
measurement of blood pressure on wrist.<br />
• Measuring system:<br />
Oscillometric determination of systole,<br />
diastole and pulse value<br />
• Reference procedure of clinical<br />
investigation:<br />
Auscultatory measurement<br />
• Display:<br />
LCD-display for 7-digit measuring parameters<br />
and check display<br />
• Memory:<br />
30 measurements (saved automatically)<br />
and the average value<br />
• Measuring range:<br />
Blood pressure measurement:<br />
0–300 mmHg<br />
Pulse measurement:<br />
40–160 pulse/min.<br />
• Error range:<br />
– Blood pressure measurement:<br />
correspond to EN 1060 Part 3<br />
– Pressure measurement: ±3 mmHg<br />
– Pulse measurement: ±5%<br />
• Type of cuff:<br />
Shell-shaped cuff<br />
G<br />
GB-51<br />
english
english<br />
G<br />
• Deflation valve:<br />
Electronically regulated linear valve<br />
• Deflation rate:<br />
average 5,5 mmHg<br />
• Inflating pressure:<br />
Approx. 190 mmHg<br />
• Battery:<br />
– Battery type:<br />
2 x AAA alkaline-manganate block<br />
cell (LR 03) or lithium (FR 03)<br />
– Durability:<br />
More than 600 measurements in 2 years<br />
– Battery check:<br />
Display ” “ means exchange<br />
battery<br />
GB-52<br />
– Automatic power-off:<br />
About 3 minutes after end of<br />
measurement<br />
• Conditions of use:<br />
Temperature between 10–40°C<br />
Humidity 15–90%<br />
• Accessory<br />
Shell-shaped cuff ”Type H4“<br />
(12,5 – 21,5 cm)<br />
Art.No. 2104001<br />
Important:<br />
Use the display unit only<br />
with original cuff Type H<strong>4.</strong><br />
Appendix
Appendix G<br />
CE-mark<br />
This blood pressure display unit corresponds<br />
to the European regulation of EC directive<br />
93/42/EEC on medical devices and bears the<br />
CE-mark “CE 0123”.<br />
Reference procedure of clinical investigation:<br />
auscultatory measurement.<br />
Protection grade against electric<br />
shock: Type BF<br />
note instruction manual<br />
Applied standards:<br />
• EN 1060 Part 1: 1995<br />
Non-invasive sphygmomanometers<br />
Part 1: General requirements<br />
• EN 1060 Part 3: 1997<br />
Non-invasive sphygmomanometers<br />
Part 3: Supplementary requirements for<br />
electromechanical blood pressure measuring<br />
systems<br />
• prEN 1060-4: 2002<br />
Non-invasive sphygmomanometers (clinically<br />
validated)<br />
• EN 60601-1:1990<br />
+A1:1993<br />
+A2:1995<br />
1. Medical electrical devices<br />
2. General commitment for safety<br />
• EN 60601-1-2:2001<br />
Medical electrical devices<br />
Electromagnetic tolerance<br />
GB-53<br />
english
english<br />
G<br />
Producer UEBE Medical GmbH<br />
Zum Ottersberg 9<br />
97877 Wertheim/Germany<br />
Metrological inspection<br />
(for professional users)<br />
A metrological inspection corresponding to<br />
the “Regulations for the Retail of Medical<br />
Products” should be carried out every two<br />
years either by Uebe Medical GmbH, a public<br />
authority responsible for weights and measures<br />
or by an authorised service centre.<br />
On request, the responsible authority or<br />
maintenance service will be sent a copy of<br />
the “Instructions for metrological inspections”<br />
by the manufacturer.<br />
GB-54<br />
Appendix<br />
Manufacturer’s guarantee<br />
The equipment was manufactured and tested<br />
with great care. However, in the unlikely<br />
event of a defect being detected after delivery,<br />
we are prepared to give a guarantee in<br />
accordance with the following conditions:<br />
1. During the guarantee period of 3 years<br />
from the date of purchase, we reserve the<br />
right to either repair any such defect at<br />
our expense or supply a perfect replacement<br />
unit (in any case the defective equipment<br />
must be returned to our factory).<br />
2. Excluded from the guarantee are parts<br />
subject to normal wear and tear as well<br />
as damage caused by non-compliance<br />
with the operating instructions, improper
Appendix<br />
handling (for example: unsuitable supply<br />
mains, breakages, leaking batteries) and/or<br />
dismantling of the unit by the purchaser.<br />
Furthermore, no claims for damages<br />
against us can be justified through the<br />
guarantee.<br />
3. Claims under the guarantee can only be<br />
made during the guarantee period by<br />
presentation of the purchase receipt.<br />
In the case of claim under the guarantee,<br />
the equipment together with the purchase<br />
receipt and a written justification of the<br />
claim are to be sent to UEBE Medical<br />
GmbH, Service-Center, Zum Schlag 18,<br />
97877 Wertheim, Germany.<br />
G<br />
<strong>4.</strong> In the case of defectiveness of the goods,<br />
the contractual rights of the purchaser<br />
to claim against the supplier/salesman in<br />
accordance with § 437 BGB (The German<br />
Civil Code) are not limited by the guarantee.<br />
Please note:<br />
In a warranty case, please return the entire<br />
unit together with the sales slip.<br />
GB-55<br />
english
français<br />
Sommaire<br />
Descriptif de l’appareil/Indications de contrôle 57<br />
A Bref descriptif des mesures<br />
1. Insertion des piles 58<br />
2. Application de l’appareil 58<br />
3. Gonflage du brassard 59<br />
<strong>4.</strong> Mesure de la tension artérielle 59<br />
5. Eteindre l‘appareil 60<br />
6. Rappel des valeurs mémorisées 61<br />
7. Effacer les valeurs mémorisées 61<br />
B Remarques importantes<br />
1. Règles de base pour la mesure de la tension artérielle 63<br />
2. Autres remarques 64<br />
C Annexe 65<br />
Service client 65<br />
Garantie du fabricant 65
Brassard pour<br />
poignet<br />
Couvercle du<br />
boîtier à piles<br />
Descriptif de l’appareil<br />
Affichage systole,<br />
diastole et pouls,<br />
affichage de contrôle<br />
Touche Start/Stop<br />
Touche mémoire<br />
(rappel des<br />
données enregistrées)<br />
F-57<br />
français
français<br />
A<br />
Avant de procéder à la première mesure,<br />
nous vous prions de lire attentivement et<br />
entièrement le mode d’emploi!.<br />
1. Insertion des piles<br />
2. Application de l’appareil<br />
F-58<br />
Dégager le poignet gauche<br />
Enfiler le brassard jusqu’au poignet.<br />
Maintenir une distance d’environ 1 cm<br />
(Fig. 1) entre le bord supérieur du brassard<br />
et la paume de la main.<br />
Fermer le brassard.<br />
Maintenir l’appareil à la hauteur du coeur<br />
(Fig. 2). Immobiliser le bras et ne pas<br />
parler.<br />
Bref descriptif des mesures<br />
Fig. 1<br />
Fig. 2
Bref descriptif des mesures A<br />
3. Gonflage du brassard<br />
Appuyer sur la touche « Start/Stop ».<br />
L’appareil effectue un test de fonction,<br />
toutes les données affichables apparaissent<br />
sur l’écran. Le gonflage du brassard<br />
s’effectue automatiquement jusqu’à une<br />
pression de 190 mmHg. Au cas où la<br />
pression du brassard serait insuffisante,<br />
l’appareil augmente automatiquement la<br />
pression au pas de 30 mmHg environ.<br />
<strong>4.</strong> Mesure de la tension artérielle<br />
Une fois le gonflage terminé, l’air se<br />
dégage automatiquement, la valeur de la<br />
pression descendante du brassard apparaît<br />
sur l’affichage et le symbole „“ clignote<br />
et donne un signal sonore.<br />
No.<br />
F-59<br />
français
français<br />
A<br />
Le dégonflage automatique du brassard<br />
signale la fin de la mesure.<br />
En alternance avec la fréquence des pulsations<br />
cardiaques, les valeurs de tension<br />
artérielle systolique et diastolique apparaissent<br />
sur l’écran<br />
5. Eteindre l’appareil<br />
F-60<br />
Appuyer sur la touche Start/Stop.<br />
Les valeurs qui viennent d’être mesurées<br />
sont mémorisées automatiquement.<br />
Bref descriptif des mesures
Bref descriptif des mesures<br />
6. Rappel des valeurs mémorisées<br />
L’appareil est équipé d’une mémoire qui<br />
permet de rappeler et de visualiser les 30<br />
dernières valeurs de tension artérielle ainsi<br />
que la valeur moyenne.<br />
En appuyant sur la touche « Memory » la<br />
valeur moyenne apparaît sur l’écran dès<br />
que deux valeurs mesurées ont été mises<br />
en mémoire auparavant. En appuyant<br />
encore une fois sur la touche, la dernière<br />
valeur mesurée apparaît sur l’écran. En<br />
appuyant de nouveau sur la touche<br />
«Memory» la dernière valeur mémorisée<br />
apparaît sur l’écran. De cette manière il<br />
est possible de faire apparaître sur l’écran<br />
toutes les valeurs mémorisées, 30 au total.<br />
Reportez les valeurs mémorisées dans votre<br />
carnet de tension artérielle. De cette manière<br />
vous disposez d’une documentation<br />
de vos valeurs de tension artérielle sur une<br />
plus grand période, que vous pourrez, le cas<br />
échant, présenter à votre médecin traitant.<br />
En appuyant de nouveau sur la touche<br />
«Memory» la valeur moyenne de toutes<br />
les mesures apparaît sur l’écran.<br />
A<br />
Avant de répéter une mesure, nous conseillons<br />
d’attendre environ trois minutes pour<br />
permettre une normalisation de la circulation<br />
sanguine dans votre bras.<br />
F-61<br />
français
français<br />
A<br />
7. Effacer les valeurs mémorisées<br />
F-62<br />
Pour effacer certaines valeurs, appuyez plusieurs<br />
fois sur la touche «Memory» jusqu’à<br />
ce que la valeur désirée apparaisse puis<br />
effacer la valeur en maintenant la touche<br />
appuyée pendant 4 secondes. Pour effacer<br />
toute la mémoire appuyez pendant une<br />
durée d’environ 7-8 secondes sur la touche<br />
«Memory». Se l’affichage clignote, c’est que<br />
la mémoire n’a pas été effacée dans sa totalité.<br />
Dans ce cas répétez tout le procéssus.<br />
Bref descriptif des mesures<br />
Avertissement:<br />
Les piles vides et les appareils techniques<br />
ne doivent pas être jetés avec les ordures<br />
ménagères. Merci de les considérer<br />
comme des déchets toxiques.
Remarques importantes B<br />
1. Règles de base pour la mesure<br />
de la tension artérielle<br />
• La mesure de la tension artérielle doit être<br />
effectuée au repos. Marcher ou monter les<br />
escaliers fait monter la tension artérielle.<br />
Attendez au moins 5 minutes pour permettre<br />
à votre circulation de se stabiliser.<br />
• Contrôlez votre tension artérielle deux fois<br />
par jour – le matin après le lever et le soir<br />
lorsque vous êtes reposé de votre journée<br />
de travail.<br />
• Il est préférable d’effectuer la prise de<br />
tension en position assise. Pour cela asseyez-vous<br />
sur une chaise près d’une table<br />
(en aucun cas sur un canapé en général<br />
trop bas) et maintenez votre poignet à la<br />
hauteur du cœur.<br />
• Pour être sûr d’obtenir des mesures exactes,<br />
ôtez votre montre ou vos bijoux et<br />
appliquez l’appareil sur le poignet nu.<br />
• Pendant le laps de temps nécessaire à la<br />
mesure, le poignet sur lequel se trouve<br />
l’appareil doit être maintenu immobile afin<br />
d’éviter des impulsions étrangères susceptibles<br />
de fausser la mesure. Ne parlez pas<br />
pendant la mesure.<br />
• Entre plusieurs mesures consécutives il est<br />
nécessaire d’observer une pause de trois<br />
minutes environ pour éviter d’obtenir des<br />
résultats erronés.<br />
F-63<br />
français
français<br />
B<br />
2. Autres remarques<br />
• Circonférence du bras<br />
Le brassard est calculé pour une circonférence<br />
du poignet entre 12,5 et 21,5 cm.<br />
• Perturbations de rythme cardiaque<br />
Si vous souffrez de perturbations cardiaques<br />
ou bien d’arythmie, cela peut fausser le<br />
résultat des mesures. Faites attention à des<br />
pépiements réguliers durant la mesure. Dans<br />
ce cas, nous vous conseillons de consulter<br />
votre médecin traitant avant de mesurer<br />
votre tension artérielle par vous-même.<br />
• Fréquence du stimulateur cardiaque<br />
L’indication de la fréquence du pouls n’est<br />
pas adéquate pour le contrôle de la fréquence<br />
des stimulateurs cardiaques.<br />
F-64<br />
Remarques importantes<br />
• Grossesse<br />
Une grossesse peut entraîner une modification<br />
des valeurs de tension artérielle.<br />
C’est pourquoi nous vous conseillons de<br />
consulter votre médecin avant de procéder<br />
au contrôle de la tension artérielle par<br />
vous-même.<br />
• Medicaments<br />
Si vous utilisez des médicaments qui fluidifient<br />
le sang / anticoagulants (formation<br />
d’hématome) consultez votre médecin<br />
traitant avant d’effectuer une mesure.<br />
L’autocontrôle de la tension artérielle ne<br />
signifie pas thérapie! Ne modifiez en aucun<br />
cas le dosage des médicaments prescrits par<br />
votre médecin traitant.
français<br />
Annexe C<br />
Service client<br />
Une réparation éventuelle de l’appareil ne<br />
doit être effectuée que par le fabricant luimême<br />
ou bien l’un des représentants agrées.<br />
Dans ce cas veuillez vous adresser à:<br />
Uebe Medical GmbH<br />
Zum Otterberg 9<br />
97877 Wertheim/Germany<br />
Téléphone : + 49 / 93 42 / 92 40 40<br />
Télécopie : + 49 / 93 42 / 92 40 80<br />
Email : info@uebe.com<br />
Internet : www.uebe.de<br />
Garantie du fabricant<br />
L’appareil a été fabriqué et contrôlé avec<br />
le plus grand soin. Cependant, pour le cas<br />
d’une constatation de vice à la livraison,<br />
nous accordons une garantie aux conditions<br />
suivantes:<br />
1. Pendant la période de garantie de 3 ans à<br />
partir de la date d’achat, nous corrigeons<br />
de tels vices à notre convenance et à nos<br />
frais soit en effectuant une réparation<br />
(après retour de la marchandise en usine)<br />
soit par livraison d’un appareil de rechange<br />
en état de marche.<br />
2. La garantie ne couvre pas l’usure des<br />
pièces soumises à l’usure ni les dommages<br />
causés par un non respect du mode<br />
F-65<br />
français
français<br />
C<br />
F-66<br />
d’emploi, par un maniement non adéquat<br />
(par exemple alimentation électrique non<br />
appropriée, cassure, piles non étanches)<br />
et/ou par un démontage de l’appareil effectué<br />
par l’acheteur. En outre la garantie<br />
ne justifie aucune réclamation de dommages<br />
et intérêts.<br />
3. Les réclamations sous garantie ne sont<br />
valables que pendant la période de<br />
garantie et sur présentation du bon<br />
d’achat. En cas de réclamation sous<br />
garantie, retourner l’appareil accompagné<br />
du bon d’achat ainsi que d’une description<br />
du vice à l’adresse suivante: UEBE Medical<br />
GmbH, Service-Center, Zum Schlag 18,<br />
97877 Wertheim, Germany.<br />
Annexe<br />
<strong>4.</strong> En cas de réclamation pour vice, les droits<br />
contractuels de acheteur contre le vendeur<br />
conformément à l’article 437 du Code<br />
Civil allemand ne sont pas restreints par la<br />
garantie.<br />
Remarque:<br />
Pour une réclamation sous garantie<br />
n’oubliez pas de joindre la bon<br />
d‘achat.
Indice<br />
Descrizione dello strumento/Indicazioni per il controllo 68<br />
A Come missura la pressione: breve descrizione<br />
1. Inserire le pile 69<br />
2. Applicazione dello strumento al polso 69<br />
3. Gonfiaggio del bracciale 70<br />
<strong>4.</strong> Misurazione della pressione 70<br />
5. Spegnimento dello strumento 71<br />
6. Richiamo della memoria dei valori misurati 72<br />
7. Cancellazione della memoria dei valori misurati 73<br />
B Avvertenze importanti<br />
1. Regole principali per la misurazione della pressione 74<br />
2. Ulteriori fattori da osservare 75<br />
C Allegato<br />
Assistenza clienti 76<br />
Garanzia del produttore 76<br />
I-67<br />
Italiano
italiano<br />
I-68<br />
Bracciale<br />
gonfiabile<br />
Coperchio del<br />
vano batterie<br />
Descrizione dello strumento/Indicazioni per il controllo<br />
Indicazioni per valori<br />
sistolici, diastolici,<br />
polso, controllo<br />
Pulsante di accensione/spegnimento<br />
Start/Stop<br />
Pulsante Memory<br />
(richiamo della memoria)
Come missura la pressione: breve descrizione<br />
Per un impiego corretto dello strumento, vi<br />
preghiamo di leggere attentamente le istruzioni<br />
per l’uso prima di effettuare la prima<br />
misurazione.<br />
1. Inserire le pile<br />
2. Applicazione dello strumento al polso<br />
Scoprire il polso sinistro.<br />
Avvolgere lo strumento al polso.<br />
Mantenere una distanza di ca. 1 cm (Fig. 1)<br />
tra il bordo superiore del bracciale ed il<br />
palmo della mano.<br />
Chiudere il bracciale.<br />
Mantenere lo strumento all’altezza del<br />
cuore (Fig. 2).<br />
Tenere immobile il braccio, non parlare.<br />
Fig. 1<br />
Fig. 2<br />
A<br />
I-69<br />
italiano
italiano<br />
A<br />
3. Gonfiaggio del bracciale<br />
I-70<br />
Premete il pulsante di accensione Start/<br />
Stop. Lo strumento esegue un test delle<br />
funzioni utilizzate e tutti gli elementi di indicazione<br />
vengono visualizzati sul display.<br />
Il bracciale si gonfia automaticamente<br />
sino a raggiungere una pressione di 190<br />
mmHg. Qualora la pressione all’interno del<br />
bracciale non fosse sufficiente, lo strumento<br />
l’aumenterà automaticamente ad<br />
intervalli di circa 30 mmHg.<br />
<strong>4.</strong> Misurazione della pressione<br />
Una volta che il bracciale si è gonfiato<br />
sufficientemente, l’aria fuoriesce automaticamente<br />
ed il display visualizza la diminu-<br />
No.<br />
Breve descrizione
Breve descrizione<br />
zione della pressione facendo lampeggiare<br />
il simbolo „“ e si sente un segnale<br />
acustico..<br />
Lo sgonfiamento automatico del bracciale<br />
segnala la fine della misurazione. Sul<br />
display vengono visualizzati alternativamente<br />
i valori della pressione arteriosa<br />
massima (sistolica) e minima (diastolica) e<br />
la frequenza del polso.<br />
5. Spegnimento dello strumento<br />
Premete il pulsante di accensione/spegnimento<br />
Start/Stop. I valori misurati vengono<br />
memorizzati automaticamente.<br />
A<br />
I-71<br />
italiano
italiano<br />
A<br />
6. Richiamo della memoria dei valori<br />
misurati<br />
I-72<br />
L‘apparecchio è dotato di una memoria<br />
dei valori misurati che consente di visualizzare<br />
gli ultimi trenta valori pressori misurati<br />
per ultimi ed il valore intermedio (media).<br />
Premendo il tasto Memory sul display<br />
compare il valore intermedio se sono già<br />
stati rilevati due valori misurati. Premendo<br />
nuovamente il tasto si richiama il valore<br />
misurato per ultimo. Premendo ancora,<br />
ogni volta compare il valore misurato precedentemente.<br />
In questo modo è possibile<br />
richiamare tutti i trenta valori misurati. Se<br />
il tasto viene nuovamente premuto, compare<br />
la media di tutte le misurazioni.<br />
Breve descrizione<br />
Riportate i valori memorizzati<br />
nell’apposito libretto per il controllo<br />
della pressione. In questo modo<br />
disporrete di un quadro generale della<br />
pressione che potrete eventualmente<br />
discutere con il vostro medico di<br />
fiducia.
Breve descrizione A<br />
7. Cancellazione della memoria dei valori<br />
misurati<br />
Per cancellare singoli valori misurati,<br />
richiamate il valore desiderato premendo<br />
ripetutamente il tasto Memory quindi<br />
tenete premuto il tasto per 4 secondi. Per<br />
cancellare l‘intera memoria, premete il<br />
tasto Memory e tenetelo premuto per 7-8<br />
secondi.<br />
Se la visualizzazione a display lampeggia,<br />
significa che la cancellazione non è conclusa<br />
e deve essere ripetuta.<br />
Prima di ripetere una misurazione è<br />
necessario attendere tre minuti per<br />
consentire alla circolazione del braccio<br />
di normalizzarsi.<br />
Attenzione:<br />
le batterie e apparecchi elettrici<br />
non devono essere smaltite insieme<br />
all‘immondizia domestica, bensì dovranno<br />
essere riconsegnate al produttore,<br />
al negoziante o ad altri enti preposti.<br />
I-73<br />
italiano
italiano<br />
B<br />
1. Regole principali per la misurazione<br />
della pressione<br />
• La misurazione deve essere eseguita in<br />
assoluta tranquillità. Camminare o salire<br />
le scale aumenta la pressione sanguigna.<br />
Attendete almeno 5 minuti per consentire<br />
alla vostra circolazione di stabilizzarsi.<br />
• Controllate la pressione due volte al giorno,<br />
cioè al mattino appena alzati e la sera,<br />
quando siete rilassati.<br />
• La pressione deve essere misurata stando<br />
seduti. Per effettuare la misurazione,<br />
sedetevi ad un tavolo da pranzo sufficientemente<br />
alto, non al tavolino da salotto,<br />
e tenete sempre il polso all’altezza del<br />
cuore.<br />
I-74<br />
Avvertenze importanti<br />
• Per ottenere valori assolutamente esatti,<br />
toglietevi l’orologio o eventuali gioielli ed<br />
effettuate la misurazione sul polso nudo.<br />
• Durante la misurazione, il braccio con lo<br />
strumento deve restare completamente<br />
immobile per evitare qualsiasi interferenza<br />
con la rilevazione. Non parlate durante la<br />
misurazione.<br />
• Tra diverse misurazioni consecutive si deve<br />
sempre osservare una pausa di circa 3 minuti<br />
per evitare di ottenere risultati errati.
Avvertenze importanti<br />
2. Ulteriori fattori da osservare<br />
• Circonferenza del braccio<br />
Il bracciale gonfiabile è idoneo ad una<br />
circonferenza del polso compresa tra<br />
12,5–21,5 cm.<br />
• Disturbi cardiaci<br />
Disturbi cardiaci o aritmie possono alterare<br />
i risultati della misurazione, pertanto vi<br />
consigliamo di consultare il vostro medico<br />
curante prima di procedere alla misurazione.<br />
Durante la misurazione, i segnali<br />
acustici devono essere uniformi.<br />
• Frequenza dei pace-maker<br />
L’indicazione della frequenza del polso non<br />
è idonea al controllo della frequenza dei<br />
pace-maker (stimolatori cardiaci).<br />
• Gravidanza<br />
In gravidanza, la misurazione della pressione<br />
sanguigna deve essere eseguita sotto il<br />
controllo del medico, poiché nel periodo<br />
di gestazione i valori di pressione possono<br />
variare.<br />
Misurare da soli la pressione<br />
non vuol dire seguire una terapia!<br />
Non modificate in nessun caso i<br />
dosaggi di eventuali farmaci prescritti<br />
dal vostro medico.<br />
B<br />
• Farmaci<br />
Se si assumono sostanze emodiluenti/anticoagulanti<br />
(formazione di ematomi),<br />
effettuare la misurazione solo dietro consultazione<br />
del medico curante.<br />
I-75<br />
italiano
italiano<br />
C<br />
Assistenza clienti<br />
Eventuali riparazioni dello strumento possono<br />
essere effettuate unicamente presso il<br />
produttore, il distributore oppure un centro<br />
di assistenza espressamente autorizzato. In<br />
caso di guasto siete pregati di rivolgervi al<br />
seguente indirizzo:<br />
UEBE Medical GmbH<br />
Zum Ottersberg 9<br />
97877 Wertheim/Germany<br />
Tel.-Nr.: +49 / 9342 / 924040<br />
Fax-Nr.: +49 / 9342 / 924080<br />
E-mail: info@uebe.com<br />
Internet: www.uebe.de<br />
I-76<br />
Allegato<br />
Garanzia del produttore<br />
L’apparecchio è stato prodotto e controllato<br />
con la massima precisione. Ciò nonostante,<br />
qualora si riscontrassero vizi al momento<br />
della consegna, viene concessa una garanzia<br />
alle seguenti condizioni:<br />
1. Durante il periodo di garanzia di 3 anni<br />
dalla data di acquisto, i vizi verranno eliminati<br />
a nostra discrezione e a nostre spese<br />
tramite riparazione (l’apparecchio dovrà<br />
essere rispedito alla nostra fabbrica) oppure<br />
tramite sostituzione con un apparecchio<br />
nuovo in perfette condizioni.<br />
2. Dalla garanzia sono esclusi la normale<br />
usura dei componenti usurabili ed i danni<br />
derivanti dall’inosservanza delle istruzioni
Allegato<br />
per l’uso, da un impiego improprio (ad<br />
esempio fonti di energia elettrica non<br />
idonee, rottura, batterie scariche) e/o dallo<br />
smontaggio dell’apparecchio da parte<br />
dell’acquirente. Inoltre, la garanzia non<br />
prevede alcun diritto al risarcimento dei<br />
danni nei nostri confronti.<br />
3. I diritti alla garanzia valgono unicamente<br />
entro il periodo di garanzia e<br />
solo dietro presentazione dello scontrino<br />
di acquisto. In caso di garanzia,<br />
l’apparecchio dovrà essere inviato al<br />
seguente indirizzo unitamente al scontrino<br />
di acquisto ed alla descrizione del reclamo:<br />
UEBE Medical GmbH, Service-Center, Zum<br />
Schlag 18, 97877 Wertheim, Germany.<br />
C<br />
<strong>4.</strong> I diritti di denuncia dei vizi dell’acquirente<br />
nei confronti del venditore derivanti dal<br />
contratto ai sensi del § 437 del codice<br />
civile tedesco non vengono limitati dalla<br />
garanzia.<br />
Nota:<br />
accludere sempre il certificato di garanzia<br />
debitamente compilato in ogni sua parte.<br />
I-77<br />
italiano
español<br />
Tabla de contenido<br />
Descripción del aparato 79<br />
A Breves instrucciones de medición<br />
1. Colocar las pilas 80<br />
2. Colocar el aparato 80<br />
3. Inflado del brazalete 81<br />
<strong>4.</strong> Medir la presión arterial 81<br />
5. Apagar el aparato 82<br />
6. Consultar la memoria de los valores de medición 83<br />
7. Borrar la memoria de los valores de medición 83<br />
B Indicaciones importantes<br />
1. Reglas básicas para medir la presiónarterial 84<br />
2. Lo que ha de observarse además 85<br />
C Apéndice<br />
Servicio postventa 86<br />
Garantía del fabricante 86<br />
E-78
Descripción del aparato<br />
Brazalete<br />
de muñeca<br />
Tapa<br />
de las pilas<br />
Indicadores correspondientes<br />
a sístole y<br />
diástole, pulso,<br />
indicadores de control<br />
Botón de encendido/<br />
parada<br />
Botón de memoria<br />
(botón de recuperación de<br />
la memoria)<br />
E-79<br />
español
español<br />
A<br />
E-80<br />
¡Antes de realizar la primera medición, se<br />
ruega leer detenidamente el manual de<br />
instrucciones!<br />
1. Colocar las pilas<br />
2. Colocar el aparato<br />
Dejar libre la muñeca izquierda. Colocar el<br />
aparato en la muñeca. Distancia desde el<br />
borde superior del brazalete a la palma de<br />
la mano aprox. 1 cm (ilustración 1).<br />
Cerrar el brazalete.<br />
Mantener el aparato a la altura del corazón<br />
(ilustración 2). Mantener quieto el<br />
brazo y no hablar.<br />
Breves instrucciones de medición<br />
Ilu. 1<br />
Ilu. 2
Breves instrucciones de medición A<br />
3. Inflado del brazalete<br />
Pulsar el botón de encendido. El aparato<br />
realizará un ensayo funcional. Quedarán<br />
visibles todos los elementos indicadores. El<br />
inflado del brazalete se efectúa automáticamente<br />
hasta aprox. 190 mmHg. Con<br />
una presión del brazalete demasiado baja,<br />
el aparato aumentará automáticamente la<br />
presión en pasos de unos 30 mmHg.<br />
<strong>4.</strong> Medir la presión arterial<br />
Después de inflar, el aire se evacuará automáticamente,<br />
se indicará la presión del<br />
brazalete que baja y parpadeará el símbolo<br />
„“ e indica una señal acústica.<br />
El deshinchado automático del brazalete<br />
señalará el fin de la medición.<br />
No.<br />
E-81<br />
español
español<br />
A<br />
E-82<br />
En el indicador aparecerán alternativamente<br />
con la frecuencia de pulsaciones<br />
los valores de la presión arterial sistólica y<br />
diastólica.<br />
5. Apagar el aparato<br />
Pulsar el botón de encendido/parada. Los<br />
valores medidos se almacenarán automáticamente.<br />
6. Consultar la memoria de los valores<br />
de medición<br />
El aparato dispone de una memoria para<br />
los valores de medición, la cual permite<br />
visualizar los 30 últimos valores medidos<br />
de la tensión sanguínea y el valor medio<br />
(promedio). Pulsando la tecla Memory<br />
Breves instrucciones de medición<br />
Traspase los valores de memoria a su<br />
cartilla de presión arterial. De esta<br />
forma obtendrá durante un periodo de<br />
tiempo prolongado un resumen de su<br />
situación de presión arterial sobre la<br />
cual, dado el caso, podrá hablar con<br />
su médico.
Breves instrucciones de medición<br />
aparecerá el valor medio, si previamente se<br />
han registrado 2 valores de medición. Una<br />
nueva pulsación visualizará el último valor<br />
medido. Mediante una nueva pulsación<br />
aparecerá el valor de medición anterior.<br />
De esta forma se podrán consultar los 30<br />
valores de medición anteriores. Con una<br />
nueva pulsación de la tecla se visualizará el<br />
valor medio de todas las mediciones.<br />
7. Borrar la memoria de los valores<br />
de medición<br />
Para borrar determinados valores de<br />
medición, seleccionar el valor de medición<br />
deseado pulsando varias veces la<br />
tecla Memory y mantener pulsada la tecla<br />
durante 4 segundos. Para borrar toda la<br />
memoria, pulsar la tecla Memory y mantenerla<br />
pulsada durante 7-8 segundos.<br />
Si el indicador del visualizador destella,<br />
el proceso de borrado no ha concluido y<br />
debe repetirse.<br />
Atención:<br />
Las baterías y dospositivos eléctricos no<br />
deben depositarse en la basura doméstica,<br />
sino que deben devolverse a su<br />
fabricante, vendedor o a sus representantes.<br />
A<br />
Antes de comenzar una nueva medición<br />
repetida, debería esperar durante<br />
tres minutos hasta que se haya nuevamentenormalizado<br />
la circulación de<br />
la sangre en su brazo.<br />
E-83<br />
español
español<br />
B Indicaciones importantes<br />
1. Reglas básicas para medir la presión<br />
arterial<br />
• La medición deberá realizarse en calma.<br />
Andando o subiendo escaleras aumenta la<br />
presión arterial. Espere al menos 5 minutos<br />
hasta que se haya tranquilizada su circulación.<br />
• Controle la presión arterial dos veces al<br />
día; por la mañana después de levantarse<br />
y por la noche cuando se haya relajado<br />
después del trabajo.<br />
• La presión arterial deberá tomarse sentado.<br />
Para efectuar la medición, siéntese en<br />
su mesa (en ningún caso una mesa de sofá<br />
baja) y mantenga la muñeca a la altura del<br />
corazón.<br />
E-84<br />
• Los valores más exactos se obtendrán con<br />
mayor seguridad cuando se haya quitado<br />
el reloj de pulsera o las joyas yefectúe la<br />
medición en la muñeca desnuda.<br />
• Durante la medición no deberá moverse<br />
el brazo con el aparato con el fin de evitar<br />
en todo caso impulsos perturbadores. No<br />
hable durante la medición.<br />
• Siempre deberá guardarse un descanso de<br />
unos 3 minutos entre las mediciones para<br />
evitar mediciones erróneas.
Indicaciones importantes<br />
2. Lo que ha de observarse además:<br />
• Circunferencia del brazo<br />
El brazalete está diseñado para una circunferencia<br />
de muñeca de 12,5 a 21,5 cm.<br />
• Alteraciones del ritmo cardíaco<br />
Si padece de alteraciones del ritmo cardíaco<br />
o de arritmia, pueden producir resultados<br />
de medición incorrectos. Compruebe<br />
que los pitidos durante la medición sean<br />
uniformes.Por esta razón, hable con su<br />
médico antes de que mida su presión<br />
arterial.<br />
• Frecuencia de marcapasos<br />
La indicación de ritmo cardíaco no es<br />
válida para controlar la frecuencia de los<br />
marcapasos.<br />
• Embarazo<br />
Los valores de la presión arterial pueden<br />
variar como consecuencia del embarazo.<br />
Realice un autocontrol de la presión arterial<br />
previa consulta con su médico.<br />
• Medicamentos<br />
Cuando se están tomando fármacos<br />
diluyentes de la sangre/ anticoagulantes<br />
(aparición de hematomas), efectuar la<br />
medición solamente tras consultarlo con<br />
su médico.<br />
La automedición no significa ninguna<br />
terapia. No modifique en ningún caso<br />
la dosis del medicamento prescrita por<br />
el médico.<br />
B<br />
E-85<br />
español
español<br />
C<br />
Servicio postventa<br />
La reparación del aparato sólo podrá ser llevada<br />
a cabo por el fabricante o por un centro<br />
expresamente autorizado para ello.<br />
Rogamos se dirija a:<br />
UEBE Medical GmbH<br />
Zum Ottersberg 9<br />
97877 Wertheim/Germany<br />
Tel.-Nr.: +49 / 93 42 / 92 40 40<br />
Fax-Nr.: +49 / 93 42 / 92 40 80<br />
E-mail: info@uebe.com<br />
Internet: www.uebe.de<br />
E-86<br />
Garantía del fabricante<br />
Apéndice<br />
El aparato ha sido fabricado y revisado<br />
cuidadosamente. En el caso de que a pesar<br />
de ello presentara vicios en el momento de<br />
su entrega, concedemos una garantía en las<br />
siguientes condiciones:<br />
1. Durante el plazo de garantía de 3 años a<br />
partir de la fecha de compra, corregiremos<br />
estos vicios a nuestro criterio y a nuestra<br />
cuenta mediante reparación (después de la<br />
devolución a nuestra fábrica) o sustitución<br />
por un aparato sin vicios.<br />
2. La garantía no comprende el desgaste<br />
normal de las piezas de desgaste ni los<br />
daños que se produzcan por la inobservancia<br />
de las instrucciones de uso, el manejo
Apéndice<br />
inapropiado (p. ej. fuentes de electricidad<br />
inapropiadas, rotura, baterías desgastadas),<br />
y / o por el desmontaje del aparato por<br />
parte del comprador. Además, la garantía<br />
no supone ninguna base para realizar<br />
reclamaciones de indemnización.<br />
3. Los derechos de garantía solamente se<br />
pueden reclamar durante el plazo de<br />
garantía y mediante la presentación<br />
del ticket de compra. En caso de garantía,<br />
enviar el aparato junto con el ticket de<br />
compra y una descripción de la reclamación<br />
a UEBE Medical GmbH, Service-Center,<br />
Zum Schlag 18, 97877 Wertheim, Germany.<br />
<strong>4.</strong> Las reclamaciones contractuales por vicios<br />
del comprador contra el vendedor conforme<br />
al Art. 437 del Código Civil Alemán no<br />
se verán restringidas por la garantía.<br />
Por favor, tenga en cuenta lo siguiente:<br />
En caso de garantía es imprescindible<br />
adjuntar el comprabante de compra.<br />
C<br />
E-87<br />
español
UEBE Art.-Nr. 21040<br />
<strong>visomat</strong> und UEBE <strong>sind</strong> international<br />
geschützte Warenzeichen der<br />
UEBE Medical GmbH<br />
Zum Ottersberg 9<br />
97877 Wertheim/Germany<br />
Phone: + 49 93 42 / 92 40 40<br />
Fax: + 49 93 42 / 92 40 80<br />
E-Mail: info@uebe.com<br />
Internet: www.uebe.de<br />
Technische Änderungen vorbehalten.<br />
© Copyright UEBE Medical GmbH<br />
7 21040 003 A