Untitled
Untitled
Untitled

You also want an ePaper? Increase the reach of your titles
YUMPU automatically turns print PDFs into web optimized ePapers that Google loves.
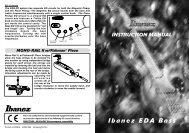
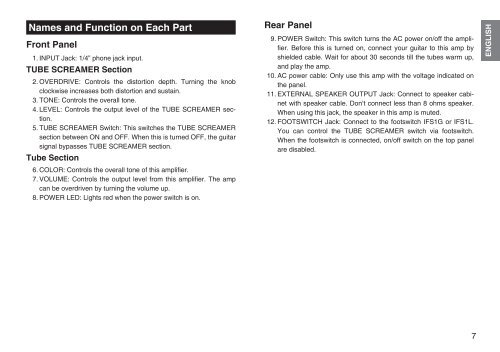
Names and Function on Each Part<br />
Front Panel<br />
1. INPUT Jack: 1/4” phone jack input.<br />
TUBE SCREAMER Section<br />
2. OVERDRIVE: Controls the distortion depth. Turning the knob<br />
clockwise increases both distortion and sustain.<br />
3. TONE: Controls the overall tone.<br />
4. LEVEL: Controls the output level of the TUBE SCREAMER section.<br />
5. TUBE SCREAMER Switch: This switches the TUBE SCREAMER<br />
section between ON and OFF. When this is turned OFF, the guitar<br />
signal bypasses TUBE SCREAMER section.<br />
Tube Section<br />
6. COLOR: Controls the overall tone of this amplifier.<br />
7. VOLUME: Controls the output level from this amplifier. The amp<br />
can be overdriven by turning the volume up.<br />
8. POWER LED: Lights red when the power switch is on.<br />
Rear Panel<br />
9. POWER Switch: This switch turns the AC power on/off the amplifier.<br />
Before this is turned on, connect your guitar to this amp by<br />
shielded cable. Wait for about 30 seconds till the tubes warm up,<br />
and play the amp.<br />
10. AC power cable: Only use this amp with the voltage indicated on<br />
the panel.<br />
11. EXTERNAL SPEAKER OUTPUT Jack: Connect to speaker cabinet<br />
with speaker cable. Don’t connect less than 8 ohms speaker.<br />
When using this jack, the speaker in this amp is muted.<br />
12. FOOTSWITCH Jack: Connect to the footswitch IFS1G or IFS1L.<br />
You can control the TUBE SCREAMER switch via footswitch.<br />
When the footswitch is connected, on/off switch on the top panel<br />
are disabled.<br />
7<br />
ENGLISH