SAUGFIX 3253 - Mesto.de
SAUGFIX 3253 - Mesto.de
SAUGFIX 3253 - Mesto.de

You also want an ePaper? Increase the reach of your titles
YUMPU automatically turns print PDFs into web optimized ePapers that Google loves.
<strong>de</strong>utsch<br />
english<br />
français<br />
Gebrauchsanleitung und Ersatzteile<br />
Operation manual and spare parts list<br />
Instructions <strong>de</strong> service et liste <strong>de</strong> pièces <strong>de</strong><br />
rechange<br />
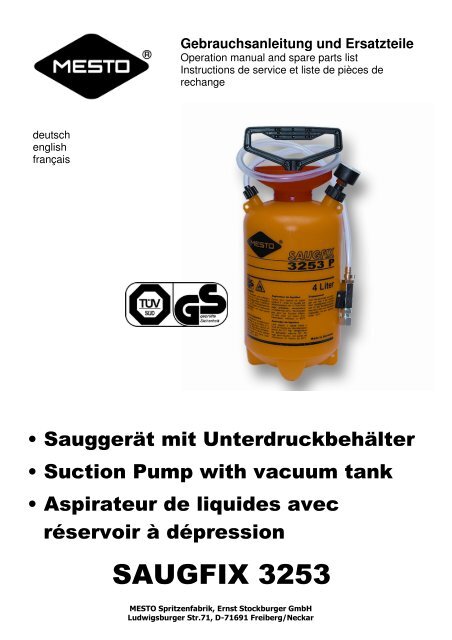
• Sauggerät mit Unterdruckbehälter<br />
• Suction Pump with vacuum tank<br />
• Aspirateur <strong>de</strong> liqui<strong>de</strong>s avec<br />
réservoir à dépression<br />
<strong>SAUGFIX</strong> <strong>3253</strong><br />
MESTO Spritzenfabrik, Ernst Stockburger GmbH<br />
Ludwigsburger Str.71, D-71691 Freiberg/Neckar
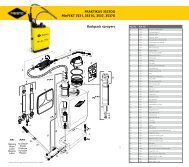
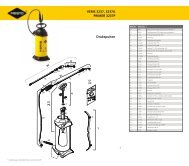
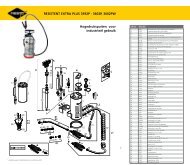
1. Technik<br />
1.1 Technische Daten<br />
Max. Füllmenge 4 l<br />
Max. Betriebsunterdruck - 0,7 bar<br />
Max. Betriebstemperatur 30° C<br />
Leergewicht ca. 1,5 kg<br />
Behälterwerkstoff Hartpolyethylen<br />
Pumpenwerkstoff Polypropylen<br />
Pumpen-Überzugsrohr Messing, weichgelötet<br />
Kennbuchstaben siehe Text "(.)" - Nummern siehe Ersatzteilliste auf Seite 8<br />
1.2 Ausrüstung<br />
• Saugschlauch (S) aus gewebeverstärktem PVC-P, freie Länge 50 cm.<br />
• Kugelabsperrhahn (K) aus Messing, Saugkanüle (SK) 8 mm, aus Polyethylen, 50 cm lang.<br />
2. Verwendung<br />
2.1 Das Gerät <strong>SAUGFIX</strong> ist für das Ansaugen von dünnflüssigem Schmieröl und an<strong>de</strong>ren nicht<br />
aggressiven und nicht leicht entzündlichen Flüssigkeiten bestimmt.<br />
2.2 Das Gerät ist nicht geeignet für<br />
• Flüssigkeiten mit Temperaturen über 30° C.<br />
• Flüssigkeiten, die Gerätewerkstoffe angreifen können.<br />
• Brennbare Flüssigkeiten mit Flammpunkt unter 55° C.<br />
• Sehr zähe, klebrige o<strong>de</strong>r rückstandsbil<strong>de</strong>n<strong>de</strong> Flüssigkeiten, die sich aus <strong>de</strong>m Gerät nicht<br />
restlos ausschütten o<strong>de</strong>r ausspülen lassen.<br />
2.3 Eigenmächtige Verän<strong>de</strong>rungen am Gerät o<strong>de</strong>r nicht bestimmungsgemäße Verwendung<br />
schließen eine Haftung <strong>de</strong>s Herstellers für daraus resultieren<strong>de</strong> Schä<strong>de</strong>n aus.<br />
3. Sicherheitshinweise<br />
3.1 Beim Pumpen wird Luft aus <strong>de</strong>m Behälter nach außen geför<strong>de</strong>rt, die mit Dämpfen vermischt sein<br />
kann. Deshalb beim Umgang mit gefährlichen Flüssigkeiten geeignete Schutzkleidung und<br />
gegebenenfalls Atemschutz tragen. Bei brennbaren Flüssigkeiten, auch solchen mit Flammpunkt<br />
über 55° C, Zündquellen in <strong>de</strong>r Umgebung vermei<strong>de</strong>n und für gute Belüftung <strong>de</strong>s Arbeitsplatzes<br />
sorgen.<br />
3.2 Gerät nur in senkrechter Stellung betreiben und bewegen.<br />
3.3 Beim Pumpen stets Vakuummeter (V) beobachten und zulässigen Unterdruck von - 0,7 bar nicht<br />
überschreiten.<br />
3.4 Beschädigte Geräteteile unverzüglich ersetzen. Dafür nur Originalteile verwen<strong>de</strong>n. Bei allen<br />
Reparatur- und Wartungsarbeiten muss das Gerät leer und drucklos sein.<br />
3.5 Drucktragen<strong>de</strong>, flüssigkeitsführen<strong>de</strong> und Bedienteile sowie Vakuummeter regelmäßig auf<br />
einwandfreien Zustand prüfen. Bei Verdacht auf Schä<strong>de</strong>n Gerät sofort außer Betrieb setzen.<br />
3.6 Gerät niemals längere Zeit mit Unterdruck stehen lassen o<strong>de</strong>r transportieren. Behälter sofort nach<br />
Gebrauch entleeren.<br />
4. Betrieb<br />
4.1 Gerät auf einwandfreien Zustand und Dichtheit überprüfen. Sicherstellen, dass das<br />
Pumpenüberzugsrohr (Ü) auf <strong>de</strong>r Luftpumpe (P) sitzt und bis zum Gewin<strong>de</strong> hochgeschoben ist.<br />
4.2 Kugelhahn (K) ganz schließen - Knebel muß quer stehen. Gerät auf - 0,7 bar Unterdruck pumpen.<br />
4.3 Mündung <strong>de</strong>r Saugkanüle (SK) ganz in die abzusaugen<strong>de</strong> Flüssigkeit tauchen und Kugelhahn<br />
öffnen. Wenn Motorenöl aus Kleinmotoren abgesaugt wer<strong>de</strong>n soll, ist es zweckmäßig, <strong>de</strong>n Motor<br />
etwas in Richtung <strong>de</strong>r Absaugstelle zu neigen. Eine leichte Erwärmung <strong>de</strong>s Öles erleichtert das<br />
Absaugen, jedoch die für das Sauggerät zulässige Höchsttemperatur von 30° C beachten.<br />
4.4 Wenn <strong>de</strong>r vorgepumpte Unterdruck im Gerät nicht ausreicht, kann während <strong>de</strong>s Absaugens<br />
nachgepumpt wer<strong>de</strong>n.<br />
4.5 Achtung ! Maximale Füllmenge <strong>de</strong>s Behälters von 4 l beachten, sonst gelangt beim Pumpen<br />
Flüssigkeit nach außen.<br />
4.6 Pumpe (P) aus <strong>de</strong>m Behälter schrauben und die aufgefangene Flüssigkeit in Sammelgefäß<br />
schütten o<strong>de</strong>r vorschriftsgemäß entsorgen.<br />
6393530 2 0410
5. Wartung und Pflege<br />
5.1 Das Gerät ist nicht zur Aufbewahrung von Flüssigkeiten bestimmt. Deshalb nach je<strong>de</strong>m Gebrauch<br />
entleeren. Bei Verwendung an<strong>de</strong>rer Mittel als Schmieröl, Heizöl o<strong>de</strong>r Dieselöl (siehe Abschnitt 2.),<br />
Gerät nach je<strong>de</strong>m Gebrauch spülen. Wahl und Entsorgung <strong>de</strong>r Spülflüssigkeit richten sich nach<br />
<strong>de</strong>n Vorgaben <strong>de</strong>s Mittelherstellers. Auch beim Spülen die Beständigkeit <strong>de</strong>r Gerätewerkstoffe<br />
beachten.<br />
5.2 Die Lebensdauer <strong>de</strong>r Pumpe wird erheblich verlängert, wenn ab und zu die Pumpenmanschette<br />
(M) mit etwas harz- und säurefreiem Fett geschmiert wird.<br />
5.3 Zum Ausbau <strong>de</strong>r Kolbenstange mit <strong>de</strong>r Manschette (M), Pumpengriff (P) ganz nach oben ziehen,<br />
im Führungsstopfen (F) einrasten und etwa 1/8 Umdrehung entgegen <strong>de</strong>m Uhrzeigersinn drehen.<br />
6. Fehlersuchplan<br />
Fehler Abhilfe<br />
6.1 Im Gerät aufgebauter Unterdruck fällt ab:<br />
Abdichtung entwe<strong>de</strong>r an Vakuummeter, Dichtstellen nachziehen, wenn nötig<br />
zwischen Pumpe und Behälter o<strong>de</strong>r an Dichtungen an Vakuummeter und<br />
Schlauchanschluß nicht in Ordnung Pumpe ersetzen<br />
6.2 Pumpe (P) entwickelt keinen Unterdruck,<br />
Betätigung geht auffallend leicht:<br />
* Kugelhahn (K) nicht geschlossen Hahn ganz schließen<br />
* Manschette (M) <strong>de</strong>fekt Manschette erneuern<br />
* Saugventil (SV) <strong>de</strong>fekt Pumpe o<strong>de</strong>r Saugventil erneuern<br />
* Fremdkörper verhin<strong>de</strong>rt Schließen <strong>de</strong>s Saugventils Ventil reinigen<br />
6.3 Pumpenkolben wird durch Unterdruck nach unten gezogen:<br />
* Saugventil (SV) verklebt Ventil reinigen bzw. tauschen o<strong>de</strong>r<br />
Pumpe erneuern<br />
6.4 Beim Pumpen tritt Flüssigkeit oben aus <strong>de</strong>r Pumpe<br />
in <strong>de</strong>n Auffangtrichter:<br />
* Fassungsvermögen <strong>de</strong>s Behälters überschritten Behälter leeren<br />
* Behälter nicht in senkrechter Lage Behälter senkrecht halten<br />
* Pumpen-Überzugsrohr (Ü) fehlt Überzugsrohr auf Pumpe stecken<br />
* Überzugsrohr (Ü) im unteren Bereich undicht Überzugsrohr erneuern<br />
7. Ersatzteile (Siehe Seite 8)<br />
6393530 3 0410
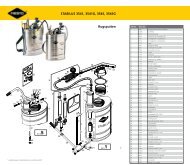
1. Technique<br />
1.1 Technical Data<br />
Filling capacity; max. 4 l<br />
Operating pressure; max. - 0,7 bar vacuum<br />
Spray medium temp.;max. 30° C<br />
Empty weight: 1,5 kg<br />
Material of tank: Polyethylen<br />
Material of pump: Polypropylen<br />
Material of pump sleeve: Brass, soft-sol<strong>de</strong>red<br />
Letters in drawing are found in section "(.)" - Numbers in drawing can be found in page 7.<br />
1.2 Unit is equipped with:<br />
• Suction hose (S) of reinforced PVC, length 50 cm<br />
• Ball-shut-off valve (K) of brass, suction tube (SK) 8 mm, ma<strong>de</strong> of polyethylene, 50 cm long.<br />
2. Application<br />
2.1 Vacuum pump <strong>SAUGFIX</strong> is <strong>de</strong>signed to suck liquid lubricates and other not aggressive fluids which<br />
do have an ignition point of less than 55° C.<br />
2.2 Do not use with:<br />
• liquids with temperatures of above 30° C.<br />
• liquids wihich harm components of sprayer.<br />
• liquids with an ignition point of less than 55° C.<br />
• liquids with a high viscosity which cannot be rinsed out of the tank thoroughly.<br />
2.3 Any modification to the unit and any application which is not <strong>de</strong>scribed above will waive the liability<br />
of the manufacturer.<br />
3. Safety Warnings<br />
3.1 While pumping, air will be moved out of the tank. This air can be contaminated with gas. Please,<br />
make sure that the operator will be protected. Protection clothes and face masks have to be worn.<br />
When using flammable liquids, please make sure that there is no open fire and make sure that the<br />
work place is ventilated properly.<br />
3.2 Use unit only in upright position.<br />
3.3 Always watch vacuum meter (V) to make sure that vacuum will not go above - 0,7 bar.<br />
3.4 Damaged parts will be replaced immediately. Please use only MESTO spare parts.To repair unit,<br />
unit must be empty and without pressure.<br />
3.5 Parts which will be pressurised, parts which will carry liquids and vacuum meter have to be<br />
checked regularly to make sure that they are working properly. If any damage is suspected, please<br />
stop operating equipment immediately.<br />
3.6 Never transport or leave equipment pressurised. Empty tank immediately after use.<br />
4. Operating Instructions<br />
4.1 Check the unit for any damages or leakage. Make sure that pump cover (U) is on the pump (P) and<br />
is pulled up all the way to the thread.<br />
4.2 Ball-shut-off-valve (K) has to be closed completely - lever has to be square to the flow direction.<br />
Depressurise unit to - 0,7 bar.<br />
4.3 Put end of suction tube (SK) completely into liquid to be sucked. Open ball-shut-off-valve. If engine<br />
oil is sucked out of an engine it is advised to tilt engine towards the suction point. To accelerate the<br />
suction process it is advised that the oil is not cold.<br />
Please, make sure that the max. temperature of 30° C is not excee<strong>de</strong>d.<br />
4.4 If the <strong>de</strong>pressurisation is not sufficient the tank can be <strong>de</strong>pressurised while operating the unit.<br />
4.5 Attention ! Max. filling capacity of the tank is 4 l. Otherwise liquid will be sucked out from the tank.<br />
4.6 To <strong>de</strong>pressurise tank, open the ball-shut-off valve and let air suck. Then take pump (P) out of tank<br />
and dispose liquid properly .<br />
6393530 4 0410
5. Maintenance and Cleaning<br />
5.1 The tank is not <strong>de</strong>termined to store the liquids. After every use tank has to be emptied. In case<br />
other liquids than oil are used, tank has to be cleaned (with water or an appropriate cleaning<br />
agent.) after every usage. Disposal of the liquid and the liquid to be used to flash the tank has to<br />
be <strong>de</strong>termined in conjunction with the information given by the manufacturer of the liquid which has<br />
been sucked. Please, make sure that also the liquid with which the unit is flashed will not do any<br />
harm to the components of the equipment.<br />
5.2 The life of the unit can be exten<strong>de</strong>d if the piston (M) is greased occasionally.<br />
5.3 To disassemble the pump with the piston (M), pull the pump handle all the way out, make sure that<br />
the guiding lever (F) is clicked into position and turn handle counterclockwise 1/8 of a turn.<br />
6. Troubleshooting<br />
Fault Solution:<br />
6.1 Pressure drop in the unit:<br />
Either connection between vacuum meter Tighten connections , if necessary<br />
and tank between pump and tank or hose replace seals on pump and vacuum<br />
and tank is not sealed properly. meter<br />
6.2 Pump (P) does not <strong>de</strong>velop <strong>de</strong>pressurisation /<br />
pump can be moved very easily:<br />
* Ball-shut-off valve (K) is open Close shut-off-valve<br />
* Piston (M) is broken Replace piston<br />
* Suction (SV) is damaged Replace pump or suction valve<br />
* Obstacle enables valve to be closed Clean valve<br />
6.3 Pump cylin<strong>de</strong>r is pulled due to un<strong>de</strong>r-pressurisation<br />
* Suction valve (SV) is glued Clean valve or replace, or replace pump<br />
6.3.1 While pumping liquid is pulled out of the pump into<br />
the filling funnel<br />
* Tank is full Empty tank<br />
* Tank is not upright Put tank in upright position<br />
* Pump sleeve (U) is missing Put pump cover over pump<br />
* Pump sleeve (U) is broken Replace pump cover<br />
7 Spare Parts List (see page 8)<br />
6393530 5 0410
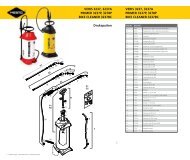
1. Technique<br />
1.1 Caractéristiques techniques<br />
Volume <strong>de</strong> remplissage, max. 4 l<br />
Dépression <strong>de</strong> service max. -0,7 bar<br />
Température <strong>de</strong> service, max. 30° C<br />
Poids à vi<strong>de</strong> env. 1,5 kg<br />
Matériau du réservoir Polyéthylène dur<br />
Matériau <strong>de</strong> la pompe Polypropylène<br />
Tube-coffrage pour cylindre <strong>de</strong> pompe Laiton, soudure tendre<br />
Lettres d’i<strong>de</strong>ntificaton voir texte '(.)' - Numéros <strong>de</strong> référence voir liste <strong>de</strong>s pièces détachées, page 8<br />
1.2 Equipement<br />
• Tuyau d’aspiration (S) en PVC renforcé, longueur disponible 50 cm<br />
• Robinet d’arrêt à tournant sphérique (K) en laiton, canule d’aspiration (SK) <strong>de</strong> 8 mm, en<br />
polyéthylène, 50 cm <strong>de</strong> long<br />
2. Domaines d’utilisation<br />
2.1 <strong>SAUGFIX</strong> est concu pour aspirer <strong>de</strong>s huiles lubrifiantes très liqui<strong>de</strong>s et <strong>de</strong>s autres liqui<strong>de</strong>s non<br />
agressifs et pas facilement inflammables.<br />
2.2 Pour raison <strong>de</strong> sécurité, l’appareil ne doive pas être utilisé pour<br />
• <strong>de</strong>s liqui<strong>de</strong>s à une température supérieure à 30 ° C.<br />
• <strong>de</strong>s liqui<strong>de</strong>s qui peuvent attaquer les matériaux <strong>de</strong>s appareils.<br />
• <strong>de</strong>s liqui<strong>de</strong>s combustibles présentant un point d’inflammation inférieure à 55° C.<br />
• <strong>de</strong>s liqui<strong>de</strong>s très visqueux, collants ou formant <strong>de</strong>s résidus qui ne peuvent pas être totalement<br />
évacués du réservoir, ou <strong>de</strong>s liqui<strong>de</strong>s ne permettant pas le rinçage du réservoir.<br />
2.3 Le constructeur décline toute résponsabilité et se dégage du droit <strong>de</strong><br />
garantie au cas où <strong>de</strong>s modifications quelconques auraient été réalisés<br />
sur l’appareil. Il ne pourra être tenu responsable <strong>de</strong>s dommages qui<br />
pourraient en résulter.<br />
3. Consignes <strong>de</strong> sécurité<br />
3.1 Pendant le pompage, <strong>de</strong> l’air est évacué du réservoir qui peut contenir <strong>de</strong>s vapeurs. Donc il<br />
convient en cas d’utilisation <strong>de</strong> produits dangereux, <strong>de</strong> porter <strong>de</strong>s vêtements <strong>de</strong> protection<br />
adéquats et, si nécessaire, d’utiliser un masque respiratiore protecteur contre les vapeurs<br />
dégagées par les produits. Dans le cas <strong>de</strong>s produits combustibles (même ceux ayant un point<br />
d’inflammation supérieure à 55° C) il faut les tenir absolument à l’écart <strong>de</strong>s sources inflammables,<br />
et l’endroit doit être bien aéré.<br />
3.2 Utiliser et transporter l’appareil rempli seulement en position verticale.<br />
3.3 Pendant le pompage, toujours observer le vacuomètre (V) et ne pas dépasser la dépression<br />
admise <strong>de</strong> -0,7 bar.<br />
3.4 Les pièces endommagées doivent être immédiatement remplacées. A cet effet, il convient d’utiliser<br />
exclusivement <strong>de</strong>s pièces originales MESTO. Lors <strong>de</strong> tous travaux <strong>de</strong> réparation et <strong>de</strong><br />
maintenance, il faut absolument que l’appareil ne soit plus sous dépression et vi<strong>de</strong>.<br />
3.5 Les pièces sous pression ou conduisant <strong>de</strong>s liqui<strong>de</strong>s, ainsi que le vacuomètre doivent être<br />
régulièrement soumis à un contrôle. Lorsqu’une défectuosité est soupçonnée, il convient <strong>de</strong> mettre<br />
l’appareil immédiatement hors-service.<br />
3.6 Ne jamais laisser l’appareil sous dépression quand il doit rester un certain temps sans servir, ou<br />
pour le transporter. Le vi<strong>de</strong>r après chaque usage.<br />
6393530 6 0410
4. Mise en service<br />
4.1 Vérifier que l’appareil est en bon état et bien étanche. Veiller à ce que le tube-coffrage (Ü) <strong>de</strong> la<br />
pompe soit bien placé sur le cylindre <strong>de</strong> pompe et poussé jusqu’au filet en haut du cylindre.<br />
4.2 Fermer totalement le robinet d’arrêt (K) - la manette doit être tournée en travers.-Pomper l’appareil<br />
à une dépression <strong>de</strong> -0,7 bar.<br />
4.3 Plonger profondément la tête <strong>de</strong> la canule d’aspiration dans le liqui<strong>de</strong> à aspirer, et ouvrir le robinet<br />
d’arrêt. Pour aspirer <strong>de</strong> l’huile <strong>de</strong>s moteurs <strong>de</strong> faible puissance, il est recommandable d’incliner le<br />
moteur un peu dans le sens du point d’aspiration. Un léger échauffement <strong>de</strong> l’huile facilite le<br />
procédé d’aspiration; toutefois il faut tenir compte <strong>de</strong> la température maximale admise pour l’usage<br />
<strong>de</strong> l’appareil.<br />
4.4 Si la dépression pompée au préalable dans l’appareil ne suffit pas, on peut repomper pendant<br />
l’action d’aspiration.<br />
4.5 Attention: Veiller à ce que le volume <strong>de</strong> remplissage max. <strong>de</strong> 4 litres ne soit pas dépassé. Si non,<br />
du liqui<strong>de</strong> est aspiré en <strong>de</strong>hors du réservoir.<br />
4.6 Dévisser la pompe (P) du réservoir et verser le liqui<strong>de</strong> ramassé dans un récipient <strong>de</strong> stockage ou<br />
le retraiter (enlever) selon les préscriptions officielles.<br />
5. Maintenance, entretien<br />
5.1 L’appareil n’est pas conçu pour le stockage <strong>de</strong>s liqui<strong>de</strong>s. Le vi<strong>de</strong>r après chaque usage. En cas<br />
d’utilisation d’autres produits que <strong>de</strong> l’huile lubrifiante, du mazout ELF ou du carburant Diesel (voir<br />
paragraphe 2), l’appareil doit être rincé après chaque usage. Le choix du liqui<strong>de</strong> <strong>de</strong> rinçage ainsi<br />
que son retraitement/enlèvement se règlent par les instructions données par le fabriquant du<br />
produit. Tenir compte <strong>de</strong> la résistance <strong>de</strong>s matériaux <strong>de</strong> l’appareil aussi pour le processus <strong>de</strong><br />
rinçage.<br />
5.2 La longévité <strong>de</strong> la pompe peut être considérablement prolongée, si le joint <strong>de</strong> piston (M) est lubrifié<br />
<strong>de</strong> temps en temps avec un peu <strong>de</strong> graisse non-aci<strong>de</strong> et non résineuse.<br />
5.3 Pour sortir la tige <strong>de</strong> piston avec joint (M), tirer la poignée <strong>de</strong> pompe complètement vers le haut,<br />
l’accrocher dans le bouchon <strong>de</strong> gui<strong>de</strong> (F) et visser env. 1/8 en sens inverse <strong>de</strong>s aiguilles d’une<br />
montre.<br />
6. Plan <strong>de</strong> dépannage<br />
Faute Comment trouver remè<strong>de</strong>:<br />
6.1 La dépression dans le réservoir baisse:<br />
Etanchéité défecteuse au vacuomètre, Serrer à fond les points d’étanchéité<br />
entre la pompe et le réservoir, ou au et, si nécessaire, remplacer le joint<br />
raccord du tuyau au vacuomètre et à la pompe<br />
6.2 La pompe ne génère pas <strong>de</strong> dépression;<br />
La pompe peut être actionnée très facilement:<br />
* Robinet d’arrêt (K) n’est pas fermé: Fermer complètement robinet<br />
* Joint <strong>de</strong> piston (M) défecteux Remplacer joint <strong>de</strong> piston<br />
* Soupape d’aspiration (SV) défecteuse Remplacer soupape ou pompe<br />
* Des corps étrangers empêchent la soupape Nettoyer la soupape<br />
d’aspiration <strong>de</strong> se fermer<br />
6.3 Le piston <strong>de</strong> la pompe est tiré vers le bas<br />
par décompression:<br />
* Soupape d'aspiration (SV) est collée Nettoyer ou remplacer soupape<br />
d'aspiration, ou remplacer la pompe<br />
6.4 Du liqui<strong>de</strong> s’échappe en haut <strong>de</strong> la pompe<br />
(le long <strong>de</strong> la tige) dans l’entonnoir:<br />
* Volume <strong>de</strong> remplissage max. est dépassé Vi<strong>de</strong>r le réservoir<br />
* Le réservoir n’est pas dans la position verticale Mettre l’appareil dans position verticale<br />
* Le tube-coffrage (Ü) manque <strong>de</strong> pompe Attacher le tube-coffrage sur le cylindre<br />
* Tube-coffrage (Ü) inférieur n’est pas Remplacer le tube-coffrage<br />
étanche dans sa partie<br />
7. Pièces <strong>de</strong> rechange (voir page 8)<br />
6393530 7 0410
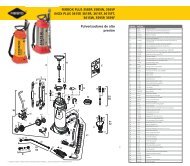
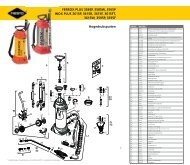
7. Ersatzteilliste<br />
Spare Parts<br />
Pièces <strong>de</strong> rechange<br />
6272<br />
6005<br />
6005<br />
6270<br />
6715<br />
6005<br />
6155A<br />
6346<br />
6356<br />
6328<br />
6348<br />
6347<br />
No. Ersatzteile Spare Parts Pièces <strong>de</strong> rechange<br />
6005 Dichtungssatz Service Kit Kit dépannage; jeu <strong>de</strong> joints<br />
6155A Schlauchhalter Hose Cradle Disposition fixation tuyau<br />
6270 Saugluftpumpe kpl. , ohne Vacuum pump cpl. , with Pompe dépresseur, sans tube-<br />
Überzugsrohr<br />
sleeve<br />
coffrage<br />
6272 Pumpenüberzugsrohr,<br />
Messing<br />
Pump sleeve, brass Tube-coffrage, laiton<br />
6328 Saugschlauch kpl. mit Suction hose assy, with Conduite d'aspiration, ensemble.<br />
Verschraubungen und<br />
Knickschutz<br />
antiking spring<br />
cpl. avec ressort anticoque<br />
6346 Kugelhahn 3/8“ Ball Valve 3/8“ Robinet à boisseau sphérique 3/8“<br />
6347 SK-Verschraubung 2 x 3/8“ Socket 2 x 3/8“ Raccord 2 x 3/8“<br />
6348 Saugkanüle 8x1x500 mm Suction Tube 8x1x500 mm Tuyau d'aspiration 8x1x500 mm<br />
6356 Verschraubung für Kanüle Hose coupling Raccord <strong>de</strong> tuyau<br />
6715 Vakuumeter kpl. mit<br />
Trägerscheibe und<br />
Überwurfmutter<br />
Vacuum Meter, cpl. assembly. Vacuomètre, ensemble cpl.<br />
6393530 8 0410